
Why does the gimbal automatically power off?
The gimbal will automatically power off if no phone is installed or the phone is not properly balanced (causing motor overload). You will hear a «beep» sound as a warning before it shuts down. Make sure to install and balance the phone correctly before turning on the gimbal (see the First Use section for details).
How can I connect my phone’s Bluetooth to the gimbal while the app can’t find the device?
Clear the Bluetooth connection and try reconnecting:
Push the zoom lever upwards and simultaneously long-press the M button for 5s. When the Bluetooth indicator flashes green five times, it means the Bluetooth connection has been cleared. You can then follow the Bluetooth connection steps to connect again.
How to use face tracking and gesture control to take photos and videos?
This function is available exclusively through Hohem Joy App.
A. Ensure that your phone is connected to the gimbal via Bluetooth.
B. Enter Hohem Joy App, open the camera, tap the tracking icon on the top and select face tracking.
C. Tap the gesture icon on the right to enable the gesture control.
D. Use this gesture for shutter control of taking photo/video, and use this gesture to end video recording.
How to switch to ultra wide angle mode?
A. Ensure that the gimbal is powered on.
B. Press the trigger on the back side four times to enter ultra wide angle mode.
*Only landscape mode supports switching to ultra wide angle mode.
What are the four working modes of the gimbal?
A. Pan Follow Mode (PF)
Roll and Tilt axes are locked. The gimbal allows the phone to pan left or right smoothly following the operator’s movements, while maintaining a steady tilt and roll position.
B. Pan and Tilt Follow Mode (PTF)
Roll axis is locked. This mode enables the phone to follow the operator’s pan (left/right) and tilt (up/down) movements, offering more dynamic control over the framing.
C. Point of View Mode (POV)
All three axes (Roll, Pan, and Tilt) are active. This mode allows the phone to follow the operator’s movements in all directions, It offers a ‘first-person’ perspective, capturing footage as if the viewers are seeing through the operator’s eyes.
D. All Lock Mode (L)
All three axes (Roll, Tilt, and Pan) are locked. The phone’s orientation remains fixed regardless of the gimbal’s movements.
What should I do if the zoom slider is not working?
*Zoom function is available exclusively through Hohem Joy App and some Android phones.
A. Ensure that Bluetooth is connected.
B. Enter Hohem Joy App and open the camera.
C. Push the slider up to zoom in, and push it down to zoom out.
What should I do if the motor arm can be seen on the screen during shooting?
Ensure that the phone is attached tightly and horizontally, and you can solve the problem in the following two ways:
A. While keeping the phone balanced, move it appropriately to the left in landscape mode and up in portrait mode.
B. Press the trigger on the back side four times to enter ultra wide angle mode.
How do I connect the remote controller?
* The remote controller is an optional accessory and needs to be purchased separately.
Switch the remote to «OFF». Press the M button seven times to enter the remote controller pairing mode (at this point, the Bluetooth indicator will alternate between yellow and green). Switch the remote to «ON,» and it will automatically connect to the gimbal. When you press buttons on the remote controller, and the gimbal’s Bluetooth indicator flashes yellow, it indicates a successful pairing.
- June 16, 2024
- hohem
Table of Contents
- 2024 iSteady Mobile Plus Kit
- Battery & Charging
- Mounting A Phone
- Landscape
- Portrait
- Hohem Joy
- Fill Light
- Operation
- References
- Read User Manual Online (PDF format)
- Download This Manual (PDF format)
2024 iSteady Mobile Plus Kit

Quick Start
Guide v1.0
Battery & Charging

Mounting A Phone

Landscape

Portrait

Hohem Joy

Fill Light

Operation

CALL CENTER -Toll Free
UNITED STATES:
+1(888)9658512
Mon-Fri: 9:00AM-5:00PM(EST}
UNITED KINGDOM:
+44(0)808 2737578
Mon-Fri: 2:00PM-10:00PM(GMT +0)
CANADA:
+1(855)758-8939
Mon-Fri: 9:00AM-5:00PM(EST)
BRAZIL:
+55 (0)800 5911897
Mon-Fri: 10:00AM-6:00PM(GMT -3)
Subscribe for More Information
Hohem Technology Co., Ltd.
ADD: B106, University Creative Park, Xili
Nanshan, Shenzhen, 518055, P.R.China
WEB: www.hohem.com
EMAIL: service@hohem.com
References
- Hohem — Official Website — Gimbal, Gimbal Stabilizer, Phone Gimbal, Gimbal for iphone, 3 axis gimbal, Hohem, iSteady V2, AI Sensor, AI Gimbal, Tracking
Read User Manual Online (PDF format)
Read User Manual Online (PDF format) >>
Download This Manual (PDF format)
Download this manual >>
Hohem
Tripod
iSteady Mobile+
Read below 📖 the manual in Italian for Hohem iSteady Mobile+ (16 pages) in the Tripod category. This guide has been helpful for 17 people and has been rated 4.5 stars on average by 2 users
Download PDF
Page 1/16
Product Specifications
| Brand: | Hohem |
| Category: | Tripod |
| Model: | iSteady Mobile+ |
Do you need help?
If you need help with Hohem iSteady Mobile+, ask a question below and other users will answer you
Your Name*
Your Email*
Write your question here
FREE ENGLISH HOHEM ISTEADY MOBILE+ (MOBILEPLUS) (01) PDF USER GUIDE
FREE ENGLISH HOHEM ISTEADY MOBILE+ (MOBILEPLUS) (01) PDF USER MANUAL
FREE ENGLISH HOHEM ISTEADY MOBILE+ (MOBILEPLUS) (01) PDF OWNER GUIDE
FREE ENGLISH HOHEM ISTEADY MOBILE+ (MOBILEPLUS) (01) PDF OWNER MANUAL
FREE ENGLISH HOHEM ISTEADY MOBILE+ (MOBILEPLUS) (01) PDF REFERENCE GUIDE
FREE ENGLISH HOHEM ISTEADY MOBILE+ (MOBILEPLUS) (01) PDF INSTRUCTION GUIDE
FREE ENGLISH HOHEM ISTEADY MOBILE+ (MOBILEPLUS) (01) PDF REFERENCE MANUAL
FREE ENGLISH HOHEM ISTEADY MOBILE+ (MOBILEPLUS) (01) PDF INSTRUCTION MANUAL
FREE ENGLISH HOHEM ISTEADY MOBILE+ (MOBILEPLUS) (01) PDF OPERATING INSTRUCTIONS
CLICK HERE TO DOWNLOAD HOHEM ISTEADY MOBILE+ (MOBILEPLUS) (01) PDF MANUAL
If this is not the document you want for this product, click here to see if we have any other documents for this product.
What are the important usage guidelines for the iSteady Mobile gimbal?
* Please use the product in accordance with the user guide.
* Make sure your mobile device is mounted before powering on the gimbal.
* Keep the gimbal away from fire and heat source.
* Prohibiting the product to be used for any illegal purpose. The user who violates the regulation will be responsible for all the consequences by purchasing and using the product.
* Hohem won’t provide any service for any user who has product which comes from non-normal resource.
* For any question, please contact the technical support of Hohem Tech. Hohem won’t be responsible for any faulty operation.
* Hohem Tech reserves the right of final explanation.
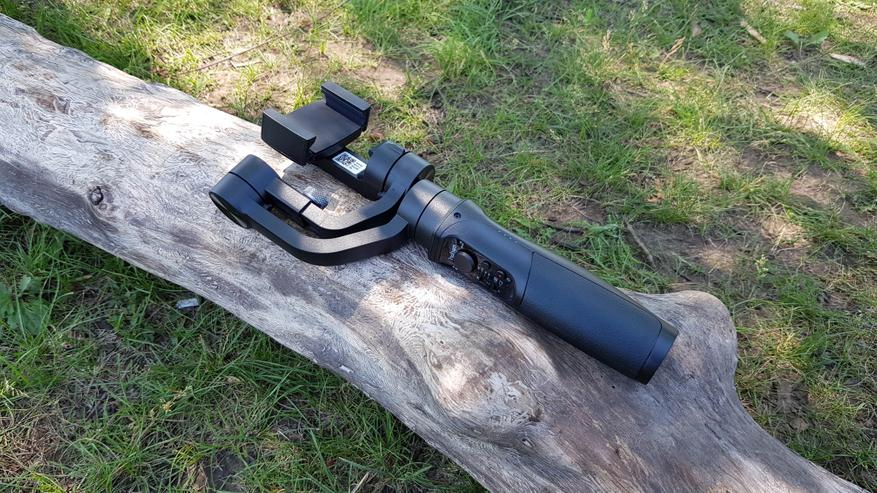
What are the main parts of the iSteady Mobile gimbal?
1. Roll Motor
2. Pan Motor
3&5. 1/4 Inch Extension Screw Hole
4. Handle (Battery inside)
6. Bluetooth Light
7. Zoom/Focus Slider
8. Mode Light
9. Joystick
10. Mode Button
11. ON/OFF (Shutter button)
12. Tilt Motor
13. Balancing Knob
14. Rotated Phone Holder
15. Trigger Button
16. Charging Port
What accessories are included with the iSteady Mobile?
Mini Tripod*1
USB Cable*1
Carry Case*1
User Manual*1
How do I download the Hohem Gimbal app?
Scan the QR code provided in the user guide or search for ‘Hohem Gimbal’ in the App Store (for iOS 9.0 and above) or Google Play (for Android 4.5 or above). Follow the instructions within the store to install the app.
How do I quickly start using the gimbal?
A. Charge the battery fully before first use.
B. Mount and balance your smartphone correctly on the gimbal.
C. Long press the power button for 3 seconds to turn on the gimbal.
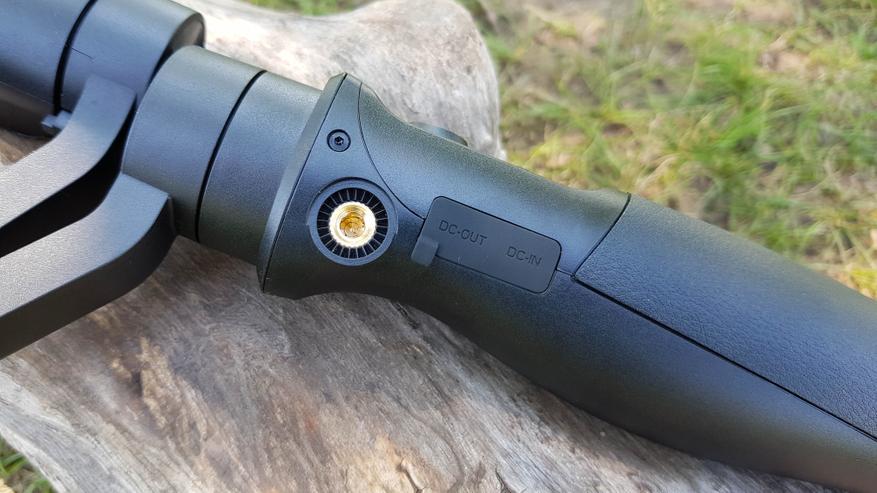
How do I charge the gimbal and my smartphone using the gimbal?
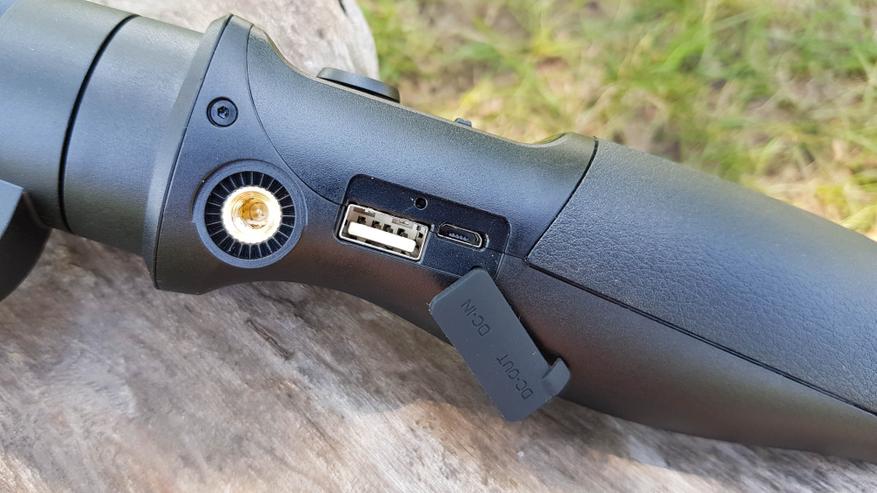
Use the Micro USB Port on the gimbal handle to charge the gimbal itself. Use the standard USB Port on the gimbal handle to charge your smartphone using the gimbal’s internal battery. Always charge the gimbal fully before using it for the first time.
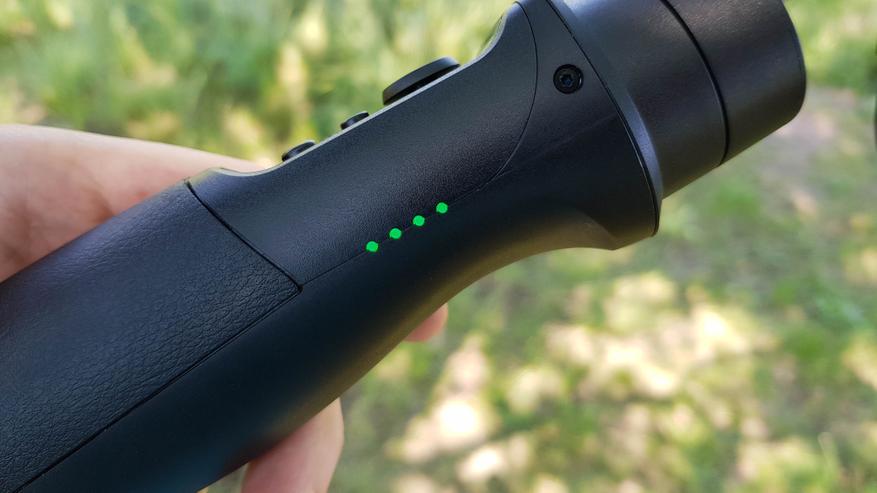
How can I check the gimbal’s battery status?
Tap the power button once to check the battery level indicated by the LED lights:
4 LED lights on: 100%
3 LED lights on: 75%
2 LED lights on: 50%
1 LED light on: 25%
Low Battery Warning: The Mode Light Blinks.
While Charging: The indicator lights blink sequentially.
Fully Charged: All 4 LED lights stay on.
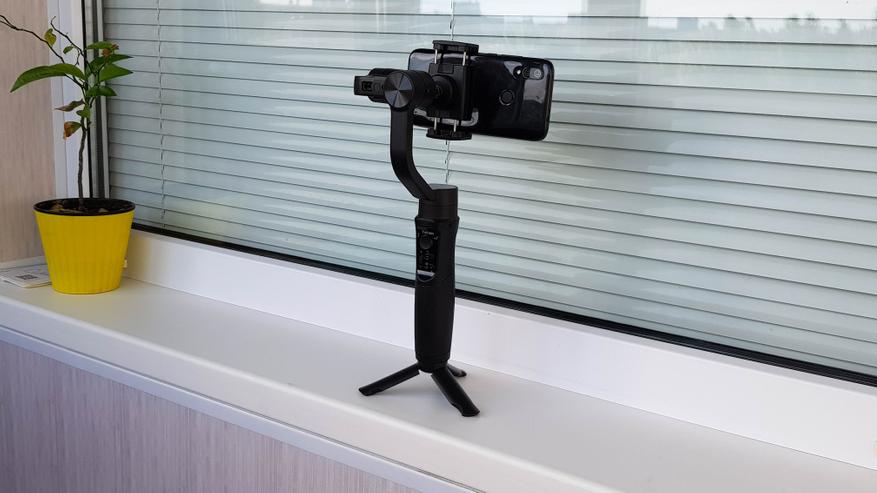
How do I mount my smartphone on the gimbal?
Important: Do not turn on the gimbal without a smartphone mounted. Mounting the phone with a case is not recommended.
1. Push and open the phone holder.
2. Insert the smartphone into the holder.
3. Make the home button side (or bottom edge) of the smartphone as close as possible against the tilt motor.
4. For vertical mounting, rotate the phone clamp 90 degrees (approx. 45° + 45°) before inserting the phone.
What are the specifications for compatible smartphones?
Max Payload: 280g
Phone Holder supports width of mobile devices: 58mm~89mm
Supported Mobile Devices Examples: iPhone series (iPhone XS/XS Max/X/XR/8~5/plus); Android major models from Samsung, HUAWEI, Xiaomi, VIVO, OPPO, Sony, Nubia, Meizu, etc.
How do I balance my smartphone on the gimbal?
Balance the smartphone *before* powering on the gimbal.
Horizontal Mounting: Adjust the smartphone’s position left or right within the holder and adjust the roll arm by loosening the balancing knob, sliding the arm, and retightening the knob until the phone stays level and still when the roll axis is tilted up and down manually.
Vertical Mounting: First, adjust the roll arm left and right using the balancing knob. Then, adjust the phone holder itself left and right until the phone is balanced as well as possible.
Note: For some lightweight mobile phones, achieving a perfect balance might not be possible. In such cases, balance the phone as well as you can to conserve battery power.
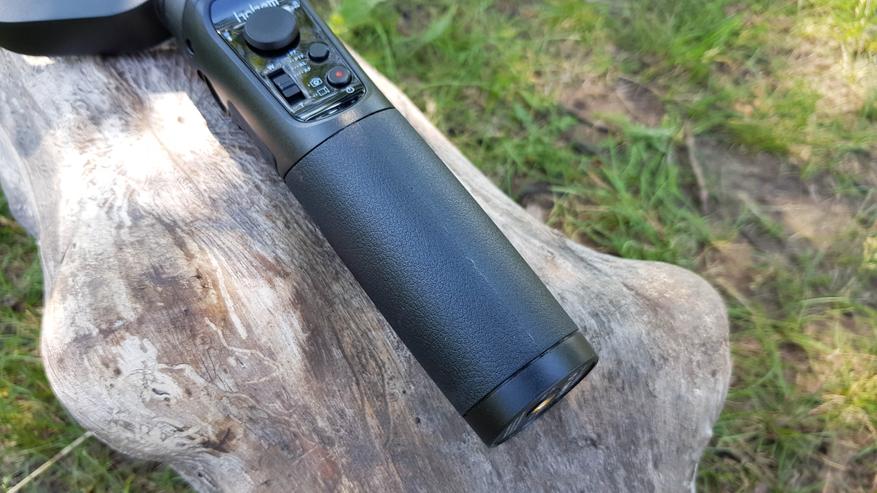
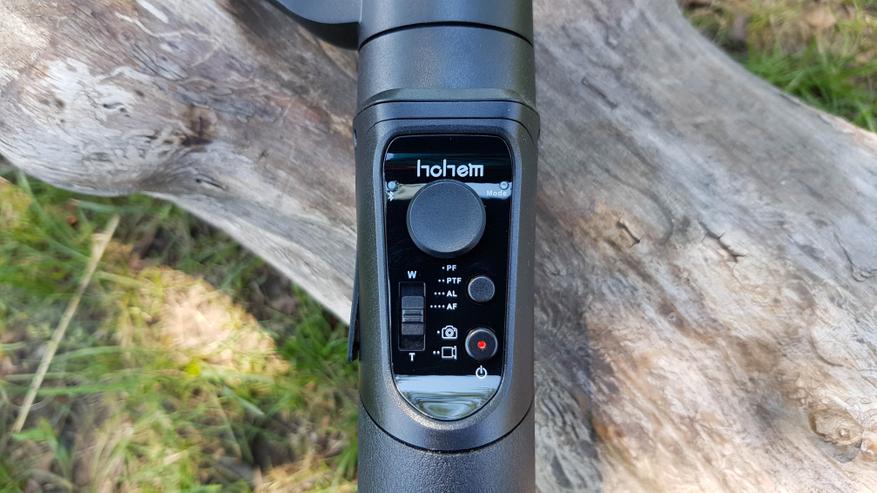
How do the buttons and controls operate?
Joystick: Push right/left or up/down to control the gimbal’s pan and tilt movements.
Slider: Slide up or down for Focus/Zoom control (this function is only available when connected to the Hohem Gimbal app).
Mode Button: Controls the gimbal’s working modes (See Working Modes FAQ).
Power ON/OFF (Shutter Button): Long press for 3 seconds to turn the gimbal ON or OFF. When connected via Bluetooth in the Hohem Gimbal app: Single Tap takes a photo; Double Tap starts/stops video recording.
Trigger Button: Press and Hold to enter Sport mode (faster motor response). Double Tap quickly to re-center the gimbal.
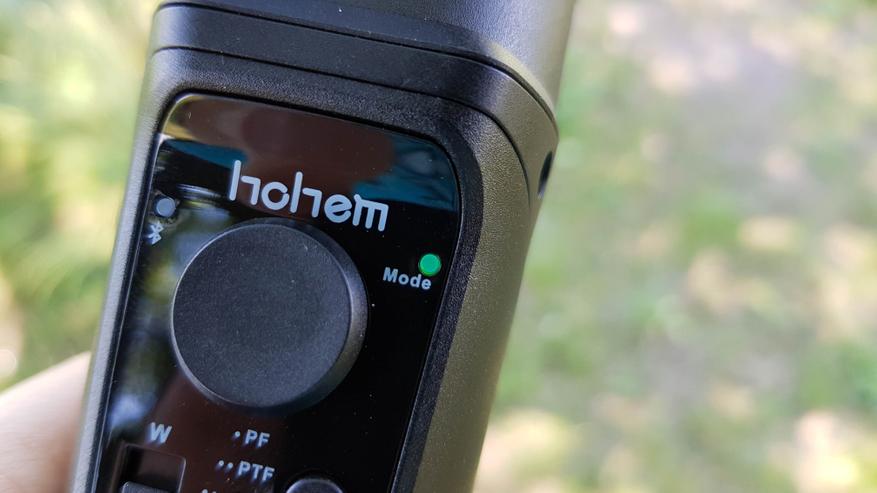
Bluetooth Light: Indicates Bluetooth status: Solid Light On = Connected; Blinks Twice = Powering On/Off; Light Off = Disconnected.
Mode Light: Indicates the active working mode through different flashing patterns or stays solid during calibration.
What are the different working modes and how are they activated?
| Action | Mode | Light Indication | Description |
|---|---|---|---|
| Single Tap Mode Button | PF (Pan Following) | Flash once, quick flash | Default mode. Tilt & roll axis locked. Camera moves left/right smoothly following handle movement. |
| Double Tap Mode Button | PTF (Pan & Tilt Following) | Flash twice | Roll axis locked. Camera moves left/right and tilts up/down following handle movement. |
| Triple Tap Mode Button | AL (All Locked) | Flash triple | Pan, tilt, and roll axes are all locked. The camera stays fixed in its current orientation regardless of handle movement. |
| Quartic Tap Mode Button | AF (All Following & Inception) | Flash once, slow flash | Tilt axis, roll axis, and pan axis all follow the handle’s movement. Allows for Inception-style shots. |
| Long Press Mode Button (6s) | Calibration Mode | Light on | Enters off-line calibration mode. Place on a flat surface. |
| Press and Hold Trigger | Sport Mode | (No specific mode light change) | Increases the motor following speed for tracking fast-moving subjects. Release to exit. |
How do I connect the gimbal to the Hohem Gimbal app?
1. Enable Bluetooth on your smartphone.
2. Open the downloaded Hohem Gimbal app.
3. In the app, choose the ‘iSteady Mobile’ product model from the list.
4. Follow the app prompts to confirm and establish the Bluetooth connection.
5. Make sure the gimbal’s Bluetooth indicator light turns solid blue, confirming the connection.
Important: You must connect the gimbal directly *within* the Hohem Gimbal app. Do not try to pair it through your smartphone’s main Bluetooth settings menu. Ensure you grant all necessary permissions when prompted by the app upon first use.
What functions are available in the Hohem Gimbal app?
The Hohem Gimbal app provides access to various features and settings:
Main Camera Interface Functions:
1. Home: Return to the main screen.
2. Setting: Access gimbal and app settings.
3. Front/Rear camera switch.
4. Flash control.
5. Camera Setting: Adjust resolution, grid lines, etc.
6. Album: Access photos and videos taken with the app.
7. Object Tracking: Draw a box around an object to track.
8. Zoom & Focus control (using the slider on the gimbal).
9. Bluetooth connection status.
10. Face Tracking: Automatically detect and track faces.
11. Shutter Button (on-screen).
12. Panorama mode setup.
13. Motion Timelapse mode setup.
Gimbal Specs Setting (within Settings menu):
A. Following Speed: Adjust how quickly the pan/tilt/roll axes follow your movements.
B. Joystick Speed: Adjust the rotation speed when using the joystick.
C. Following Dead Area: Set a threshold angle below which the gimbal won’t follow small movements.
D. Trim: Make fine adjustments to the level of the tilt/roll axis for a perfect balance.
E. Joystick Reverse: Reverse the control direction of the joystick.
F. Motor Torsion: Adjust the power output of the pan/tilt/roll motors. This can help resolve vibration issues with very lightweight or heavier phones within the payload limit.
When and how should I calibrate the gimbal?
Calibration is required only if you notice the gimbal is not working properly, specifically if:
1. The pitch angle (tilt) is not level with the horizontal surface.
2. The roll angle is not parallel to the horizontal surface.
3. The pan axis drifts slowly when the gimbal is in All Lock (AL) mode.
There are two calibration methods:
Method 1: Off-line Calibration
(1) Power on the gimbal.
(2) Long press the mode button for over 6 seconds until the mode light stays on continuously.
(3) Place the gimbal on a static, flat surface where it will not vibrate.
(4) Calibration is complete once the mode light flashes twice.
Method 2: 6-Side Calibration Via App
(1) Ensure the gimbal is successfully connected to the Hohem Gimbal app via Bluetooth.
(2) In the app’s settings, find and enter the “Calibration” section.
(3) Follow the detailed instructions provided within the app to perform the 6-side calibration procedure.
* If the off-line calibration (Method 1) does not resolve the issue, use Method 2.
How do I update the gimbal’s firmware?
Firmware upgrades can optimize the gimbal’s performance and may be released periodically. To upgrade:
1. Ensure the gimbal is powered on and successfully connected to the Hohem Gimbal app via Bluetooth.
2. Navigate to the “Firmware Upgrade” section within the app’s settings.
3. Follow the on-screen instructions provided by the app to download and install the latest firmware onto the gimbal.
Why does the gimbal vibrate after powering on?
Vibration usually occurs if the smartphone is not mounted correctly or balanced properly *before* powering on the gimbal.
A: Make sure your smartphone is mounted firmly and is well-balanced. Do not turn on the gimbal without a balanced load, as doing so can damage the motors. Refer to the mounting and balancing instructions.
For some particularly lightweight mobile phones, vibration might still occur. In this case, try adjusting the ‘Motor Torsion’ setting within the Hohem Gimbal app settings to better match the phone’s weight.
What should I do if the gimbal is not level or drifts after powering on?
A: If the gimbal is not level or drifts on any axis after being powered on, it requires calibration. Please perform either the Off-line Calibration or the 6-Side Calibration via the Hohem Gimbal app as detailed in the calibration instructions.
What are the technical specifications of the iSteady Mobile?
| Weight | 495g (including battery) |
| Main Material | High performance composite |
| Payload | 280g |
| Mobile Width Supported | 58mm~89mm |
| Supported Mobile Devices | iPhone series iPhone XS/XS Max/X/XR/8~5/plus; Android major models of Samsung, HUAWEI, Xiaomi, VIVO, OPPO, Sony, Nubia, Meizu, ect. |
| Battery Capacity | 3600 mAh |
| Working Time | 12 hours |
| Charging Time | 3.5 hours |
| Mechanical Range | Panning: 600° Rolling: 320° Tilting: 320° |
| Working Temperature | -10~45°C |
| Motors Protection | Gimbal is able to power off automatically due to improper operation of the motors. |
| Standard Accessories | Tripod, Carry case, USB cable (for charging gimbal) |
CLICK HERE TO DOWNLOAD HOHEM ISTEADY MOBILE+ (MOBILEPLUS) (01) PDF MANUAL
Для работы проектов iXBT.com нужны файлы cookie и сервисы аналитики.
Продолжая посещать сайты проектов вы соглашаетесь с нашей
Политикой в отношении файлов cookie
На сегодняшний день смартфоны научились очень хорошо снимать видео, особенно в топ классе и флагманы. Full HD со скоростью 60 кадров в секунду или Ultra HD уже никого не удивишь, да и быстрый качественный автофокус является привычным стандартом. Теперь не нужно покупать громоздкую и дорогую камеру, а можно снимать просто со своего смартфона. Чем собственно и пользуются многие блогеры, ютуберы и конечно же простые пользователи, которые снимают видеоролики на отдыхе или важных мероприятиях. Единственное в чем смартфон все еще уступает камерам — это стабилизация. Чаще всего в смартфонах есть только EIS стабилизация и видео хоть и становится плавнее, но все равно присутствуют определенные «рывки» и качество заметно страдает. Сегодня расскажу вам о полезном устройстве, которое в быту называют стедикам, т.е стабилизатор камеры. Модель Hohem iSteady Mobile была разработана специально для использования со смартфоном, чем и вызвала мой интерес, т.к видео я снимаю достаточно много (как для своего канала, так и на отдыхе в личную коллекцию). Изначально мне хотелось понять — реально ли это полезное устройство или просто дорогая игрушка? Будем разбираться вместе…
В первую очередь предлагаю ознакомиться с техническими характеристиками:
- Угол наклона Pan (панарамирование) — 640°
- Угол наклона по вертикали — 320°
- Угол наклона по горизонтали — 320°
- Крепление для смартфонов с шириной 58 — 85 мм
- Емкость аккумулятора: 4000 mAh
- Работа от полного зарядка: до 12 часов
- Время зарядки: 3,5 часа
- Вход: 5V/1,5А
- Выход (в режиме power bank): 5V/1,5А
- Рабочая температура: от -10°С до +45°С
Видео версия обзора
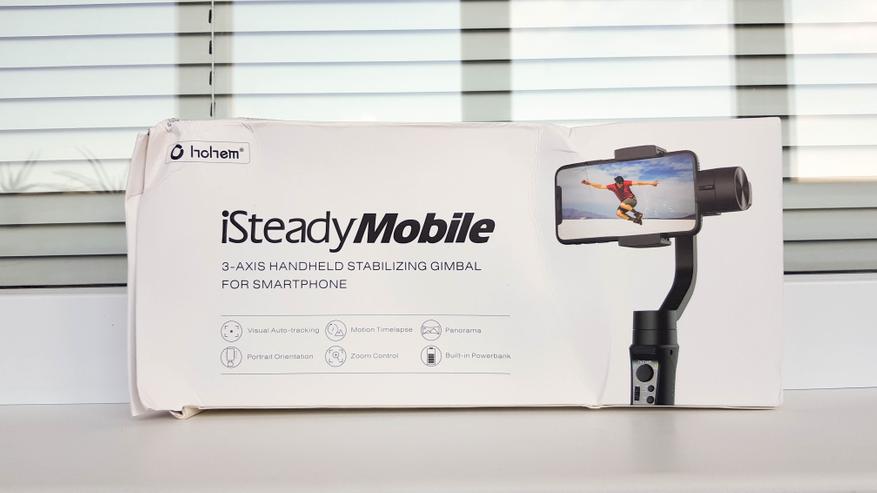
На коробке изображено устройство и перечислены некоторые особенности:
- Автоматическое слежение за объектом
- Запись таймлапсов
- Съемка панорам
- Поддержка портретной ориентации
- Управление зумом
- Функция Powerbank
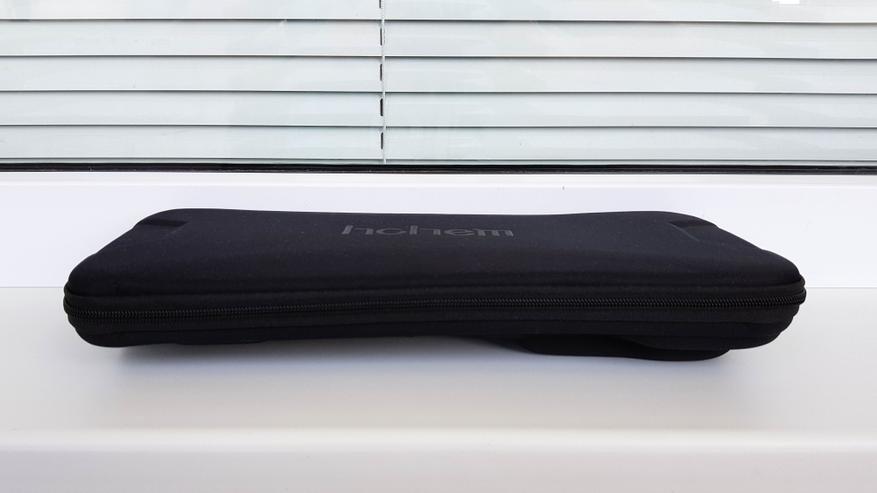
Упаковка в дороге заметно пострадала, т.к картон достаточно тонкий.
Но переживать о сохранности стабилизатора не стоит, т.к он расположен в твердом кейсе.

Кейс удобно использовать для транспортировки, а его небольшая толщина позволяет разместить его даже в городской сумке или рюкзаке.
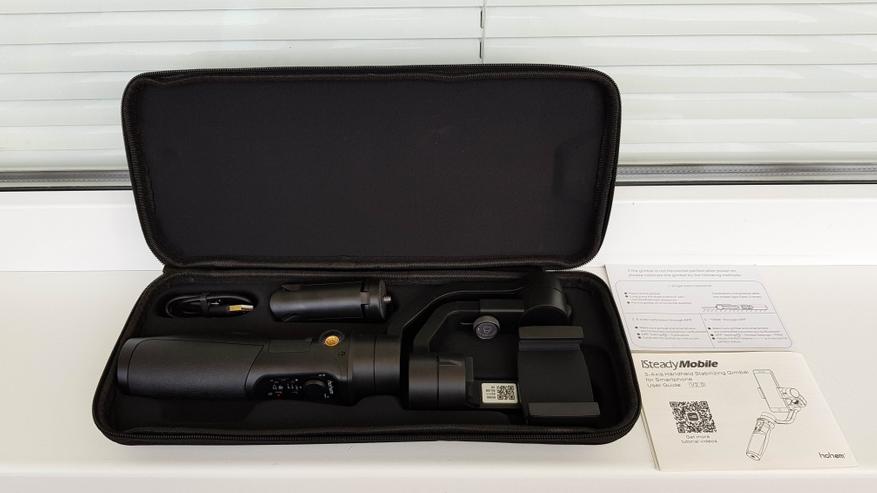
Внутри разместили стабилизатор, кабель для зарядки и съемную подставку на трех ножках. Также есть документация на английском языке, в которой указано как пользоваться устройством и как его откалибровать (если необходимо). Там же есть ссылка на приложение Hohem Studio для смартфона.
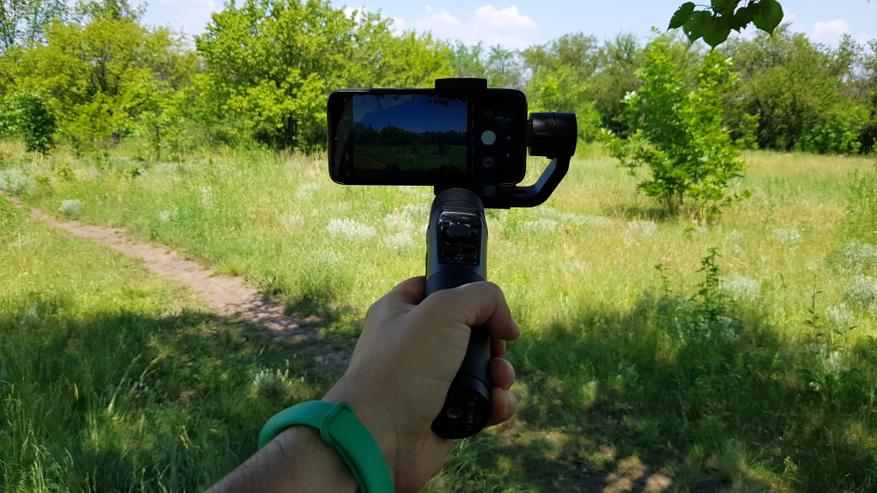
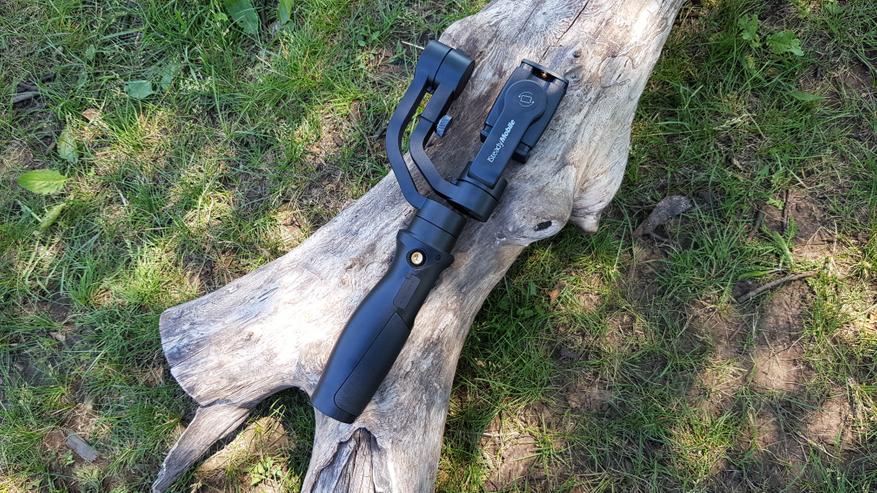
Дальнейший осмотр и тесты я проводил на свежем воздухе. Стабилизатор ощущается в руках добротным изделием, корпус изготовлен из плотного пластика (в характеристиках указано что это стеклопластик + нейлон).
Для более надежного хвата на ручке использовали вставку из искусственной кожи.
В основании есть резьба со стандартным размером 1/4″, что дает возможность использовать стабилизатор с обычным штативом.

Небольшая подставка уже есть в комплекте и позволяет разместить устройство на ровной горизонтальной поверхности.
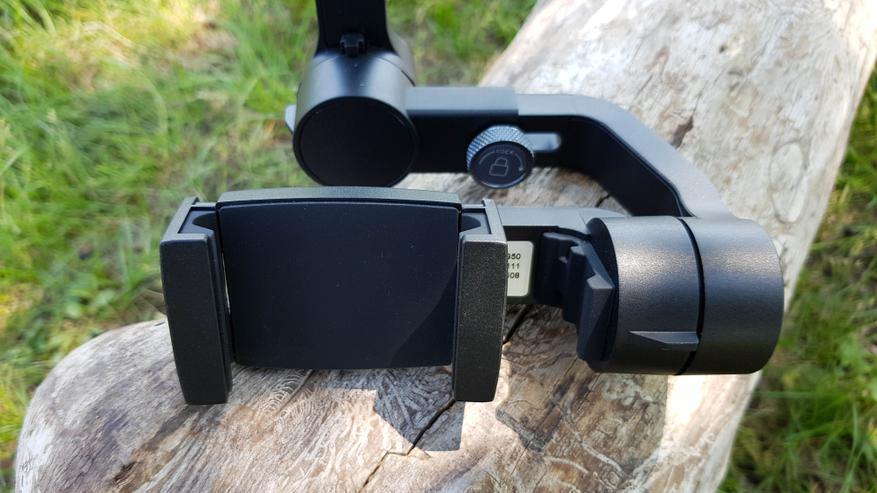
На ручке присутствует еще одна резьба 1/4″, которую можно использовать для установки ручки или дополнительных креплений. За резиновой заглушкой спрятаны разъемы для подзарядки.
Micro USB для подзарядки стабилизатора и стандартный USB для отдачи заряда в режиме power bank — можно подзарядить свой севший смартфон или другой гаджет. Как power bank он работает даже в отключенном состоянии.
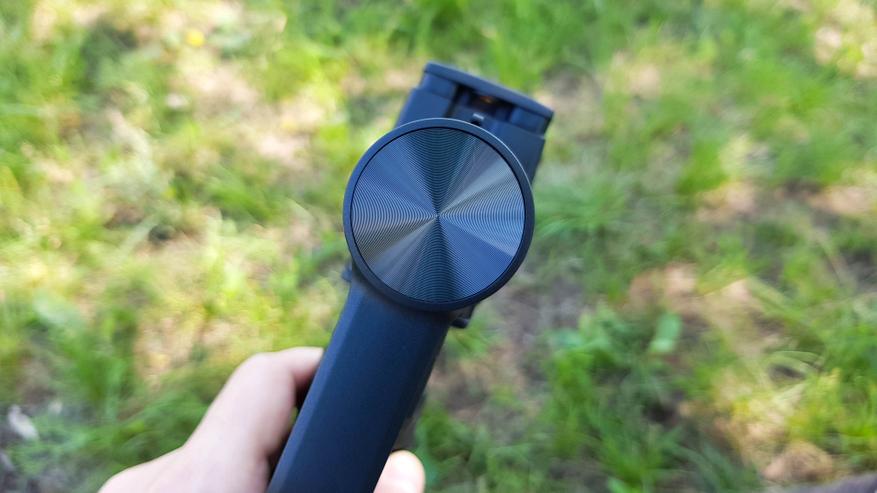
Панель управления удобная: по центру расположен крупный джойстик с помощью которого можно управлять поворотами и наклоном в ручном режиме, чуть ниже расположен ползунок для зумирования. Кнопка питания помечена красной точкой, она же позволяет переключать камеру из режима фото в видео и обратно. Выше расположена кнопка для переключения режимов, левее от нее есть подсказки:
- Однократное нажатие включает режим PF (Pan Following) — отслеживание движений только по горизонтали
- Двукратное нажатие активирует PTF (Pan Tilt Following) — отслеживание движений по горизонтали и вертикали
- Трехкратное нажатие активирует AL (All Locked) – фиксируется выбранное положение без следования
- Четырехкратное нажатие активирует AF (All Following) — отслеживание по всем осям, в том числе и по углу горизонта
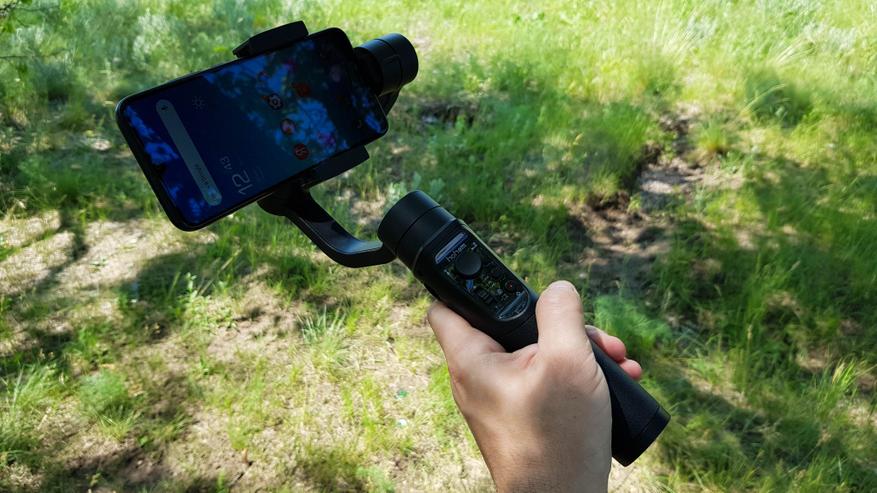
Для того, чтобы понимать какой режим активирован в данный момент предусмотрен небольшой индикатор. Смотрим сколько раз он мигает и сверяемся с подсказками.
Также есть индикатор остаточного заряда аккумулятора. За пару часов использования не потух даже один светодиод, т.е заявленное время непрерывной работы похоже на правду.
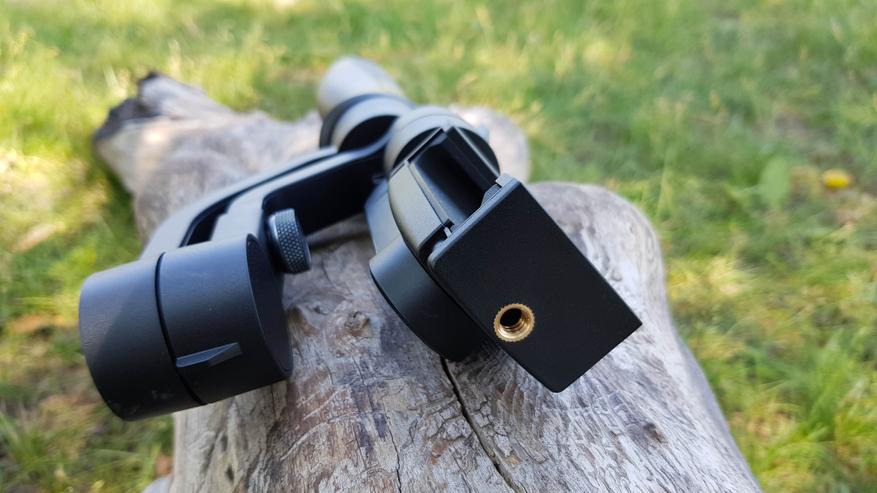
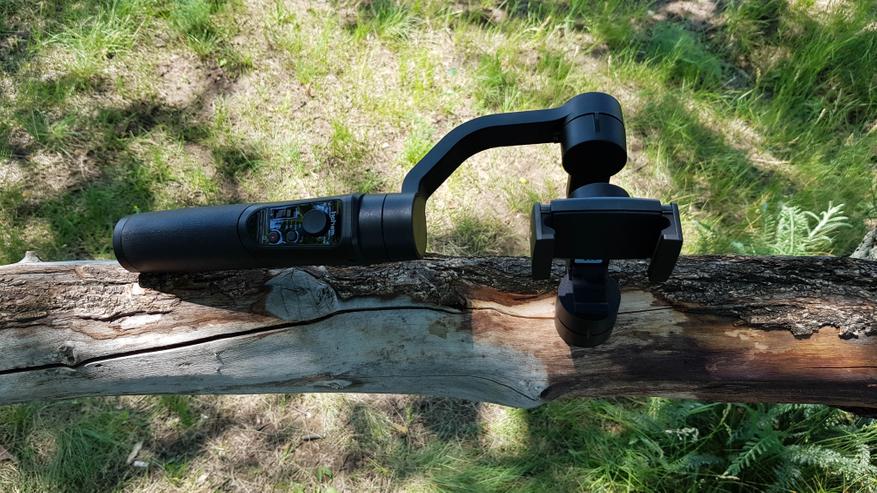
Теперь посмотрим на крепление для смартфона: это металлическая скоба, которую можно повернуть для установки смартфона в портретный или альбомный режим. Поворот осуществляется механическим путем, нужно просто приложить небольшое усилие.
С внутренней стророны держатель защищен вспененным материалом, который сохранит первоначальный внешний вид вашему смартфону не оставляя на корпусе царапин. Скоба раздвигается с заметным усилием и надежно удерживает смартфон. Мой Samsung S8+ с диагональю экрана 6,2″ без проблем вмещается в креплении даже в защитном бампере.
Смартфон Redmi 7 с диагональю 6,26″ тоже без проблем уместился в креплении стабилизатора.
В зависимости от длины смартфона, для лучшего баланса можно увеличить расстояние до крепления при помощи выдвижной части и прижимного винта.

На креплении есть еще одна резьба под 1/4″, которую можно использовать для установки крепления с экшн камерой, так что стабилизатор фактически универсальный и позволяет использовать не только смартфон.
Некоторые элементы имеют декоративную фактуру и делают стабилизатор более привлекательным.
В использовании он удобен. На освоение и привыкание ушло не более 15 минут, а уже через час я мог мастерски делать проводки, бегать по балке и управлять им почти не глядя.
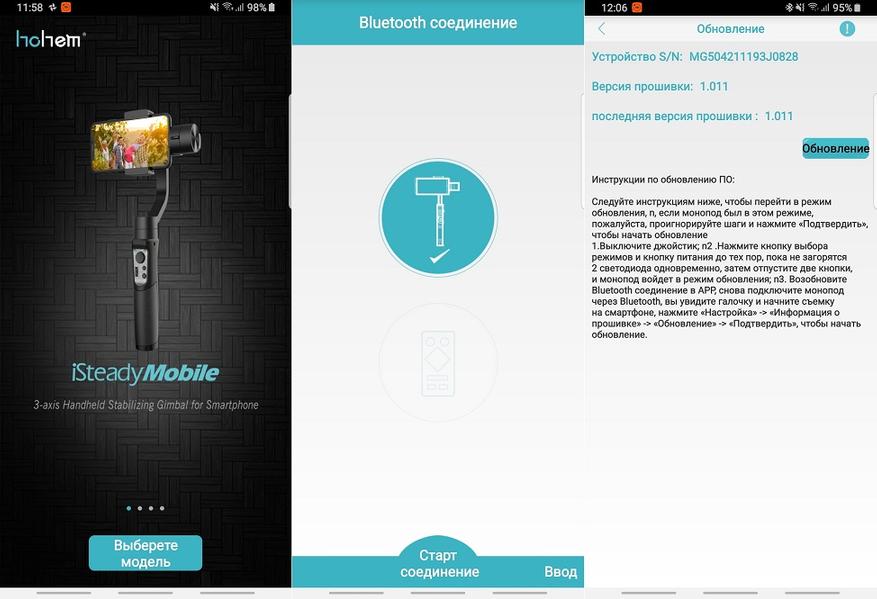
Теперь расскажу о приложении Hohem Studio. Тут конечно у меня есть вопросы, но обо все по порядку. Использовать его не обязательно, т.к стандартное приложение камеры смартфонов Samsung и Xiaomi позволяют осуществлять основные действия. Но некоторые «фишки» работают только в своем приложении (приближение, режим слежения и т.д). Скачать Hohem Studio можно в маркете, далее все просто:
- Подключаете стабилизатор по Bluetooth и запускаете приложение.
- Выбираете свою модель стабилизатора.
- Ожидаете пока приложение подключит стаб к смартфону.
- Пользуетесь
 Можно еще проверить прошивку и при необходимости обновить.
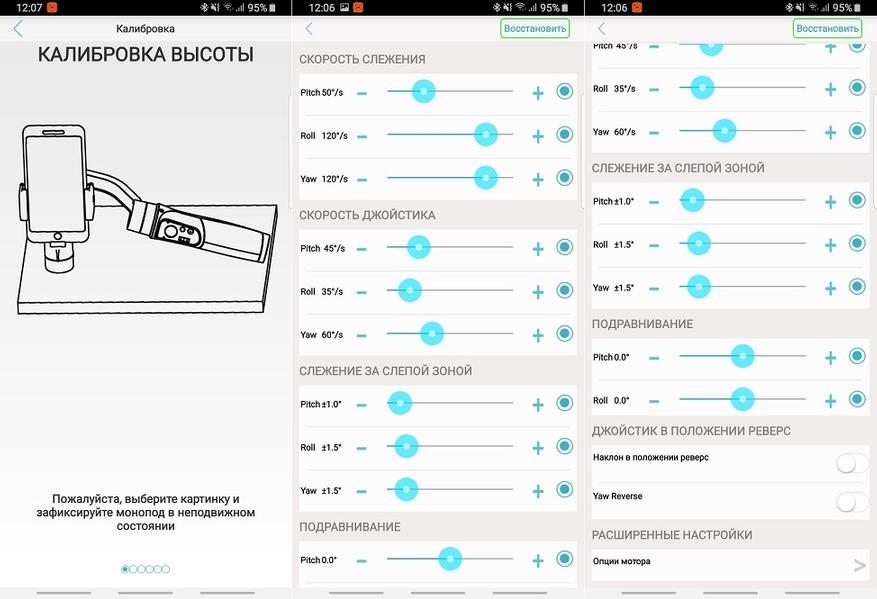
В настройках есть автоматическая калибровка устройства (выполняете по инструкции) и ручные настройки моторчиков, чувствительности и скорости движения.
Главный экран по умолчанию включен в режиме фото. Здесь можно подкорректировать значение ISO, экспозицию и изменить настройки баланса белого.
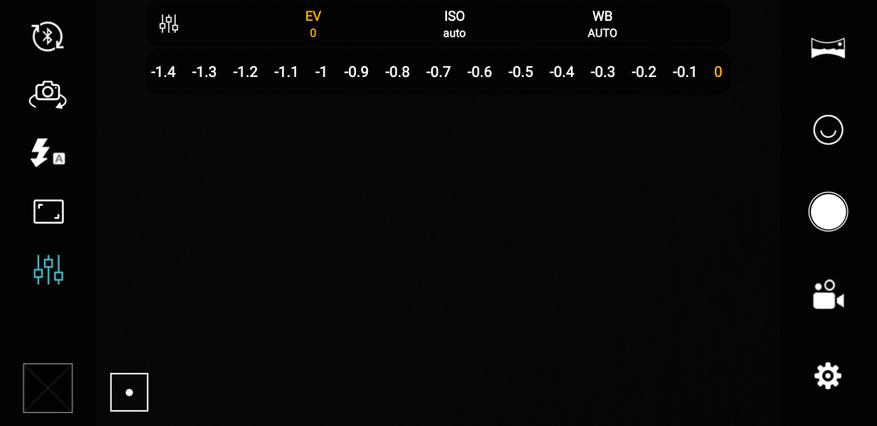
Кроме этого есть управление вспышкой, можно выбрать формат снимков, сделать панораму и т.д.

Все это конечно здорово, но меня интересует в первую очередь запись видео, поэтому переключаю режим. Выбираю обычную съемку и…
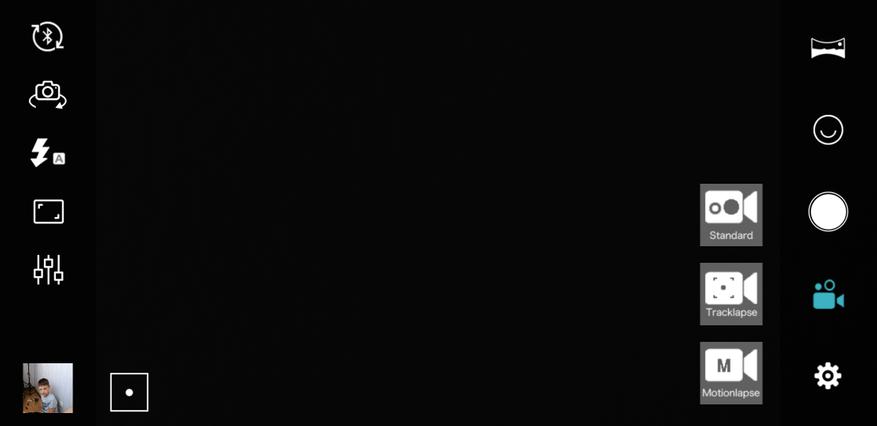
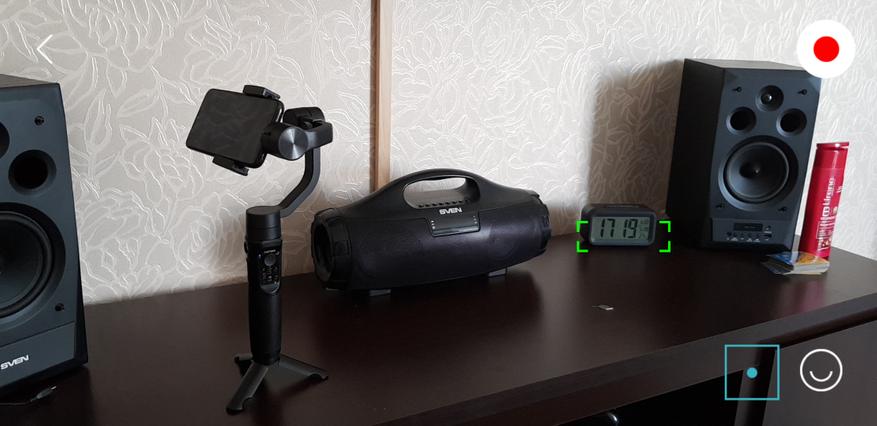
И офигеваю от того, что в этом режиме нет никаких настроек. В фото есть, а в видео нет. Как после этого назовешь китайцев умными? Доступно всего 2 возможности. Первая это отслеживание заданного объекта. Отмечаете область с объектом на экране смартфона и теперь при вашем движении стедикам будет поворачивать смартфон вслед за объектом.
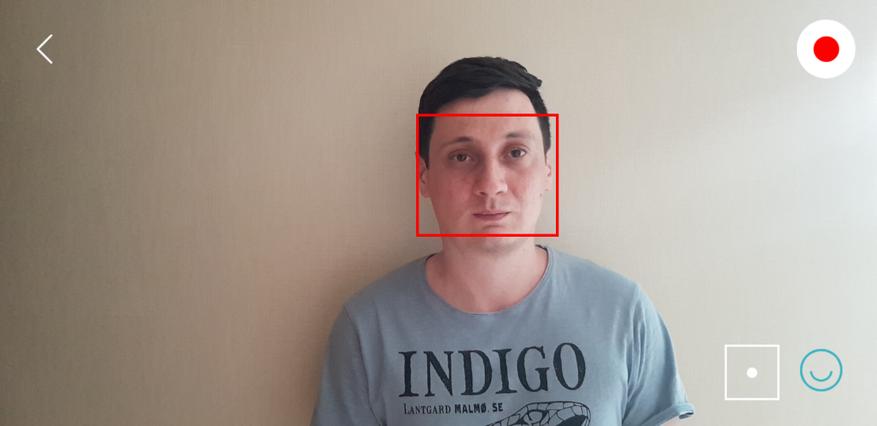
Второй режим позволяет стедикаму следить за лицом, что актуально при записи различных влогов. Работают обе функции неплохо, но если объект резко пропадет из кадра, то стедикам теряется и начинает вращаться в его поиске 
Ну и конечно самое важное — как показал он себя в работе. Предлагаю посмотреть на небольшой видеоролик, где я показал его возможности. Стабилизация в смартфоне отключена, т.е в видео работает только стабилизация при помощи Hohem iSteady Mobile. Я немного походил, побегал, в том числе и вверх/вниз, а также попробовал разные режимы работы.
Подведем итоги. Стабилизатор прекрасно справляется с поставленными задачами, обеспечивая плавность в видео даже при быстром беге. На сегодняшний день уже вышла улучшенная версия Hohem iSteadyMobile+ в которой установили более мощные моторчики (+30%) и добавили кнопку-курок для быстрого возвращения стабилизатора в исходное положение, поэтому ссылку даю на нее. Сейчас как раз идет распродажа и цена опустилась до рекордных $69, в то время как на али цены стартуют от $89. узнать актуальную стоимость