
Welcome to our ICONSIGN blog of how to use lash & brow lift kit!

Our lash lift kit is designed for lifting and curling your eyelashes, giving them a longer and fuller appearance without the need for extensions. The simple lifting process takes only a few minutes and can be easily carried out by yourself from the comfort of your home.
Once complete, you’re left with beautifully long and lifted natural lashes for nearly 2 months! Now you can wake up to perfectly curled lashes every morning, without the added hassle.
Materials in the Kit (Classic Kit For Example Here):

Cleanser: To clean your lashes before the procedure.
Perm Lotion: To break down the structure of your lashes for reshaping.
Fixation Lotion: To set the lashes in the new lifted position.
Nourishing Lotion: To moisturize and nourish your lashes after the treatment.
Glue: To attach the lashes to the silicone pads.
Silicone Pads/Rods: To shape your lashes while lifting.
Lash Tool: For separating and placing the lashes on the silicone pads.
Step-by-Step Instructions:
-
Preparation:
Clean your lashes: Use the Cleanser from the kit or micellar water to remove any oil, dirt, or makeup from your lashes. Make sure they’re completely dry.
Pick a Silicone Pad Size: Choose a silicone pad based on the curl you want (smaller pads for tighter curls, larger pads for a more natural look).
Apply the Pads: Apply a small amount of glue to the back of the silicone pad and stick it to your eyelid, as close to the lash line as possible.
-
Attach Lashes to the Pads:
Apply Glue: Carefully apply a thin layer of glue to the silicone pad.
Lift Lashes onto the Pad: Use the lash tool to gently lift your lashes and stick them to the silicone pad. Make sure each lash is separated and straight, with no crisscrossing.
-
Perming the Lashes:
Apply Perm Lotion: Using a micro brush or cotton swab, apply the Perm Lotion to the midsection of your lashes. Avoid the roots and tips.
Wait Time: Leave the lotion on for 8-12 minutes, depending on the thickness of your lashes. Cover your eyes with plastic wrap during this time to keep the product from drying out.
-
Fixing the Lashes:
Apply Fixation Lotion: Remove the Perm Lotion gently with a cotton swab or tissue. Then apply the Fixation Lotion to the same area as before.
Wait Time: Leave the Fixation Lotion on for 8-12 minutes.
-
Cleaning and Nourishing:
Remove the Lotions: Clean off the Fixation Lotion using the Cleanser and a cotton swab.
Nourish the Lashes: Apply the Nourishing Lotion to your lashes to hydrate and protect them after the procedure.
-
Remove the Pads:
Gently detach the silicone pads from your eyelids. Clean the residue off your lashes and eyelids using the cleanser.
-
Aftercare:
- Avoid getting your lashes wet for at least 24 hours.
- Don’t use mascara or eye makeup for a day to allow the lashes to set properly.
- Use a nourishing serum or oil to keep your lashes healthy.
Tips for Success:
Patch Test: Always perform a patch test before using the kit to avoid allergic reactions.
Work Carefully: Ensure your lashes are well-separated and straight on the silicone pads for the best lift.
Time Management: Don’t over-process your lashes—this could cause damage.
Following these steps will help you achieve a beautiful, natural lash lift like this:


Extra Tips:
Please ensure that all products are kept out of the reach of children.
TIP 1:Doing the application with a friend can make it easier and more enjoyable. Follow each step carefully and watch a tutorial video for guidance.
TIP 2:Don’t rush through the process, take your time. If you have any questions, feel free to contact our support team for assistance.
TIP 3:Avoid using mascara, water, sauna, and steam for the first 24-48 hours after the lift. If using mascara afterwards, choose a non-waterproof formula.
Must Do After Lash Lift:

AVOID AFTER LIFTING:
Avoid contact of your eyelashes with water, steam, hot baths, saunas after the application for 24–48 hours.
Avoid oils, shampoo and lotions for 24–48 hours.
Avoid eye make up for 24 hours.
Avoid rubbing or pulling your lashes for 24 hours.
PRO TIP:
Try to sleep on your back for 24-48 hours! Since your lashes are still shape-shifting, sleeping on your side or putting pressure on your lashes can leave them misshaped.
WHAT WE RECOMMEND
Use an oil-free mascara and an oil free makeup remover.
After about two to three days following your ICONSIGN Lash lift treatment, you can wear mascara.
You can use normal mascara afterwards, but please avoid waterproof mascara and other aggressive products.
To keep your lashes fluffy-looking and to prevent them from getting tangled, brush them daily.

In the lash lift process, you may encounter many problems, such as:
1. Why My Lashe’s Didn’t Lift?
Most people rush through the process, which is why their eyelashes do not lift properly. Your lashes may not have been lifted due to a few reasons:
1. Clean your lashes thoroughly before the treatment to remove makeup residue and ensure they are free of oil.
2. Follow the recommended processing time and be patient during the application.
3. Ensure your lashes are tightly pulled upward against the pad without any gaps or air.
4. After the treatment, avoid steam, water, and makeup for 24-48 hours to maintain the results.
2. LASHES BECOME TOO CURLED AFTER A WHILE
During a lash lifting procedure, lashes may become too curled due to various reasons.
SOLUTION:
Ensure you don’t over-process the lashes by following the recommended processing time.
Clean the lashes properly after each step to remove any lotion residues.
Use the appropriate pad size and curvature to achieve the desired curl.
Avoid lifting the tips and ends of the lashes excessively.
If the lashes become too curled, you can gently straighten them by applying a small amount of lotion on two microbrushes. Place one brush on the top and the other from the bottom, then straighten the lashes. Repeat this process for a few lashes at a time, allowing the lotion to remain for 1-2 minutes. Remove the lotion with a dry cotton swab, not water. Give your lashes a rest for a few days before repeating the lifting process.
3. LASHES ARE CROSSED AND CREASED
SOLUTION:
Ensure proper placement of lashes on the pads during application.
Separate the lashes well before applying the lotions to avoid overlapping.
Take your time to position each lash individually and avoid clumping.
Remember that lashes hold the shape they are placed in on the pad, so be careful during placement.
4. THE CURL LOOKS UNEVEN
Your curl looks uneven? No problem, we got you!
SOLUTION:
Ensure that the lotions are applied evenly to all lashes, avoiding any excess on specific lashes.
Pay attention to the placement of the pads and ensure they are properly positioned and at consistent angles for each eye.
Take care to apply the lotions uniformly across all lashes, ensuring they receive equal treatment.
Double-check the positioning of the pads and adjust if necessary to achieve a more even curl.
Pay attention to the application process and ensure consistency in the treatment of each lash to promote a uniform curl.
5. I WANT TO RE-DO MY LASHES. HOW LONG SHOULD I WAIT?
Lifts can be repeated as often as desired, but it is recommended to wait at least 2 weeks between treatments to prevent over-processing.
If you want to freshen up your lift after a week or two, it is perfectly fine to do so.
Users Notice:
Please note before use: Despite multiple tested ingredients and no intolerance confirmed so far by our customers, please test the product for skin compatibility before use (test small amount on the back of the hand). Keep the eye closed during application and remove contact lenses.
Lifts may be repeated as often as you want, but we recommend to wait at least 2 weeks to avoid over-processing. This means that if you want to freshen up your lift after a week or two, it’s absolutely fine!
Incorrect application may cause irritation to the eye (avoid eye contact). If eye contact occurs, please rinse with water for 3–5 minutes and seek medical attention if necessary.
ICONSIGN Cosmetics is not responsible for any damages caused by this product or improper use. Keep away from children.
If you are still experiencing any issues, please feel free to email us via info@iconsignbeauty.com and one of our experts will help you out!
Содержание
- Lash Лифт Профессиональный ресниц комплект Makeupbemine Набор для ламинирования
- Iconsign Lash Lift Professional Lash lift Kit Makeupbemine ресницы Набор для ламинирования ресниц Ресницы Набор для завивки
- Шаги подъема ресниц
- Инструкция по ламинированию ресниц
- Инструкция по ламинированию ресниц
- Валики (бигуди) для ламинирования ресниц Lash Botox
- Силиконовые формы (бигуди) для ламинирования Lash Botox EASY LIFT
- Силиконовые формы (бигуди) для ламинирования Lash Botox EASY LIFT
- Состав #1 для долговременной укладки бровей BROW LIFT, 8мл
- О товаре
Lash Лифт Профессиональный ресниц комплект Makeupbemine Набор для ламинирования
Special Price от 905,08 руб.*
Доступность: На складе

Для получения более полной информации о стоимости и сроках доставки Lash Лифт Профессиональный ресниц комплект Makeupbemine Набор для ламинирования нажмите «Подробнее».
- В избранное
- Сравнить
- Email рассылка
Iconsign Lash Lift Professional Lash lift Kit Makeupbemine ресницы Набор для ламинирования ресниц Ресницы Набор для завивки
Это альтернатива накладные ресницы и фальсификации для свернутого эффекта ресниц. лечение имеет три варианта размера щита, и технология ресниц оценит вашу длину волос и форму глаз для вида, который лучше всего подойдет вам.
Обратите внимание: высоко Рекомендуем профессиональные ресницы для работы, не Управляйте ресницами самостоятельно
Шаги подъема ресниц
1. используйте средство для очистки масла, пыли и остатков макияжа.
2. Нанесите накладки для глаз на нижние веки, чтобы защитить нашу кожу от лосьон для перманентной завивки волос.
3. Положите подтяжки на ресницы, затем нанесите клей на ресницы, чтобы она держалась на подушечках.
4. Используйте клей, устанавливающий ресницы на подтяжки около 1 минуты.
5. Используйте #1 жидкость для завивки (белый цвет) на реснице, а затем покрывайте пластиковую пленку около 8
12 минут.
6. Используйте #2 закрепитель (синий цвет) на реснице и затем покрывайте пластиковую пленку около 8
12 минут
7. Clean ресниц lift-колодки, затем используйте #3 Питание лосьон (желтый цвет), чтобы питают ресницы.
8. Применение #4 очистки (белый прозрачный цвет), чтобы очистить от всех Пермь остаток


Источник
Инструкция по ламинированию ресниц

Инструкция по ламинированию ресниц
Ламинирование ресниц — это восстанавливающая процедура для укрепления, утолщения, окрашивания и блеска ресниц. Благодаря этой процедуре, ресницы приобретают красивый желанный изгиб, глаза становятся более выразительными, а
взгляд более привлекательным.
Составы, которыми выполняется процедура, содержат питательные вещества. Именно они проникают в саму структуру реснички, питая и наполняя ее изнутри. Это помогает увеличить ее объем, придать ей здоровья и крепости.
Эффект завитых в результате процедуры ресниц сохраняется более четырех недель, в зависимости от скорости роста ресниц может продолжаться и до трех месяцев.
Описание по процедуре:
1) Заклеиваем нижние ресницы, любым средством для изоляции нижних ресниц (лента, гидрогелевые подушечки)
2) Очищение, обезжиривание ресниц.
3) Подбираем валик на верхнее веко
Валик подбирается по длине ресниц. При наложении ресниц на валик, реснички не должны быть выше середины валика более чем на 1-2 мм.
Чем ресницы короче, тем меньший размер валика.
или многофункционального прибора(Spot Иглa для разделения ресниц)
Распределять ресницы можно от внешнего уголка к внутреннему или наоборот.
Важно следить, чтобы ресницы не пересекались между собой и не заламывались кончики.
1 состав — размягчает и открывает чешуйки ресницы. Бережно поднимает ресницы от корня.
На внутренний и внешний угол глаза, состав наносим на меньшее пространство (чтоб был менее интенсивный завиток)
7) Делаем баню (накладываем пленку и ватный диск, смоченный в теплой воде, накрываем полотенцем)
Время экспозиции состава №1 с момента нанесения, составляет от 10 до 12 минут.
Время экспозиции зависит от типа ресниц.
— тонкие ресницы — 10 минут
— средние ресницы — 10-11 минут
— плотные ресницы — 11-12 минут
8. Снимаем средство №1 сухими ватными палочками. Удаляем состав аккуратно по направлению от прикорневой зоны ресницы вверх к кончикам.
9. Наносим средство №2 на все ресницы, время экспозиции состава №2 составляет от 5 до 10 минут. Зависит от типа ресниц.
— тонкие ресницы — 5-6 минут
— средние ресницы — 7-8 минут
— плотные ресницы — 9-10 минут
Время экспозиции краски составляет от 8 до 12 минут.
Зависит от типа ресниц.
— тонкие ресницы — 8-9 минут
— средние ресницы — 9-10 минут
— плотные ресницы -10-12 минут.
15. Снимаем краску сухими ватными палочками.
3 состав – питает и увлажняет ресницы. Обволакивает и закрывает чешуйки ресниц. При последующем нанесении, имеет накопительный эффект.
17. Снимаем валики, аккуратным движением, при помощи ватной палочки или микробраша смоченного в любое средство для снятия макияжа или масла.
18. Удаляем остатки краски с кожи клиента, если таковые есть.
19. Клиент после выполнения всех манипуляций должен подержать 2-3 минуты глаза закрытыми.
Рекомендации: Не мочить глаза 24 часа
Противопоказания: Любые болезни глаз, беременность.
Источник
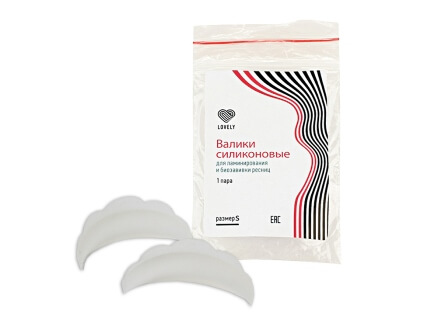
Валики (бигуди) для ламинирования ресниц Lash Botox

Силиконовые формы (бигуди) для ламинирования Lash Botox EASY LIFT
- Скидка в день рождения до 20% — подробности ЗДЕСЬ!
- Персональная скидка до 15% каждому — подробности ЗДЕСЬ!
- Скидка до 20% на первую покупку — подробности ЗДЕСЬ!
- Выгоднее цен, чем у нас быть не может — подробности ЗДЕСЬ!
- Чёрная пятница каждый месяц — подробности ЗДЕСЬ!
- Условия доставки, оплаты, обмена/возврата ЗДЕСЬ!
- Выгодные условия опта со скидкой до 40% ЗДЕСЬ!
Цена действительна только для интернет-магазина и может отличаться от цен в розничных магазинах
| Артикул | |
|---|---|
| Категория | Валики (бигуди) для ламинирования ресниц |
| Соседние товары | Cуперэластичные формы (бигуди) с рисками для ламинирования, Набор силиконовых бигуди In Lei ONLY (4 пары) |
Силиконовые формы (бигуди) для ламинирования Lash Botox EASY LIFT
Силиконовые формы (бигуди) для ламинирования Lash Botox EASY LIFT
Инновационные силиконовые формы для ламинирования ресниц c технологией Easy Lift.
ТЕХНОЛОГИЯ EASY LIFT
- ТОЧКА ПЕРЕГИБА обеспечивает быстрый и безошибочный выбор нужного размера формы в зависимости от длины ресниц и позволяет определить зону нанесения состава для создания разного по форме завитка. Плоское нанесение точки предотвращает залом ресниц.
- ПЛАВНОЕ УПЛОТНЕНИЕ ФОРМЫ К ВНУТРЕННИМ УГОЛКАМ ГЛАЗА позволяет создать равномерный и красивый завиток без заломов и перезавивки, а также обеспечивает упрощенную выкладку составов без специальных замеров.
- ЛИФТИНГОВЫЙ ТИП форм (S, M) позволяет работать с нависшим веком и поднимает ресницы от корня.
- ОКРУГЛЫЙ ТИП форм (M1, M2, L, L1) позволяет работать с широкой межресничкой и создает выразительный завиток.
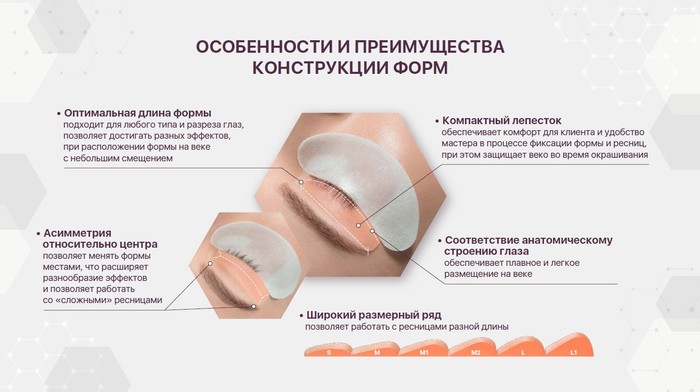
ОСОБЕННОСТИ И ПРЕИМУЩЕСТВА КОНСТРУКЦИИ ФОРМ:
- Оптимальная длина формы подходит для любого типа и разреза глаз, позволяет достигать разны эффектов, при расположении формы на веке с небольшим смещением.
- Асимметрия относительно центра позволяет менять формы местами, что расширяет разнообразие эффектов
- и позволяет работать со «сложными» ресницами.
- Компактный лепесток обеспечивает комфорт для клиента и удобство мастера в процессе фиксации формы и ресниц, при этом защищает веко во время окрашивания.
- Соответствие анатомическому строению глаза обеспечивает плавное и легкое размещение на веке.
- Широкий размерный ряд позволяет работать с ресницами разной длины.
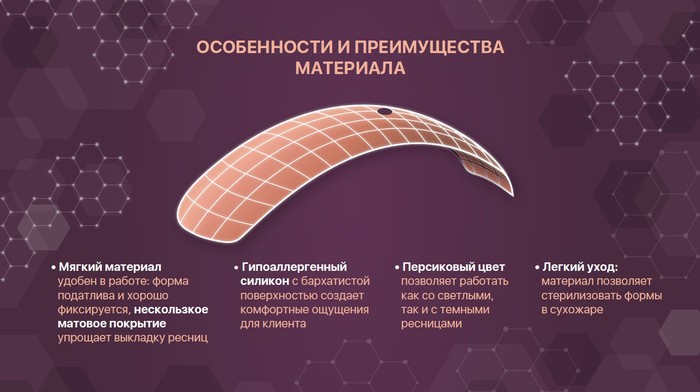
ОСОБЕННОСТИ И ПРЕИМУЩЕСТВА МАТЕРИАЛА:
- Мягкий материал удобен в работе: форма податлива и хорошо фиксируется, нескользкое матовое покрытие упрощает выкладку ресниц.
- Гипоаллергенный силикон с бархатистой поверхностью создает комфортные ощущения для клиента.
- Персиковый цвет позволяет работать как со светлыми, так и с темными ресницами.
- Легкий уход: материал позволяет стерилизовать формы в сухожаре.
Источник
Состав #1 для долговременной укладки бровей BROW LIFT, 8мл
Бонусная программа BROWMART
- Описание
- Инструкция
О товаре
Новая, более мягкая формула обогащена протеинами пшеницы и ланолиновым спиртом.
Протеин пшеницы:
● Проникая в структуру, обеспечивает глубокое питание стержней волос.
● Заполняет повреждения волоса.
● Участвует в формировании кератина.
● Защищает волоски от воздействия составов, восстанавливает их в процессе долговременной укладки.
Ланолиновые спирты обладают увлажняющими и защитными свойствами.
Срок годности состава после вскрытия: 6 мес.
Способ применения:
Состав #1 BROW LIFT используется на первом этапе в процедуре долговременной укладки бровей, делает их мягкими и послушными, подготавливает волоски ко второму этапу. Консистенция состава однородная, кремообразная, удобно наносится и не растекается.
Новая, более мягкая формула обогащена протеинами пшеницы и ланолиновым спиртом.
Протеин пшеницы:
● Проникая в структуру, обеспечивает глубокое питание стержней волос.
● Заполняет повреждения волоса.
● Участвует в формировании кератина.
● Защищает волоски от воздействия составов, восстанавливает их в процессе долговременной укладки.
Ланолиновые спирты обладают увлажняющими и защитными свойствами.
Срок годности состава после вскрытия: 6 мес.
Источник
Skip to navigation
Skip to content
$22.99
Get ready to transform your lashes with ICONSIGN‘s Lash Lift Kit – the ultimate solution for lifted, voluminous lashes in just a few simple steps!
ICONSIGN Lash Lift Kit
$22.99
ICONSIGN Lash Lift Kit quantity
-
Gallery
-
Specifications
-
Description
-
How to Use
-
What’s Inside
-
Shipping & Returns
Specifications
| Brand: | ICONSIGN | Category: | Lash Lift |
| Product Dimensions: | 16 x 12 x 2 cm | Weight: | 122g |
| Number Of Products: | 1 set | Shelf Life: | 18 Months |
| Function: | Lift Eyelashes | Lasting after Perming: | 30 to 45 Days |
Description
How to Use?
What’s Inside?
- Perm lotion: 1 bottle
- Fixation lotion: 1 bottle
- Nutrition lotion: 1 bottle
- Cleanser lotion: 1 bottle
- 5ml/bottle False Lashes Glue: 1 bottle
- Silicone Lash Lift pads: 5 pairs(S,M,M1,M2,L)
- Y-shape Brushes: 3 pieces
Shipping & Returns
Free delivery with all orders.
You can return your order for any reason, free of charge, within 30 days.
Easy 30 days returns
30 days money back guarantee
International Warranty
Offered in the country of usage
100% Secure Checkout
PayPal / MasterCard / Visa
-
Страна продавца: Польша
-
Доставка: от 990 ₽ -
Срок доставки: 12-20 дней -
Купили: 37 раз
-
В наличии: 39
-
Оценка: 4.84
-
Отзывов: 45
Характеристики
-
Identyfikator produktu - 14877372530
-
Waga produktu z opakowaniem jednostkowym - 0.41 kg
-
Stan opakowania - oryginalne
-
Rodzaj - zestawy do laminacji
Описание
Приобрести НАБОР ICONSIGN LASH LIFT ДЛЯ ЛИФТИНГА И ПЕРМАНЕНТНОГО ЛАМИНИРОВАНИЯ РЕСНИЦ И БРОВЕЙ по привлекательной цене с доставкой из Польши по всей России, вы можете на сайте Boxcentr.ru
Информация о технических характеристиках, комплекте поставки, стране изготовления и внешнем виде товара носит справочный характер.
Стоимость доставки приблизительная. Точная стоимость доставки указывается после обработки заказа менеджером.
Boxcentr.ru — является автоматизированным агрегатором товаров. Вся информация (включая описания и изображения) агригируются автоматически с площадок allegro.pl и amazon.pl.
Администрация не несет ответственности за ее достоверность.
If you’re looking for a way to enhance your natural lashes without the hassle of extensions or mascara, you might want to try the ICONSIGN Lash Lift Kit. This kit is a DIY lash lifting system that gives you salon-quality results at home. In this blog post, we’ll explain what the ICONSIGN Lash Lift Kit is, how it works, what it contains, how to use it, and what the benefits and drawbacks are. We’ll also answer some frequently asked questions that you might have before trying it out.
What is the ICONSIGN Lash Lift Kit?
The ICONSIGN Lash Lift Kit is a professional-grade lash lifting system you can use at home. It comes with all the tools you need to lift and curl your lashes, including a perm lotion, a setting lotion, and a nourishing serum. The kit also includes silicone pads, lash glue, and applicator brushes. The kit is designed to be easy to use, safe, and effective. The ICONSIGN Lash Lift Kit can give you lifted, voluminous lashes that last for up to two months.
How does the ICONSIGN Lash Lift Kit work?
The ICONSIGN Lash Lift Kit works by using a chemical process to change the shape of your lashes. The perm lotion breaks down the bonds in your lash hairs, making them more flexible. The setting lotion then fixes the new shape of your lashes, making them stay curled. The nourishing serum then conditions and protects your lashes, making them look healthy and shiny. The silicone pads and lash glue help you to create the desired curl and lift for your lashes. The whole process takes about an hour to complete.
What does the ICONSIGN Lash Lift Kit contain?
The ICONSIGN Lash Lift Kit contains the following items:
- Perm lotion: 1 bottle
- Fixation lotion: 1 bottle
- Nutrition lotion: 1 bottle
- Cleanser lotion: 1 bottle
- False lashes glue: 1 bottle
- Silicone lash lift pads: 5 pairs (S, M, M1, M2, L)
- Y-shape brushes: 3 pieces
The kit also comes with a user manual that guides you through the steps of the lash lifting procedure.
How to use the ICONSIGN Lash Lift Kit?
To use the ICONSIGN Lash Lift Kit, you need to follow these steps:
- Clean your lashes and eyes with the cleanser lotion and a cotton pad. Make sure there is no makeup, oil, or dirt on your lashes.
- Choose the silicone pad size that suits your lash length and eye shape. Apply a thin layer of lash glue on the back of the pad and stick it on your eyelid, close to the lash line.
- Apply another thin layer of lash glue on the front of the pad and use the Y-shape brush to lift your lashes onto the pad. Make sure your lashes are evenly spread and attached to the pad.
- Apply the perm lotion on your lashes with a cotton swab. Avoid getting the lotion on your skin or eyes. Leave the lotion on for 10 to 15 minutes, depending on your lash thickness and desired curl.
- Remove the perm lotion with a cotton pad or a tissue. Apply the fixation lotion on your lashes with a cotton swab. Leave the lotion on for 10 to 15 minutes.
- Remove the fixation lotion with a cotton pad or a tissue. Apply the nutrition lotion on your lashes with a cotton swab. Leave the lotion on for 5 minutes.
- Remove the nutrition lotion with a cotton pad or a tissue. Use the cleanser lotion to remove the lash glue and the silicone pad from your eyelid. Gently wipe your lashes with a cotton pad to remove any residue.
- Enjoy your lifted and curled lashes!
What are the benefits of the ICONSIGN Lash Lift Kit?
The ICONSIGN Lash Lift Kit has many benefits, such as:
- It gives you natural-looking, long-lasting lashes that don’t need mascara or curling.
- It saves you time and money from going to a salon or applying extensions.
- It is easy to use and suitable for all lash types and lengths.
- It is gentle and safe for your lashes and eyes, as it uses natural and harmless ingredients.
- It enhances your eye beauty and charm, making you look more awake and attractive.
What are the drawbacks of the ICONSIGN Lash Lift Kit?
The ICONSIGN Lash Lift Kit also has some drawbacks, such as:
- It requires some patience and precision to apply the products and the pads correctly.
- It may cause irritation, allergy, or infection if you have sensitive skin or eyes, or if you don’t follow the instructions carefully.
- It may not work well for very short, sparse, or damaged lashes, as they may not hold the curl well.
- It may not last as long as expected if you expose your lashes to water, heat, or oil frequently.
FAQs about the ICONSIGN Lash Lift Kit
Here are some common questions and answers about the ICONSIGN Lash Lift Kit that you might want to know before trying it out.
Q: How long does the ICONSIGN Lash Lift Kit last?
A: The ICONSIGN Lash Lift Kit can last for up to two months, depending on your lash growth cycle and how you take care of your lashes. To prolong the effect, you should avoid rubbing, wetting, or applying makeup on your lashes for the first 24 hours after the treatment. You should also avoid using oil-based products, heat, or steam on your lashes, as they may weaken the curl.
Q: Can I use the ICONSIGN Lash Lift Kit with lash extensions or tint?
A: No, you should not use the ICONSIGN Lash Lift Kit with lash extensions or tint, as they may interfere with the lash lifting process and damage your lashes. You should remove any lash extensions or tint before using the kit. If you want to tint your lashes, you should do it after the lash lifting treatment, using a suitable lash tint product.
Q: Is the ICONSIGN Lash Lift Kit safe for my lashes and eyes?
A: Yes, the ICONSIGN Lash Lift Kit is safe for your lashes and eyes, as it uses natural and harmless ingredients that are tested and approved by professional agencies. However, you should always do a patch test before using the kit, to check for any allergic reactions. You should also avoid getting the products in your eyes, and rinse them immediately with water if that happens. If you experience any irritation, redness, swelling, or pain, you should stop using the kit and consult a doctor.
Q: How often can I use the ICONSIGN Lash Lift Kit?
A: You can use the ICONSIGN Lash Lift Kit once every two months, or when your lashes start to lose their curl. You should not use the kit more frequently than that, as it may damage your lashes or cause them to fall out.
Q: Where can I buy the ICONSIGN Lash Lift Kit?
A: You can buy the ICONSIGN Lash Lift Kit from the official website or from other online platforms such as Amazon. The kit costs around $25 and can be used for 12 to 15 applications. You can also find other ICONSIGN products such as lash tint, brow lamination, and false lashes on the website.
I hope this blog post has answered your questions about the ICONSIGN Lash Lift Kit and helped you decide whether to try it or not. If you have any other questions or feedback, please feel free to leave a comment below. Thank you for reading and have a wonderful day!