
PP
Инструкция по
эксплуатации
Цифровая фотокамера
Модель №.
DMC-FZ18
VQT1F98
Перед пользованием прочтите,
пожалуйста, эту инструкцию
полностью.
EE
DMC-FZ18-RUS.book 1 ページ 2007年7月18日 水曜日 午後6時43分

Перед использованием
2
VQT1F98
Перед использованием
Уважаемый покупатель!
Благодарим вас за приобретение этой
цифровой камеры Panasonic.
Прочитайте, пожалуйста, внимательно
эту инструкцию по эксплуатации и
держите ее всегда под рукой.
Информация для
вашей безопасности
Тщательно соблюдайте законы об
авторских правах.
Запись с предварительно
записанных магнитных лент или
дисков, а также других
опубликованных или
телевещательных материалов с
целью, отличной от вашего личного
пользования, является нарушением
закона об авторских правах. Даже с
целью вашего личного пользования
запись определённого материала
может быть запрещена.
•
Просьба обратить внмание, что органы
управления, составные части и меню
вашей цифровой камеры могут
несколько отличаться от тех, что
представлены на рисунках этой
инструкции.
•
Логотип SDHC является торговым
знаком.
•
Leica является зарегистрированным
торговым знаком компании Leica
Microsystems IR GmbH.
•
Elmarit является зарегистрированным
торговым знаком компании Leica
Camera AG.
•
Другие названия, названия фирм и
изделий, отмеченные в этой
инструкции, являются торговыми
знаками или зарегистрированными
товарными знаками соответствующих
компаний.
ПРЕДУПРЕЖДЕНИЕ:
ЧТОБЫ УМЕНЬШИТЬ ОПАСНОСТЬ
ВОЗНИКНОВЕНИЯ ПОЖАРА,
ПОРАЖЕНИЯ ЭЛЕКТРИЧЕСКИМ
ТОКОМ ИЛИ ПОВРЕЖДЕНИЯ
ИЗДЕЛИЯ,
•
НЕ ПОДВЕРГАЙТЕ ЭТОТ АППАРАТ
ВОЗДЕЙСТВИЮ ДОЖДЯ, ВЛАГИ,
КАПЕЛЬ ИЛИ БРЫЗГ, И НЕ
ПОМЕЩАЙТЕ НА АППАРАТ
НИКАКИЕ ПРЕДМЕТЫ,
НАПОЛНЕННЫЕ ВОДОЙ,
НАПРИМЕР, ВАЗЫ.
•
ИСПОЛЬЗУЙТЕ ТОЛЬКО
РЕКОМЕНДУЕМЫЕ
ПРИНАДЛЕЖНОСТИ.
•
НЕ СНИМАЙТЕ КРЫШКУ (ИЛИ
ЗАДНЮЮ КРЫШКУ); ВНУТРИ НЕТ
ЧАСТЕЙ ДЛЯ ОБСЛУЖИВАНИЯ
ПОЛЬЗОВАТЕЛЕМ. ЗА
ОБСЛУЖИВАНИЕМ
ОБРАЩАЙТЕСЬ К
КВАЛИФИЦИРОВАННОМУ
ОБСЛУЖИВАЮЩЕМУ
ПЕРСОНАЛУ.
РАЗЪЕМ ДОЛЖЕН НАХОДИТЬСЯ
ВБЛИЗИ АППАРАТУРЫ И ДОСТУП К
НЕМУ НЕ ДОЛЖЕН БЫТЬ
ЗАТРУДНЕН.
ПРЕДУПРЕЖДЕНИЕ
При неправильной замене
аккумулятора возникает опасность
взрыва. Производить замену,
используя только тот же тип
аккумулятора, или равноценный ему,
рекомендуемый производителем.
Размещение в отходы
использованных аккумуляторов
производить согласно инструкциям
производителя.
Предупреждение
Существует риск возгорания, взрыва
или ожогов. Запрещается разбирать,
нагревать свыше 60
xC или сжигать.
Маркировка продукта находится на
нижней панели устройств.
DMC-FZ18-RUS.book 2 ページ 2007年7月18日 水曜日 午後6時43分
Перед использованием
3
VQT1F98
-Если Вы увидите такой символ-
∫ О зарядном устройстве батареи
•
Когда шнур питания переменного тока
подключен, зарядное устройство
аккумулятора находится в режиме
ожидания.
Первичная цепь всегда “работает”,
если шнур питания подключен к
электрической розетке.
Информация по обращению с
отходами для стран, не входящих в
Европейский Союз
Действие этого символа
распространяется только на
Европейский Союз.
Если Вы собираетесь выбросить
данный продукт, узнайте в местных
органах власти или у дилера, как
следует поступать с отходами такого
типа.
ПРЕДОСТЕРЕЖЕНИЕ!
•
НЕ СЛЕДУЕТ УСТАНАВЛИВАТЬ ИЛИ
РАЗМЕЩАТЬ ДАННЫЙ АППАРАТ В
КНИЖНОМ ШКАФУ, ВСТРОЕННОМ
ШКАФУ ИЛИ ДРУГОМ
ОГРАНИЧЕННОМ ПРОСТРАНСТВЕ
ДЛЯ ТОГО, ЧТОБЫ СОХРАНИТЬ
УСЛОВИЯ ХОРОШЕЙ ВЕНТИЛЯЦИИ.
УДОСТОВЕРЬТЕСЬ, ЧТО ШТОРЫ И
ДРУГИЕ ПОДОБНЫЕ ПРЕДМЕТЫ НЕ
ПРЕПЯТСТВУЮТ НОРМАЛЬНОЙ
ВЕНТИЛЯЦИИ ДЛЯ
ПРЕДОТВРАЩЕНИЯ РИСКА
ПОРАЖЕНИЯ ЭЛЕКТРИЧЕСКИМ
ТОКОМ ИЛИ ВОЗНИКНОВЕНИЯ
ПОЖАРА ИЗ-ЗА ПЕРЕГРЕВА.
•
НЕ ЗАКРЫВАЙТЕ
ВЕНТИЛЯЦИОННЫЕ ОТВЕРСТИЯ
АППАРАТА ГАЗЕТАМИ,
СКАТЕРТЯМИ, ШТОРАМИ И
ПОДОБНЫМИ ПРЕДМЕТАМИ.
•
НЕ РАЗМЕЩАЙТЕ НА АППАРАТ
ИСТОЧНИКИ ОТКРЫТОГО
ПЛАМЕНИ, ТАКИЕ, КАК ГОРЯЩИЕ
СВЕЧИ.
•
ВЫБРАСЫВАЙТЕ БАТАРЕИ В
МУСОР, УЧИТЫВАЯ ОХРАНУ
ОКРУЖАЮЩЕЙ СРЕДЫ.
DMC-FZ18-RUS.book 3 ページ 2007年7月18日 水曜日 午後6時43分
Перед использованием
4
VQT1F98
∫ Уход за камерой
•
Нельзя сильно трясти или ударять
камеру, роняя ее и т.д.
Данный аппарат может выйти из строя,
запись изображений может стать
невозможной, или может повредиться
объектив либо монитор ЖКД.
•
Складывайте объектив перед
переносом камеры или
воспроизведением снимков.
•
Будьте особенно осторожны в
перечисленных ниже местах,
поскольку они могут стать причиной
неисправности данной камеры.
– Места с большим количеством песка
или пыли.
– Места возможного контакта данной
камеры с водой, например, при
использовании камеры в дождливый
день или на пляже.
•Не касайтесь объектива или
разъемов грязными руками.
Следите также за тем, чтобы
жидкость не попадала на участки
вокруг объектива, кнопок и т.д.
•
В случае попадания на камеру
пресной или морской воды
осторожно протрите корпус камеры
сухой тканью.
∫ О конденсации (Когда объектив
или видоискатель запотевают)
•
Конденсация происходит, когда
окружающая температура или влажность
изменяются. Остерегайтесь
конденсации, поскольку она вызывает
появление пятен на объективе, плесени
или неисправностей в работе камеры.
•
Если конденсация все-таки
произошла, выключите камеру и
оставьте ее на 2 часа. Конденсат
исчезнет сам собой, когда температура
камеры сравняется с окружающей
температурой.
∫ Читайте вместе с разделом
“Предосторожности при
использовании фотокамеры”.
(P133)
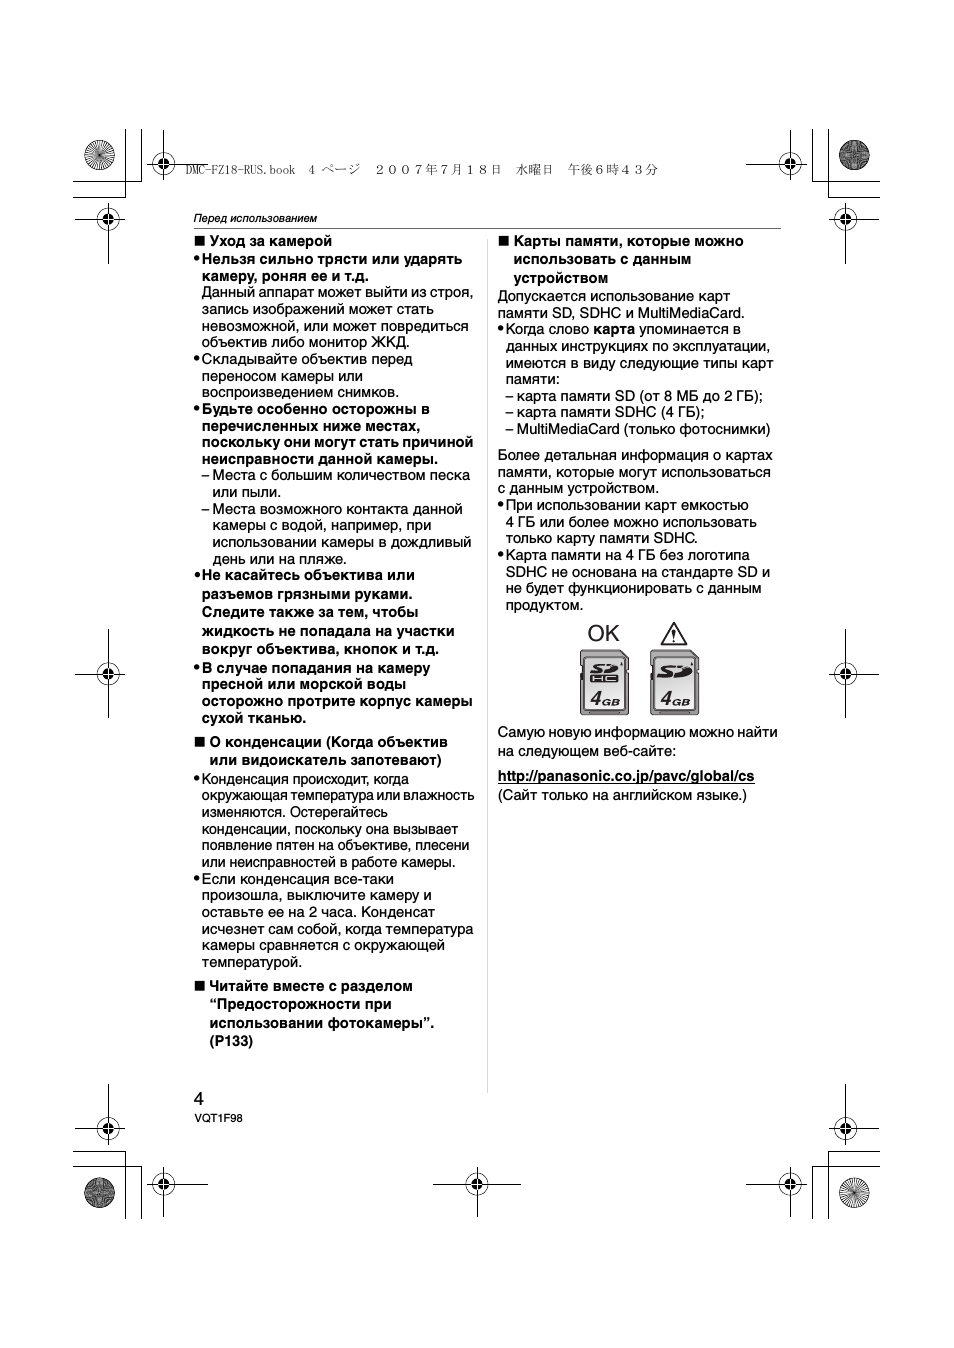
∫ Карты памяти, которые можно
использовать с данным
устройством
Допускается использование карт
памяти SD, SDHC и MultiMediaCard.
•
Когда слово карта упоминается в
данных инструкциях по эксплуатации,
имеются в виду следующие типы карт
памяти:
– карта памяти SD (от 8 МБ до 2 ГБ);
– карта памяти SDHC (4 ГБ);
– MultiMediaCard (только фотоснимки)
Более детальная информация о картах
памяти, которые могут использоваться
с данным устройством.
•
При использовании карт емкостью
4 ГБ или более можно использовать
только карту памяти SDHC.
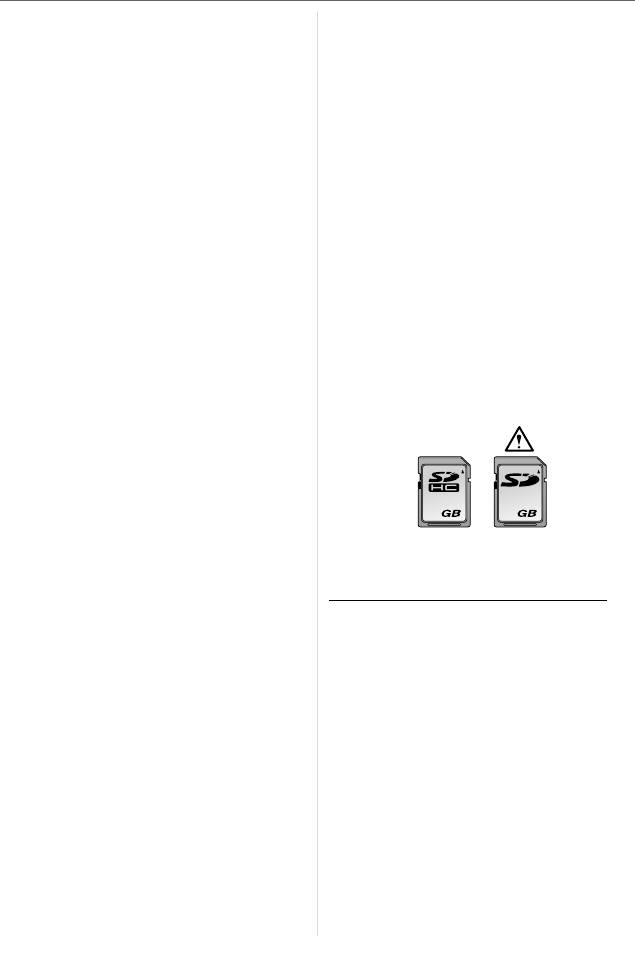
•
Карта памяти на 4 ГБ без логотипа
SDHC не основана на стандарте SD и
не будет функционировать с данным
продуктом.
Самую новую информацию можно найти
на следующем веб-сайте:
http://panasonic.co.jp/pavc/global/cs
(Сайт только на английском языке.)
4
4
OK
DMC-FZ18-RUS.book 4 ページ 2007年7月18日 水曜日 午後6時43分
5
VQT1F98
Содержание
Перед использованием
Информация для вашей безопасности …. 2
Подготовка
Стандартные принадлежности …………. 7
Названия составных частей ……………… 7
Прикрепление крышки
объектива/ремешка………………………….. 9
Присоединение бленды объектива ……. 10
Краткое руководство ……………………… 11
Подзарядка аккумулятора при
помощи зарядного устройства ………… 12
Об аккумуляторах (время
заряда/количество снимков)…………… 13
Установка и извлечение карты
(поставляется отдельно)/
аккумулятора …………………………………. 14
О встроенной памяти/карте
(не входит в комплект поставки)…….. 15
Настройка даты/времени
(настройка часов) …………………………… 17
• Изменение настроек часов ……….. 17
Информация о диске рабочего
режима…………………………………………… 18
Настройка меню …………………………….. 19
О меню настроек ……………………………. 21
Отображение на мониторе
ЖКД/видоискателе/Переключение
отображения между монитором
ЖКД/видоискателем ………………………. 24
Основные сведения
Съемка…………………………………………… 26
Выполнение снимков с
использованием автоматической
функции (интеллектуальный
автоматический режим)………………….. 29
Съемка с увеличением……………………. 32
• Использование оптического
увеличения……………………………….. 32
• Использование дополнительного
оптического увеличения (EZ) ………. 33
• Использование цифрового
увеличения
Дальнейшее увеличение……………. 33
Проверка записанного снимка
(просмотр) ……………………………………… 35
Воспроизведение/удаление снимков …… 36
Расширенные сведения
(Запись изображений)
Информация о мониторе
ЖКД/Видоискателе ………………………… 39
• Изменение набора
отображаемой информации ………. 39
• Усиление яркости
монитора ЖКД ………………………….. 42
Съемка со встроенной вспышкой ……. 43
Съемка с автоматическим таймером…… 47
Компенсация экспозиции ………………… 49
Съемка с автоматической
настройкой значений экспозиции ……. 50
Съемка в режиме серийной съемки…….. 51
Съемка крупным планом ………………… 52
Режим приоритета диафрагмы AE ….. 54
Режим приоритета скорости
затвора AE …………………………………….. 54
Ручная экспозиция …………………………. 55
Показатель диафрагмы и скорость
затвора ………………………………………….. 56
Съемка в режиме ручной
фокусировки ………………………………….. 57
Сохранение личных настроек меню
(Сохранение индивидуальных
настроек) ……………………………………….. 60
Съемка в индивидуальном режиме ……. 61
Съемка выразительных
портретов и пейзажей
(расширенный режим сцены)…………… 62
• [ПОРТРЕТ] ……………………………….. 62
• [ПЕЙЗАЖ] ………………………………… 63
• [СПОРТ]……………………………………. 63
• [НОЧН. ПОРТРЕТ] …………………….. 64
Выполнение снимков в
соответствии с записываемой
сценой (Режим сцены)…………………….. 64
• [ЕДА] ……………………………………….. 65
DMC-FZ18-RUS.book 5 ページ 2007年7月18日 水曜日 午後6時43分

6
VQT1F98
• [ВЕЧЕРИНКА] …………………………… 65
• [СВЕЧИ] ……………………………………. 66
• [ЗАКАТ]…………………………………….. 66
• [ВЫС. ЧУВСТВ.]………………………… 66
• [РЕБЕНОК1]/[РЕБЕНОК2] …………. 67
• [ДОМ.ЖИВОТНОЕ]……………………. 68
• [ПАНОРАМИРОВ.]…………………….. 68
• [ЗВЕЗДНОЕ НЕБО]……………………. 69
• [ФЕЙЕРВЕРК] …………………………… 70
• [ПЛЯЖ] …………………………………….. 71
• [СНЕГ]………………………………………. 71
• [АЭРОСЪЕМКА] ……………………….. 71
Режим видео ………………………………….. 72
При съемке записывается день
отпуска, когда была сделана
фотография……………………………………. 74
Отображение времени в пункте
назначения поездки
(Мировое Время)…………………………….. 76
Использование меню [ЗАП.] ……………. 78
• [БАЛ. БЕЛ.] ……………………………….. 79
• [НАСТР.БАЛ.БЕЛ.]…………………….. 80
• [ИНТЕЛЛ.УПР.ISO] ……………………. 81
• [СВЕТОЧУВСТ.] ………………………… 82
• [ФОРМАТ]…………………………………. 83
• [РАЗР. КАДРА]/[КАЧЕСТВО] ……… 83
• [ЗАП. ЗВУКА] ……………………………. 85
• [РЕЖИМ ЗАМЕРА] ……………………. 86
• [РЕЖИМ АФ] …………………………….. 86
• [СТАБИЛИЗ.]…………………………….. 89
• [НЕПРЕР. АФ] …………………………… 90
• [ВСП. ЛАМП. АФ] ………………………. 90
• [БЛОКИР. AФ/AЭ] ……………………… 91
• [ЦВЕТ. ЭФФЕКТ] ………………………. 92
• [НАСТР. ИЗОБР.]………………………. 92
• [АНИМАЦИЯ] ……………………………. 92
• [ПРЕОБ. ЛИНЗА] ………………………. 94
Расширенные сведения
(Воспроизведение)
Отображение нескольких экранов
(многооконное воспроизведение)……. 97
Отображение в порядке даты съемки
(Воспроизведение в хронологическом
порядке) …………………………………………. 98
Использование функции увеличения
при воспроизведении ……………………….. 99
Воспроизведение видео/
снимков со звуком………………………… 100
Создание фотоснимков из видео ….. 101
Использование меню [ВОСП.] ……….. 103
• [ПОК. СЛАЙД.] ………………………… 103
• [КАТЕГОРИЯ] …………………………. 105
• [ПОВЕРН. ЖКД]/[ПОВЕРН.] …….. 107
• [ИЗБРАННОЕ]…………………………. 108
• [РЕД ЗАГОЛ ……………………………. 109
• [ОТПЕЧ СИМВ] ……………………….. 111
• [DPOF ПЕЧ.] ……………………………. 113
• [ЗАЩИТИТЬ] …………………………… 115
• [ДУБЛ. ЗВУК.] ………………………… 116
• [ИЗМ. РАЗР.] …………………………… 117
• [ПОДРЕЗКА]……………………………. 118
• [ИЗМ. ФОРМАТ]………………………. 119
• [КОПИЯ] …………………………………. 120
• [ФОРМАТИР.]………………………….. 121
Подсоединение к другому
оборудованию
Подсоединение к персональному
компьютеру ………………………………….. 122
Печать снимков ……………………………. 125
Воспроизведение фотоснимков
на экране телевизора …………………… 129
Другое
Использование защитного
устройства MC/фильтра ND ………….. 130
Вид экрана …………………………………… 131
Предосторожности при
использовании фотокамеры………….. 133
Сообщения …………………………………… 136
Устранение неисправностей …………. 138
Количество записываемых
снимков и доступное
время записи ………………………………… 144
Технические характеристики ………… 148
DMC-FZ18-RUS.book 6 ページ 2007年7月18日 水曜日 午後6時43分
Подготовка
7
VQT1F98
Подготовка
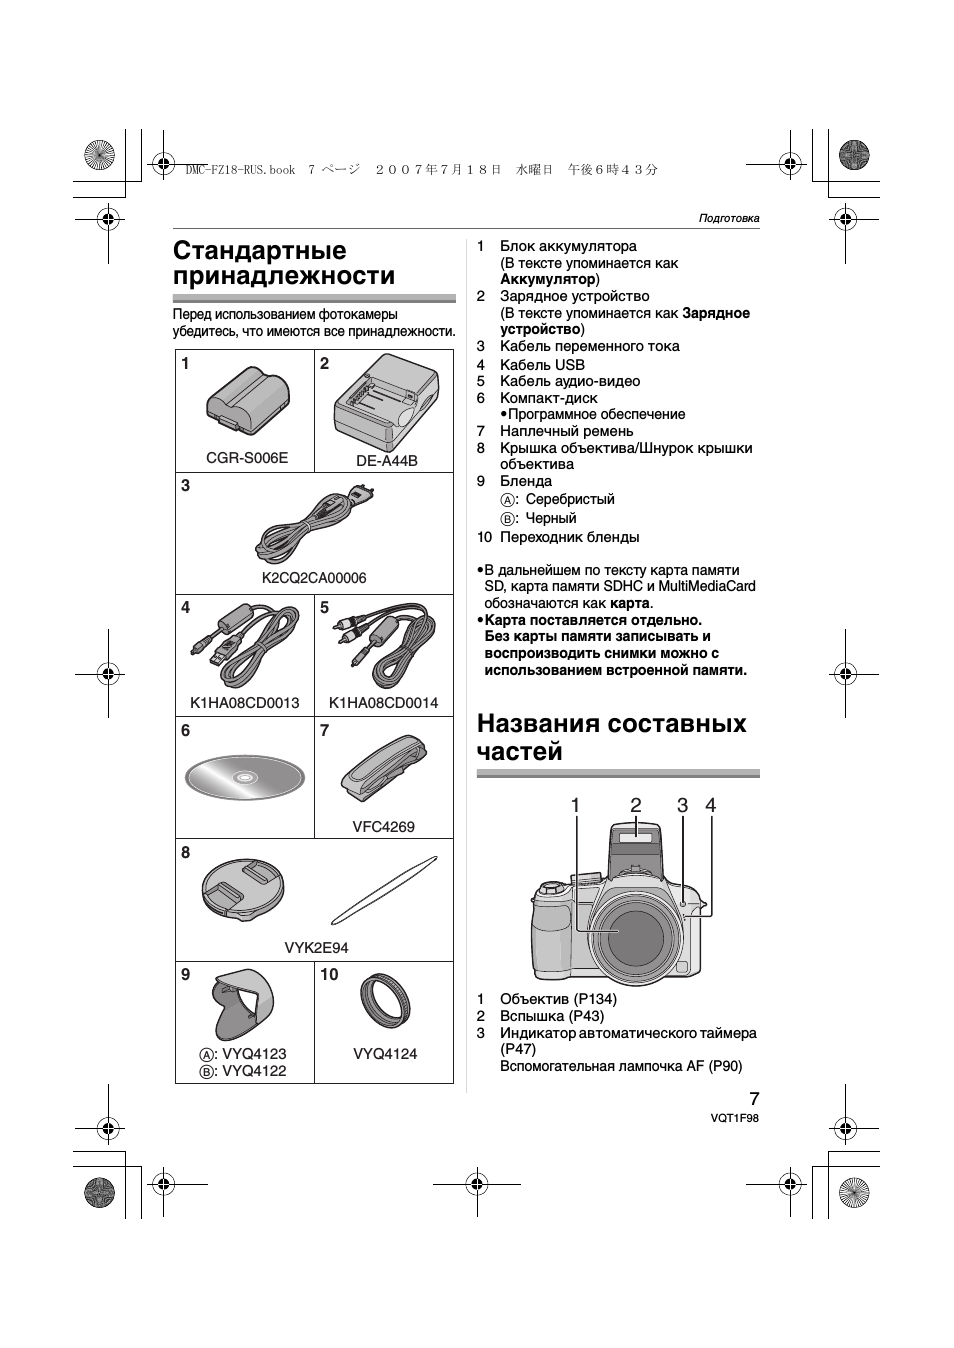
Стандартные
принадлежности
Перед использованием фотокамеры
убедитесь, что имеются все принадлежности.
1
Блок аккумулятора
(В тексте упоминается как
Aккумулятор)
2
Зарядное устройство
(В тексте упоминается как Зарядное
устройство
)
3
Кабель переменного тока
4
Кабель USB
5
Кабель аудио-видео
6
Компакт-диск
•Программное обеспечение
7
Наплечный ремень
8
Крышка объектива/Шнурок крышки
объектива
9
Бленда
A: Серебристый
B: Черный
10 Переходник бленды
•В дальнейшем по тексту карта памяти
SD, карта памяти SDHC и MultiMediaCard
обозначаются как карта.
•Карта поставляется отдельно.
Без карты памяти записывать и
воспроизводить снимки можно с
использованием встроенной памяти.
Названия составных
частей
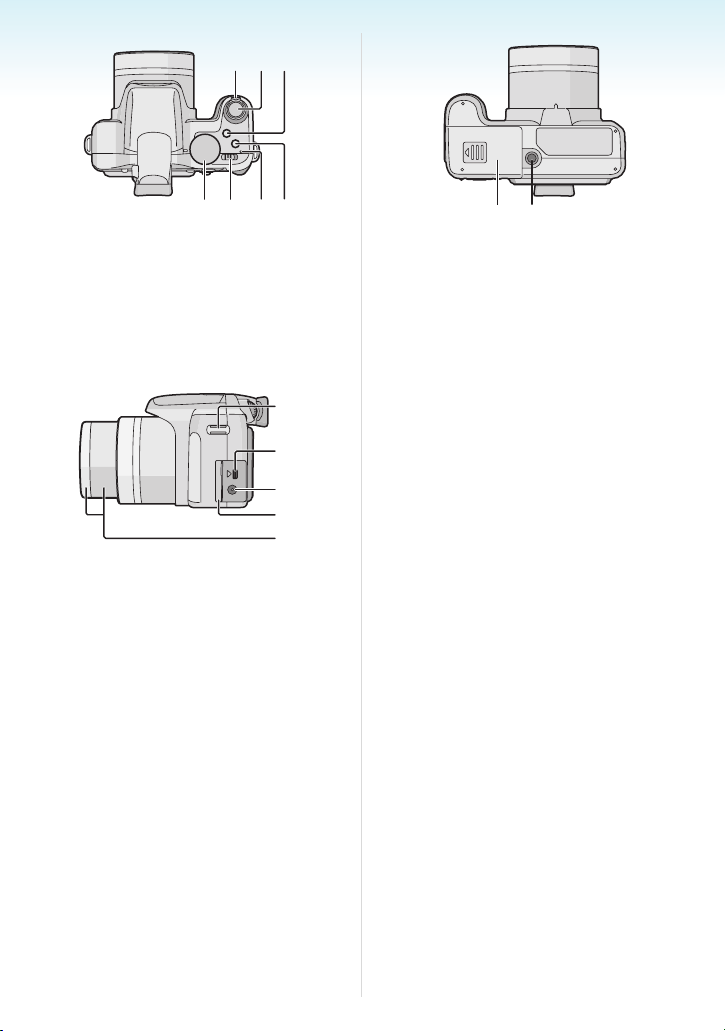
1
Объектив (P134)
2
Вспышка (P43)
3
Индикатор автоматического таймера
(P47)
Вспомогательная лампочка AF (P90)
K1HA08CD0013
K1HA08CD0014
K2CQ2CA00006
3
1
2
4
5
6
7
8
9
10
VFC4269
DE-A44B
VYK2E94
CGR-S006E
A: VYQ4123
B: VYQ4122
VYQ4124
1
2
3 4
DMC-FZ18-RUS.book 7 ページ 2007年7月18日 水曜日 午後6時43分
Подготовка
8
VQT1F98
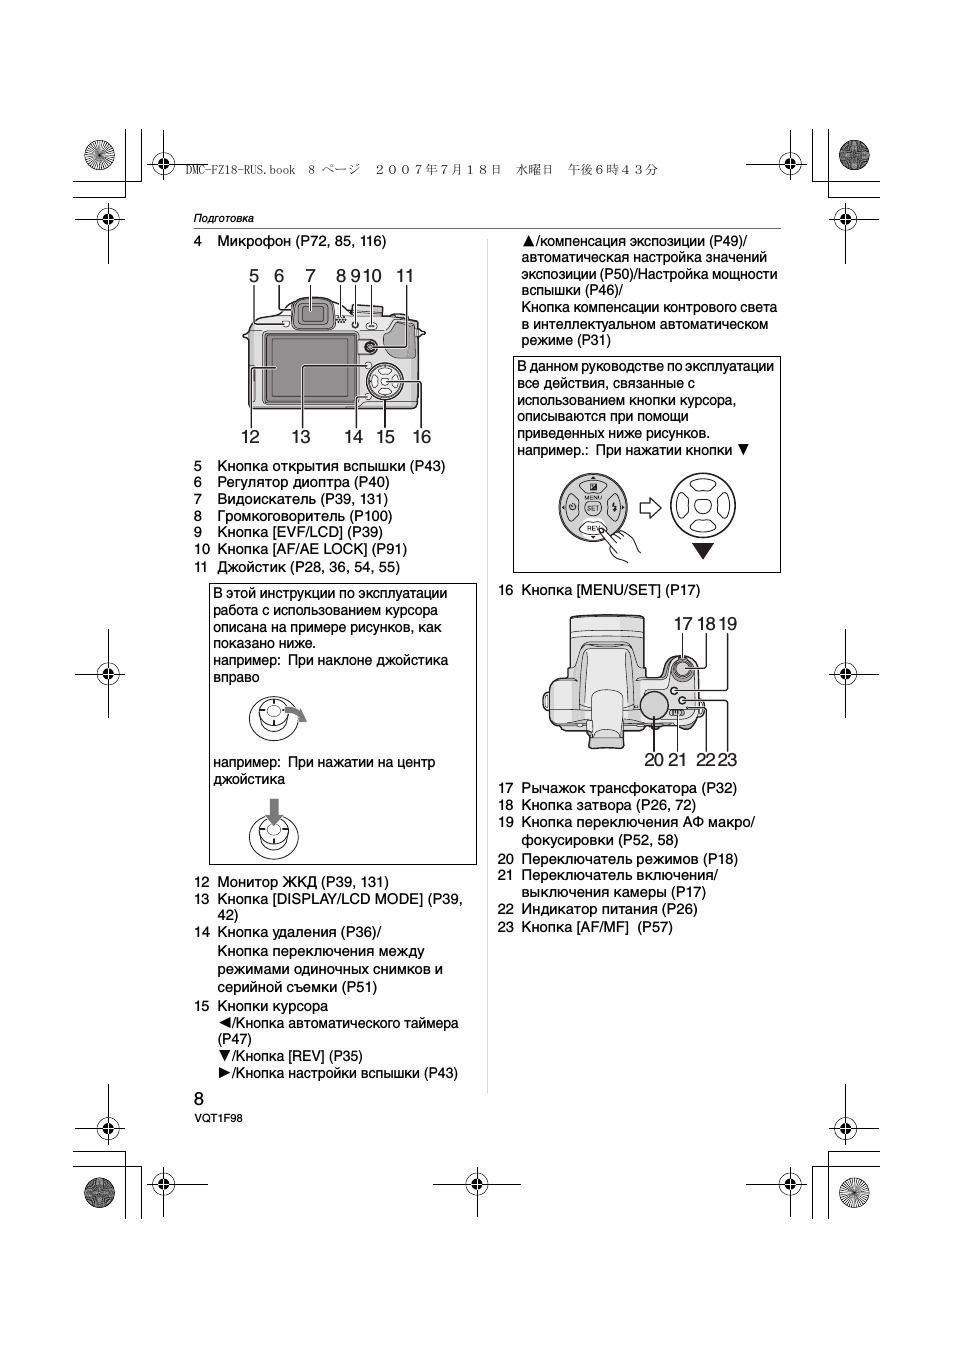
4
Микрофон (P72, 85, 116)
5
Кнопка открытия вспышки (P43)
6
Регулятор диоптра (P40)
7
Видоискатель (P39, 131)
8
Громкоговоритель (P100)
9
Кнопка [EVF/LCD] (P39)
10
Кнопка [AF/AE LOCK] (P91)
11 Джойстик (P28, 36, 54, 55)
12 Монитор ЖКД (P39, 131)
13 Кнопка [DISPLAY/LCD MODE] (P39,
42)
14
Кнопка удаления (P36)/
Кнопка переключения между
режимами одиночных снимков и
серийной съемки (P51)
15 Кнопки курсора
2/Кнопка автоматического таймера
(P47)
4/Кнопка [REV] (P35)
1/Кнопка настройки вспышки (P43)
3/компенсация экспозиции (P49)/
автоматическая настройка значений
экспозиции (P50)/Настройка мощности
вспышки (P46)/
Кнопка компенсации контрового света
в интеллектуальном автоматическом
режиме (P31)
16 Кнопка [MENU/SET] (P17)
17 Рычажок трансфокатора (P32)
18 Кнопка затвора (P26, 72)
19
Кнопка переключения АФ макро/
фокусировки (P52, 58)
20 Переключатель режимов (P18)
21 Переключатель включения/
выключения камеры (P17)
22
Индикатор питания (P26)
23
Кнопка [AF/MF] (P57)
В этой инструкции по эксплуатации
работа с использованием курсора
описана на примере рисунков, как
показано ниже.
например: При наклоне джойстика
вправо
например: При нажатии на центр
джойстика
8
13
11
12
14 15
10
9
5 6
7
16
В данном руководстве по эксплуатации
все действия, связанные с
использованием кнопки курсора,
описываются при помощи
приведенных ниже рисунков.
например.: При нажатии кнопки
4
20 21
23
17 18 19
22
DMC-FZ18-RUS.book 8 ページ 2007年7月18日 水曜日 午後6時43分
Подготовка
9
VQT1F98
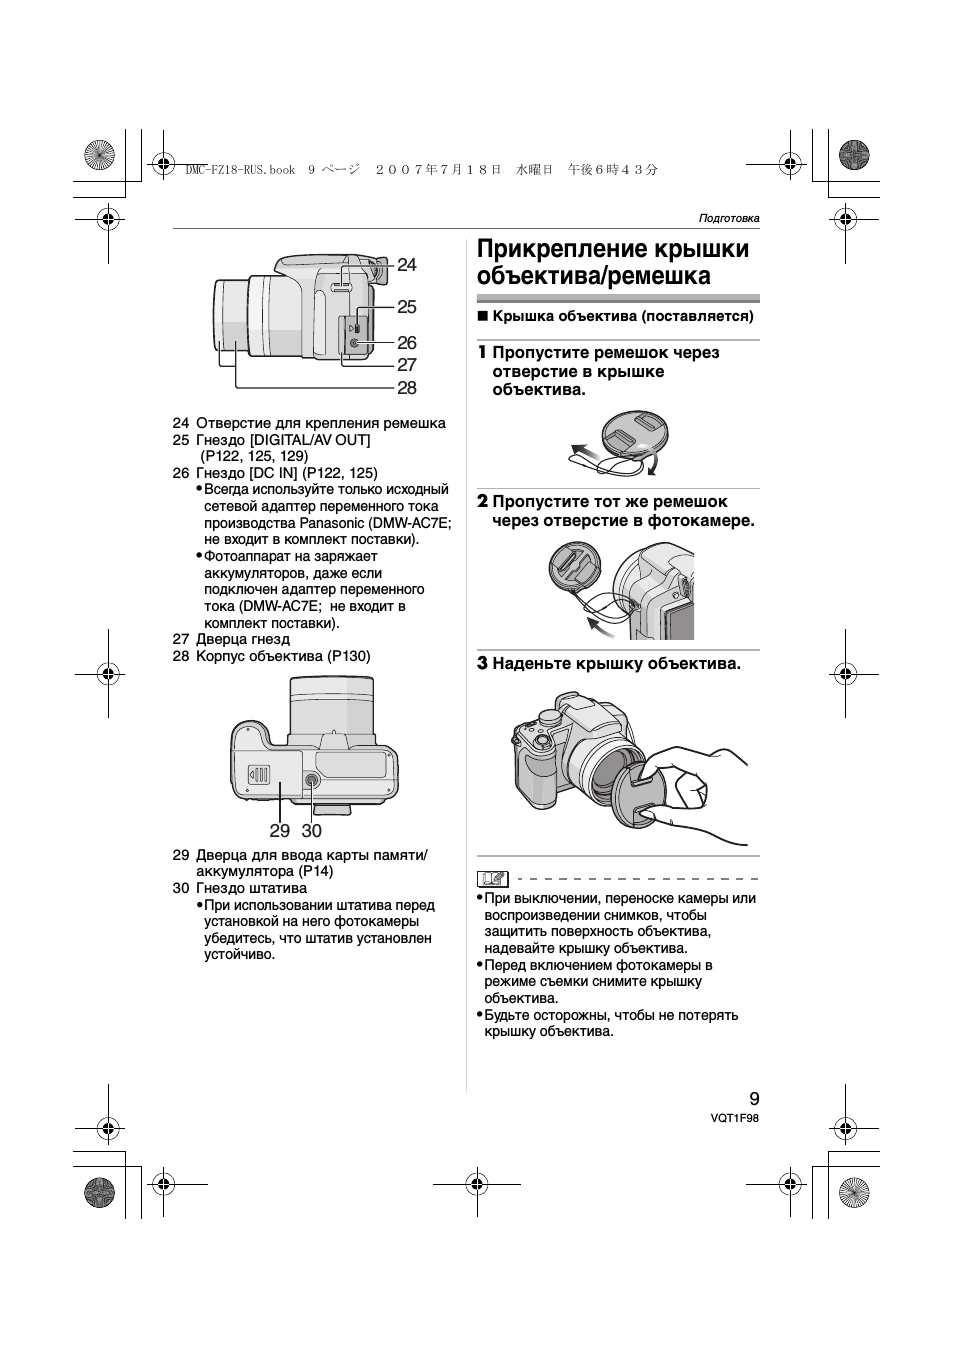
24 Отверстие для крепления ремешка
25 Гнездо [DIGITAL/AV OUT]
(P122, 125, 129)
26 Гнездо [DC IN] (P122, 125)
•
Всегда используйте только исходный
сетевой адаптер переменного тока
производства Panasonic (DMW-AC7E;
не входит в комплект поставки).
•
Фотоаппарат на заряжает
аккумуляторов, даже если
подключен адаптер переменного
тока (DMW-AC7E; не входит в
комплект поставки).
27 Дверца гнезд
28 Корпус объектива (P130)
29 Дверца для ввода карты памяти/
аккумулятора (P14)
30 Гнездо штатива
•При использовании штатива перед
установкой на него фотокамеры
убедитесь, что штатив установлен
устойчиво.
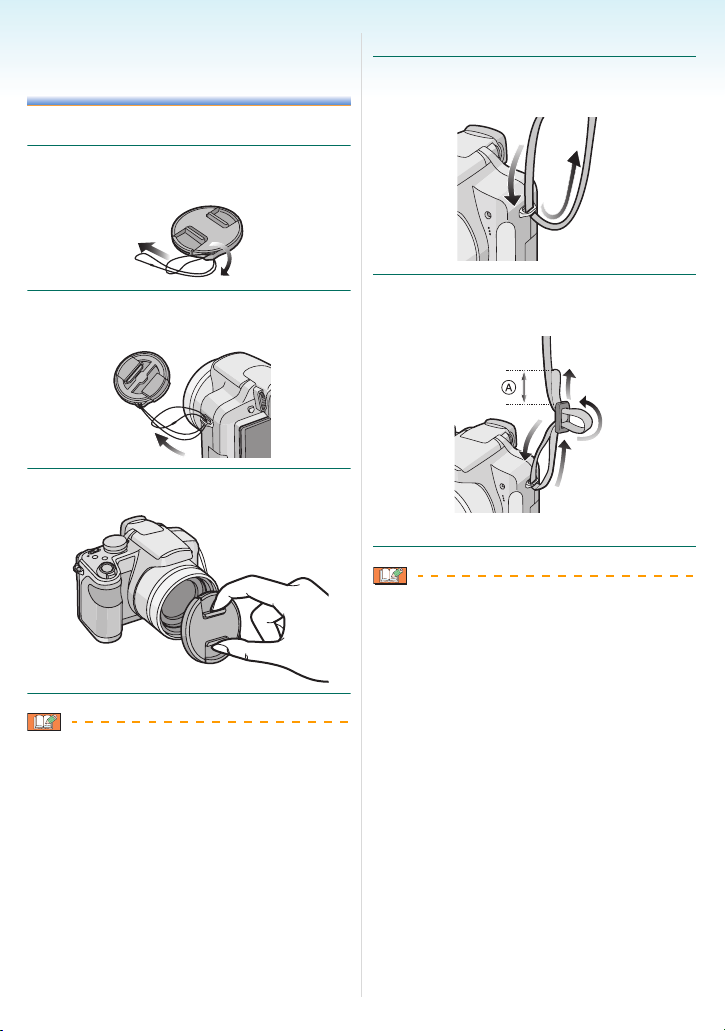
Прикрепление крышки
объектива/ремешка
∫ Крышка объектива (поставляется)
1 Пропустите ремешок через
отверстие в крышке
объектива.
2 Пропустите тот же ремешок
через отверстие в фотокамере.
3 Наденьте крышку объектива.
•
При выключении, переноске камеры или
воспроизведении снимков, чтобы
защитить поверхность объектива,
надевайте крышку объектива.
•
Перед включением фотокамеры в
режиме съемки снимите крышку
объектива.
•
Будьте осторожны, чтобы не потерять
крышку объектива.
25
26
27
24
28
29 30
DMC-FZ18-RUS.book 9 ページ 2007年7月18日 水曜日 午後6時43分
Подготовка
10
VQT1F98
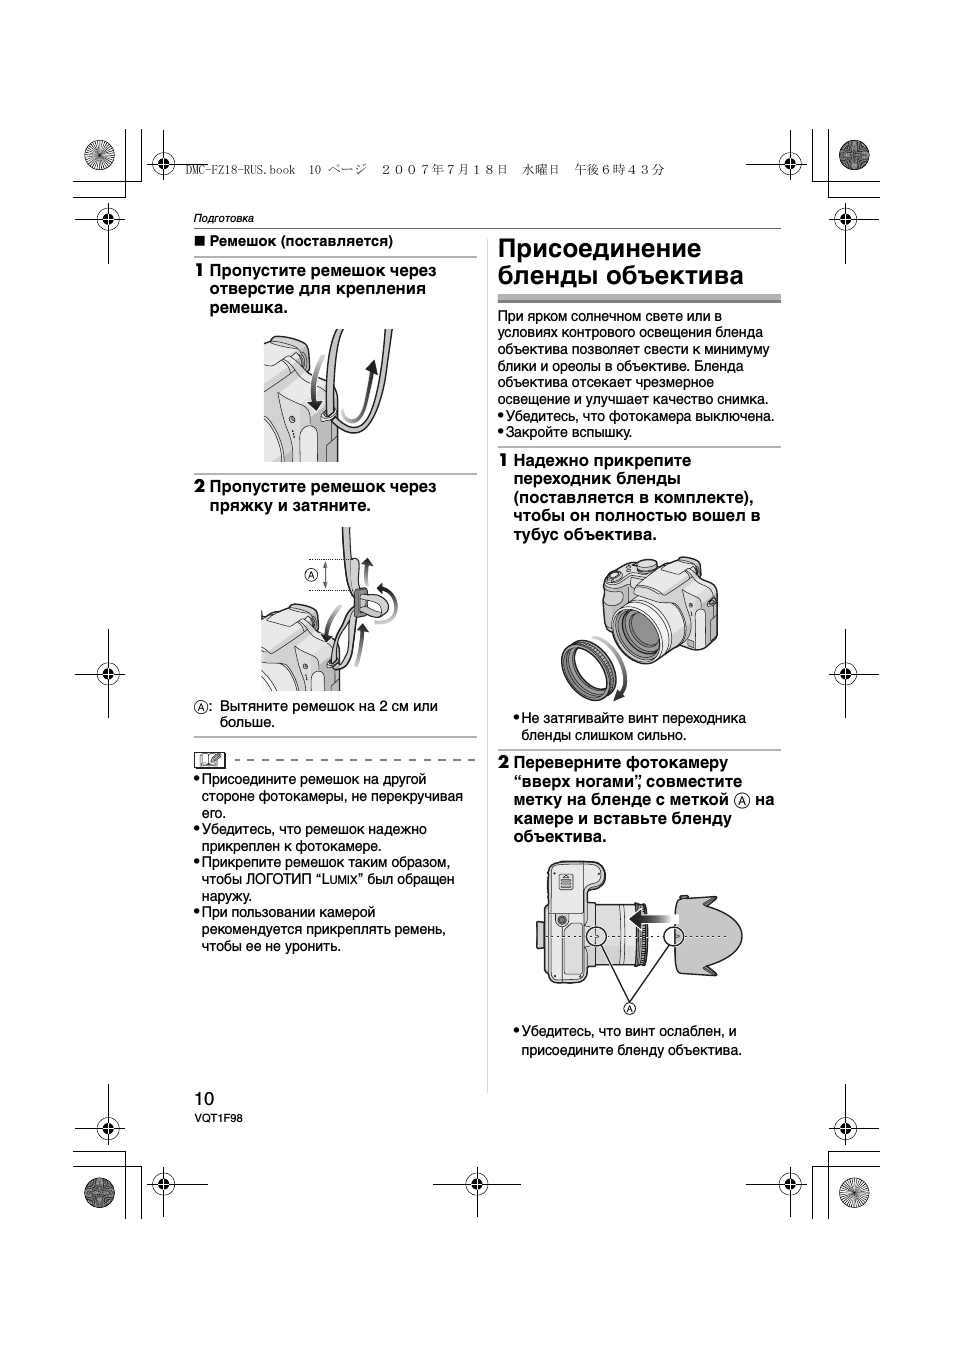
∫ Ремешок (поставляется)
1 Пропустите ремешок через
отверстие для крепления
ремешка.
2 Пропустите ремешок через
пряжку и затяните.
A: Вытяните ремешок на 2 см или
больше.
•
Присоедините ремешок на другой
стороне фотокамеры, не перекручивая
его.
•
Убедитесь, что ремешок надежно
прикреплен к фотокамере.
•
Прикрепите ремешок таким образом,
чтобы ЛОГОТИП “L
UMIX
” был обращен
наружу.
•
При пользовании камерой
рекомендуется прикреплять ремень,
чтобы ее не уронить.
Присоединение
бленды объектива
При ярком солнечном свете или в
условиях контрового освещения бленда
объектива позволяет свести к минимуму
блики и ореолы в объективе. Бленда
объектива отсекает чрезмерное
освещение и улучшает качество снимка.
•
Убедитесь, что фотокамера выключена.
•
Закройте вспышку.
1 Надежно прикрепите
переходник бленды
(поставляется в комплекте),
чтобы он полностью вошел в
тубус объектива.
•
Не затягивайте винт переходника
бленды слишком сильно.
2 Переверните фотокамеру
“вверх ногами”, совместите
метку на бленде с меткой
A на
камере и вставьте бленду
объектива.
•
Убедитесь, что винт ослаблен, и
присоедините бленду объектива.
DMC-FZ18-RUS.book 10 ページ 2007年7月18日 水曜日 午後6時43分
16:46
обзор lumix dmc-fz50
09:34
Panasonic Lumix DMC FZ18 review
11:06
Panasonic Lumix DMC-FZ18
03:12
Panasonic Lumix DMC-FZ18
08:25
Почему камера PANASONIC, а не что-то другое? ????
05:40
Panasonic FZ28 Lumix digital camera 10.1mp review
01:44
camara Panasonic Lumix Dmc Fz18 Optico 18x, Leica 8.1 Mp
Нажмите на кнопку для помощи

Cover
Operating Instructions
Digital Camera
Model No. DMC-FZ18
Before use, please read these
instructions completely.
QuickTime and the QuickTime logo are trademarks
or registered trademarks of Apple Inc., used under
license therefrom.
VQT1K47

Before Use
Dear Customer,
We would like to take this opportunity to thank
you for purchasing this Panasonic Digital
Camera. Please read these Operating
Instructions carefully and keep them handy
for future reference.
Before Use
Information for Your
Safety
WARNING:
TO REDUCE THE RISK OF FIRE,
ELECTRIC SHOCK OR PRODUCT
DAMAGE,
• DO NOT EXPOSE THIS APPARATUS
TO RAIN, MOISTURE, DRIPPING OR
SPLASHING AND THAT NO
OBJECTS FILLED WITH LIQUIDS,
SUCH AS VASES, SHALL BE
PLACED ON THE APPARATUS.
• USE ONLY THE RECOMMENDED
ACCESSORIES.
• DO NOT REMOVE THE COVER (OR
BACK); THERE ARE NO USER
SERVICEABLE PARTS INSIDE.
REFER SERVICING TO QUALIFIED
SERVICE PERSONNEL.
Carefully observe copyright laws.
Recording of pre-recorded tapes or discs
or other published or broadcast material
for purposes other than your own private
use may infringe copyright laws. Even for
the purpose of private use, recording of
certain material may be restricted.
• Please note that the actual controls and
components, menu items, etc. of your Digital
Camera may look somewhat different from
those shown in the illustrations in these
Operating Instructions.
• SDHC Logo is a trademark.
• Leica is a registered trademark of Leica
Microsystems IR GmbH.
• Elmarit is a registered trademark of Leica
Camera AG.
• Other names, company names, and product
names printed in these instructions are
trademarks or registered trademarks of the
companies concerned.
THE SOCKET OUTLET SHALL BE
INSTALLED NEAR THE EQUIPMENT
AND SHALL BE EASILY ACCESSIBLE.
CAUTION
Danger of explosion if battery is
incorrectly replaced. Replace only with
the same or equivalent type
recommended by the manufacturer.
Dispose of used batteries according to
the manufacturer’s instructions.
Warn ing
Risk of fire, explosion and burns. Do not
disassemble, heat above 60 xC or
incinerate.
Product Identification Marking is located
on the bottom of units.
— 2 —
Before Use
-If you see this symbol-
Information on Disposal for Users of Waste Electrical & Electronic Equipment (private
households)
This symbol on the products and/or accompanying documents means that
used electrical and electronic products should not be mixed with general
household waste.
For proper treatment, recovery and recycling, please take these products
to designated collection points, where they will be accepted on a free of
charge basis. Alternatively, in some countries you may be able to return
your products to your local retailer upon the purchase of an equivalent
new product.
Disposing of this product correctly will help to save valuable resources and
prevent any potential negative effects on human health and the environment which could
otherwise arise from inappropriate waste handling. Please contact your local authority for
further details of your nearest designated collection point.
Penalties may be applicable for incorrect disposal of this waste, in accordance with national
legislation.
For business users in the European Union
If you wish to discard electrical and electronic equipment, please contact your dealer or
supplier for further information.
Information on Disposal in other Countries outside the European Union
This symbol is only valid in the European Union.
If you wish to discard this product, please contact your local authorities or dealer and ask for
the correct method of disposal.
∫ About the battery charger
CAUTION!
• DO NOT INSTALL OR PLACE THIS
UNIT IN A BOOKCASE, BUILT-IN
CABINET OR IN ANOTHER CONFINED
SPACE. ENSURE THE UNIT IS WELL
VENTILATED. TO PREVENT RISK OF
ELECTRIC SHOCK OR FIRE HAZARD
DUE TO OVERHEATING, ENSURE
THAT CURTAINS AND ANY OTHER
MATERIALS DO NOT OBSTRUCT THE
VENTILATION VENTS.
• DO NOT OBSTRUCT THE UNIT’S
VENTILATION OPENINGS WITH
NEWSPAPERS, TABLECLOTHS,
CURTAINS, AND SIMILAR ITEMS.
• DO NOT PLACE SOURCES OF NAKED
FLAMES, SUCH AS LIGHTED
CANDLES, ON THE UNIT.
• DISPOSE OF BATTERIES IN AN
ENVIRONMENTALLY FRIENDLY
MANNER.
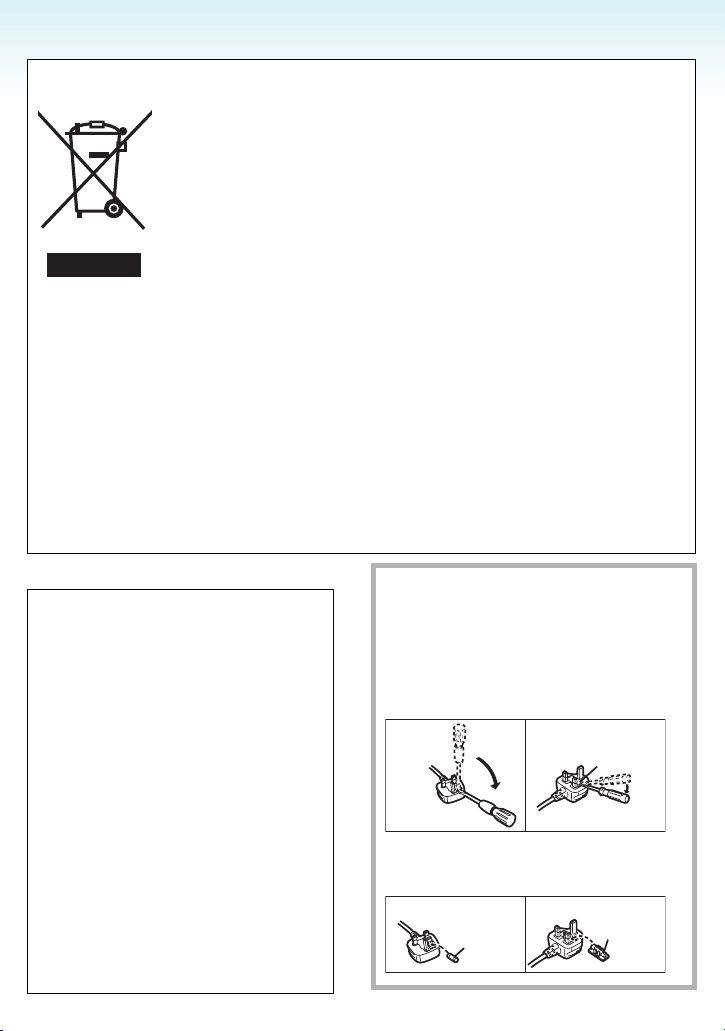
∫ How to replace the Fuse
The location of the fuse differ according to
the type of AC cable (figures A and B).
Confirm the AC cable fitted and follow the
instructions below.
Illustrations may differ from actual AC cable.
1 Open the fuse cover with a screwdriver.
Figure A Figure B
2 Replace the fuse and close or attach
the fuse cover.
Figure A Figure B
Fuse
(5 ampere)
— 3 —
Fuse cover
Fuse
(5 ampere)

Before Use
• The battery charger is in the standby
condition when the AC power is supplied.
The primary circuit is always “live” as long as
the battery charger is connected to an
electrical outlet.
∫ Care of the camera
• Do not strongly shake or bump the
camera by dropping it etc.
This unit may malfunction, recording pictures
may no longer be possible or the lens or the
LCD monitor may be damaged.
• Retract the lens before carrying the camera
or playing back pictures.
• Be particularly careful in the following
places as they may cause this unit to
malfunction.
– Places with a lot of sand or dust.
– Places where water can come into contact
with this unit such as when using it on a
rainy day or on a beach.
• Do not touch the lens or the sockets with
dirty hands. Also, be careful not to allow
liquids to get into the space around the
lens, buttons etc.
• If water or seawater splashes on the
camera, use a dry cloth to wipe the
camera body carefully.
∫ About Condensation (When the lens or
the Viewfinder is fogged up)
• Condensation occurs when the ambient
temperature or humidity changes. Be careful
of condensation since it causes lens stains,
fungus and camera malfunction.
• If condensation occurs, turn the camera off
and leave it for about 2 hours. The fog will
disappear naturally when the temperature of
the camera becomes close to the ambient
temperature.
∫ Read together with the “Cautions for
Use”. (P155)
∫ About cards that can be used in this unit
You can use an SD Memory Card, an SDHC
Memory Card and a MultiMediaCard.
• When the term card is used in these
operating instructions this refers to the
following types of Memory Cards.
– SD Memory Card (8 MB to 2 GB)
– SDHC Memory Card (4 GB)
– MultiMediaCard (still pictures only)
More specific information about memory
cards that can be used with this unit.
• You can only use an SDHC Memory Card if
using cards with 4 GB or more capacity.
• A 4 GB Memory Card without an SDHC logo
is not based on the SD Standard and will not
work in this product.
OK
44
Please confirm the latest information on the
following website.
http://panasonic.
(This Site is English only.)
co.jp/pavc/global/cs
— 4 —

Contents
Advanced (Recording pictures)
Before Use
Information for Your Safety…………………..2
Preparation
Standard Accessories ………………………….7
Names of the Components …………………..8
Attaching the Lens Cap/Strap ……………..10
Attaching the Lens Hood…………………….11
Quick Guide ……………………………………..13
Charging the Battery with the Charger…. 14
About the Battery (charging/number of
recordable pictures) …………………………..15
Inserting and Removing the Card
(optional)/the Battery………………………….17
About the Built-in Memory/the Card
(optional) ………………………………………….18
Setting Date/Time (Clock Set)……………..19
• Changing the clock setting …………….20
About the Mode Dial…………………………..21
Setting the Menu……………………………….23
About the Setup Menu ……………………….25
LCD Monitor/Viewfinder Display/
Switching the LCD Monitor/Viewfinder
Display …………………………………………….29
Basic
Taking Pictures …………………………………31
Taking pictures using the automatic
function (Intelligent Auto Mode) …………..35
Taking Pictures with the Zoom…………….38
• Using the Optical Zoom ………………..38
• Using the Extra Optical Zoom (EZ) … 39
• Using the Digital Zoom
Further extending the zoom………….. 40
Checking the Recorded Picture
(Review)…………………………………………..41
Playing back/Deleting Pictures……………. 42
About the LCD Monitor/Viewfinder……….45
• Changing the information
displayed…………………………………….45
• Brightening the LCD Monitor ………….48
Taking Pictures using the Built-in
Flash………………………………………………..50
Taking Pictures with the Self-timer……….55
Compensating the Exposure ……………….57
Taking Pictures using Auto Bracket ……..59
Taking Pictures using Burst Mode………..60
Taking Close-up Pictures……………………62
Aperture-priority AE ……………………………64
Shutter-priority AE ……………………………..64
Manual exposure……………………………….65
Aperture Value and Shutter Speed ………66
Taking Pictures with Manual Focus………67
Registering Personal Menu Settings
(Registering custom settings)………………70
Taking pictures in Custom mode ………….71
Taking expressive portraits and
landscape pictures
(Advanced scene mode) …………………….72
• [PORTRAIT]………………………………..73
• [SCENERY]…………………………………74
• [SPORTS] …………………………………..74
• [NIGHT PORTRAIT]……………………..75
Taking pictures that match the scene
being recorded (Scene mode) ……………..76
• [FOOD] ………………………………………77
• [PARTY] ……………………………………..77
• [CANDLE LIGHT] …………………………78
• [SUNSET]……………………………………78
• [HIGH SENS.] ……………………………..79
• [BABY1]/[BABY2] …………………………79
• [PET] ………………………………………….80
• [PANNING]………………………………….81
• [STARRY SKY] ……………………………82
• [FIREWORKS] …………………………….83
• [BEACH]……………………………………..84
• [SNOW] ………………………………………85
• [AERIAL PHOTO]…………………………85
Motion Picture Mode ………………………….86
Recording which Day of the Vacation
You Take the Picture………………………….88
— 5 —

Displaying the Time at the Travel
Destination (World Time) ……………………90
Using the [REC] Mode Menu ………………92
• [W.BALANCE]……………………………..93
• [WB ADJUST.] …………………………….95
• [INTELLIGENT ISO]……………………..96
• [SENSITIVITY] …………………………….97
• [ASPECT RATIO]…………………………97
• [PICT.SIZE]/[QUALITY] ………………..98
• [AUDIO REC.]……………………………100
• [METERING MODE] …………………..100
• [AF MODE]………………………………..101
• [STABILIZER] ……………………………104
• [CONT.AF] ………………………………..105
• [AF ASSIST LAMP]…………………….105
• [AF/AE LOCK]……………………………106
• [COL.EFFECT]…………………………..107
• [PICT.ADJ.]……………………………….108
• [FLIP ANIM.] ……………………………..109
• [CONVERSION]…………………………111
Advanced (Playback)
Displaying Multiple Screens
(Multi Playback)………………………………. 113
Displaying Pictures by Recording Date
(Calendar Playback)…………………………114
Using the Playback Zoom …………………115
Playing Back Motion Pictures/Pictures
with Audio……………………………………….116
Creating still pictures from a motion
picture ……………………………………………118
Using the [PLAY] mode menu…………… 120
• [SLIDE SHOW] ………………………….121
• [CATEGORY]…………………………….122
• [ROTATE DISP.]/[ROTATE] ………..125
• [FAVORITE]………………………………127
• [TITLE EDIT]……………………………..128
• [TEXT STAMP] ………………………….130
• [DPOF PRINT] …………………………..132
• [PROTECT]……………………………….134
• [AUDIO DUB.] …………………………..135
• [RESIZE]…………………………………..136
• [TRIMMING]………………………………137
• [ASPECT CONV.] ………………………138
• [COPY]……………………………………..139
• [FORMAT]…………………………………140
Connecting to other equipment
Connecting to a PC ………………………….142
Printing the Pictures…………………………145
Playing Back Pictures on a TV
Screen……………………………………………150
Others
Using the MC Protector/ND Filter……….151
Screen Display ………………………………..152
Cautions for Use………………………………155
Message Display ……………………………..158
Troubleshooting……………………………….160
Number of Recordable Pictures and
Available Recording Time …………………167
Specifications ………………………………….171
— 6 —

Preparation
Preparation
Standard Accessories
Check that all the accessories are included
before using the camera.
1 Battery Pack
(Indicated as battery in the text)
2 Battery Charger
(Indicated as charger in the text)
3 AC Cable
4 USB Connection Cable
5AV Cable
6 CD-ROM
• Software
7 CD-ROM
• Operating Instructions
8 Shoulder Strap
9 Lens Cap/Lens Cap String
10 Lens Hood
11 Hood Adaptor
• The accessories and their shape will differ
depending on the country or area where the
camera was purchased.
• SD Memory Card, SDHC Memory Card and
MultiMediaCard are indicated as card in the
text.
• The card is optional.
You can record or play back pictures on
the built-in memory when you are not
using a card.
For the United Kingdom and Continental
Europe
Notice about the rechargeable battery
The battery is designated recyclable.
Please follow your local recycling
regulations.
— 7 —

Names of the
Components
1234
Preparation
In these operating instructions, the
operations using the joystick are
described as illustrated below shown.
e.g.: When you tilt the joystick right
e.g.: When you press the centre of the
joystick
1 Lens (P156)
2Flash (P50)
3 Self-timer indicator (P55)
AF assist lamp (P105)
4 Microphone (P86, 100, 135)
8
10956 7
13
12 14 15
5 Flash open button (P50)
6 Diopter adjustment dial (P46)
7 Viewfinder (P45, 152)
8 Speaker (P117)
9 [EVF/LCD] button (P45)
10 [AF/AE LOCK] button (P106)
11 Joystick (P34, 42, 64, 65)
11
12 LCD monitor (P45, 152)
13 [DISPLAY/LCD MODE] button (P45, 48)
14 Delete button (P42)/
Single or burst mode button (P60)
15 Cursor buttons
2/Self-timer button (P55)
4/[REV] button (P41)
1/Flash setting button (P50)
3/Exposure compensation (P57)/
Auto bracket (P59)/Flash output
adjustment (P53)/
Backlight compensation in intelligent auto
mode (P37) button
In these operating instructions,
1
operations using the cursor button are
described with illustrations below.
e.g.: When you press the 4 button
16 [MENU/SET] button (P19)
— 8 —
17 18 1
20 21 2
22
17 Zoom lever (P38)
18 Shutter button (P31, 86)
19 AF macro/Focus switch button (P62, 68)
20 Mode dial (P21)
21 Camera ON/OFF switch (P19)
22 Power lamp (P31)
23 [AF/MF] button (P67)
2
2
2
2
2
24 Strap eyelet
25 [DIGITAL/AV OUT] socket (P142, 145,
150)
26 [DC IN] socket (P142, 145)
• Always use a genuine Panasonic AC
adaptor (optional).
• This camera cannot charge the battery
even though the AC adaptor (optional) is
connected to it.
27 Terminal door
28 Lens barrel (P151)
Preparation
29 30
29 Card/Battery door (P17)
30 Tripod receptacle
• When you use a tripod, make sure the
tripod is stable when the camera is
attached to it.
— 9 —
Preparation
Attaching the Lens Cap/
Strap
∫ Lens Cap (supplied)
1 Pass the string through the hole on
the lens cap.
∫ Strap (supplied)
1 Pass the strap through the hole at
the strap eyelet.
2 Pass the same string through the
hole on the camera.
3 Attach the lens cap.
• When you turn the camera off, carry the
camera or play back the pictures, attach the
lens cap to protect the surface of the lens.
• Detach the lens cap before turning on the
camera in the recording mode.
• Be careful not to lose the lens cap.
2 Pass the strap through the stopper
and fasten the strap.
A: Pull the strap 2 cm or more.
• Attach the strap to the other side of the
camera being careful not to twist it.
• Check that the strap is firmly attached to the
camera.
• Attach the strap so that the “L
on the outside.
• We recommend attaching the strap when
using the camera to prevent it from dropping.
UMIX” LOGO is
— 10 —

Preparation
Attaching the Lens
Hood
In bright sunlight or backlight, the lens hood
will minimise lens flare and ghosting. The lens
hood cuts off excess lighting and improves
the picture quality.
• Check that the camera is turned off.
• Close the flash.
1 Securely attach the hood adaptor
(supplied) so that it is all the way
into the lens barrel.
• Do not tighten the hood adaptor too much.
2 Place the camera upside down,
align the mark on the lens hood
with the mark A on the camera and
then insert the lens hood.
3 Tighten the screw.
• Do not tighten the screw too much.
∫ Removing the hood adaptor
• Grasp the base of the hood adaptor to
remove it.
• Check if the screw is loose and then
attach the lens hood.
— 11 —

Preparation
• You cannot attach the lens hood the
opposite way.
• When taking pictures with flash with the lens
hood attached, the lower portion of the photo
may turn dark (vignetting effect) and the
control of the flash may be disabled because
the photo flash may be obscured by the lens
hood. We recommend detaching the lens
hood.
• When using the AF assist lamp in the dark,
detach the lens hood.
• For details on how to attach the MC
protector and the ND filter, refer to P151.
• You cannot attach the tele conversion lens
and the close-up lens when the hood
adaptor is attached.
• For information about [CONVERSION], refer
to P111.
• Consult the dealer or your nearest Service
Centre if you lose the supplied accessories.
(You can purchase the accessories
separately.)
— 12 —

Preparation
Quick Guide
This is an overview of how to record and play
back pictures with the camera. For each step,
be sure to refer to the pages indicated in
brackets.
1 Charge the battery. (P14)
plug-in type
inlet type
• The battery is not charged when the
camera is shipped. Charge the battery
before use.
2 Insert the battery and the card.
(P17)
3 Turn the camera on to take pictures.
• Set the clock. (P19)
CUSTOM
OFF ON
1 Set the mode dial to [ ].
2 Press the shutter button to take pictures.
(P31)
4 Play back the pictures.
CUSTOM
1 Set the mode dial to [ ].
2 Select the picture you want to view. (P42)
• When you do not use the card, you can
record or play back pictures on the
built-in memory. (P18) Refer to P18
when you use a card.
— 13 —

Charging the Battery
with the Charger
The battery is not charged when the
camera is shipped. Charge the battery
before use.
1 Insert the battery terminals and
attach the battery to the charger.
2 Connect the charger to the
electrical outlet.
plug-in type
inlet type
• The AC cable does not fit entirely into the
AC input terminal. A gap will remain as
shown below.
Preparation
• Charging is complete when the
[CHARGE] indicator A turns off (after
about 120 minutes).
• When the [CHARGE] indicator flashes,
read P15.
3 Detach the battery after charging is
completed.
• After charging is completed, be sure to
disconnect the power supply device from the
electrical outlet.
• The battery becomes warm after using it and
during and after charging. The camera also
becomes warm during use. This is not a
malfunction.
• The battery will be exhausted if left for a long
period of time after being charged.
Recharge the battery when it is exhausted.
• The battery can be charged even if it is not
fully discharged.
• Use the dedicated charger and battery.
• Charge the battery with the charger
indoors.
• Do not disassemble or modify the
charger.
• Do not leave any metal items (such as
clips) near the contact areas of the power
plug. Otherwise, a fire and/or electric
shocks may be caused by
short-circuiting or the resulting heat
generated.
• Charging starts when the [CHARGE]
indicator A lights green.
— 14 —

Preparation
About the Battery
(charging/number of recordable
pictures)
∫ The battery life
The number of recordable pictures
(By CIPA standard in programme AE mode
[])
Number of
recordable
pictures
Recording conditions by CIPA standard
• Temperature: 23 °C/
Humidity: 50% when LCD monitor is on.
• Using a Panasonic SD Memory Card
(16 MB).
• Using the supplied battery.
• Starting recording 30 seconds after the
camera is turned on. (When the optical
image stabilizer function is set to [MODE1].)
• Recording once every 30 seconds with full
flash every second recording.
• Rotating the zoom lever from Tele to Wide or
vice versa in every recording.
• Turning the camera off every 10 recordings
and leaving it until the temperature of the
battery decreases.
¢ The number of recordable pictures
decreases in Auto power LCD mode,
Power LCD mode and High angle mode
(P48).
• CIPA is an abbreviation of
[Camera & Imaging Products Association].
The number of recordable pictures
varies depending on the recording
interval time.
If the recording interval time becomes
longer, the number of recordable
pictures decreases.
[e.g. When recording once every
2 minutes, the number of recordable
pictures decreases to about 100.]
Approx. 400 pictures
(Approx. 200 min)
¢
The number of recordable pictures when
using the Viewfinder
(Recording conditions comply with CIPA
standard.)
Number of
recordable
pictures
Playback time when using the LCD
monitor
Playback
time
The number of recordable pictures and
playback time will vary depending on the
operating conditions and storing condition of
the battery.
∫ Charging
Charging
time
Charging time and number of recordable
pictures with the optional battery pack are the
same as above.
• The [CHARGE] indicator lights when
charging starts.
∫ When the [CHARGE] indicator flashes
• The battery is over discharged (discharged
excessively). In a while, [CHARGE] indicator
will light up and normal charging will start.
• The battery temperature is excessively high
or low. The charging time will be longer than
normal. Also, charging may not be
completed.
• The terminals of the charger or the battery
are dirty. In this case, wipe them with a dry
cloth.
• When the operating time of the camera
becomes extremely short even after properly
charging the battery, the life of the battery
may have expired. Buy a new battery.
Approx. 400 pictures
(Approx. 200 min)
Approx. 420 min
Approx. 120 min
— 15 —

∫ Charging conditions
• Charge the battery in a temperature
between 10 oC to 35 oC. (The battery
temperature should also be the same.)
• The performance of the battery may
temporarily deteriorate and the operating
time may become shorter in low temperature
conditions (e.g. skiing/snowboarding).
• The battery may swell and its operating time
may become shorter as the number of times
it is charged increases. For long term battery
use, we recommend you do not frequently
charge the battery before it is exhausted.
Preparation
— 16 —

Preparation
Inserting and Removing
the Card (optional)/the
Battery
• Check that this unit is turned off.
• Close the flash.
• Prepare a card. (optional)
• You can record or play back pictures on
the built-in memory when you are not
using a card.
1 Slide the card/battery door to open
it.
• Always use genuine Panasonic
batteries.
• If you use other batteries, we cannot
guarantee the quality of this product.
2 Battery:
Insert it fully being careful about
the direction you insert it.
Pull the lever A in the direction of
the arrow to remove the battery.
Card:
Push it fully until it clicks being
careful about the direction you
insert it.
To remove the card, push the card
until it clicks, then pull the card out
upright.
• Do not touch the connection terminals of
the card.
• The card may be damaged if it is not fully
inserted.
3 1:
Close the card/battery door.
2:
Slide the card/battery door to the
end and then close it firmly.
• If the card/battery door cannot be
completely closed, remove the card,
check its direction and then insert it again.
• Remove the battery after use.
• Do not remove the battery with the
camera turned on since the settings on
the camera may not be stored properly.
• The supplied battery is designed only for
the camera. Do not use it with any other
equipment.
• Do not insert or remove the battery or the
card while this unit is turned on. The data
on the built-in memory or the card may
be damaged. Be particularly careful while
the built-in memory or the card is being
accessed. (P29)
• We recommend using a Panasonic card.
— 17 —
Preparation
About the Built-in
Memory/the Card
(optional)
The built-in memory can be used as a
temporary storage device when the card
being used becomes full.
You can copy the recorded pictures to a
card. (P139)
∫ Built-in Memory [ ]
You can record or play back pictures with
the built-in memory. (The built-in memory
cannot be used when a card is inserted.)
• The built-in memory capacity is about
27 MB.
• Picture size is fixed to QVGA
(320k240 pixels) when recording motion
pictures to the built-in memory.
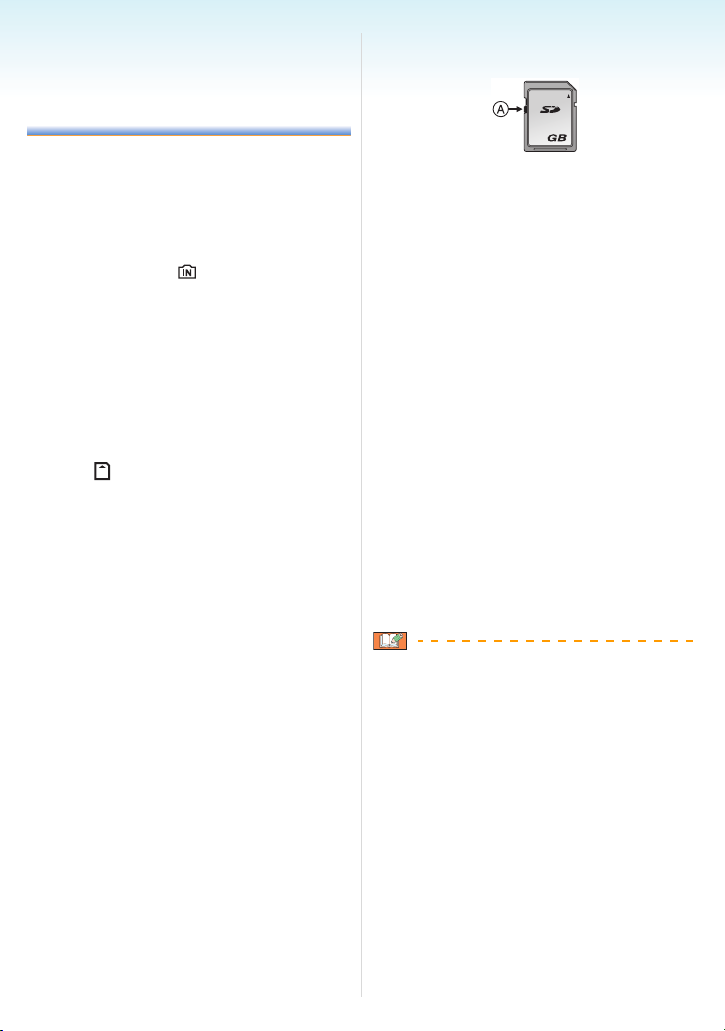
∫ Card [ ]
When a card is inserted, you can record or
play back pictures on a card.
∫ Card (optional)
• The SD Memory Card, SDHC Memory Card
and MultiMediaCard are small, lightweight,
removable external cards. Read P4 for
information about cards that can be used in
this unit.
• The SDHC Memory Card is a memory card
standard decided by the SD Association in
2006 for high capacity memory cards more
than 2 GB.
• The reading/writing speed of an SD Memory
Card and an SDHC Memory Card is fast.
Both types of card are equipped with a
Write-Protect switch A that prevents writing
and formatting the card. (If the switch is slid
to the [LOCK] side, it is not possible to write
or delete data on the card and format it.
When the switch is slid to the other side,
these functions become available.)
2
• This unit (SDHC compatible equipment) is
compatible with SD Memory Cards based on
SD Memory Card Specifications and
formatted in FAT12 system and FAT16
system. It is also compatible with SDHC
Memory Cards based on SD Memory Card
Specifications and formatted in FAT32
system.
• You can use an SDHC Memory Card in
equipment that is compatible with SDHC
Memory Cards however you cannot use an
SDHC Memory Card in equipment that is
only compatible with SD Memory Cards.
(Always read the operating instructions for
the equipment being used. If you also order
a photo studio to print pictures, ask the
photo studio before printing.) (P4)
• Refer to P167 for information about the
number of recordable pictures and the
available recording time for each Card.
• We recommend using High Speed SD
Memory Cards/SDHC Memory Cards when
recording motion pictures.
• The data on the built-in memory or the card
may be damaged or lost due to
electromagnetic waves, static electricity or
breakdown of the camera or the card. We
recommend storing important data on a PC
etc.
• Do not format the card on your PC or other
equipment. Format it on the camera only to
ensure proper operation. (P140)
• Keep the Memory Card out of reach of
children to prevent swallowing.
— 18 —

Setting Date/Time
(Clock Set)
∫ Initial setting
The clock is not set so the following screen
appears when you turn the camera on.
OFF ON
A [MENU/SET] button
B Cursor buttons
C Mode dial
Preparation
1 Press [MENU/SET].
2 Press 3/4/2/1 to select the date
and time.
:
:
A Time at the home area
B Time at the travel destination (P90)
• 2/1: Select the desired item.
• 3/4: Set the display order for the date
and time.
• : Cancel without setting the clock.
3 Press [MENU/SET] to set.
• Turn the camera off after setting the clock.
Then set the mode dial to a recording
mode to turn the camera on and check
whether or not the clock setting is correct.
— 19 —

Preparation
Changing the clock setting
1 Press [MENU/SET].
2 Press 3/4 to select [CLOCK SET].
3 Press 1 and then perform steps
to set the clock.
4 Press [MENU/SET] to close the menu.
• You can also set the clock in the [SETUP]
menu. (P25)
• When a fully charged battery has been
inserted for more than 24 hours, charging of
the built-in battery for the clock is completed
so the clock setting will be stored (in the
camera) for at least 3 months even if the
battery is removed. (If you insert a battery
that is not sufficiently charged, the length of
time that the clock setting is stored may
become less.) However the clock setting is
cancelled after this time. In this case, set the
clock again.
• You can set the year from 2000 to 2099. The
24-hour system is used.
• If the clock is not set, the correct date cannot
be printed when you stamp the date on the
pictures with [TEXT STAMP] (P130) or order
a photo studio to print the pictures.
• If the clock is set, the correct date can be
printed even if the date is not displayed on
the screen of the camera.
2 and 3
— 20 —

Preparation
About the Mode Dial
If you turn on this unit and then rotate the
mode dial, you can not only switch
between recording and playback but also
switch to a scene mode that matches your
recording purpose.
∫ Switching the mode by rotating the
mode dial
Align a desired mode with part A.
Rotate the mode dial slowly and surely to
adjust to each mode. (The mode dial rotates
360 o)
CUSTOM
∫ Basic
Programme AE mode (P31)
The exposure is automatically adjusted by
the camera.
Intelligent auto mode (P35)
Use this mode to have the camera
automatically handle all settings for taking
pictures.
Playback mode (P42)
This mode allows you to play back
recorded pictures.
∫ Advanced
Aperture-priority AE mode (P64)
The shutter speed is automatically
determined by the aperture value you set.
Shutter-priority AE mode (P64)
The aperture value is automatically
determined by the shutter speed you set.
Manual exposure mode (P65)
The exposure is adjusted by the aperture
value and the shutter speed which are
manually adjusted.
• The above screen B appears on the LCD
monitor/Viewfinder if the mode dial is
rotated. (P28)
The mode currently selected appears on the
LCD monitor/Viewfinder when the camera is
turned on.
Custom mode (P71)
Use this mode to take pictures with
previously registered settings.
Motion picture mode (P86)
This mode allows you to record motion
pictures.
Print mode (P145)
Use this to print pictures.
Scene mode (P76)
This allows you to take pictures that match
the scene being recorded.
— 21 —

Advanced scene mode
Portrait mode (P73)
Use this mode to take pictures of people.
Scenery mode (P74)
Use this mode to take pictures of scenery.
Sports mode (P74)
Use this mode to take pictures of sporting
events, etc.
Night portrait mode (P75)
Use this mode to take pictures of night
scenes and people with night time
scenery.
Preparation
— 22 —

Preparation
Setting the Menu
∫ Displaying the menu screens
Press [MENU/SET].
e.g.: The first page of the total 4 pages is
displayed.
B
A
A Menu icons
B Current page
C Menu items and settings
• Rotate the zoom lever while selecting the
menu item to switch to the next/previous
page easily.
• The menu icons and the menu items that are
displayed differ depending on the position of
the mode dial.
C
∫ About the menu icons
: The [CUSTOM] mode is displayed.
[REC] mode menu (P92)
This is displayed when the mode dial is
set to [ ]/[ ]/[ ]/[ ]/[ ]/[ ]/
[ ]/[ ]/[ ]/[ ]/[ ]/[ ].
[PLAY] mode menu (P120)
This is displayed when the mode dial is
set to [ ].
Advanced scene mode menu
(P72)
This is displayed when the mode dial is
set to [ ]/[ ]/[ ]/[ ].
[SCENE MODE] menu (P76)
This is displayed when the mode dial is
set to [ ].
[SETUP] menu (P25)
This is displayed when the mode dial is
set to [ ]/[ ]/[ ]/[ ]/[ ]/[ ]/
[ ]/[ ]/[ ]/[ ]/[ ]/[ ]/[ ].
[CUSTOM] mode menu (P71)
This is displayed when the mode dial is
set to [ ].
— 23 —

Preparation
∫ Setting menu items
• The following example shows how to set
[PICT.SIZE] when programme AE mode [ ]
is selected.
1 Press 3/4 to select the menu item.
∫ Closing the menu screen
Press [MENU/SET].
• When the mode dial is set to [ ]/[ ]/
[ ]/[ ]/[ ]/[ ]/[ ]/[ ]/[ ]/
[ ]/[ ]/[ ], you can also close the
menu screen by pressing the shutter
button halfway or press the centre of the
joystick to finish.
A
• Press 4 at A to switch to the next screen.
2 Press 1.
3 Press 3/4 to select the setting.
4 Press [MENU/SET] to set.
or
∫ Switching to the [SETUP] menu
1 Press 2 on a menu screen.
or
2 Press 4 to select the [SETUP]
menu icon.
or
or
3 Press 1.
or
• Select a menu item next and set it.
or
MENU
SET
or
— 24 —

Preparation
About the Setup Menu
• Set items as required.
• Select [RESET] to return the settings to the
initial settings at the time of purchase. (P27)
• [CLOCK SET], [AUTO REVIEW] and
[POWER SAVE] are important items.
Check their settings before using them.
[CLOCK SET] (P19)
(Changing the date and time.)
MENU
Press [ ] to display the [SETUP] menu and
SET
select the item to set. (P23)
Change date and time.
[AUTO REVIEW]
(Displaying the recorded picture.)
MENU
Press [ ] to display the [SETUP] menu and
SET
select the item to set. (P23)
Set the length of time that the picture is
displayed after taking it.
[OFF]
[1SEC.]
[3SEC.]
[ZOOM]: The picture is displayed for
1 second and then enlarged
4k and displayed for 1 more
second.
• The auto review function is not activated in
motion picture mode [ ].
• The auto review function is activated
regardless of its setting when using the auto
bracket (P59) and burst (P60) modes, as
well as when recording still pictures with
audio (P100). (The pictures are not
enlarged.)
• When the quality is set to [RAW] or
[RAWiJPEG], the auto review function
works until the end of recording onto the
card. (The picture is not enlarged.)
• The auto review setting is disabled when
using auto bracket or burst mode, in motion
picture mode [ ], when [AUDIO REC.] is
set to [ON] or when the quality is set to
[RAW] or [RAWiJPEG].
• In intelligent auto mode [ ], the auto
review function is fixed to [1SEC.].
[POWER SAVE]
(Turning off this unit automatically.)
MENU
Press [ ] to display the [SETUP] menu and
SET
select the item to set. (P23)
Power save mode is activated (the camera is
automatically turned off to save the battery
life) if the camera has not been used for the
time selected on the setting.
[1MIN.], [2MIN.], [5MIN.], [10MIN.], [OFF]
• Press the shutter button halfway or turn this
unit off and on to cancel power save mode.
• In intelligent auto mode [ ], power save
mode is fixed to [5MIN.].
• Power save mode is not activated in the
following cases.
– When using the AC adaptor (optional)
– When connecting to a PC or a printer
– When recording or playing back motion
pictures
– During a slide show
[WORLD TIME] (P90)
MENU
Press [ ] to display the [SETUP] menu and
SET
select the item to set. (P23)
Set the time in your home area and travel
destination.
[]: Travel destination area
[]: Your home area
[CUST. SET MEM.]
MENU
Press [ ] to display the [SETUP] menu and
SET
select the item to set. (P23)
The current camera settings are registered in
[], [] or []. (P70)
[ ], [ ], [ ]
— 25 —
Preparation
[MONITOR/VIEWFINDER]
MENU
Press [ ] to display the [SETUP] menu and
SET
select the item to set. (P23)
You can adjust the brightness of the monitor
or the Viewfinder in 7 steps.
[GUIDE LINE]
MENU
Press [ ] to display the [SETUP] menu and
SET
select the item to set. (P23)
Set the pattern of the guide lines displayed
when taking pictures.
You can also set whether or not to have the
recording information and histogram
displayed when the guide lines are displayed.
(P45, 47)
[REC. INFO.]: [ON]/[OFF]
[HISTOGRAM]: [ON]/[OFF]
[PATTERN]: [ ]/[ ]
• In intelligent auto mode [ ], the guide lines
and histogram are not displayed.
[TRAVEL DATE] (P88)
MENU
Press [ ] to display the [SETUP] menu and
SET
select the item to set. (P23)
Set the departure date and the return date of
the vacation.
[SET], [OFF]
[PLAY ON LCD] (P47)
MENU
Press [ ] to display the [SETUP] menu and
SET
select the item to set. (P23)
If you selected the Viewfinder in a recording
mode, the display will automatically switch to
the LCD monitor when reviewing or playing
back the pictures.
[ON], [OFF]
[ZOOM RESUME]
MENU
Press [ ] to display the [SETUP] menu and
SET
select the item to set. (P23)
The zoom position is stored when this unit is
turned off. When this unit is turned on again,
the zoom automatically returns to the position
it was at when this unit was turned off. (P38)
[ON], [OFF]
[MF ASSIST] (P67)
(Recording mode only)
MENU
Press [ ] to display the [SETUP] menu and
SET
select the item to set. (P23)
In manual focus, the assistance screen
appears on the centre of the screen to
facilitate focusing on the subject.
[MF1]: The centre of the screen is
enlarged. You can adjust the
focus while determining the
composition of the whole of the
screen.
[MF2]: The centre of the screen is
enlarged over the whole
screen. This is convenient for
adjusting the focus in wide
angle shots for which changes
in focus are difficult to grasp.
[OFF]: The screen is not enlarged.
— 26 —

Preparation
[BEEP]
MENU
Press [ ] to display the [SETUP] menu and
SET
select the item to set. (P23)
This allows you to set the beep.
[]: No operation sound
[]: Soft operation sound
[]: Loud operation sound
[AF BEEP]
MENU
Press [ ] to display the [SETUP] menu and
SET
select the item to set. (P23)
This allows you to set the AF beep.
[]: No AF beep
[]: Soft AF beep
[]: Loud AF beep
[SHUTTER]
MENU
Press [ ] to display the [SETUP] menu and
SET
select the item to set. (P23)
This allows you to set the shutter sound.
[]: No shutter sound
[]: Soft shutter sound
[]: Loud shutter sound
[VOLUME]
MENU
Press [ ] to display the [SETUP] menu and
SET
select the item to set. (P23)
The volume of speakers can be adjusted in 7
steps from level 6 to 0.
• When you connect the camera to a TV, the
volume of the TV speakers does not change.
[NO.RESET]
MENU
Press [ ] to display the [SETUP] menu and
SET
select the item to set. (P23)
Reset the file number of the next recording to
0001.
• The folder number is updated and the file
number starts from 0001. (P143)
• A folder number between 100 and 999 can
be assigned.
When the folder number reaches 999, the
number cannot be reset. We recommend
formatting the card after saving the data on a
PC or elsewhere.
• To reset the folder number to 100, format
(P140) the built-in memory or the card first
and then use this function to reset the file
number.
A reset screen for the folder number will then
appear. Select [YES] to reset the folder
number.
[RESET]
MENU
Press [ ] to display the [SETUP] menu and
SET
select the item to set. (P23)
The [REC], [CUST. SET MEM.] or [SETUP]
menu settings are reset to the initial settings.
•[FAVORITE] (P127) is fixed to [OFF] and
[ROTATE DISP.] (P125) is fixed to [ON].
• If the [SETUP] menu settings are reset, the
following settings are also reset.
– The birthday and name settings for
[BABY1]/[BABY2] (P79) and [PET] (P80) in
scene mode.
– The number of days that have passed
since the departure date in
[TRAVEL DATE]. (P88)
– The [WORLD TIME] (P90) setting.
– [ZOOM RESUME] (P38)
• The folder number and the clock setting are
not changed.
— 27 —

Preparation
[VIDEO OUT]
(Playback mode only)
MENU
Press [ ] to display the [SETUP] menu and
SET
select the item to set. (P23)
Set to match the colour television system in
each country.
[NTSC]: Video output is set to NTSC
system.
[PAL]: Video output is set to PAL
system.
[TV ASPECT]
(Playback mode only) (P150)
MENU
Press [ ] to display the [SETUP] menu and
SET
select the item to set. (P23)
Set to match the type of TV.
[]:When connecting to a 16:9
screen TV.
[]: When connecting to a 4:3
screen TV.
[m/ft] (P67)
MENU
Press [ ] to display the [SETUP] menu and
SET
select the item to set. (P23)
Change the unit displayed for the focus
distance in manual focus.
[m]: The distance is displayed in
metres.
[ft]: The distance is displayed in
feet.
[SCENE MENU] (P72, 76)
MENU
Press [ ] to display the [SETUP] menu and
SET
select the item to set. (P23)
Set the screen that will appear when the
mode dial is set to [ ]/[ ]/[ ]/[ ]/
[].
[AUTO]: The advanced scene mode
or [SCENE MODE] menu
screen appears.
[OFF]: The recording screen in the
currently selected advanced
scene mode or scene mode
appears.
[DIAL DISPLAY]
MENU
Press [ ] to display the [SETUP] menu and
SET
select the item to set. (P23)
Set whether or not to show the mode dial
display when the mode dial is rotated.
[ON], [OFF]
[LA NGUAGE]
MENU
Press [ ] to display the [SETUP] menu and
SET
select the item to set. (P23)
Set the language displayed on the screen.
• If you set a different language by mistake,
select [ ] from the menu icons to set the
desired language.
— 28 —

Preparation
LCD Monitor/Viewfinder
Display/Switching the
LCD Monitor/Viewfinder
Display
10 Built-in memory/Card
• The access indication lights red when
pictures are being recorded on the
built-in memory (or the card).
– When using the built-in memory
∫ Screen display in programme AE mode
[ ] (at the time of purchase)
12
17
16
15
1 Recording mode
2 Flash mode (P50)
3 AF area (P31)
• The AF area displayed is bigger than
usual when taking pictures in dark
places.
4 Focus (P31)
5 Picture size (P98)
6 Quality (P98)
: Jitter alert (P33)
7 Battery indication
• The indication turns red and blinks if the
remaining battery power is exhausted.
Recharge the battery or replace it with a
fully charged battery.
• It does not appear when you use the
camera with the AC adaptor (optional)
connected.
8 Number of recordable pictures (P167)
9 Recording state
4567
3
1/30
F2.8
14 13
8
6
9
10
1112
– When using the card
• Do not do the following when the access
indication lamps lights. The card or the
data on the card may be damaged and
this unit may no longer operate normally.
– Turn this unit off.
– Remove the battery or the card (when
using a card).
– Shake or bump this unit.
– Disconnect the AC adaptor (optional).
(when using the AC adaptor)
• Do not do the above when pictures are
being read or deleted or the built-in
memory (or the card) is being formatted
(P140).
• The access time for the built-in memory
may be longer than the access time for a
card.
11 AF area selection (P103)
12 Joystick operation (P34, 42, 64, 65)
13 Shutter speed (P31)
14 Aperture value (P31)
• If the exposure is not adequate, the
aperture value and the shutter speed
turn red. (They do not turn red when the
flash is activated.)
15 Exposure compensation (P57)
16 Metering mode (P100)
17 Optical Image Stabilizer (P104)
— 29 —

Preparation
• Refer to P152 for information about other
screen displays.
∫ Switching the screen display
You can change the screen display by
pressing [DISPLAY]. This allows you to
display information while taking pictures such
as the picture size or the number of
recordable pictures or take pictures without
displaying any information. Refer to P45 for
details.
— 30 —
Loading…
DMC-FZ18-RUS.book 1 ページ 年月日 水曜日 午後時分
Инструкция по
эксплуатации
Цифровая фотокамера
Модель №. DMC-FZ18
PP
Перед пользованием прочтите,
пожалуйста, эту инструкцию
полностью.
EE
VQT1F98

DMC-FZ18-RUS.book 2 ページ 年月日 水曜日 午後時分
Перед использованием
Перед использованием
Уважаемый покупатель!
запись определённого материала
Благодарим вас за приобретение этой
может быть запрещена.
цифровой камеры Panasonic.
•Просьба обратить внмание, что органы
Прочитайте, пожалуйста, внимательно
управления, составные части и меню
эту инструкцию по эксплуатации и
вашей цифровой камеры могут
держите ее всегда под рукой.
несколько отличаться от тех, что
представлены на рисунках этой
инструкции.
Информация для
•Логотип SDHC является торговым
знаком.
вашей безопасности
•Leica является зарегистрированным
торговым знаком компании Leica
Microsystems IR GmbH.
•Elmarit является зарегистрированным
торговым знаком компании Leica
ПРЕДУПРЕЖДЕНИЕ:
Camera AG.
ЧТОБЫ УМЕНЬШИТЬ ОПАСНОСТЬ
•Другие названия, названия фирм и
ВОЗНИКНОВЕНИЯ ПОЖАРА,
изделий, отмеченные в этой
ПОРАЖЕНИЯ ЭЛЕКТРИЧЕСКИМ
инструкции, являются торговыми
ТОКОМ ИЛИ ПОВРЕЖДЕНИЯ
знаками или зарегистрированными
товарными знаками соответствующих
ИЗДЕЛИЯ,
компаний.
•НЕ ПОДВЕРГАЙТЕ ЭТОТ АППАРАТ
ВОЗДЕЙСТВИЮ ДОЖДЯ, ВЛАГИ,
КАПЕЛЬ ИЛИ БРЫЗГ, И НЕ
РАЗЪЕМ ДОЛЖЕН НАХОДИТЬСЯ
ПОМЕЩАЙТЕ НА АППАРАТ
ВБЛИЗИ АППАРАТУРЫ И ДОСТУП К
НИКАКИЕ ПРЕДМЕТЫ,
НЕМУ НЕ ДОЛЖЕН БЫТЬ
НАПОЛНЕННЫЕ ВОДОЙ,
ЗАТРУДНЕН.
НАПРИМЕР, ВАЗЫ.
•ИСПОЛЬЗУЙТЕ ТОЛЬКО
РЕКОМЕНДУЕМЫЕ
ПРЕДУПРЕЖДЕНИЕ
ПРИНАДЛЕЖНОСТИ.
При неправильной замене
•НЕ СНИМАЙТЕ КРЫШКУ (ИЛИ
аккумулятора возникает опасность
ЗАДНЮЮ КРЫШКУ); ВНУТРИ НЕТ
взрыва. Производить замену,
ЧАСТЕЙ ДЛЯ ОБСЛУЖИВАНИЯ
используя только тот же тип
ПОЛЬЗОВАТЕЛЕМ. ЗА
аккумулятора, или равноценный ему,
ОБСЛУЖИВАНИЕМ
рекомендуемый производителем.
ОБРАЩАЙТЕСЬ К
Размещение в отходы
КВАЛИФИЦИРОВАННОМУ
использованных аккумуляторов
ОБСЛУЖИВАЮЩЕМУ
производить согласно инструкциям
ПЕРСОНАЛУ.
производителя.
Тщательно соблюдайте законы об
Предупреждение
авторских правах.
Существует риск возгорания, взрыва
Запись с предварительно
или ожогов. Запрещается разбирать,
записанных магнитных лент или
нагревать свыше 60 xC или сжигать.
дисков, а также других
опубликованных или
телевещательных материалов с
аа а а а
целью, отличной от вашего личного
а .
пользования, является нарушением
закона об авторских правах. Даже с
целью вашего личного пользования
2
VQT1F98
DMC-FZ18-RUS.book 3 ページ 年月日 水曜日 午後時分
Перед использованием
∫ О зарядном устройстве батареи
-Если Вы увидите такой символ-
Информация по обращению с
ПРЕДОСТЕРЕЖЕНИЕ!
отходами для стран, не входящих в
•НЕ СЛЕДУЕТ УСТАНАВЛИВАТЬ ИЛИ
Европейский Союз
РАЗМЕЩАТЬ ДАННЫЙ АППАРАТ В
Действие этого символа
КНИЖНОМ ШКАФУ, ВСТРОЕННОМ
распространяется только на
ШКАФУ ИЛИ ДРУГОМ
Европейский Союз.
ОГРАНИЧЕННОМ ПРОСТРАНСТВЕ
Если Вы собираетесь выбросить
ДЛЯ ТОГО, ЧТОБЫ СОХРАНИТЬ
данный продукт, узнайте в местных
УСЛОВИЯ ХОРОШЕЙ ВЕНТИЛЯЦИИ.
органах власти или у дилера, как
УДОСТОВЕРЬТЕСЬ, ЧТО ШТОРЫ И
следует поступать с отходами такого
ДРУГИЕ ПОДОБНЫЕ ПРЕДМЕТЫ НЕ
типа.
ПРЕПЯТСТВУЮТ НОРМАЛЬНОЙ
ВЕНТИЛЯЦИИ ДЛЯ
ПРЕДОТВРАЩЕНИЯ РИСКА
ПОРАЖЕНИЯ ЭЛЕКТРИЧЕСКИМ
ТОКОМ ИЛИ ВОЗНИКНОВЕНИЯ
ПОЖАРА ИЗ-ЗА ПЕРЕГРЕВА.
•НЕ ЗАКРЫВАЙТЕ
ВЕНТИЛЯЦИОННЫЕ ОТВЕРСТИЯ
АППАРАТА ГАЗЕТАМИ,
СКАТЕРТЯМИ, ШТОРАМИ И
ПОДОБНЫМИ ПРЕДМЕТАМИ.
•НЕ РАЗМЕЩАЙТЕ НА АППАРАТ
ИСТОЧНИКИ ОТКРЫТОГО
ПЛАМЕНИ, ТАКИЕ, КАК ГОРЯЩИЕ
СВЕЧИ.
•ВЫБРАСЫВАЙТЕ БАТАРЕИ В
МУСОР, УЧИТЫВАЯ ОХРАНУ
ОКРУЖАЮЩЕЙ СРЕДЫ.
•Когда шнур питания переменного тока
подключен, зарядное устройство
аккумулятора находится в режиме
ожидания.
Первичная цепь всегда “работает”,
если шнур питания подключен к
электрической розетке.
3
VQT1F98
DMC-FZ18-RUS.book 4 ページ 年月日 水曜日 午後時分
Перед использованием
∫ Уход за камерой
∫ Карты памяти, которые можно
•Нельзя сильно трясти или ударять
использовать с данным
камеру, роняя ее и т.д.
устройством
Данный аппарат может выйти из строя,
Допускается использование карт
запись изображений может стать
памяти SD, SDHC и MultiMediaCard.
невозможной, или может повредиться
•Когда слово карта упоминается в
объектив либо монитор ЖКД.
данных инструкциях по эксплуатации,
•Складывайте объектив перед
имеются в виду следующие типы карт
переносом камеры или
памяти:
воспроизведением снимков.
– карта памяти SD (от 8 МБ до 2 ГБ);
•Будьте особенно осторожны в
– карта памяти SDHC (4 ГБ);
перечисленных ниже местах,
– MultiMediaCard (только фотоснимки)
поскольку они могут стать причиной
Более детальная информация о картах
неисправности данной камеры.
памяти, которые могут использоваться
– Места с большим количеством песка
с данным устройством.
или пыли.
•При использовании карт емкостью
– Места возможного контакта данной
4 ГБ или более можно использовать
камеры с водой, например, при
только карту памяти SDHC.
использовании камеры в дождливый
•Карта памяти на 4 ГБ без логотипа
день или на пляже.
SDHC не основана на стандарте SD и
•Не касайтесь объектива или
не будет функционировать с данным
разъемов грязными руками.
продуктом.
Следите также за тем, чтобы
жидкость не попадала на участки
OK
вокруг объектива, кнопок и т.д.
•В случае попадания на камеру
пресной или морской воды
осторожно протрите корпус камеры
44
сухой тканью.
Самую новую информацию можно найти
∫ О конденсации (Когда объектив
на следующем веб-сайте:
или видоискатель запотевают)
•
Конденсация происходит, когда
http://panasonic.
co.jp/pavc/global/cs
окружающая температура или влажность
(Сайт только на английском языке.)
изменяются. Остерегайтесь
конденсации, поскольку она вызывает
появление пятен на объективе, плесени
или неисправностей в работе камеры.
•Если конденсация все-таки
произошла, выключите камеру и
оставьте ее на 2 часа. Конденсат
исчезнет сам собой, когда температура
камеры сравняется с окружающей
температурой.
∫ Читайте вместе с разделом
“Предосторожности при
использовании фотокамеры”.
(P133)
4
VQT1F98

DMC-FZ18-RUS.book 5 ページ 年月日 水曜日 午後時分
• Использование цифрового
Содержание
увеличения
Дальнейшее увеличение…………….33
Перед использованием
Проверка записанного снимка
(просмотр) ………………………………………35
Информация для вашей безопасности
….2
Воспроизведение/удаление снимков
……36
Подготовка
Расширенные сведения
Стандартные принадлежности ………….7
(Запись изображений)
Названия составных частей ……………… 7
Прикрепление крышки
Информация о мониторе
объектива/ремешка………………….……….9
ЖКД/Видоискателе ….……….………..….. 39
Присоединение бленды объектива
……. 10
• Изменение набора
Краткое руководство .……………………..11
отображаемой информации ………. 39
Подзарядка аккумулятора при
• Усиление яркости
помощи зарядного устройства ..……….12
монитора ЖКД …………………………..42
Об аккумуляторах (время
Съемка со встроенной вспышкой …….43
заряда/количество снимков)……………13
Съемка с автоматическим таймером
……47
Установка и извлечение карты
Компенсация экспозиции………………… 49
(поставляется отдельно)/
Съемка с автоматической
аккумулятора…….….………….…………….14
настройкой значений экспозиции ……. 50
О встроенной памяти/карте
Съемка в режиме серийной съемки
……..51
(не входит в комплект поставки)……..15
Съемка крупным планом …………………52
Настройка даты/времени
Режим приоритета диафрагмы AE ….. 54
(настройка часов) ……………………………17
• Изменение настроек часов ………..17
Режим приоритета скорости
Информация о диске рабочего
затвора AE ……………………………………..54
режима…….…..…………………….….……….18
Ручная экспозиция ………………..……….. 55
Настройка меню ……………………………..19
Показатель диафрагмы и скорость
О меню настроек …..….…….………………21
затвора …………….…………………………….56
Отображение на мониторе
Съемка в режиме ручной
ЖКД/видоискателе/Переключение
фокусировки ………………..…………………57
отображения между монитором
Сохранение личных настроек меню
ЖКД/видоискателем ……….……….……..24
(Сохранение индивидуальных
настроек) ………………….…………………….60
Основные сведения
Съемка в индивидуальном режиме
……. 61
Съемка выразительных
Съемка…….…..…………………….….……….26
портретов и пейзажей
Выполнение снимков с
(расширенный режим сцены)……………62
использованием автоматической
• [ПОРТРЕТ] ………..……………….……..62
функции (интеллектуальный
• [ПЕЙЗАЖ] .….…….……………….….….63
автоматический режим)…………………..29
• [СПОРТ]…….…….…………………..……63
Съемка с увеличением…………………….32
• [НОЧН. ПОРТРЕТ]..……….….…..….. 64
• Использование оптического
Выполнение снимков в
увеличения……………………………….. 32
соответствии с записываемой
•
Использование дополнительного
сценой (Режим сцены)……………………..64
оптического увеличения (EZ)
……….33
• [ЕДА] …….………….……….………….….65
5
VQT1F98

DMC-FZ18-RUS.book 6 ページ 年月日 水曜日 午後時分
• [ВЕЧЕРИНКА] ……….…………….……. 65
Использование функции увеличения
• [СВЕЧИ]…..……………….….…………... 66
при воспроизведении
…..….…….…………. 99
• [ЗАКАТ]…………….…….…………….….. 66
Воспроизведение видео/
• [ВЫС. ЧУВСТВ.]……………….……….. 66
снимков со звуком.………………….……. 100
• [РЕБЕНОК1]/[РЕБЕНОК2] …….…... 67
Создание фотоснимков из видео ….. 101
• [ДОМ.ЖИВОТНОЕ]..…………….……. 68
Использование меню [ВОСП.] ……….. 103
• [ПАНОРАМИРОВ.]…….……………….68
• [ПОК. СЛАЙД.]……..………..……….. 103
• [ЗВЕЗДНОЕ НЕБО]..………………….. 69
• [КАТЕГОРИЯ] ………………..……….. 105
• [ФЕЙЕРВЕРК]…..…..………………….. 70
• [ПОВЕРН. ЖКД]/[ПОВЕРН.] …….. 107
• [ПЛЯЖ]……..………….…………….……. 71
• [ИЗБРАННОЕ]….……….…..….…….. 108
• [СНЕГ]……..….………….…………….….. 71
• [РЕД ЗАГОЛ ………….….…..….…….. 109
• [АЭРОСЪЕМКА] ……..………………... 71
• [ОТПЕЧ СИМВ] ….……….…..….…… 111
Режим видео………………..………………... 72
• [DPOF ПЕЧ.]……..……………….….… 113
При съемке записывается день
• [ЗАЩИТИТЬ] …………….….…..….…. 115
отпуска, когда была сделана
• [ДУБЛ. ЗВУК.] ……………….……….. 116
фотография…….………….………………….. 74
• [ИЗМ. РАЗР.] ……………….…….……. 117
Отображение времени в пункте
• [ПОДРЕЗКА]……….………….………..118
назначения поездки
• [ИЗМ. ФОРМАТ]……….…….………..119
(Мировое Время)…………………………….. 76
• [КОПИЯ] …..…….……………….….….. 120
Использование меню [ЗАП.] .…………… 78
• [ФОРМАТИР.]…..….….………….…… 121
• [БАЛ. БЕЛ.]……………..………………... 79
• [НАСТР.БАЛ.БЕЛ.]………….………….80
Подсоединение к другому
• [ИНТЕЛЛ.УПР.ISO]……..….…………. 81
оборудованию
• [СВЕТОЧУВСТ.]……………….……….. 82
• [ФОРМАТ]……..………..………………... 83
Подсоединение к персональному
• [РАЗР. КАДРА]/[КАЧЕСТВО] ….…..83
компьютеру …………………….…….………122
• [ЗАП. ЗВУКА] ………..…………….…….85
Печать снимков …………….…….……….. 125
• [РЕЖИМ ЗАМЕРА] …….……….…..… 86
Воспроизведение фотоснимков
• [РЕЖИМ АФ]…….…….……….……….. 86
на экране телевизора ….……………….. 129
• [СТАБИЛИЗ.]…………..………………... 89
• [НЕПРЕР. АФ] …..…..………………….. 90
Другое
• [ВСП. ЛАМП. АФ]……………………….90
Использование защитного
• [БЛОКИР. AФ/AЭ] ….………………….. 91
устройства MC/фильтра ND ………….. 130
• [ЦВЕТ. ЭФФЕКТ] …….……….………..92
Вид экрана .…………………….……………. 131
• [НАСТР. ИЗОБР.]………….…………... 92
Предосторожности при
• [АНИМАЦИЯ] ……..…….……………….92
использовании фотокамеры………….. 133
• [ПРЕОБ. ЛИНЗА] …..…………………..94
Сообщения …..………………………………. 136
Расширенные сведения
Устранение неисправностей …………. 138
Количество записываемых
(Воспроизведение)
снимков и доступное
время записи………………………………… 144
Отображение нескольких экранов
Технические характеристики………… 148
(многооконное воспроизведение)……. 97
Отображение в порядке даты съемки
(Воспроизведение в хронологическом
порядке)
…….….……………….……….……... 98
6
VQT1F98
Просмотр
Доступно к просмотру 152 страницы. Рекомендуем вам скачать файл инструкции, поскольку онлайн просмотр документа может сильно отличаться от оригинала.
-
DMC-FZ18-RUS.book  1 ???  2007?7?18? ??? ??6?43?
Инструкция по
эксплуатации
Цифровая фотокамера
Модель №.  DMC-FZ18
PP
Перед пользованием прочтите,
пожалуйста, эту инструкцию
полностью.
EE                                                   VQT1F98
-
DMC-FZ18-RUS.book  2 ???  2007?7?18? ??? ??6?43?
Перед использованием
Перед использованием
Уважаемый покупатель!            запись определённого материала
Благодарим вас за приобретение этой   может быть запрещена.
цифровой камеры Panasonic.       •Просьба обратить внмание, что органы
Прочитайте, пожалуйста, внимательно   управления, составные части и меню
эту инструкцию по эксплуатации и   вашей цифровой камеры могут
держите ее всегда под рукой.      несколько отличаться от тех, что
представлены на рисунках этой
инструкции.
Информация для                   •Логотип SDHC является торговым
знаком.
вашей безопасности               •Leica является зарегистрированным
торговым знаком компании Leica
Microsystems IR GmbH.
•Elmarit является зарегистрированным
ПРЕДУПРЕЖДЕНИЕ:                  торговым знаком компании Leica
Camera AG.
ЧТОБЫ УМЕНЬШИТЬ ОПАСНОСТЬ       •Другие названия, названия фирм и
ВОЗНИКНОВЕНИЯ ПОЖАРА,            изделий, отмеченные в этой
ПОРАЖЕНИЯ ЭЛЕКТРИЧЕСКИМ          инструкции, являются торговыми
ТОКОМ ИЛИ ПОВРЕЖДЕНИЯ            знаками или зарегистрированными
ИЗДЕЛИЯ,                         товарными знаками соответствующих
•НЕ ПОДВЕРГАЙТЕ ЭТОТ АППАРАТ     компаний.
ВОЗДЕЙСТВИЮ ДОЖДЯ, ВЛАГИ,
КАПЕЛЬ ИЛИ БРЫЗГ, И НЕ          РАЗЪЕМ ДОЛЖЕН НАХОДИТЬСЯ
ПОМЕЩАЙТЕ НА АППАРАТ            ВБЛИЗИ АППАРАТУРЫ И ДОСТУП К
НИКАКИЕ ПРЕДМЕТЫ,               НЕМУ НЕ ДОЛЖЕН БЫТЬ
НАПОЛНЕННЫЕ ВОДОЙ,              ЗАТРУДНЕН.
НАПРИМЕР, ВАЗЫ.
•ИСПОЛЬЗУЙТЕ ТОЛЬКО
РЕКОМЕНДУЕМЫЕ                   ПРЕДУПРЕЖДЕНИЕ
ПРИНАДЛЕЖНОСТИ.                 При неправильной замене
•НЕ СНИМАЙТЕ КРЫШКУ (ИЛИ         аккумулятора возникает опасность
ЗАДНЮЮ КРЫШКУ); ВНУТРИ НЕТ      взрыва. Производить замену,
ЧАСТЕЙ ДЛЯ ОБСЛУЖИВАНИЯ         используя только тот же тип
ПОЛЬЗОВАТЕЛЕМ. ЗА               аккумулятора, или равноценный ему,
ОБСЛУЖИВАНИЕМ                   рекомендуемый производителем.
ОБРАЩАЙТЕСЬ К                   Размещение в отходы
КВАЛИФИЦИРОВАННОМУ              использованных аккумуляторов
ОБСЛУЖИВАЮЩЕМУ                  производить согласно инструкциям
ПЕРСОНАЛУ.                      производителя.
Тщательно соблюдайте законы об
авторских правах.                 Предупреждение
Запись с предварительно           Существует риск возгорания, взрыва
записанных магнитных лент или     или ожогов. Запрещается разбирать,
дисков, а также других            нагревать свыше 60 xC или сжигать.
опубликованных или
телевещательных материалов с
целью, отличной от вашего личного   Маркировка продукта находится на
пользования, является нарушением   нижней панели устройств.
закона об авторских правах. Даже с
целью вашего личного пользования
2
VQT1F98
-
DMC-FZ18-RUS.book  3 ???  2007?7?18? ??? ??6?43?
Перед использованием
-Если Вы увидите такой символ-   ? О зарядном устройстве батареи
Информация по обращению с       ПРЕДОСТЕРЕЖЕНИЕ!
отходами для стран, не входящих в   •НЕ СЛЕДУЕТ УСТАНАВЛИВАТЬ ИЛИ
Европейский Союз                 РАЗМЕЩАТЬ ДАННЫЙ АППАРАТ В
Действие этого символа           КНИЖНОМ ШКАФУ, ВСТРОЕННОМ
распространяется только на       ШКАФУ ИЛИ ДРУГОМ
Европейский Союз.                ОГРАНИЧЕННОМ ПРОСТРАНСТВЕ
Если Вы собираетесь выбросить    ДЛЯ ТОГО, ЧТОБЫ СОХРАНИТЬ
данный продукт, узнайте в местных   УСЛОВИЯ ХОРОШЕЙ ВЕНТИЛЯЦИИ.
органах власти или у дилера, как   УДОСТОВЕРЬТЕСЬ, ЧТО ШТОРЫ И
следует поступать с отходами такого   ДРУГИЕ ПОДОБНЫЕ ПРЕДМЕТЫ НЕ
типа.                            ПРЕПЯТСТВУЮТ НОРМАЛЬНОЙ
ВЕНТИЛЯЦИИ ДЛЯ
ПРЕДОТВРАЩЕНИЯ РИСКА
ПОРАЖЕНИЯ ЭЛЕКТРИЧЕСКИМ
ТОКОМ ИЛИ ВОЗНИКНОВЕНИЯ
ПОЖАРА ИЗ-ЗА ПЕРЕГРЕВА.
•НЕ ЗАКРЫВАЙТЕ
ВЕНТИЛЯЦИОННЫЕ ОТВЕРСТИЯ
АППАРАТА ГАЗЕТАМИ,
СКАТЕРТЯМИ, ШТОРАМИ И
ПОДОБНЫМИ ПРЕДМЕТАМИ.
•НЕ РАЗМЕЩАЙТЕ НА АППАРАТ
ИСТОЧНИКИ ОТКРЫТОГО
ПЛАМЕНИ, ТАКИЕ, КАК ГОРЯЩИЕ
СВЕЧИ.
•ВЫБРАСЫВАЙТЕ БАТАРЕИ В
МУСОР, УЧИТЫВАЯ ОХРАНУ
ОКРУЖАЮЩЕЙ СРЕДЫ.
•Когда шнур питания переменного тока
подключен, зарядное устройство
аккумулятора находится в режиме
ожидания.
Первичная цепь всегда “работает”,
если шнур питания подключен к
электрической розетке.
3
VQT1F98
- 1
- 2
- 3
- 4
- 152