
Operating Instructions
HƯỚNG DẪN SỬ DỤNG
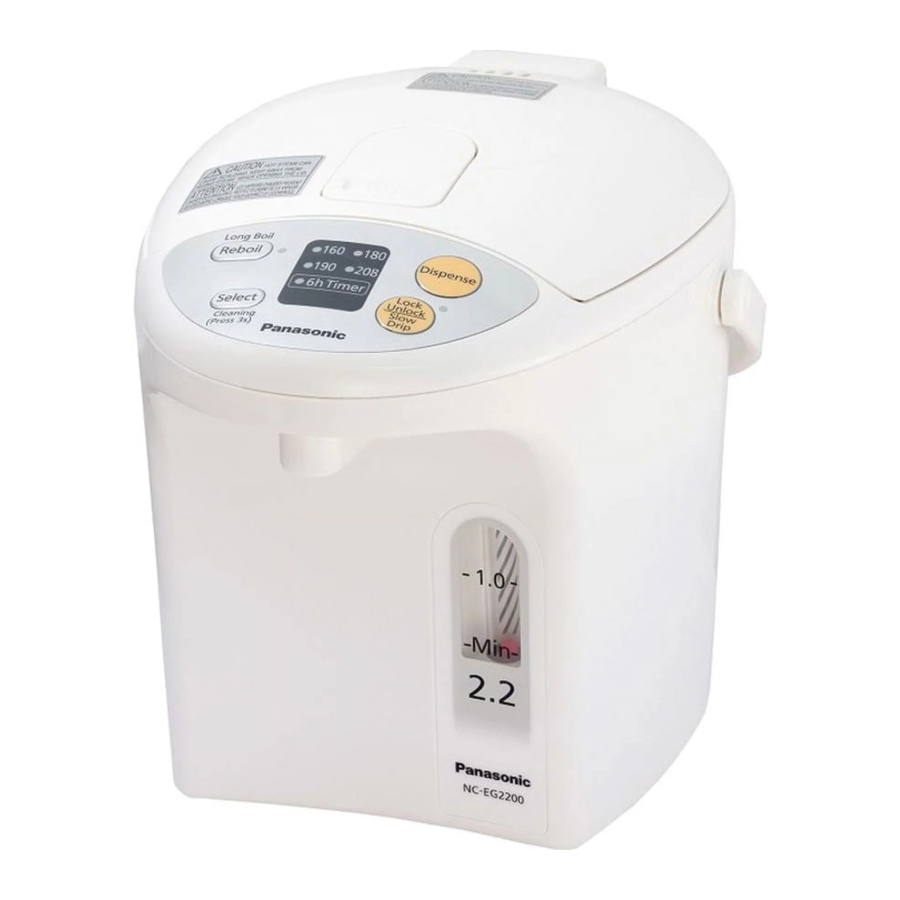
Electric Thermo Pot
Bình Thủy Điện
Model No./ Kiểu Số
Dùng Trong Gia Đình
Household Use
NC-EG4000
NC-EG3000
NC-EG2200
Thank you for purchasing the Panasonic product.
Please read these instructions carefully and follow safety precautions when
using this product. Before using this product please give your special attention to
“Safety Precautions” (page 5~7). This product is intended for household use only.
Cám ơn bạn đã mua sản phẩm Panasonic.
Vui lòng đọc kỹ hướng dẫn này và làm theo những cảnh báo an toàn khi dùng
sản phẩm này. Trước khi dùng sản phẩm này, hãy lưu ý đặc biệt đến những “Phòng
ngừa để bảo đảm an toàn” (trang 19~21). Sản phẩm này chỉ để sử dụng trong gia đình.
5

Table of Contents
Main Features………………………………………………………………………………..4
Safety Precautions ………………………………………………………………………5-7
Part Names and Handling Instructions ……………………………………………8-9
How to Use ……………………………………………………………………………..10-11
Convenient use methods …………………………………………………………..12-13
Daily Maintenance ……………………………………………………………………14-15
Troubleshooting ……………………………………………………………………………16
Replacement of Parts ……………………………………………………………………17
Specifications ………………………………………………………………………………17

Mục lục
Các tính năng chính ……………………………………………………………………..18
Phòng ngừa để đảm bảo an toàn ……………………………………………….19-21
Tên các bộ phận và hướng dẫn …………………………………………………22-23
Cách sử dụng ………………………………………………………………………….24-25
Các cách sử dụng tiện lợi …………………………………………………………26-27
Bảo trì hàng ngày …………………………………………………………………….28-29
Xử lý lỗi phát sinh ………………………………………………………………………… 30
Thay thế một số bộ phận ………………………………………………………………. 31
Tính năng kỹ thuật ……………………………………………………………………….. 31
Main Features
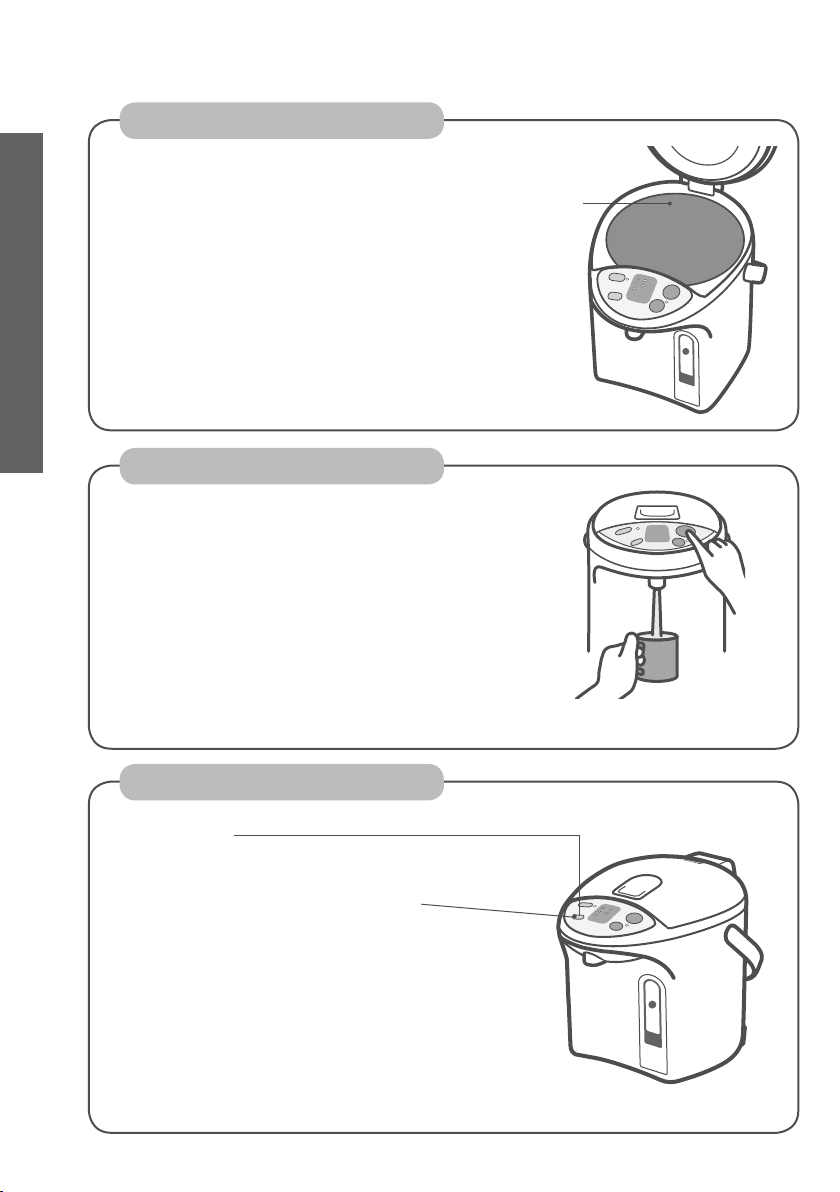
Easy to Clean
●
Charcoal coated non-stick inner container
The inner container is fluoridated with floury
charcoal, which is easy to clean and maintain.
Main Features
Convenient
●
Electric dispense
(See «Dispensing» on P.10-11)
●
Slow Drip mode for making
drip coffee (P.12-13)
Economy use
●
6h Timer
(See “Setting the 6h timer” on P.12-13)
●
4 Keep-warm temperature
selections
98 / 90 / 80 / 70 keep-warm temperature
can be selected.
(See “Keep-warm Function” on P.12-13)
4
Safety Precautions
For your safety and in order to prevent the property damage and the hazards to the users and others,
please read the following instructions strictly.
The signals indicate harm and damage when the product is used wrongly.
n
Please take these precautions strictly
Indicating “it may
WARNING
The symbols indicate specified items that must be followed.
n
This symbol indicates prohibition. This symbol indicates mandatory.
cause severe
injuries and death.”
WARNING
To Prevent Burns
●
This appliance is not intended for use by persons (including children) with reduced
physical, sensory or mental capabilities, or lack of experience and knowledge, unless they
have been given supervision or instruction concerning use of the appliance by a person
responsible for their safety.
Children should be supervised to ensure that they do not play with the appliance.
●
Do not let the unit fall over. Do not lift, tilt or shake the unit or carry it by the lid.
Even when the Pour Out key is locked, hot water may leak through the dispensing spout and
the steam vent, causing burns, if the unit falls over or is tilted.
●
Do not close the lid by force.
Hot water can spill causing burns.
●
Do not pour in water above the maximum
water level indication line.
If the appliance is overfilled, boiling
water may be ejected. Hot water can spill
causing burns.
●
Do not boil anything other than water.
Do not heat tea bags, tea leaves, milk,
alcohol or anything other than water which
may cause it to spurt out hot liquid or steam
and cause burns.
The water tube may also get clogged, the
inner container may burn or corrode, and the
fluororesin insulating coating may peel off.
●
Do not block the steam vent.
Hot water can overflow causing burns.
●
Do not throw away the remaining hot
water while the lid is attached.
If the Iid comes off, hot water may splash
causing burns.
●
Do not touch the steam vent.
This may cause burns. Take special care to
prevent infants from touching the steam vent.
●
Close the lid securely.
If the unit topples, hot water may spill out
causing burns.
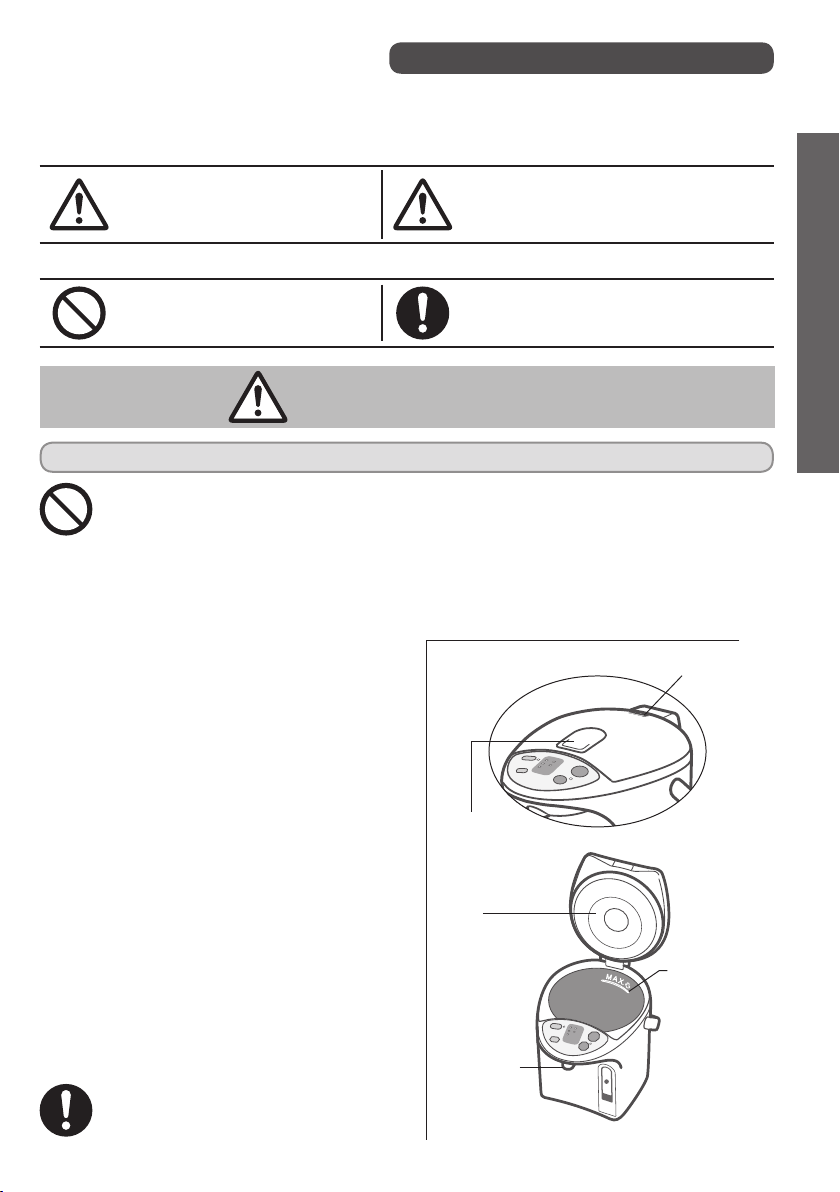
Lid opening
lever
Dispensing
spout
Indicating “the user may get
CAUTION
Lid
injured or the product may
cause the property damage.”
Steam vent
Maximum
water level
Safety Precautions
5
Safety Precautions
Power Cord
●
Never do anything that might cause damage to
the cord, power plug or body plug.
Do not damage them, modify them, place hot
objects near to them, bend them, twist them,
stretch them, place heavy objects on them, or
bundle them together.
If the unit is used when damaged, electrical short
circuit or fire may cause.
●
If the supply cord is damaged, it must be replaced
Safety Precautions
by a special cord available from an authorized
dealer.
●
Do not connect or disconnect the power plug or
the body plug with wet hands.
This may cause electric shock.
●
Do not allow infants access to the body plug.
You must pay special attention to prevent infants from putting the body plug into their mouths.
This may cause electric shock or injury.
●
Do not place small metal parts near the body plug.
This may cause electric shock, electrical short circuit or fire.
●
Make sure the power plug is correctly inserted into the wall outlet.
If the plug is inserted improperly it may cause electric shock or generate heat causing fire.
●
Do not use a damaged plug or a connection in a loose outlet.
●
To prevent electric shock and/or fire, dust off power plug or body plug regularly.
Water-laden dust settled on the cable or plug may cause insufficient insulation.
●
Remove the plugs and clean them with a dry cloth.
●
Use a single outlet that matches the power rating of the unit.
Plugging multiple appliance into one outlet may generate heat and cause fire.
Please take these precautions strictly
WARNING
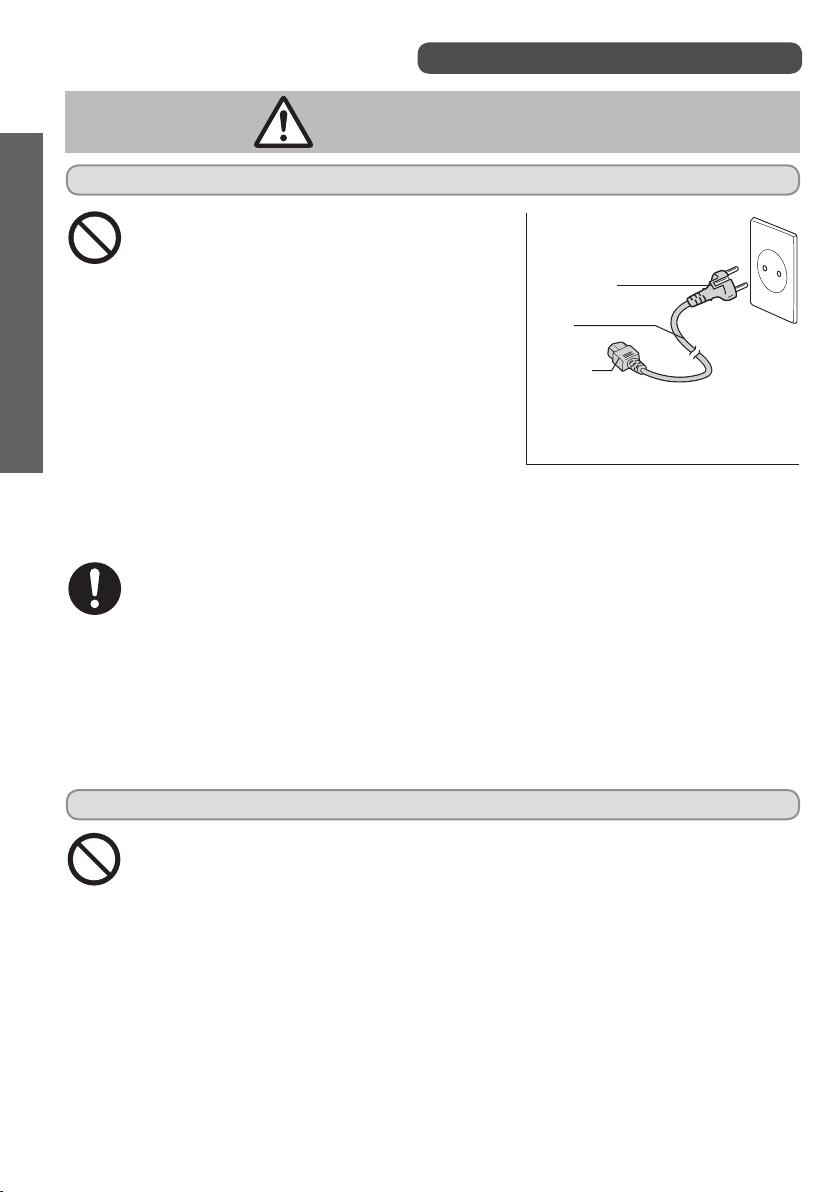
Power cord
Power plug*
Cord
Body plug
* The shape of plug differs according
to region.
During use
6
●
Do not immerse the unit in water or splash water over it.
●
Do not supply water directly from the tap or place the unit in a sink where the bottom
may get wet.
●
Do not turn the unit upside down when the bottom is wet.
This may cause a short circuit and electric shock, due to water enters the electrical
parts in the main unit.
●
Never disassemble, repair or modify the unit.
Any attempt to do so may cause the unit to operate abnormally and may cause fire or injury.
●
Please contact an authorized dealer for a check or repair.
●
Do not use to store ice.
Condensation will occur, creating a potential source of electric shock and malfunction.
To Prevent Burns
●
Do not place the unit on unstable surfaces.
The appliance may topple over causing burns.
●
Do not open the lid or dispense hot water while boiling.
Splashing hot water or steam may cause burns.
●
Do not rotate the unit while dispensing hot water.
Splashing hot water may cause burns.
●
Do not touch the hot parts of the unit during use or shortly after use.
This may cause burns.
●
When opening or closing the lid, keep hands away from the steam.
Steam can cause burns.
●
When carrying the unit, do not touch the lid opening lever.
The lid may open causing burns and other injury.
●
Wait until the unit is cooled down before maintenance.
A hot appliance may cause burns.
●
When disposing hot water, be careful not to get burned.
Power Cord
●
Do not use a different power cord and do not use this power cord with any other device.
(Do not use a power cord other than the one designed specifically for the unit.)
It may cause malfunction or fire.
CAUTION
Safety Precautions
●
When the unit is not in use, unplug the power plug from the wall outlet.
Deteriorating insulation may cause electric shock and/or fire.
●
When unplugging the unit, pull by the power plug — not the cord.
Electric shock and short circuit may cause fire.
During use
●
Do not use the unit on surfaces that can be affected by heat for a long time.
The unit may get discolored or break up.
●
Do not place near walls or furniture.
Steam and heat could damage walls and furniture, causing a change in color and shape.
●
Replace gasket if it discolors whitish. (P.17)
Otherwise it may cause hot water to spill out when it is leaned or knocked down
accidentally.
7
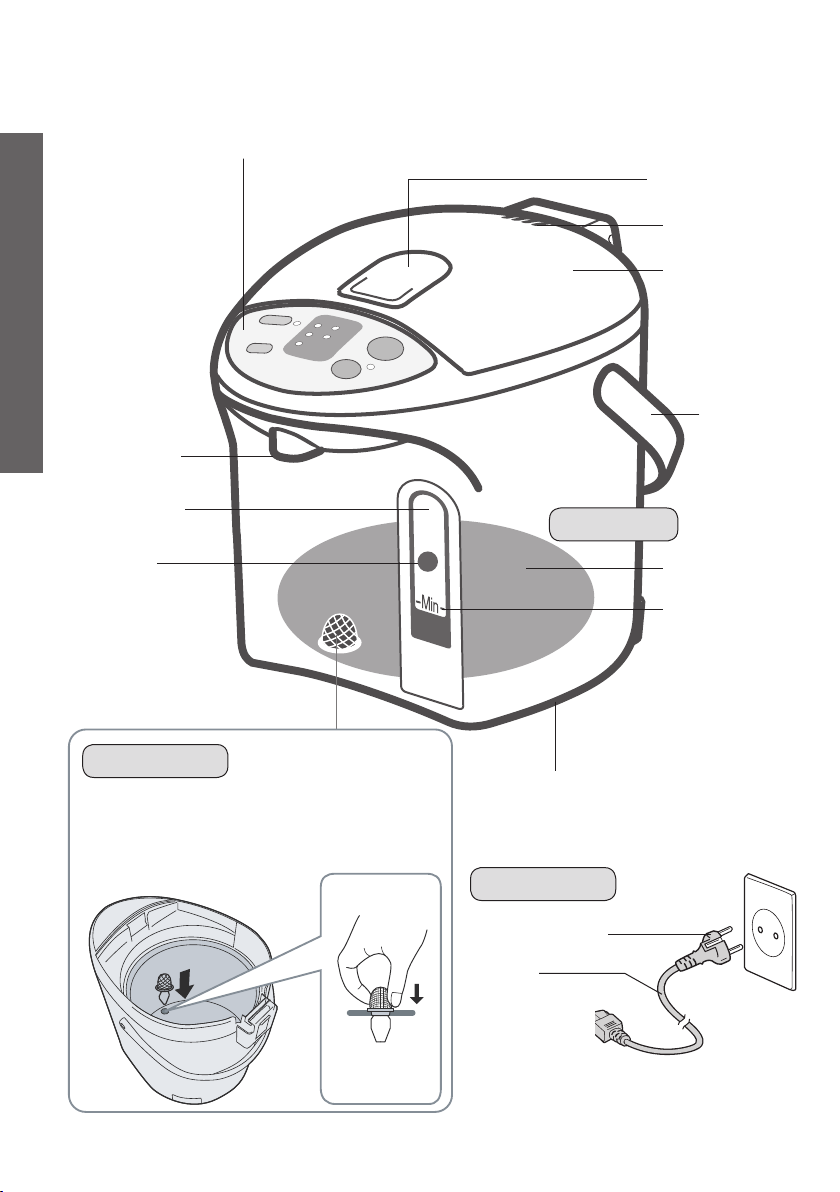
Part Names and Handling Instructions
Operation panel
Part Names and Handling Instructions
Dispensing
spout
Window rim
Red ball
Water level
indicator cannot be
seen when water
level is above the
window rim.
Lid opening
lever
Steam vent
Lid
Handle
Main unit
Inner
container
Minimum
water
level mark
Mesh filter
(Replaceable part)
It may have been come off from
the bottom of the inner
container.
Push it completely into the
correct position. (See P.17)
8
Rotating base (360 degrees)
When rotating the unit, do not allow
the cord to wind around the main unit.
Power cord
Power plug*
Cord
Body plug
APB97-480-0U
*The shape of plug differs according to region.
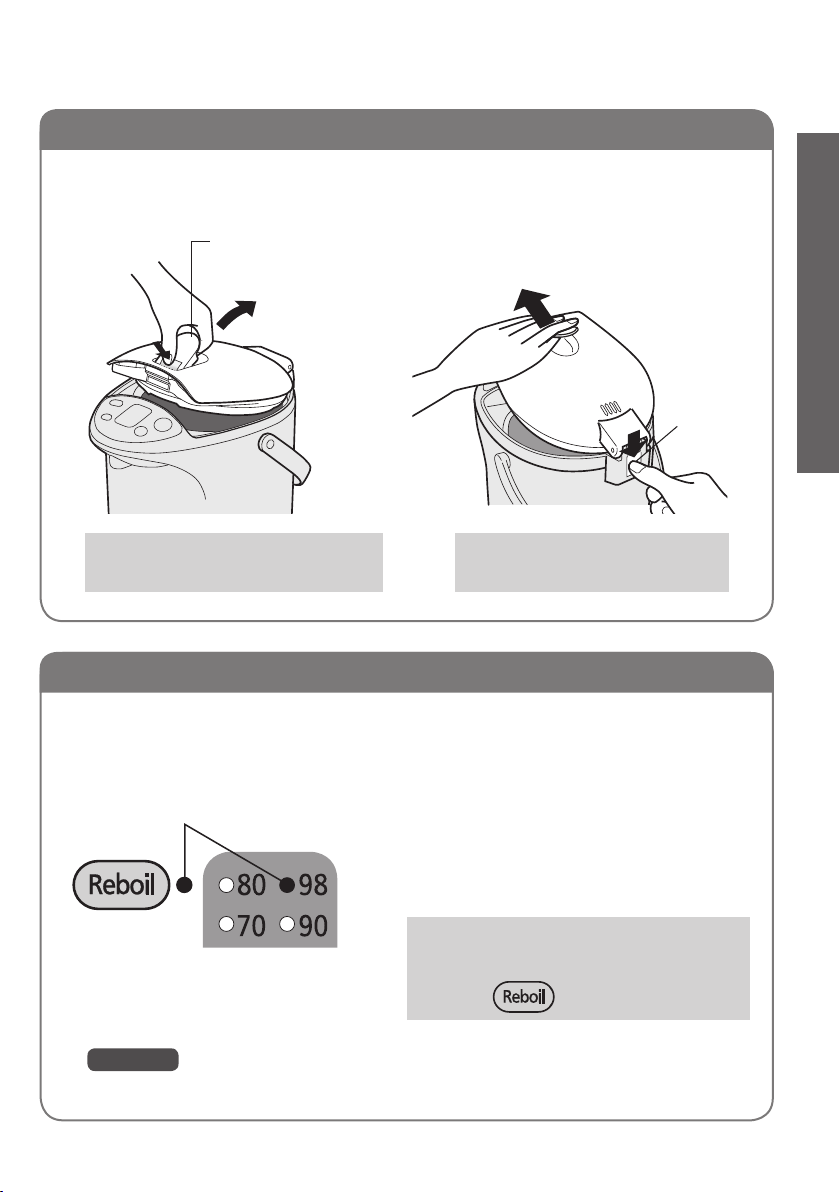
How to Remove the Lid
Part Names and Handling Instructions
Press and lift the lid opening
lever to open the lid.
Lid opening lever
To close
Press down until hearing “click” sound.
Pull it up slantwise while pressing
the lid release lever.
Lid release
lever
To attach
Insert the lid slantwise.
Overheating Protection
If an empty inner container is heated, the overheat safety function (which prevents an empty
inner container from being heated) will be activated. The power will be shut off automatically
to prevent the problems that may occur due to overheating. This will be shown on the display
as shown below.
Flashing alternately
Causing
●
Less than the minimum water level in the inner
container was boiled.
●
After water is added, the lid might be left open.
How to cancel the display
Supply water into the container,
and press key.
Notice
If an empty inner container is heated, an odor will be emitted and the container
may be discolored.
9
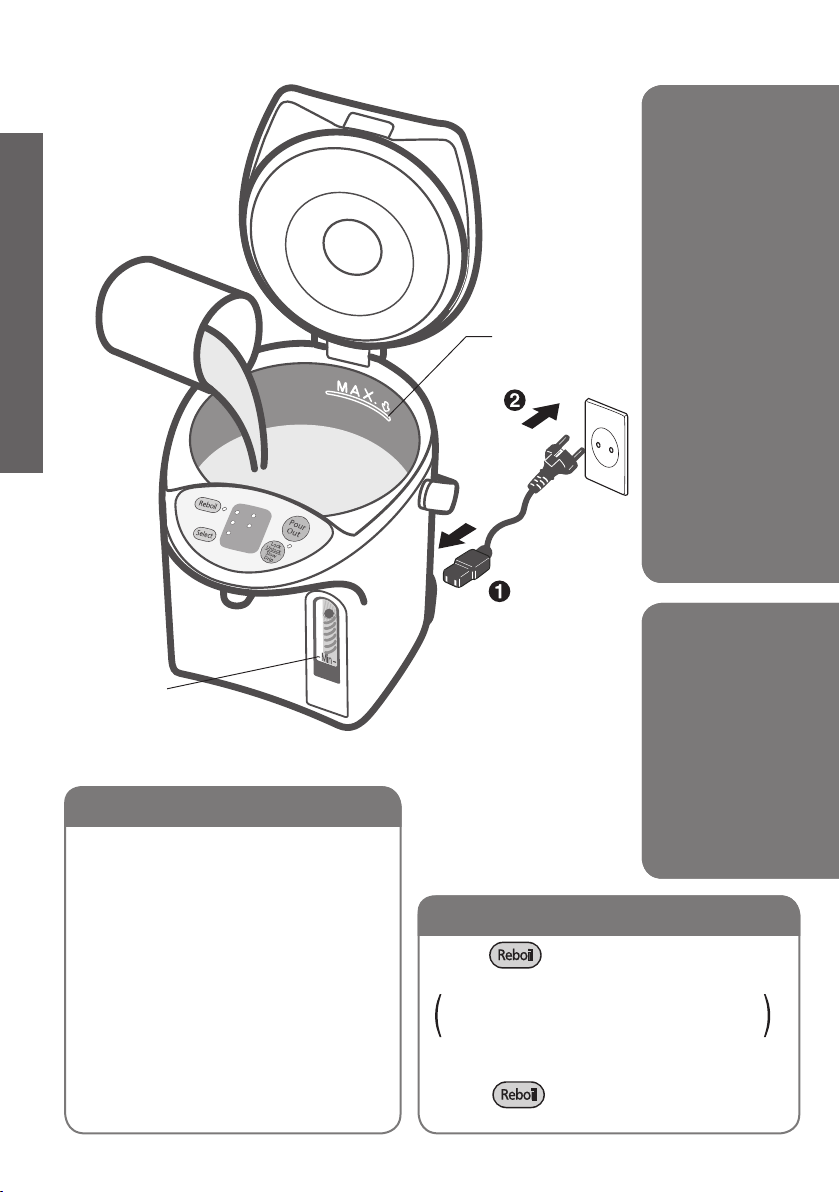
How to Use
Pour in water
with another
container!
How to Use
Minimum
water level
Fill the water higher than the
minimum water level.
Before you use this unit for the first time
Pour in water with another container
1
to the maximum level.
Close the lid securely.
2
Boil the water until Reboil light
3
goes out.
Dispense the hot water.
4
Unplug and remove the lid.
5
Pour out any remaining hot water
6
slowly via the DRAIN mark.
Maximum
water level
Do not fill water
above maximum
water level.
Boiling
water
Dispensing
(Electric dispense)
How to reduce the chlorine in the water
Press key to make the indicator
light flash. (Long Boil mode)
Press one time while water is being boiled,
and press twice while water is being kept
warm.
Extends the boiling time by about 6 minutes
to reduce the chlorine by about 80% in the water.
●
Press key again to boil.
10

Pour in water with another container. Close the lid securely.
Securely plug the body plug horizontally into the body.
Plug into wall outlet. (P.10 1
Starts
boiling
automatically.
2)
Indicate as
below when
boiled.
The temperature will
drop to approximately
90℃ and switches to
keep-warm function
automatically.
Light onFlashingFlashing
How to Use
Light on
Off
Off
(Displayed temperature
is indicative.)
Time required to boil water
NC-EG4000:approx. 35 min. / NC-EG3000:approx. 27 min. / NC-EG2200:approx. 20 min.
(Amount of water: Maximum Water / Room temperature: 20°C)
Press key to release lock.
The indicator light beside the key
will light on.
Press twice
The indicator light beside the key will
flash. (See «slow drip» on P.12-13)
key for slow drip.
Light on
Flash
Press key to dispense the
hot water.
The key will be re-locked automatically
in 10 seconds after stop dispensing hot
water.
When the unit is not in use
Unplug, and remove the lid. Pour out any remaining hot
water slowly via the
Lid release part
DRAIN
mark.
Operation panel
Cautions
●
Do not pour out water too swiftly.
If water splashes over lid release part or
operation panel, it may cause a malfunction.
●
Do not leave water in the inner container.
(It may cause the container to corrode or smell.)
11

Convenient use methods
Convenient use methods
Reboil
●
It is ideal to use boiling water for
making coffee / tea / instant cup
noodle etc.
Keep-warm function
●
”80 keep-warm” is an ideal mode
for making green tea.
●
”70 keep-warm” is an ideal mode
for making milk for a baby.
Be sure to leave milk to cool down
or mix it with cool boiled water
before giving it to a baby.
●
When the unit will not be used for
a short time, such as when you go
out for a day…
Notice
●
The keep-warm temperature or the timer can
be set while the water is being boiled or being
kept warm.
●
After power is restored in the event of a
power failure, the keep-warm temperature will
be automatically set to 90, even if the timer or
the “98”, “80” or “70” keep-warm function was
previously selected.
12
Setting the 6h timer
●
While setting the timer, the
electrification of heater stops.
Slow Drip mode for
making drip coffee
●
Slow dispense water.
●
Right after boiling, it maybe
difficultly dispensed or be
dispensed unsteady.

Light on
Press
key to
reboil water that is being
kept warm.
After a few minute, water
will be boiled.
• The keep-warm
temperature setting is
left unchanged.
Press key.
Each time the key is
pressed, “ ” mark
will shift to the next
choice and change
the keep-warm
temperature or set
the timer.
Flashing
Time required for the reboil procedure
From 98 keep-warm: approx. 2.5-4 min.
From 90 keep-warm: approx. 4-6.5 min.
From 80 keep-warm: approx. 6-12 min.
Off
From 70 keep-warm: approx. 7-14 min.
Amount of water: Maximum
Room temperature: 20°C
(After boiled)
Flashing
Time required to reach the settled
keep-warm temperature
keep-warm: approx. 2-3 min.
keep-warm: approx. 0.5-1 hours.
keep-warm: approx. 1.5-2.5 hours.
Amount of water: Maximum
(When selecting
80 keep-warm)
After a short time, water will be kept warm at approximately 80℃.
Light
on
6 hours later, timer will turn off and water starts boiling
When the water is brought up to boiling temperature, it will be kept
warm at 90℃.
Room temperature: 20°C
Previous keep-warm setting: 90°C
Convenient use methods
Flash
Press key twice, then press key for making drip coffee.
●
Automatically locked in 30 seconds after dispensing is finished.
●
To dispense hot water again, press key before time count up to 30 seconds.
●
The key will be re-locked automatically in 10 seconds if key is not pressed.
Each time is pressed, function will be switched as below.
Auto lock Dispense (lamp lit) Slow drip (lamp flash)
13

Daily Maintenance
Main unit and lid
Clean with a damp, well-wrung cloth.
●
Do not wet or soak the main unit in water.
If water enters the main unit from the bottom or from the dispensing
spout, it can also get into the electrical components in the main unit
and may cause a malfunction.
●
Do not use detergents.
(They may leave an odor.)
Inner container
Clean with a wet soft sponge.
●
Do not use polishing
powder, a scrub brush
Daily Maintenance
or a nylon brush.
They may damage the fluororesin
finish of the inner container.
About «Scale»
While you are using this unit, minerals contained
in the water (like calcium) can get stuck on the
inner container or on the mesh filter. This is
called «scale», and it is harmless.
●
Milky-white gritty surface (caused by calcium)
●
White or glittering floating material
(crystals of minerals)
●
Discoloration in the finish like dark brown, gray,
or green areas
(metallic ion made on the fluororesin covering)
These are not discoloration or corrosion of the
inner container itself, nor are they flakes from
the fluororesin covering.
Before cleaning, be sure to disconnect the power plug
from outlet, dispense water and cool down the unit.
●
Do not use benzine or thinner.
(They may damage the surface.)
Clean the inner container using
citric acid. (See P.15)
Mesh filter
Clean the filter with a brush.
When filter is clogged, water does not flow
smoothly.
* After cleaning the filter, be sure to reattach it to
the inner container.
APB97-480-0U
14
When storing the unit
●
Dry it thoroughly.
●
Put it into a plastic bag and seal the bag to
keep insects from getting in.

How to clean the inner container using citric acid.
Make sure that the mesh filter is attached to the inner container.
1
Put citric acid in the inner container.
2
●
Amount of citric acid to be used at one time:
80 g (two packages) or seven level tablespoons
* In case that our citric acid is not available, place 1-2 sliced
lemons wrapped with a thin cloth into the inner container
instead.
(The detergency of lemon is less effective than using the citric
acid.)
The citric acid is available from an authorized dealer. (Model No: SAN-80N)
* Follow the directions for cleaning printed on the citric acid package.
* Since the citric acid used for cleaning is a food additive, it is harmless to humans.
Add water to the maximum water level mark,
3
Once every two or three
()
months to clear scale.
and mix the citric acid and water well. Close
the lid.
Connect the plug immediately after stirring and press key
4
more than 3 seconds.
Cleaning start End of cleaning
citric acid
Daily Maintenance
Light on
Cleaning time (approx.)
NC-EG4000: 50 min.
NC-EG3000: 42 min.
Indications would
notice cleaning start.
Dispense some water, then unplug, remove the lid and drain away the
5
NC-EG2200: 35 min.
Flashing
Indications would
notice cleaning end.
hot water via the ‘DRAIN’ mark.
Refill with water and boil it to remove the smell of the citric acid or
6
lemons. Then throw the hot water away as same as step 5.
●
To remove any discoloration from the area above the maximum water level, rub the inside lightly with a wet
soft sponge.
●
If the discoloration cannot be removed by rubbing, clean the inner container several times using citric acid
or lemons.
Cautions
●
Please use citric acid to clean the inner container of this unit.
●
Do not fill with water above maximum water level.
●
Fill the inner container only with tap water (do not fill with hot water). Hot water may spout out causing
burns.
15

Before calling a service supplier,
Troubleshooting
please check the following possible causes.
If… Possible cause How to fix
White or glittering
flakes floating in
the hot water.
Rough milky white
substancess are
adhered to inner
container.
Boiling sounds
become louder.
Hot water has
odors of chlorine.
Hot water has an
Troubleshooting
unpleasant odor.
Hot water comes
out by itself.
Hot water does not
flow out smoothly.
The indicator lights
flash alternately.
Hot water does
not dispense.
●
If the problem is not fixed after checking the above possible causes, or if you think something is strange, disconnect the
body plug from the unit. Wait at least 10 seconds and then re-connect the plug.
●
The semi-transparent inner part inside the lid may become yellowish. This does not affect operation of the unit.
●
The rattling noise in the lid is made by small ball-shaped components which prevent water from flooding out
if the unit topples over.
●
If the room temperature is very high, the outside of the main unit may reach about 55°C.
The unit does not
turn on electricity.
●
The cause of this is “scale”. (see P.14)
It is not flakes of fluororesin.
* Water with a large content of minerals in it
such as mineral water or ionized water, is
more likely to cause a scale or white layer in
the hot water.
●
When “scale” adhered, boiling sounds become
louder.
●
Odors of chlorine remain depending on the
amount of chlorine in tap water.
●
When the unit is new, resin used in manufacture may give off a mild odor.
This will disappear with use.
●
If the unit is placed on surfaces such as a vinyl sheet, the odor may be carried over into the
water.
●
Water has been added above maximum water
level.
●
The mesh filter may be clogged with “scale”.
(See P.14)
●
When scale is accumulated in the inner container
and remaining hot water is low, hot water does
not flow out smoothly.
●
Immediately after boiling, hot water may not flow
out smoothly.
●
Overheating protection has been activated
(See P.9)
●
The indicator lights may flash alternately by
adding boiling water or the way the water is
supplied.
●
When the inner container is cleaned with citric
acid, citric acid have built up on the bottom.
●
The automatic lock has been engaged.
●
You poured in water directly from a tap.
●
You put the unit on the sink.
●
You turn the unit upside down with its bottom wet.
●
You washed the unit in water.
●
Clean the inner container with a
wet soft sponge. (See P.14)
●
If the “scale” still remained, clean
with citric acid. (See P.15)
●
Press key to reduce the
chlorine. (See P.10)
●
Lower the water level.
●
Clean the filter with a brush.
●
If the “scale” cannot be removed,
replace the filter (See P.17)
●
Add water and press key.
●
Press key.
●
Disconnect the plug, and stir the
citric well to dispose.
●
Press key.
●
It is broken if the electric
components are taken in water.
Contact the stores where you
purchased for repair.
“Reboil” and “80”
indicator lights
flash alternately.
16
●
This is malfunction of the sensor.
●
Contact the stores where you purchased.

Replacement of Parts
Rubber gasket set
Replace gaskets if they crack, lose their pliability
or, for any other reasons which allow steam to
escape from between the container and the lid.
Lid cover
Remove gaskets
Remove lid, unscrew 3 tapping screws and remove
the lid cover.
Exchange the gaskets and then place the lid cover
back and secure with the tapping screws.
Specifications
Mesh filter
Replace the filter, if foreign matter which
clog the filter cannot be removed, even after
you scrub with a cleaning brush, etc.
The filter can be
removed by pulling
firmly on it.
APB97-480-0U
For replacement parts, please
contact an authorized dealer.
Part name Part No.
Rubber gasket set APH65-480
Mesh filter APB97-480-0U
Replacement of Parts / Specifications
Model No.
Power supply 220Vg50Hz
Power consumption 700 W
Average power consumption
in keeping warm (approx.)
Amount of water: maximum
Room temperature: 20°C
Dimensions
(when the handle is
tilted)
Weight (including power cord) (approx.)
Rated capacity (approx.)
* Under certain conditions, such as at very high altitudes and in intense cold, the unit may not function
properly. Please avoid using the unit in such conditions.
* If the unit is not used during cold conditions, make sure to empty it of water. The water left in the inner
container may freeze causing damage.
Height (approx.)
Width (approx.)
Depth (approx.)
at 98
at 90
at 80
at 70
NC-EG4000 NC-EG3000 NC-EG2200
49 Wh
43 Wh
35 Wh
30 Wh
32.4 cm
21.7 cm
28.7 cm
2.2 k
4.0 L
g
45 Wh 40 Wh
39 Wh 33 Wh
31 Wh 27 Wh
26 Wh 23 Wh
27.5 cm 23.8 cm
21.7 cm 21.7 cm
28.7 cm 28.7 cm
g
2.1 k
3.0 L 2.2 L
2.0 k
g
17

Các tính năng chính
Lau rửa dễ dàng
●
Lớp bên trong chống dính được phủ bột
than quý đặc biệt
Bình đun nước được phủ chất bột than quý đặc
biệt, dễ dàng lau rửa và bảo quản.
Tiện dụng
●
Rót nước chỉ cần với một nút bấm
điều khiển bằng điện.
(Xem phần “Xả” trang 24-25)
●
Chế độ Slow Drip để làm cà phê
nhỏ giọt. (T.26-27)
Các tính năng chính
18
Kinh tế
●
6 mức chọn cài đặt giờ
(Xem phần: “Đặt bộ đếm thời gian 6 tiếng”
trang 26-27)
●
4 mức chọn giữ nhiệt độ
Có thể chọn giữ nhiệt độ 98 / 90 / 80 / 70.
(Xem phần: “Chức năng giữ nóng nước”
trang 26-27)

Phòng ngừa để bảo đảm an toàn
Để đảm bảo an toàn, tránh làm hỏng thiết bị và tránh nguy hiểm cho người sử dụng và những người
khác, xin hãy đọc kỹ những hướng dẫn sau.
Những dấu hiệu chỉ ra sự hỏng hóc hoặc thiệt hại khi sử dụng sản phẩm không đúng cách.
n
Xin hãy xem cẩn thận phần này
CẢNH BÁO
Các dấu hiệu chỉ sự bắt buộc.
n
Cấm không được làm Bắt buộc phải làm theo
Để tránh bị bỏng
●
Thiết bị này không dành cho người( bao gồm trẻ em) bị thiểu năng trí tuệ, thể chất, thiếu
kinh nghiệm và kiến thức sử dụng. Trừ khi họ được một người có trách nhiệm giám sát
hoặc hướng dẫn sử dụng sản phẩm.
●
Không được làm đổ bình. Không để nghiêng, lắc hoặc nhấc bình lên bằng cách cầm vào
nắp bình.
Trong trường hợp sản phẩm bị nghiêng hoặc bị rơi, nước nóng vẫn có thể rò rỉ ra khỏi bình
từ lỗ thông hơi hoặc vòi rót nước và gây bỏng kể cả khi nắp bình đã đóng.
●
Không đóng nắp bình khi bị vướng.
Nước sôi có thể trào ra và gây bỏng.
●
Không rót nước vào bình cao hơn mức
nước tối đa. Nếu bình quá đầy, n ước sôi
có thể trào ra.
Nước nóng trào ra có thể gây bỏng.
●
Không cho thứ gì ngoài nước vào bình.
Không cho trà túi lọc, lá trà, sữa, cồn,
rượu vào bình. Những thứ đó có thể
làm nước sôi trào ra khỏi bình gây bỏng.
Chúng cũng có thể làm tắc ống dẫn nước
và làm vỏ trong của bình cháy hoặc bị ăn
mòn, dẫn tới việc bột cách nhiệt rơi ra
ngoài.
●
Tránh làm tắc lỗ thông hơi.
Nước nóng trào ra có thể gây bỏng.
●
Không đổ bỏ nước nóng còn trong bình
khi nắp bình vẫn còn gắn vào thân bình.
Nếu nắp bình bị rơi ra, nước sôi có thể
bắn tóe ra gây bỏng.
●
Không chạm vào lỗ thoát hơi nước.
Điều này có thể gây bỏng. Đặc biệt chú
ý tránh để trẻ em chạm vào lỗ thoát hơi
nước.
●
Phải đóng nắp bình thật an toàn.
Nếu không khi bình bị đổ, nước nóng có
thể chảy ra ngoài gây bỏng.
Biểu thị thương tích
nặng hoặc tử vong.
CẢNH BÁO
CHÚ Ý
Lẫy mở nắp
bình
Nắp bình
Vòi rót
nước
Biểu thị nguy cơ bị thương
tích hoặc hỏng hóc tài sản.
Phòng ngừa để bảo đảm an toàn
Lỗ thoát hơi nước
Mức nước
tối đa
19

Phòng ngừa để bảo đảm an toàn
CẢNH BÁO
Dây nguồn
●
Không được làm bất cứ thứ gì gây hỏng phích
cắm, dây nguồn cũng như đầu dây cắm vào
bình.
Ví dụ như làm đứt, gẫy, uốn cong, xoắn, bẻ, làm
trầy xước, để các vật nặng lên trên, để gần vật
nóng. Khi cắm điện nếu dây nguồn hỏng có thể bị
chập điện hoặc cháy.
●
Khi dây nguồn hỏng, phải thay ngay bằng dây đặc
biệt được cung cấp bởi đại lý ủy quyền.
●
Không được cắm hoặc rút dây nguồn khi tay
ướt.
Có thể bị điện giật.
●
Không để trẻ em đến gần phích cắm.
Hãy đảm bảo rằng trẻ em không cho phích cắm
vào miệng. Làm như vậy có thể gây sốc điện hoặc tổn thương
●
Không cho các vật kim loại vào đầu cắm vào bình.
Làm như vậy có thể gây sốc điện, đoản mạch hoặc hỏa hoạn.
●
Hãy chắc chắn rằng phích cắm được cắm thật chắc vào ổ cắm.
Phích chắm không được cắm đúng cách sẽ có thể gây giật điện hoặc trở thành nguồn nóng
gây cháy.
●
Không được dùng phích cắm hỏng hoặc cắm vào ổ cắm lỏng.
●
Thường xuyên lau sạch bụi bẩn khỏi phích cắm cũng như đầu dây cắm bào bình.
Bụi bẩn tích lại sẽ hút ẩm và có thể là nguyên nhân làm hỏng dây nguồn, làm mất đặc tính
cách điện của dây nguồn dẫn đến chập, cháy.
●
Nếu cần kiểm tra hoặc sửa chữa, hãy liên lạc với đại lý bảo hành ủy quyền.
●
Dùng ổ cắm đơn có nguồn điện phù hợp với điện áp yêu cầu của bình.
Nhiệt từ các ổ cắm nhiều phích cắm có thể gây cháy.
Xin hãy xem cẩn thận phần này
Dây nguồn
Phích cắm*
Dây điện
Đầu cắm
vào bình
* Hình dạng của phích cắm có thể
thay đổi tùy theo vùng
Phòng ngừa để bảo đảm an toàn
Trong quá trình sử dụng
●
Không nhúng bình vào trong nước hoặc làm bắn nước vào bình.
●
Không lấy nước trực tiếp từ vòi nước cũng như đặt bình trên bồn, bể nước vì đáy bình có
thể bị ướt.
●
Khi đáy bình bị ướt, không dốc ngược bình.
Làm vậy nước rơi xuống có thể làm chập mạch điện và gây giật điện, nước rơi vào mạch
điều khiển lắp trong bình sẽ có thể làm mạch điều khiển này bị hỏng hoặc không thực hiện
được các chức năng điều khiển.
●
Không bao giờ được tự tháo, sửa, thay đổi thiết bị.
Bất cứ cố gắng nào nhằm tháo, sửa, thay đổi sẽ làm bình đun nước hoạt động không
tốt, thậm chí có thể gây cháy hay làm cho người dùng bị thương.
●
Nếu cần kiểm tra hoặc sửa chữa, hãy liên lạc với đại lý ủy quyền.
●
Không được dùng bình để đựng đá.
Sự ngưng tụ hơi nước là nguyên nhân tiềm tàng gây chập mạch hoặc hoạt động bất bình
thường của bình.
20

Để tránh bị bỏng
●
Không để bình trên những bề mặt không ổn định.
Bình sẽ dễ bị đổ và gây bỏng.
●
Khi đóng hoặc mở nắp bình, phải để tay xa khỏi luông hơi nước sôi.
Hởi nước
●
Không mở bình hoặc rót nước khi đang đun nước.
Nước bắn ra có thể làm bỏng.
●
Không quay, xoay bình khi đang rót nước nóng.
Nước nóng bắn ra có thể gây bỏng.
●
Không chạm vào các bộ phận nóng của bình trong khi sử dụng hoặc ngay sau khi
dùng.
Điều này có thể gây bỏng.
●
Khi đang mang bình, không được động vào cái lẫy để mở nắp bình.
Nắp bình có thể bị bật ra gây bỏng hoặc làm bị thương người cầm bình.
●
Hãy chờ đến khi bình nguội hẳn rồi mới bảo trì bình (lau, rửa…).
Các bộ phận còn nóng trong bình có thể gây bỏng.
●
Khi rót nước sôi, cẩn thận để không bị bỏng.
Dây nguồn
●
Không sử dụng dây nguồn khác và không sử dụng dây nguồn này với thiết bị khác.
(Không được dùng bất kỳ dây nguồn nào khác loại được thiết kế đặc biệt cho sản
phẩm này.)
Làm như vậy có thể gây cháy hoặc bình có thể hoạt động không bình thường.
●
Khi bình đang được sử dụng, không rút dây nguồn ra khỏi ổ cắm.
Có thể sẽ gây điện giật hoặc cháy cho nguyên nhân không còn cách điện.
●
Khi rút nguồn điện, hãy rút bằng cách cầm vào phích cắm, không cầm vào phần dây để rút.
Dây có thể bị đứt gây chập mạch, cháy hoặc điện giật.
sôi
sẽ gây bỏng.
CHÚ Ý
Phòng ngừa để bảo đảm an toàn
Trong quá trình sử dụng
●
Không đặt bình trên bề mặt bị ảnh hưởng bởi sức nóng trong thời gian dài.
Do tác dụng của nhiệt, bình đun nước có thể bị mất màu hoặc bị vỡ.
●
Không để bình gần tường hoặc gần các đồ dùng trong nhà.
Hơi nước có thể làm hỏng tường hoặc đồ vật, ví dụ như gây mất màu hoặc biến dạng đồ
vật.
●
Thay miếng đệm nếu thấy hiện tượng biến màu. (T.31)
Nếu không nước nóng có thể tràn ra ngoài khi vô tình tì vào thiết bị hoặc làm rơi thiết bị.
21

Tên các bộ phận và hướng dẫn
Bảng điều khiển
Vòi rót nước
Cửa sổ hiện
mức nước
Nút đỏ
Không thể nhìn
thấy vạch mực
nước nếu mực
nước nằm ở phía
trên mép cửa sổ.
Lẫy mở nắp
bình
Lỗ thoát hơi
nước
Nắp bình
Tay quai
xách
bình
Thân bình
Bình đựng
nước
Chỉ báo mức
nước tối
thiểu
Tấm lọc cặn
Tên các bộ phận và hướng dẫn
(có thể thay thế được)
Tấm lọc có thể rơi ra khỏi vị trí từ
đáy bình. Nếu như vậy, hãy đặt nó lại
thật đúng chỗ của nó. (Xem trang 31)
22
Để bình (có thế quay 360°)
Khi xoay bình, không để dây nguồn
cuốn quanh bình.
Dây nguồn
Phích cắm*
Dây điện
Đầu cắm
vào bình
* Hình dạng của phích cắm có thể thay đổi tùy
vùng.

Cách tháo nắp bình
Ấn và nhấc lẫy mở nắp bình lên
để mở nắp bình.
Lẫy mở nắp bình
Để đóng nắp bình
Ấn nắp bình xuống đến khi nghe tiếng
lách cách.
Vừa ấn lẫy tháo bỏ nắp bình, vừa
kéo nắp bình lên.
Lẫy tháo bỏ
nắp bình
Để lắp nắp vào bình
Đặt nắp bình vào góc gần miệng
bình.
Bảo vệ quá nhiệt
Khi bình đang không có nước mà vẫn bị đung nóng, chức năng bảo vệ quá nhiệt sẽ hoạt
dộng (chức năng này sẽ tránh cho bình bị đun nóng khi không có nước trong bình). Nguồn
điện sẽ tự động bị ngắt để tránh các trường hợp đán tiếc xảy ra khi chiếc bình rỗng bị đun
nóng. Chứ
c năng này được minh họa như dưới đây.
Tên các bộ phận và hướng dẫn
Hai đèn này sẽ cùng
nhấp nháy
Nguyên nhân
●
Nước sôi khi mức nước trong bình còn ít hơn
mức nước tối thiểu.
●
Nước đã được đổ vào bình nhưng chưa đậy nắp.
Để hai đèn thôi nhấp nháy
Đổ thêm nước vào bình và ấn nút .
Ghi chú
Khi bình không có nước bị quá nóng, sẽ có mùi khen khét tỏa ra và mặt vách phía trong
của bình có thể bị biến màu.
23

Cách sử dụng
Dùng bình
chứa nước đổ
nước vào đến
khi chạm mực
nước tối đa.
Mức nước
tối đa
không nước đổ
nước vượt quá
mực nước tối đa
cho phép.
ĐUN
NƯỚC
Mức nước
Cách sử dụng
tối thiểu
Đổ nước cao hơn mực
nước tối thiểu.
Trước khi sử dụng bình lần đầu tiên
Dùng bình chứa nước đổ nước vào
1
đến khi chạm mực nước tối đa.
Đóng chặt nắp.
2
Đun nước cho đến khi đèn báo
3
Reboil tắt.
Xả nước
4
Rút phích cắm và tháo nắp.
5
Từ từ rót hết nước nóng còn xót lại
6
qua vạch DRAIN.
24
Xả
(dùng nút bấm điều
khiển bằng điện)
Cách làm giảm nồng độ Clo trong nước (Long Boil)
Ấn nút để làm đèn nhấp nháy.
(Chế độ đun lâu)
Ấn một lần khi nước đang được đun và ấn
hai lần khi nước đang được giữ nóng sau
khi sôi.
Tăng thời gian đun sôi nước lên khoảng 6 phút
có thể làm giảm nồng độ Clo trong nước đến
80%.
●
Ấn nút một lần nữa để đun nước.

Dùng bình chứa nước đổ nước vào bình đun. Đóng lắp bình thật chặt để đảm bảo an toàn.
Cắm đầu dây nguồn thật an toàn vào bình.
Cắm phích cắm vào nguồn điện. (P.24 1
Tự động
đun nước.
Hiển thị khi
nước sôi.
2)
Nhiệt độ nước
sẽ giảm xuống
khoảng 90℃ và
chuyển sang chế
độ giữ nóng tự
động.
SángNhấp nháyNhấp nháy
Sáng
Tắt
Tắt
(Chỉ báo này hiển thị
nhiệt độ của nước.)
Thời gian cần thiết để đun sôi nước
NC-EG4000:Xấp xỉ. 35 phút. / NC-EG3000:Xấp xỉ. 27 phút. / NC-EG2200:Xấp xỉ. 20 phút.
(Lượng nước trong bình: Ở mức tối đa / Nhiệt độ trong phòng: 20°C)
Ấn nút để mở khóa.
Đèn báo bên cạnh nút sáng.
Ấn nút
Đèn báo bên cạnh nút nhấp nháy.
(Tham khảo “Rót nước nhỏ giọt” trang
26-27)
2 lần để nước từ từ nhỏ giọt.
Sáng
Ấn nút để rót nước nóng.
Nút sẽ tự động bị khóa lại sau khi
dừng rót nước 10 giây.
Nhấp nháy
Khi không dùn g bình
Rút nguồn, tháo bỏ nắp bình. Đổ hết sạch nước nóng còn lại trong bình thật
chậm qua phần đánh dấu
Phần đã được
tháo gỡ
DRAIN
.
Bảng điều khiển
Chú ý
●
Không rót nước nhanh.
Nước bắn tung tóe có thể rơi qua nắp bình
vào bảng mạch điều khiển và làm bình hoạt
động bất bình thường.
●
Không để nước xót lại trong bình.
(lượng nước này có thể làm bình bị ăn mòn hoặc
có mùi.
Cách sử dụng
25

Các cách sử dụng tiện lợi
Đun sôi lại
●
Lý tưởng nhất là dùng nước sôi để
pha trà/cà phê/phở ăn liền v.v.
Chức năng giữ
nóng nước
●
Nhiệt độ giữ nóng của bình lý
tưởng nhất để pha trà là 80℃.
●
Pha sữa cho trẻ em thì nhiệt độ tốt
nhất nên đặt là 70℃. Phải để sữa
nguội đi hoặc pha với nước đun sôi
để nguội trước khi cho trẻ ăn.
Khi không sử dụng bình trong một
thời gian ngắn. Ví dụ như khi cần ra
ngoài một ngày…
Các cách sử dụng tiện lợi
Ghi chú
●
Khi nước đã sôi, người sử dụng có thể thiết
lập nhiệt độ giữ nóng hoặc thời gian giữ nóng
nước.
●
Vào lúc nguồn điện được cắm lại sau khi bị
mất điện, nhiệt độ giữ nóng sẽ được tự động
đặt ở mức 90, bất kể trước đó nó được đặt ở
mức nào (“98”, “80” hay “70”), kể cả khi thời
gian giữ nóng được thiết lập.
26
Đặt bộ đếm thời
gian 6 tiếng
●
Khi đã đặt giờ bộ phận làm nóng
nước trong bình sẽ bị cắt điện.
Chế độ Slow Drip để
làm cà phê nhỏ giọt
●
Nước xả chậm.
●
Ngay sau khi sôi, có thể khó rót
hoặc rót không ổn định.

Sáng
Ấn nút
để đun
sôi lại nước đang
được giữ nóng.
Sau một vài phút, nước
sẽ sôi.
●
Các thiết lập về nhiệt
độ giữ nóng vẫn không
thay đổi.
Nhấp nháy
Sáng
(Sau khi nước đã sôi)
Thời gian cần thiết để đun sôi lại nước
Từ nhiệt độ giữ nóng 98: cần xấp xỉ 2.5 đến 4 phút.
Từ nhiệt độ giữ nóng 90: cần xấp xỉ 4 đến 6.5 phút.
Từ nhiệt độ giữ nóng 80: cần xấp xỉ 6 đến 12 phút.
Từ nhiệt độ giữ nóng 70: cần xấp xỉ 7 đến 14 phút.
Lượng nước trong bình: Ở mức tối đa
Nhiệt độ trong phòng: 20°C
Nhấp nháy
Thời gian cần thiết để đạt đến nhiệt độ giữ nóng
nước đã được thiết lập.
Khoảng 2 đến 3 phút.
Khoảng 0.5 đến 1 tiếng.
Khoảng 1.5 đến 2.5 tiếng.
Lượng nước trong bình: Ở mức tối đa
Ấn nút để mờ khoả
(Khi chọn nhiệt độ
°C
giữ ấm là 80
)
Nhiệt độ trong phòng: 20°C
Nhiệt độ giữ nóng hiện tại của bình: 90°C
Sau một lúc, nước sẽ được giữ nóng ở nhiệt độ 80°C.
Mỗi khi phím được
Sáng
ấn, dấu “ ” sẽ
chuyển đến mức
mới và thay đổi
nhiệt độ giữ nóng
nước của bình.
6 tiếng sau, bộ đếm giờ sẽ tắt và nước bắt đầu được đun sôi
Khi nước đã đạt nhiệt độ sôi, nước sẽ được giữ nóng ở nhiệt độ 90℃.
Nhấp nháy
Ấn nút hai lần, sau đó ấn nút để làm cà phê nhỏ giọt.
●
Tự động khóa trong vòng 30 giây sau khi rót nước.
Các cách sử dụng tiện lợi
●
Để xả lại nước nóng, ấn nút trước khi thời gian đạt mức 30 giây.
●
Nút sẽ bị khóa lại tự động sau 10 giây nếu không ấn nút .
Mỗi lần ấn , chức năng sẽ bật như bên dưới.
Tự động khóa Xả (Đèn sáng)
Nhỏ giọt (Đèn nhấp nháy)
27

Bảo trì hàng ngày
Thân bình và nắp bình
Lau vằng vải ẩm, đã được vắt kỹ hết nước.
●
Không được làm ướt hoặc nhúng thân bình vào trong nước.
Khi nước vào trong phần thân bình hoặc vào phần phía dưới của
vòi rót nước, nó có thể rơi vào các bộ phận thuộc phần điện trong
thân bình và làm bình không hoạt động bình thường được nữa.
●
không được dùng bột giặt.
(bột giặt có thể đề lại mùi khó
chịu.)
Trước khi làm sạch bình, hãy chắc chắn
là đã rút phích cắm ra khỏi ổ, đổ hết nước
trong bình và bình đã nguội hẳn.
●
không được dùng xăng hoặc các chất để
pha loãng hóa chất.
(chúng có thể làm hỏng bề mặt của bình.)
Bình đựng nước bên trong
Lau bằng miếng mút mềm, nhúng nước.
●
Không được dùng bột đánh
bóng, bàn chải thường,
bàn chải nylon.
Chúng có thể làm hỏng chất bột đặc biệt
phủ trên bình đựng nước phía trong.
Về “Cặn vôi”
Trong quá trình sử dụng bình đun nước các chất
khoáng chứa trong nước (như canxi) có thể
đóng cặn ở trong bình hoặc ở bộ lọc cặn. Đó gọi
là các “Cặn vôi” có hại.
●
Các sạn màu trắng sữa (gây ra bởi canxi)
●
Các chất màu trắng hoặc sáng lấp lánh
(các tinh thể chất khoáng)
●
Làm đổi màu của sản phẩm, xuất hiện các
mảng màu nâu sẫm, xám hoặc xanh
(do các i-on kim loại tạo ra trên lớp phủ)
Những “Cặn vôi” này không phải là sự tự mất
Bảo trì hàng ngày
máu hoặc tự bi mòn cảu bình đựng nước, cũng
không phải là những chỗ bị bong ra của lớp phủ
của bình.
Làm sạch bình đựng nước bên
trong bằng axit citric. (Xem trang 29)
Tấm lọc cặn
Làm sạch tấm lọc cặn bằng bàn chải.
Khi tấm lọc bị tắc, nước sẽ không chảy đều.
*Sau khi đã làm sạch tấm lọc cặn, hãy chắc chắn
là đã gắn nó trở lại vào bình đun nước.
28
Khi cất bình
●
Lau bình thật khô.
●
Cho bình vào túi plastic và đóng kín túi để
tránh côn trùng chui vào.

Khi bị dính “cặn vôi” hãy làm sạch bình bằng axit citric
Bảo đảm tấm lọc cặn được lắp vào bên trong bình.
1
Đổ axit citric vào bình đựng nước bên trong.
2
●
Lượng axit citric dùng cho một lần:
80 gram (hai gói) hoặc 7 thìa ăn cơm.
* Trong trường hợp không có axit citric của hãng Panasonic
cung cấp, hãy đặt 1-2 lát chanh được gói trong miếng vải
mỏng vào bên trong bình.
(Mức độ tẩy rửa của chanh không hiệu quả bằng của axit
citric.)
Axit citric có ở các đại lý bán hàng của hãng (Số hiệu sản phẩm: SAN-80N)
* Thực hiện theo hướng dẫn làm sạch in trên bao bì.
* Vì axit citric dùng để làm sạch bình cũng là một gia vị trong món ăn, nó vô hại với người.
Đổ nước đến mức nước tối đa, khuấy nước
3
thực hiện khoảng hai
()
hoặc ba tháng một lần
để làm tan hết axit citric. Đậy nắp bình lại.
axit citric
Cắm điện ngay sau khi quấy kỹ, ấn và giữ nút hơn 3 giây.
4
Bắt đầu làm
Sáng
Thời gian làm sạch:
NC-EG4000:khoảng 50 phút.
NC-EG3000:khoảng 42 phút.
Chỉ báo đèn nhấp nháy khi
quá trình làm sạch bắt đầu.
Rót bớt một chút nước, rút dây nguồn và tháo nắp bình rồi đổ hết
5
NC-EG2200:khoảng 35 phút.
Nhấp nháy
Kết thúc làm sạch
Chỉ báo đèn nhấp nháy khi quá
trình làm sạch kết thúc phút.
nước nóng qua dấu ‘DRAIN’.
Đổ đầy nước vào bình rồi đun sôi để khử bỏ hết mùi axit citric hoặc
6
mùi chanh. Sau đó đổ nước nóng đi như làm ở bước 5.
●
Loại bỏ các vết ố màu ở các vùng trên mức nước tối đa, lau nhẹ mặt trong của bình bằng miếng mút
mềm, nhúng nước.
●
Nếu không thể loại bỏ các vết này bằng miếng mút, hãy làm sạch bình vài lần bằng axit citric hoặc chanh.
Chú ý
●
Chỉ sử dụng axit citric chính hãng để làm sạch bình.
●
Không được đổ nước vượt quá mức nước tối đa cho phép.
●
Chỉ được đổ nước nguội (không được đổ nước nóng). Nước nóng sẽ có thể gây bỏng.
Bảo trì hàng ngày
29

Xử lý lỗi phát sinh
Trước khi liên lạc đến bộ phận bảo hành,
xin hãy kiểm tra các nguyên nhân sau.
Nếu… Có thể do nguyên nhân Cách khắc phục
Có các mảnh vụ
màu trắng hoặc
màu lấp lánh nổi
trong nước. Cặn
vôi bám vào bên
trong bình.
Tiếng nước sôi trở
nên to hơn.
Nước nóng có mùi
Clo.
Nước nóng có mùi
khó chịu.
Nước tự trào ra
khỏi bình.
Nước chảy ra
không đều.
Các đèn thay nhau
nhấp nháy.
Nước nóng không
Xử lý lỗi phát sinh
chảy ra khi rót.
●
Nếu như vấn đề không được giải quyết sau khi đã kiểm tra các phần trên hoặc bạn nghĩ rằng có một điều gì đó
khác thường, hay rút dây nguồn ra khỏi bình, chờ ít nhất 10 giây rồi cắm lại.
●
Một số bộ phận bên trong bình có thể bị ngả màu vàng nhưng không hề ảnh hưởng đến hoạt động của bình.
●
Có một vài tiếng lách tách trong nắp bình là do các quả bóng nhỏ có nhiệm vụ ngăn không cho nước tràn ra khi
bình bị đổ.
●
Nếu nhiệt độ trong phòng quá cao, nhiệt độ phía ngoài cảu thân bình có thể lên đến 55°C.
Bình không bật
được điện.
●
Nguyên nhân là do “Cặn vôi”. (xem trang 28)
ĐÓ không phải là các mảnh bị bong ra từ lớp phủ
của bình.
*Nước chứa một lượng lớn các khoáng chất (ví
dụ như nước khoáng hoặc nước bị i-on hóa) rất
có thể là nguyên nhân tạo ra các mảnh vụn màu
trắng hoặc màu lấp lánh nổi trong nước.
●
Khi bị đóng “cặn vôi”, tiếng nước sôi trở nên to
hơn.
●
Mùi clo còn tùy thuộc vào lượng Clo trong nước
lấy từ vòi.
●
Khi bình còn mới, nhự dùng trong việc sản xuất ra sản phẩm sẽ có thể còn có mùi nhẹ.
●
Nếu đặt bình trên các bề mặt như các tấm nhự dẻo, mùi của các tấm này có thể bay vào
trong nước.
●
Nước bị đổ vào bình vượt mức nước tối đa cho
phép.
●
Làm sạch bình đựng nước bên
trong bằng một miếng mút, bọt
mềm, ướt. (Xem trang 28)
●
Nếu “cặn vôi” vẫn còn, làm sạch
bình bằng axit citric.
(Xem trang 29)
●
Bấm nút để loại bỏ bớt
mùi Clo. (Xem trang 24)
●
Hạ bớt mức nước.
Tấm lọc cặn có thể bị tắc bởi vật chất lạ như “cặn
vôi”. (Xem trang
●
Khi cặn vôi tích tụ bên trong bình và nước nóng
còn ít, nước nóng sẽ không chảy ra đều.
●
Ngay sau khi sôi, nước nóng có thể chảy ra
không đều.
●
Chức năng bảo vệ quá nhiệt đã được kích hoạt.
(Xem trang 23)
●
Tùy thuộc vào nguồn nước được cấp. đèn báo sẽ
nháy sáng luân phiên khi thêm nước.
●
Khi đang làm sạch bình bằng axit citric, axit bị
đóng cặn ở đáy bình.
●
Bình đã bị tự động khóa.
●
Bạn đã rót nước trực tiếp từ vòi vào bình.
●
Bạn đặt bình phía trên bể nước.
●
Bạn dốc ngược bình khi đáy bình bị ướt.
●
Bạn cho bình vào trong nước.
28
)
●
Làm sạch tấm lọc bằng bàn chải.
●
Nếu không thể loại bỏ “cặn vôi”,
hãy thay tấm lọc. (Xem trang 31)
●
Thêm nước vào bình và ấn nút .
●
Bấm nút .
●
Rút dây nguồn và khuấy kỹ để axit
citric tan hết.
●
Bấm nút .
●
Bình sẽ bị hỏng nếu các bộ phận
bị nhúng trong nước, liên lạc với
cửa hàng bạn đã mua bình ở đó để
nhờ sửa chữa.
Nút “Reboil” và
“80” thay nhau
nhấp nháy.
30
●
Thiết bị cảm biến (sensor) bị lỗi.
●
Liên lạc với cửa hàng nơi bạn đã mua sản phẩm.

Thay thế một số bộ phận
Các miếng đệm gioăng cao su
Thay các miếng đệm nếu bị rạn, nứt, vỡ, mất tính
đàn hồi, hoặc vì bất kì lý do gì khiến cho hơi nước
thoát ra từ chỗ tiếp giáp giữa nắp bình và thân
bình.
Tấm phủ nắp bình
Tháo bỏ miếng đệm
Tấm lọc cặn:
Nếu các cặn bám vào tấm lọc cặn không thể
gỡ bỏ được, thậm chí là đã đánh bằng bàn
chải, hãy thay tấm lọc cặn.
Gỡ tấm lọc cặn ra
bằng cách cầm chắc
vào viền kéo lên.
APB97-480-0U
Khi cần thay thế linh kiện, liên lạc
với đại lý ủy quyền.
Tháo nắp bình, tháo 3 ốc-vít và gỡ tấm phủ nắp
bình ra.
Thay các miếng đệm gioăng và lắp tấm phủ lại, vặn
chặt các ốc-vít.
Tên linh kiệnSố hiệu
Miếng đệm
gioăng cao su
Tấm lọc cặn APB97-480-0U
APH65-480
Tính năng kỹ thuật
Model
Nguồn điện 220Vg50Hz
Mức tiêu thụ điện 700 W
Mức tiêu thụ điện bình quân
khi ở chế độ giữ nước nóng
(xấp xỉ)
Lượng nước: tối đa
()
Nhiệt độ trong phòng: 20°C
kích thước
(khi tay cầm (quai)
để nghiêng)
Khối lượng (bao gồm cả dây nguồn) (xấp xỉ)
Dung tích (xấp xỉ)
* Trong một số điều kiện nhất định, ví dụ như ở vùng cao và rất lạnh, bình có thể hoạt động không
hoàn hảo. Xin hãy không dùng bình trong những điều kiện như vậy.
* Nếu bình không được sử dụng trong điều kiện lạnh giá, hãy chắc chắn là đã tháo sạch nước ra khỏi
bình. Nước đọng lại bên trong có thể đóng băng và làm hỏng bình.
Chiều cao (xấp xỉ)
Chiều rộng (xấp xỉ)
Chiều sâu (xấp xỉ)
at 98
at 90
at 80
at 70
NC-EG4000 NC-EG3000 NC-EG2200
49 Wh
43 Wh
35 Wh
30 Wh
32.4 cm
21.7 cm
28.7 cm
2.2 k
4.0 L
g
45 Wh 40 Wh
39 Wh 33 Wh
31 Wh 27 Wh
26 Wh 23 Wh
27.5 cm 23.8 cm
21.7 cm 21.7 cm
28.7 cm 28.7 cm
g
2.1 k
3.0 L 2.2 L
2.0 k
g
Thay thế một số bộ phận / Tính năng kỹ thuật
31

Panasonic Corporation
Website : http://www.panasonic.com
© Panasonic Corporation 2015
PZ05Y693
TP0815E0
Printed in Thailand
Loading…
- May 15, 2024
- Panasonic
Table of Contents
- Main Features
- **Economy use
- **** CAUTION
- Part Names and Handling Instructions
- How to Use
- Convenient use methods
- Daily Maintenance
- Troubleshooting
- Replacement of Parts
- Specifications
- References
- Read User Manual Online (PDF format)
- Download This Manual (PDF format)
Operating Instructions
Electric Thermo Pot
Household Use
Model No.
NC-EG4000
NC-EG3000
NC-EG2200
Thank you for purchasing this Panasonic product.
- Please read this Operating Instructions carefully in order to use this product correctly and safely.
- Before using this product, please give your special attention to the Safety Precautions.
- Please keep this Operating Instructions for future use.
- Panasonic will not accept any liability if the appliance is subject to improper use, or failure to comply with these instructions.
Main Features
Easy to Clean
Charcoal coated non-stick inner container
The inner container is fluoridated with floury charcoal, which is easy to
clean and maintain.
Convenient
Electric dispense
(See “Dispensing” on P.10-11)
Slow Drip mode for making drip coffee (P.12-13)
**Economy use
**

Safety Precautions
Please take these precautions strictly
For your safety and in order to prevent the property damage and the hazards to
the users and others, please read the following instructions strictly.
The signals indicate harm and damage when the product is used wrongly.
WARNING
Indicating “it may cause severe injuries and death.”
CAUTION
Indicating “the user may get injured or the product may cause the property
damage.”
The symbols indicate specified items that must be followed.
This symbol indicates prohibition.
This symbol indicates mandatory.
WARNING
To Prevent Burns
-
Do not let the unit fall over. Do not lift, tilt or shake the unit or carry it by the lid.
Even when the Pour Out key is locked, hot water may leak through the
dispensing spout and the steam vent, causing burns, if the unit falls over or
is tilted. -
Do not close the lid by force.
Hot water can spill causing burns. -
Do not pour in water above the maximum water level indication line.
If the appliance is overfilled, boiling water may be ejected. Hot water can
spill causing burns. -
Do not boil anything other than water.
Do not heat tea bags, tea leaves, milk, alcohol or anything other than water
which may cause it to spurt out hot liquid or steam and cause burns.
The water tube may also get clogged, the inner container may burn or corrode,
and the fluororesin insulating coating may peel off. -
Do not block the steam vent.
Hot water can overflow causing burns. -
Do not throw away the remaining hot water while the lid is attached.
If the Iid comes off, hot water may splash causing burns. -
Do not touch the steam vent.
This may cause burns. Take special care to prevent infants from touching the
steam vent. -
This appliance is not intended for use by persons (including children) with reduced physical, sensory or mental capabilities, or lack of experience and knowledge, unless they have been given supervision or instruction concerning use of the appliance by a person responsible for their safety.
Children should be supervised to ensure that they do not play with the
appliance. -
Close the lid securely.
If the unit topples, hot water may spill out causing burns.

Power Cord
-
Never do anything that might cause damage to the cord, power plug or body plug.
Do not damage them, modify them, place hot objects near to them, bend them,
twist them, stretch them, place heavy objects on them, or bundle them
together.
If the unit is used when damaged, electrical short circuit or fire may cause. -
If the supply cord is damaged, it must be replaced by the manufacturer, its service centre or similarly qualified persons in order to avoid a hazard.

-
Do not connect or disconnect the power plug or the body plug with wet hands.
This may cause electric shock. -
Do not allow infants access to the body plug.
You must pay special attention to prevent infants from putting the body plug
into their mouths.
This may cause electric shock or injury. -
Do not place small metal parts near the body plug.
This may cause electric shock, electrical short circuit or fire. -
Make sure the power plug is correctly inserted into the wall outlet.
If the plug is inserted improperly it may cause electric shock or generate
heat causing fire. -
Do not use a damaged plug or a connection in a loose outlet.
-
To prevent electric shock and/or fire, dust off power plug or body plug regularly.
Water-laden dust settled on the cable or plug may cause insufficient
insulation. -
Remove the plugs and clean them with a dry cloth.
-
Use a single outlet that matches the power rating of the unit.
Plugging multiple appliance into one outlet may generate heat and cause fire.

During use
-
Do not immerse the unit, connector of power plug and body plug in water or splash water over them.
-
Do not supply water directly from the tap or place the unit in a sink where the bottom may get wet.
-
Do not turn the unit upside down when the bottom is wet.
This may cause a short circuit and electric shock, due to water enters the
electrical parts in the main unit.
Never disassemble, repair or modify the unit.
Any attempt to do so may cause the unit to operate abnormally and may cause
fire or injury. -
Please contact an authorized dealer for a check or repair.
-
Do not use to store ice.
Condensation will occur, creating a potential source of electric shock and
malfunction.
**** CAUTION
To Prevent Burns
-
Do not place the unit on unstable surfaces.
The appliance may topple over causing burns. -
Do not open the lid or dispense hot water while boiling.
Splashing hot water or steam may cause burns. -
Do not rotate the unit while dispensing hot water.
Splashing hot water may cause burns. -
Position the handle so that steam is directed away from it.
-
Do not touch the hot parts of the unit during use or shortly after use.
This may cause burns. -
When opening or closing the lid, keep hands away from the steam.
Steam can cause burns. -
When carrying the unit, do not touch the lid opening lever.
The lid may open causing burns and other injury. -
The heating element surface is subject to residual heat after use.
Wait until the unit is cooled down before maintenance.
A hot appliance may cause burns. -
When disposing hot water, be careful not to get burned.
Power Cord
-
Do not use a different power cord and do not use this power cord with any other device.
(Do not use a power cord other than the one designed specifically for the
unit.)
It may cause malfunction or fire. -
When the unit is not in use, unplug the power plug from the wall outlet.
Deteriorating insulation may cause electric shock and/or fire. -
When unplugging the unit, pull by the power plug – not the cord.
Electric shock and short circuit may cause fire.
During use
-
Fill the water higher than the minimum water level.
-
Do not pour out water too swiftly.
It may cause a malfunction if water splashes over lid release part or
operation panel. -
Do not leave water in the inner container.
It may cause the container to corrode or smell. -
Do not use the unit on surfaces that can be affected by heat for a long time.
The unit may get discolored or break up. -
Do not place near walls or furniture.
Steam and heat could damage walls and furniture, causing a change in color and
shape. -
Replace gasket if it discolors whitish. (P.17)
Otherwise it may cause hot water to spill out when it is leaned or knocked
down accidentally. -
This product is intended for household use only.
-
Ensure to clean the surfaces in contact with food after use.
(See page 14-15 “Daily maintenance”. )
Part Names and Handling Instructions

How to Remove the Lid

Overheating Protection
If an empty inner container is heated, the overheat safety function (which
prevents an empty inner container from being heated) will be activated. The
power will be shut off automatically to prevent the problems that may occur
due to overheating. This will be shown on the display as shown below.
Causing
- Less than the minimum water level in the inner container was boiled.
- After water is added, the lid might be left open.
How to cancel the display
Supply water into the container, and press key.
Notice
If an empty inner container is heated, an odor will be emitted and the
container may be discolored.
How to Use

Boiling water
Dispensing (Electric dispense)
Before you use this unit for the first time
- Pour in water with another container to the maximum level.
- Close the lid securely.
- Boil the water until Reboil light goes out.
- Dispense the hot water.
- Unplug and remove the lid.
- Pour out any remaining hot water slowly via the DRAIN mark.
How to reduce the chlorine in the water
Press key to make the indicator light flash. (Long Boil mode)
Press one time while water is being boiled, and press twice while water is
being kept warm.
Extends the boiling time by about 6 minutes to reduce the chlorine by about
80% in the water.
Press key again to boil.
Pour in water with another container. Close the lid securely.
Securely plug the body plug horizontally into the body.
Plug into wall outlet.

Time required to boil water
NC-EG4000:approx. 35 min. / NC-EG3000:approx. 27 min. / NC-EG2200:approx. 20
min.
(Amount of water: Maximum Water / Room temperature: 20°C)

When the unit is not in use
Unplug, and remove the lid. Pour out any remaining hot water slowly via the
mark.

Cautions
-
Do not pour out water too swiftly.
It may cause a malfunction if water splashes over lid release part or
operation panel. -
Do not leave water in the inner container.
(It may cause the container to corrode or smell.)
Convenient use methods

Notice
- The keep-warm temperature or the timer can be set while the water is being boiled or being kept warm.
- After power is restored in the event of a power failure, the keep-warm temperature will be automatically set to 90, even if the timer or the “98”, “80” or “70” keep-warm function was previously selected.

Time required for the reboil procedure
From 98 keep-warm: approx. 2.5-4 min.
From 90 keep-warm: approx. 4-6.5 min.
From 80 keep-warm: approx. 6-12 min.
From 70 keep-warm: approx. 7-14 min.
Amount of water: Maximum
Room temperature: 20°C


Daily Maintenance
Before cleaning, be sure to disconnect the power plug from outlet, dispense
water and cool down the unit.

How to clean the inner container using citric acid.
Once every two or three months to clear scale.
More frequent cleaning may be required depending on the usage conditions.
- Make sure that the mesh filter is attached to the inner container.
- Put citric acid in the inner container.
● Amount of citric acid to be used at one time:
80 g (two packages) or seven level tablespoons
-
In case that our citric acid is not available, place 1-2 sliced lemons wrapped with a thin cloth into the inner container instead.
(The detergency of lemon is less effective than using the citric acid.) The
citric acid is available from an authorized dealer. (Model No: SAN-80N) -
Follow the directions for cleaning printed on the citric acid package.
-
Since the citric acid used for cleaning is a food additive, it is harmless to humans.
3. Add water to the maximum water level mark, and mix the citric acid and water well. Close the lid.
4. Connect the plug immediately after stirring and press key for more than 3 seconds.
5. Dispense some water, then unplug, remove the lid and drain away the hot water via the ‘DRAIN’ mark.
6. Refill with water and boil it to remove the smell of the citric acid or lemons. Then throw the hot water away as same as step 5.- To remove any discoloration from the area above the maximum water level, rub the inside lightly with a wet soft sponge.
- If the discoloration cannot be removed by rubbing, clean the inner container several times using citric acid or lemons.

Cautions
Please use citric acid to clean the inner container of this unit.
Do not fill with water above maximum water level.
Fill the inner container only with tap water (do not fill with hot water). Hot
water may spout out causing burns.
Troubleshooting
Before calling a service supplier, please check the following possible causes.
| If… | Possible cause | How to fix |
|---|
White or glittering flakes floating in the hot water.
Rough milky white substancess are adhered to inner container.| ● The cause of
this is “scale”. (see P.14) It is not flakes of fluororesin.
-
Water with a large content of minerals in it such as mineral water or ionized water, is more likely to cause a scale or white layer in the hot water.| Clean the inner container with a wet soft sponge. (See P.14)
If the “scale” still remains, clean with citric acid. (See P.15)
Boiling sounds become louder.| When “scale” adheres, boiling sounds become
louder.
Hot water has odors of chlorine.| Odors of chlorine remain depending on the
amount of chlorine in tap water.| Press key to reduce the chlorine. (See
P.10)
Hot water has an unpleasant odor.| When the unit is new, resin used in the
manufacturing process may give off a mild odor.
This will disappear with use.
If the unit is placed on surfaces such as a vinyl sheet, the odor may be
carried over into the water.
Hot water comes out by itself.| Water has been added above maximum water
level.| Lower the water level.
Hot water does not flow out smoothly.| The mesh filter may be clogged with
“scale”. (See P.14)
When scale is accumulated in the inner container and remaining hot water is
low, hot water does not flow out smoothly.
Immediately after boiling, hot water may not flow out smoothly.| Clean the
filter with a brush.
If the “scale” cannot be removed, replace the filter (See P.17)
The indicator lights flash alternately.| ● Overheating protection has been
activated (See P.9)| ● Add water and press key.
● The indicator lights may flash alternately by adding boiling water or the
way the water is supplied.| ● Press key.
● When the inner container is cleaned with citric acid, citric acid has built
up on the bottom.| ● Disconnect the plug, and stir the citric well to dispose.
Hot water does not dispense.| ● The automatic lock has been engaged.| ● Press
key.- If the problem is not fixed after checking the above possible causes, or if you think something is strange, disconnect the body plug from the unit. Wait at least 10 seconds and then re-connect the plug.
- The semi-transparent inner part inside the lid may become yellowish. This does not affect operation of the unit.
- The rattling noise in the lid is made by small ball-shaped components which prevent water from flooding out if the unit topples over.
- If the room temperature is very high, the outside of the main unit may reach about 55°C.
The unit does not turn on.| ● You poured in water directly from a tap.| ● It
is broken if the electric components are immersed in water.
Contact the store where you purchased the unit for repair.
—|—|—
● You put the unit on the sink.
● You turn the unit upside down with its bottom wet.
● You washed the unit in water.
“Reboil” and “80” indicator lights flash alternately.| ● This is malfunction
of the sensor.
● Contact the stores where you purchased.
Replacement of Parts
Rubber gasket set
Replace gaskets if they crack, lose their pliability or, for any other reasons
which allow steam to escape from between the container and the lid.

Remove lid, unscrew 3 tapping screws and remove the lid cover.
Exchange the gaskets and then place the lid cover back and secure with the
tapping screws.
Mesh filter
Replace the filter, if foreign matter which clog the filter cannot be removed,
even after you scrub with a cleaning brush, etc.

For replacement parts, please contact an authorized dealer.
| Part name | Part No. |
|---|---|
| Rubber gasket set | APH65-480 |
| Mesh filter | APB97-480-0U |
Specifications
| Model No. | NC-EG4000 | NC-EG3000 | NC-EG2200 |
|---|---|---|---|
| Power supply | 220 V ∼ 50 Hz | ||
| Power consumption | 700 W | ||
| Average power consumption in keeping warm (approx.) | at 98 | 49 Wh | |
| 40 Wh | 45 Wh | ||
| at 90 | 43 Wh | 39 Wh | 33 Wh |
| Amount of water: maximum Room temperature: 20°C | |||
| at 80 | 35 Wh | 31 Wh | 27 Wh |
| at 70 | 30 Wh | 26 Wh | 23 Wh |
| Dimensions (when the handle is tilted) | Height (approx.) | 32.4 cm | 27.5 cm |
23.8 cm
Width (approx.)| 21.7 cm| 21.7 cm| 21.7 cm
Depth (approx.)| 28.7 cm| 28.7 cm| 28.7 cm
Weight (including power cord) (approx.)| 2.2 kg| 2.1 kg| 2.0 kg
Rated capacity (approx.)| 4.0 L| 3.0 L| 2.2 L
- Under certain conditions, such as at very high altitudes and in intense cold, the unit may not function properly. Please avoid using the unit in such conditions.
- If the unit is not used during cold conditions, make sure to empty it of water. The water left in the inner container may freeze causing damage.
Panasonic Corporation
Website : https://www.panasonic.com
© Panasonic Corporation 2015
PZ05H6934
TP0815E40223
Printed in Thailand
References
- Panasonic Australia | Air Con | Cameras | Home Appliances
Read User Manual Online (PDF format)
Read User Manual Online (PDF format) >>
Download This Manual (PDF format)
Download this manual >>
Panasonic NC-EG4000 Manuals come in various types, each serving a specific purpose to help users effectively operate and maintain their devices. Here are the common types of Panasonic NC-EG4000 User Guides and the information they typically include:
- User Manuals: Provide comprehensive instructions on how to use the device, including setup, features, and operation. They often include troubleshooting tips, safety information, and maintenance guidelines.
- Service Instructions: Designed for technicians and repair professionals, these manuals offer detailed information on diagnosing and repairing issues with the device. They include schematics, parts lists, and step-by-step repair procedures.
- Installation Guides: Focus on the installation process of the device, providing detailed instructions and diagrams for proper setup. They are essential for ensuring the device is installed correctly and safely.
- Maintenance Manuals: Provide guidance on routine maintenance tasks to keep the device in optimal condition. They cover cleaning procedures, part replacements, and regular servicing tips.
- Quick Start Guides: Offer a concise overview of the essential steps needed to get the device up and running quickly. They are ideal for users who need immediate assistance with basic setup and operation.
Each type of Panasonic NC-EG4000 instruction is designed to address specific needs, ensuring users have the necessary information to use, maintain, and repair their devices effectively.
Panasonic NC-EG4000 Kitchen Appliances PDF User Guides and Manuals for Free Download: Found (1) Manuals for Panasonic NC-EG4000 Device Model (Operating Instructions Manual)
Panasonic NC-EG4000 Operating Instructions Manual
Details:
- Manufacturer: Panasonic
- Product Name/ID: Panasonic NC-EG4000 / #1002006
- Category: Kitchen Appliances
- File Path: panasonic/nc-eg4000_1002006.pdf
- Last Updated: 26 May 2025
- Description: This manual for Panasonic NC-EG4000 offers complete guidance on installation, operational tips, and regular maintenance, ensuring your device performs optimally and efficiently at all times.
- Document Type: User Manual
- Pages: 32
Download PDF
Read Online
The Panasonic NC-EG4000 is an electric kettle that has garnered attention for its innovative design and functionality. This appliance excels in both performance and aesthetics, making it a popular choice among consumers looking for a reliable and stylish kettle. The combination of various features makes it stand out in a competitive market filled with other popular brands.
One of the most notable aspects of the Panasonic NC-EG4000 is its capacity. With a large 4.0-liter capacity, it is perfect for family gatherings or entertaining guests. You can brew multiple cups of tea or coffee at once, reducing the time spent waiting for water to boil. The sleek design also ensures that it won’t look out of place in a modern kitchen, as it complements various decor styles.
Additionally, the Panasonic NC-EG4000 comes with several temperature settings, allowing users to choose the exact temperature for different types of beverages. This feature ensures that your precious tea leaves or coffee grounds are brewed at the optimal temperature, enhancing flavor and aroma. Here is a list of some key features:
- 4.0-liter capacity
- Multiple temperature settings (60°C, 70°C, 80°C, 90°C, and 100°C)
- Automatic shut-off function
- Keep warm function for maintaining heat over time
- Removable and washable filter
The build quality of the Panasonic NC-EG4000 is impressive. Made with high-grade materials, it ensures durability and longevity. The kettle’s interior features a stainless steel body, which not only makes it easy to clean but also helps in maintaining the purity of water. The exterior is designed with a brushed finish that adds a touch of elegance to it. Users can appreciate the thoughtful details put into this product.
Another standout feature is the automatic shut-off function, which provides an added layer of safety. This is particularly important for busy households or for those who may forget to turn off the kettle. Having peace of mind that the kettle will turn off by itself is a blessing for many users, allowing them to focus on other tasks without worry.
In terms of usability, the Panasonic NC-EG4000 has been designed with user experience in mind. The ergonomic handle and spout make pouring easy and prevent unnecessary spills. The kettle also features a large opening that facilitates easy filling and cleaning. Users will find that the kettle is not only functional but also a pleasure to use daily.
In conclusion, the Panasonic NC-EG4000 is a top-notch electric kettle that marries style with functionality. Its large capacity, multiple temperature settings, and automatic shut-off function make it a well-rounded choice for those looking to enhance their beverage preparation experience. The quality and design are sure to impress anyone who uses it regularly. If you’re in the market for a reliable and aesthetically pleasing electric kettle, the Panasonic NC-EG4000 should definitely be on your list.
Panasonic NC-EG4000, NC-EG3000, NC-EG2200 Manual
Main Features
Easy to Clean
- Charcoal coated non-stick inner container
The inner container is fluoridated with floury charcoal, which is easy to clean and maintain.
Convenient
- Electric dispense
(See «Dispensing») - Slow Drip mode for making drip coffee (see «Convenient use methods»)
Economy use
- 6h Timer
(See «Setting the 6h timer») - 4 Keep-warm temperature selections
98 / 90 / 80 / 70 keep-warm temperature can be selected.
(See «Keep-warm Function»)
Part Names and Handling Instructions

*The shape of plug differs according to region.
How to Remove the Lid
Press and lift the lid opening lever to open the lid.
To close
Press down until hearing «click» sound.
Pull it up slantwise while pressing the lid release lever.
To attach
Insert the lid slantwise.
Overheating Protection
If an empty inner container is heated, the overheat safety function (which prevents an empty inner container from being heated) will be activated. The power will be shut off automatically to prevent the problems that may occur due to overheating. This will be shown on the display as shown below.
Causing
- Less than the minimum water level in the inner container was boiled.
- After water is added, the lid might be left open.
How to cancel the display
Supply water into the container, and press key.
Notice
If an empty inner container is heated, an odor will be emitted and the container may be discolored.
How to Use

Before you use this unit for the first time
- Pour in water with another container to the maximum level.
- Close the lid securely.
- Boil the water until Reboil light goes out.
- Dispense the hot water.
- Unplug and remove the lid.
- Pour out any remaining hot water slowly via the DRAIN mark.
How to reduce the chlorine in the water
Press key to make the indicator light flash. (Long Boil mode)
(Press one time while water is being boiled, and press twice while water is being kept warm.)
Extends the boiling time by about 6 minutes to reduce the chlorine by about 80% in the water.
- Press key again to boil.
Boiling water
Pour in water with another container. Close the lid securely.
Securely plug the body plug horizontally into the body. Plug into wall outlet. (See above )

Time required to boil water
NC-EG4000:approx. 35 min. / NC-EG3000:approx. 27 min. / NC-EG2200:approx. 20 min.
(Amount of water: Maximum Water / Room temperature: 20°C)
Dispensing
Press key to release lock. The indicator light beside the key will light up.
Press twice key for slow drip. The indicator light beside the key will flash. (See «slow drip» in «Convenient use methods» section)
Press key to dispense the hot water.
The key will automatically lock again 10 seconds after stop dispensing hot water.
When the unit is not in use
Unplug, and remove the lid. Pour out any remaining hot water slowly via the mark.
- Do not pour out water too swiftly.
(If water splashes over lid release part or operation panel, it may cause a malfunction.) - Do not leave water in the inner container.
(It may cause the container to corrode or smell.)
Convenient use methods

Notice
- The keep-warm temperature or the timer can be set while the water is being boiled or being kept warm.
- After power is restored in the event of a power failure, the keep-warm temperature will be automatically set to 90, even if the timer or the «98», «80» or «70» keep-warm function was previously selected.
Reboil
Press key to reboil water that is being kept warm.
After a few minute, water will be boiled.
- The keep-warm temperature setting is left unchanged.
Time required for the reboil procedure
From 98 keep-warm: approx. 2.5-4 min.
From 90 keep-warm: approx. 4-6.5 min.
From 80 keep-warm: approx. 6-12 min.
From 70 keep-warm: approx. 7-14 min.
(Amount of water: Maximum
Room temperature: 20°C)
Keep-warm function
Press key.
Each time the key is pressed, » » mark will shift to the next choice and change the keep-warm temperature or set the timer.
After a short time, water will be kept warm at approximately 80℃.
Time required to reach the settled keep-warm temperature
keep-warm: approx. 2-4 min.
keep-warm: approx. 0.5-1 hour
keep-warm: approx. 1.5-2.5 hours
(Amount of water: Maximum
Room temperature: 20°C
Previous keep-warm setting: 90°C)
Setting the 6h timer
6 hours later, timer will turn off and water starts boiling
When the water is brought up to boiling temperature, it will be kept warm at 90℃.
Slow Drip mode for making drip coffee
Press key twice, then press key for making drip coffee.
Each time is pressed, function will be switched as below.
Daily Maintenance
(Before cleaning, be sure to disconnect the power plug from outlet, dispense water and cool down the unit.)

When storing the unit
- Dry it thoroughly.
- Put it into a plastic bag and seal the bag to keep insects from getting in.
How to clean the inner container using citric acid.
(Once every two or three months to clear scale. More frequent cleaning may be required depending on the usage conditions.)
- Make sure that the mesh filter is attached to the inner container.
- Put citric acid in the inner container.
- Amount of citric acid to be used at one time:
80 g (two packages) or seven level tablespoons
* In case that our citric acid is not available, place 1-2 sliced lemons wrapped with a thin cloth into the inner container instead.
(The detergency of lemon is less effective than using the citric acid.)
- Amount of citric acid to be used at one time:
The citric acid is available from an authorized dealer. (Model No: SAN-80N)
* Follow the directions for cleaning printed on the citric acid package.
* Since the citric acid used for cleaning is a food additive, it is harmless to humans.
- Add water to the maximum water level mark, and mix the citric acid and water well. Close the lid.
- Connect the plug immediately after stirring and press more than 3 seconds.
- Dispense some water, then unplug, remove the lid and drain away the hot water via the ‘DRAIN’ mark.
- Refill with water and boil it to remove the smell of the citric acid or lemons. Then throw the hot water away as same as step

- To remove any discoloration from the area above the maximum water level, rub the inside lightly with a wet soft sponge.
- If the discoloration cannot be removed by rubbing, clean the inner container several times using citric acid or lemons.
- Please use citric acid to clean the inner container of this unit.
- Do not fill with water above maximum water level.
- Fill the inner container only with tap water (do not fill with hot water). Hot water may spout out causing burns.
Troubleshooting
Before calling a service supplier, please check the following possible causes.
| If… | Possible cause | How to fix |
| White or glittering flakes floating in the hot water. Rough milky white substances are adhered to inner container. |
|
|
Boiling sounds become louder |
|
|
Hot water has odors of chlorine |
|
|
Hot water has an unpleasant odor |
|
|
Hot water comes out by itself |
|
|
Hot water does not flow out smoothly |
|
|
The indicator lights flash alternately |
|
|
|
|
|
|
|
|
Hot water does not dispense |
|
|
|
||
The unit does not turn on |
|
|
|
||
|
||
|
||
Reboil and 80 indicator lights flash alternately |
|
Replacement of Parts
Rubber gasket set
Replace gaskets if they crack, lose their pliability or, for any other reasons which allow steam to escape from between the container and the lid.
Remove lid, unscrew 3 tapping screws and remove the lid cover.
Exchange the gaskets and then place the lid cover back and secure with the tapping screws.
Mesh filter
Replace the filter, if foreign matter which clog the filter cannot be removed, even after you scrub with a cleaning brush, etc.
The filter can be removed by pulling firmly on it.
For replacement parts, please contact an authorized dealer.
| Part name | Part No. |
| Rubber gasket set | APH65-480 |
| Mesh filter | APB97-480-0U |
Specifications
| Model No. | NC-EG4000 | NC-EG3000 | NC-EG2200 | |
| Power supply | 220V ~ 50Hz | |||
| Power consumption | 700 W | |||
| Average power consumption in keeping warm (approx.) (Amount of water: maximum Room temperature: 20°C) |
at 98 | 49 Wh | 45 Wh | 40 Wh |
| at 90 | 43 Wh | 39 Wh | 33 Wh | |
| at 80 | 35 Wh | 31 Wh | 27 Wh | |
| at 70 | 30 Wh | 26 Wh | 23 Wh | |
| Dimensions (when the handle is tilted) |
Height (approx.) | 32.4 cm | 27.5 cm | 23.8 cm |
| Width (approx.) | 21.7 cm | 21.7 cm | 21.7 cm | |
| Depth (approx.) | 28.7 cm | 28.7 cm | 28.7 cm | |
| Weight (including power cord) (approx.) | 2.2 kg | 2.1 kg | 2.0 kg | |
| Rated capacity (approx.) | 4.0 L | 3.0 L | 2.2 L |
* Under certain conditions, such as at very high altitudes and in intense cold, the unit may not function properly. Please avoid using the unit in such conditions.
* If the unit is not used during cold conditions, make sure to empty it of water. The water left in the inner container may freeze causing damage.
Safety Precautions
For your safety and in order to prevent the property damage and the hazards to the users and others, please read the following instructions strictly.
- The signals indicate harm and damage when the product is used wrongly.
- The symbols indicate specified items that must be followed.
To Prevent Burns
- Do not let the unit fall over. Do not lift, tilt or shake the unit or carry it by the lid.
Even when the Pour Out key is locked, hot water may leak through the dispensing spout and the steam vent, causing burns, if the unit falls over or is tilted. - Do not close the lid by force.
Hot water can spill causing burns. - Do not pour in water above the maximum water level indication line.
If the appliance is overfilled, boiling water may be ejected. Hot water can spill causing burns. - Do not boil anything other than water.
Do not heat tea bags, tea leaves, milk, alcohol or anything other than water which may cause it to spurt out hot liquid or steam and cause burns.
The water tube may also get clogged, the inner container may burn or corrode, and the fluororesin insulating coating may peel off. - Do not block the steam vent.
Hot water can overflow causing burns. - Do not throw away the remaining hot water while the lid is attached.
If the lid comes off, hot water may splash causing burns. - Do not touch the steam vent.
This may cause burns. Take special care to prevent infants from touching the steam vent. - Do not place the unit on unstable surfaces.
The appliance may topple over causing burns. - Do not open the lid or dispense hot water while boiling.
Splashing hot water or steam may cause burns. - Do not rotate the unit while dispensing hot water.
Splashing hot water may cause burns. - Do not touch the hot parts of the unit during use or shortly after use.
This may cause burns.
- This appliance is not intended for use by persons (including children) with reduced physical, sensory or mental capabilities, or lack of experience and knowledge, unless they have been given supervision or instruction concerning use of the appliance by a person responsible for their safety.
Children should be supervised to ensure that they do not play with the appliance. - Close the lid securely.
If the unit topples, hot water may spill out causing burns. - When opening or closing the lid, keep hands away from the steam.
Steam can cause burns. - When carrying the unit, do not touch the lid opening lever.
The lid may open causing burns and other injury. - The heating element surface is subject to residual heat after use. Wait until the unit is cooled down before maintenance.
A hot appliance may cause burns.- When disposing hot water, be careful not to get burned.
Power Cord
* The shape of plug differs according to region.
- Never do anything that might cause damage to the cord, power plug or body plug.
Do not damage them, modify them, place hot objects near to them, bend them, twist them, stretch them, place heavy objects on them, or bundle them together.
If the unit is used when damaged, electrical short circuit or fire may cause.- If the supply cord is damaged, it must be replaced by the manufacturer, its service centre or similarly qualified persons in order to avoid a hazard.
- Do not connect or disconnect the power plug or the body plug with wet hands.
This may cause electric shock. - Do not allow infants access to the body plug.
You must pay special attention to prevent infants from putting the body plug into their mouths. This may cause electric shock or injury. - Do not place small metal parts near the body plug.
This may cause electric shock, electrical short circuit or fire.
- Do not use a different power cord and do not use this power cord with any other device. (Do not use a power cord other than the one designed specifically for the unit.)
It may cause malfunction or fire.
During use
- Do not use the unit on surfaces that can be affected by heat for a long time.
The unit may get discolored or break up. - Do not place near walls or furniture.
Steam and heat could damage walls and furniture, causing a change in color and shape.
- Replace gasket if it discolors whitish.
Otherwise it may cause hot water to spill out when it is leaned or knocked down accidentally. - This product is intended for household use only.
- Ensure to clean the surfaces in contact with food after use. (See «Daily maintenance».)
Documents / Resources
Download manual
Here you can download full pdf version of manual, it may contain additional safety instructions, warranty information, FCC rules, etc.
Download Panasonic NC-EG4000, NC-EG3000, NC-EG2200 Manual