
Инструкция и руководство для
Panasonic NV-GS11
67 страниц подробных инструкций и пользовательских руководств по эксплуатации на русском
Panasonic
Operating Instructions
Инструкция no эксплуатации
шщштя
Digital Video Camera
Model No
NV-GS
1 1
GC/GK
NV-GS
1 5
GC/GK
Mini
IK
flillJl’iij.
ii„
PAL Before use, please read these instructions completely.
m
MultiMediaCard
Перед пользованием прочтите, пожалуйста, эту инструкцию
полностью.
LSQT0781 А
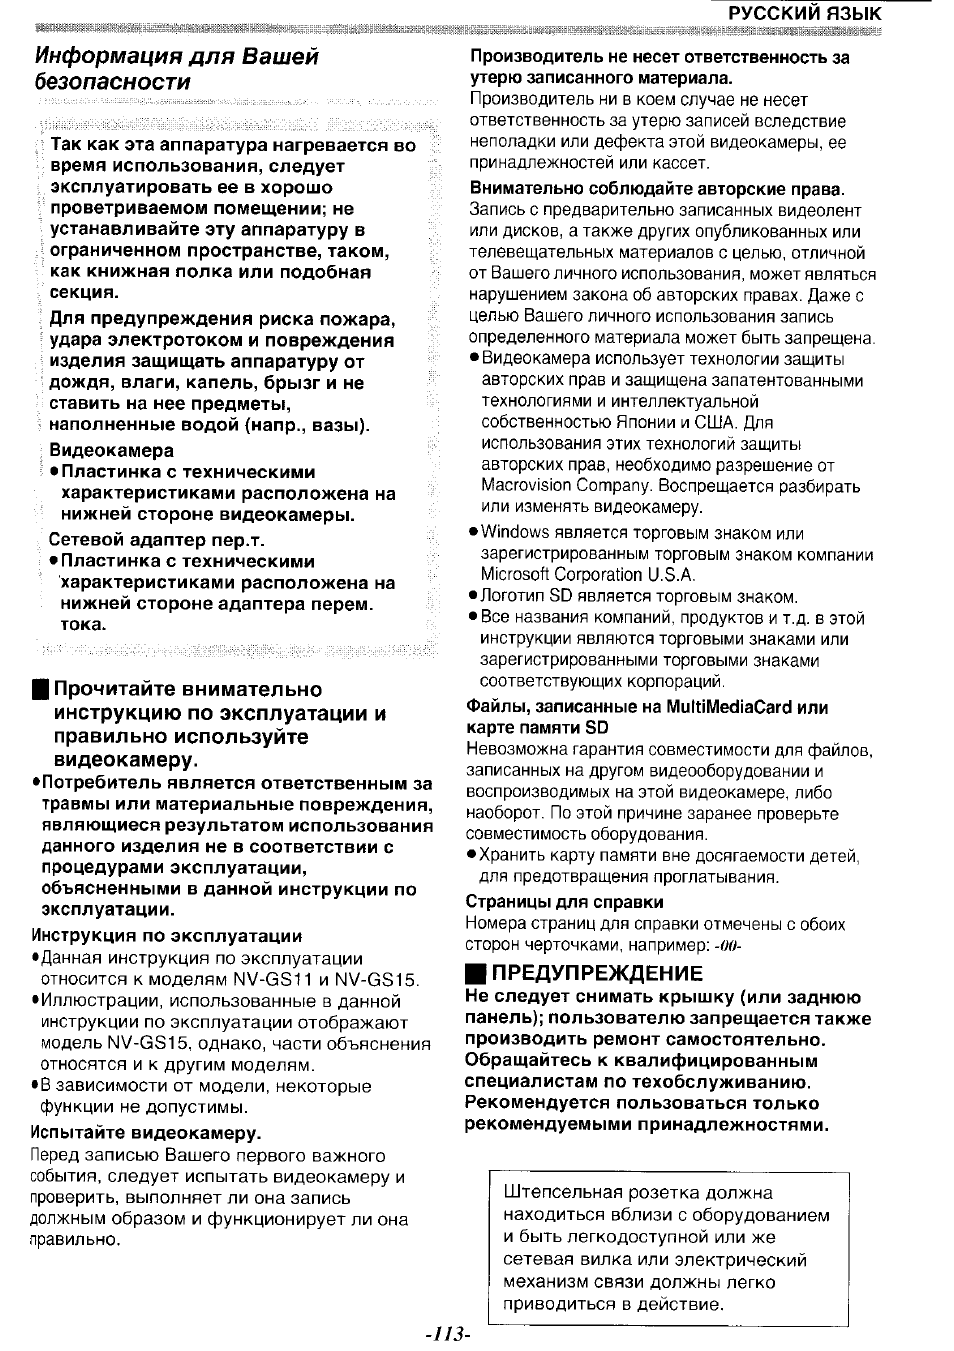
Информация для Вашей
безопасности
II
Так как эта аппаратура нагревается во
время использования, следует
1
эксплуатировать ее в хорошо
1 проветриваемом помещении; не
устанавливайте эту аппаратуру в
5 ограниченном пространстве, таком,
как книжная полка или подобная
секция.
I Для предупреждения риска пожара,
! удара электротоком и повреждения
^ изделия защищать аппаратуру от
^ дождя, влаги, капель, брызг и не
; ставить на нее предметы,
1 наполненные водой (напр., вазы).
Видеокамера
^ »Пластинка с техническими
характеристиками расположена на
нижней стороне видеокамеры.
Сетевой адаптер пер.т.
• Пластинка с техническими
характеристиками расположена на
нижней стороне адаптера перем.
тока.
I Прочитайте внимательно
инструкцию по эксплуатации и
правильно используйте
видеокамеру.
• Потребитель является ответственным за
травмы или материальные повреждения,
являющиеся результатом использования
данного изделия не в соответствии с
процедурами эксплуатации,
объясненными в данной инструкции по
эксплуатации.
Инструкция по эксплуатации
•Данная инструкция по эксплуатации
относится к моделям М\/-6311 и М\/-6815.
• Иллюстрации, использованнь!е в данной
инструкции по эксплуатации отображают
модель МУ-0515, однако, части объяснения
относятся и к другим моделям.
• В зависимости от модели, некоторые
функции не допустимы.
Испытайте видеокамеру.
Перед записью Вашего первого важного
события, следует испытать видеокамеру и
проверить, выполняет ли она запись
должным образом и функционирует ли она
правильно.
РУССКИМ язык
Производитель не несет ответственность за
утерю записанного материала.
Производитель ни в коем случае не несет
ответственность за утерю записей вследствие
неполадки или дефекта этой видеокамеры, ее
принадлежностей или кассет.
Внимательно соблюдайте авторские права.
Запись с предварительно записанных видеолент
или дисков, а также других опубликованных или
телевещательных материалов с целью, отличной
от Вашего личного использования, может являться
нарушением закона об авторских правах. Даже с
целью Вашего личного использования запись
определенного материала может быть запрещена.
• Видеокамера использует технологии защиты
авторских прав и защищена запатентованными
технологиями и интеллектуальной
собственностью Японии и США. Для
использования этих технологий защиты
авторских прав, необходимо разрешение от
Macrovision Соглрапу. Воспрещается разбирать
или изменять видеокамеру.
• Windows является торговым знаком или
зарегистрированным торговым знаком компании
Microsoft Corporation U.S.A.
• Логотип SD является торговым знаком.
• Все названия компаний, продуктов и т.д. в этой
инструкции являются торговыми знаками или
зарегистрированными торговыми знаками
соответствующих корпораций.
Файлы, записанные на MultiMediaCard или
карте памяти SD
Невозможна гарантия совместимости для файлов,
записанных на другом видеооборудовании и
воспроизводимых на этой видеокамере, либо
наоборот. По этой причине заранее проверьте
совместимость оборудования.
• Хранить карту памяти вне досягаемости детей,
для предотвращения проглатывания.
Страницы для справки
Номера страниц для справки отмечены с обоих
сторон черточками, например:
-оо-
и ПРЕДУПРЕЖДЕНИЕ
Не следует снимать крышку (или заднюю
панель); пользователю запрещается также
производить ремонт самостоятельно.
Обращайтесь к квалифицированным
специалистам по техобслуживанию.
Рекомендуется пользоваться только
рекомендуемыми принадлежностями.
-ПЗ-
Штепсельная розетка должна
находиться вблизи с оборудованием
и быть легкодоступной или же
сетевая вилка или электрический
механизм связи должны легко
приводиться в действие.
Содержание
т^ш& iiiii
Информация для Вашей
безопасности………………
Перед пользованием
время зарядки и резерв времени
Пользование видоискателем
Перезарядка внутреннего литиевого
113
Режим записи
Относительно записи……………………………. … 131
Запись на ленту……………………………………. … 131
116
Запись стоп-кадра на ленту
(Фотоснимок) (только NV-GS11)………….. … 132
116
Запись стоп-кадра на карту
117
(Фотоснимок) (только NV-GS15)………….. … 133
120
Запись со встроенным видео светом
121
LED Video light……………………………………. … 134
Быстрый старт……………………………………… … 134
122
Запись с автоматическим таймером…………. 135
122
Функции наезда/отъезда……………………….. … 135
122
Функция цифрового увеличения……………….. 135
123
Функция стабилизации
123
изображения……………………………………… … 136
124
Функции съемки “из затемнения”
124
/“в затемнение”…………………………………… … 136
124
Функция компенсации контржурного
света ………………………………………………… … 137
125
Функции ночного видения……………………… … 137
126
Функция неконтрастного
126
изображения…………………………………………. 137
129
Функция снижения шума ветра…………………. 138
Функция “кино”……………………………………… … 138
129
Запись в особых ситуациях…………………… … 138
130
Запись в естественных тонах………………… … 139
130
Ручная настройка баланса белого……………. 139
Ручная настройка скорости затвора………. … 140
Ручная настройка диафрагмы………………….. 141
Ручная настройка фокуса……………………… … 141
Функции цифрового эффекта………………… … 142
•
114
—
Режим воспроизведения
Воспроизведение ленты………………………… 145
Поиск воспроизводимой сцены………………. 146
Замедленное воспроизведение………….. . 146
Воспроизведение стоп-кадра
/покадровое воспроизведение …………….. 146
Функции поиска индекса ……………………….. 147
Функция увеличения при
воспроизведении ……………………………….. 148
Функции цифровых эффектов при
воспроизведении………………………………… 148
Воспроизведение карты
(только NV-GS15)………………………………… 149
Показ слайдов (только NV-GS15)……………. 150
Создание титра (только NV-GS15)…………. 150
Добавление титра (только NV-GS15)………. 151
Запись данных печати на карту
(только NV-GS15)……………………………….. 151
Защита файлов на карте
(только NV-GS15)………………………………… 152
Удаление записанных на карте файлов
(только NV-GS15)………………………………… 152
Форматирование карты
(только NV-GS15)………………………………… 153
Воспроизведение на телевизоре……………. 153
Режим редактирования
Запись с ленты на карту
(только NV-GS15)…………………………………. 154
Запись кадров с карты на ленту
(только NV-GS15)………………………………… 154
Дублирование звука……………………………….. 154
Копирование на кассету S-VHS
(илиУНЗ)……………………………………………… 155
Запись содержания с другой
аппаратуры…………………………………………. 156
Применение кабеля DV для записи…………. 156
С ПК
Перенос стоп-кадров на ПК
(только NV-GS15)………………………………… 157
Использование как камеры Web
или с DV STUDIO…………………………………. 157
Пользование картой на персональном
компьютере (только NV-GS15)……………… 158
Прочее
Индикация……………………………………………… 159
Инициализация режимов………………………… 160
Индикаторы предупреждения/аварии…. 161
Примечания и советы…………………………….. 162
Предосторожности по пользованию………… 168
До обращения в ремонт (неисправности
и меры по устранению)………………………… 172
Использование кнопки RESET………………… 174
Пояснение терминологии……………………….. 175
Характеристики
Характеристики………………………………………. 177
-775-
Перед пользованием
Перед пользованием
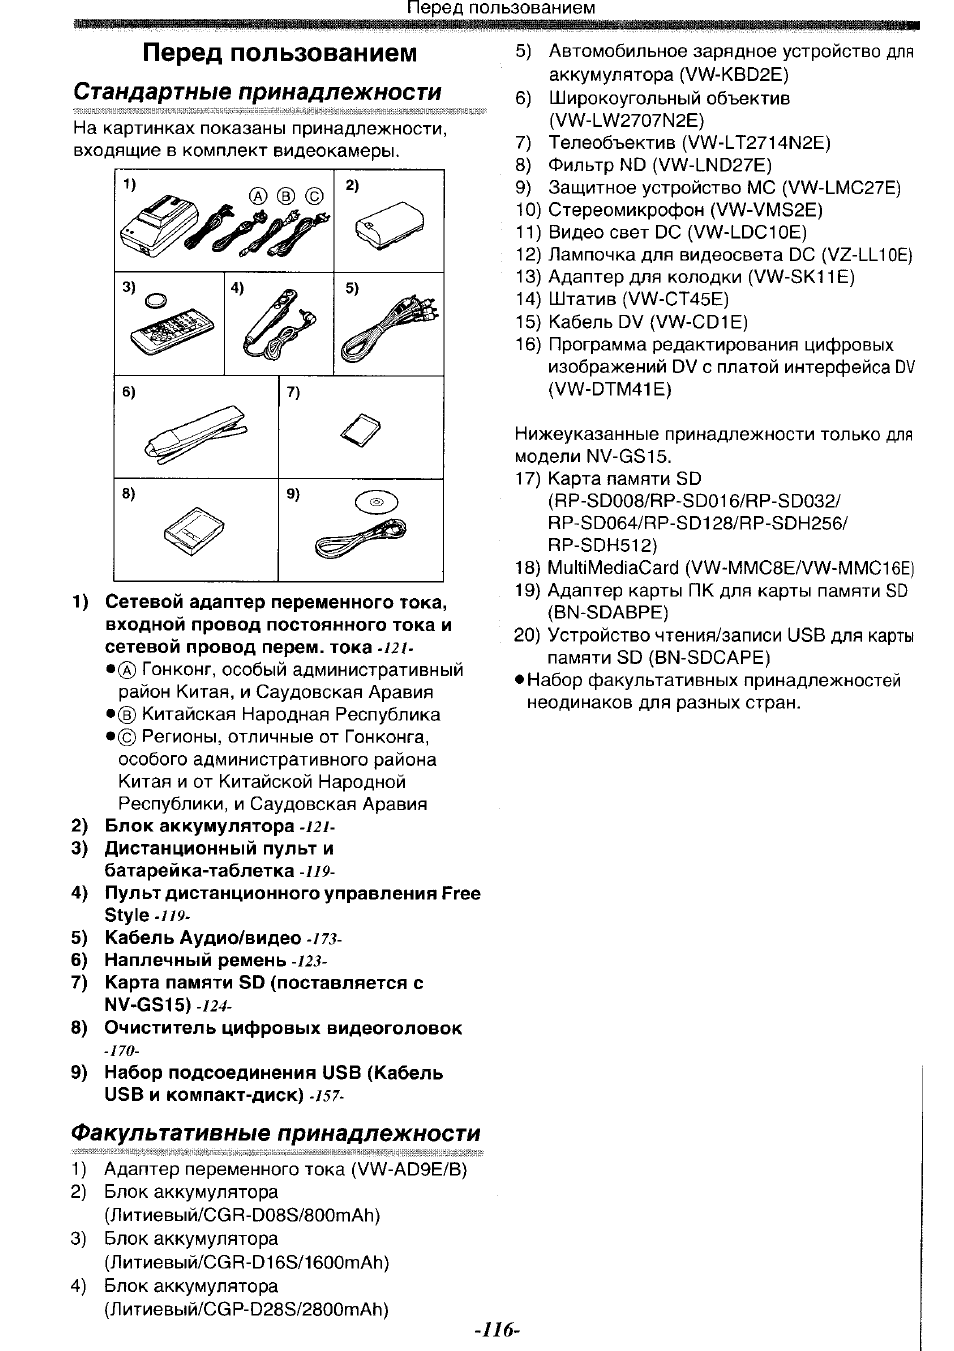
Стандартные принадлежности
На картинках показаны принадлежности,
входящие в комплект видеокамеры.
® ® ©
6
)
8
)
2
)
7)
9)
1
)
2
)
3)
4)
5)
6)
7)
8
)
9)
Сетевой адаптер переменного тока,
входной провод постоянного тока и
сетевой провод перем. тока
-I2i-
•® Гонконг, особый административный
район Китая, и Саудовская Аравия
•® Китайская Народная Республика
•© Регионы, отличные от Гонконга,
особого административного района
Китая и от Китайской Народной
Республики,и Саудовская Аравия
Блок аккумулятора
-I2i-
Дистанционный пульт и
батарейка-таблетка -/79-
Пульт дистанционного управления Free
Style
—
1
19-
Кабель
Аудио/видео
-из-
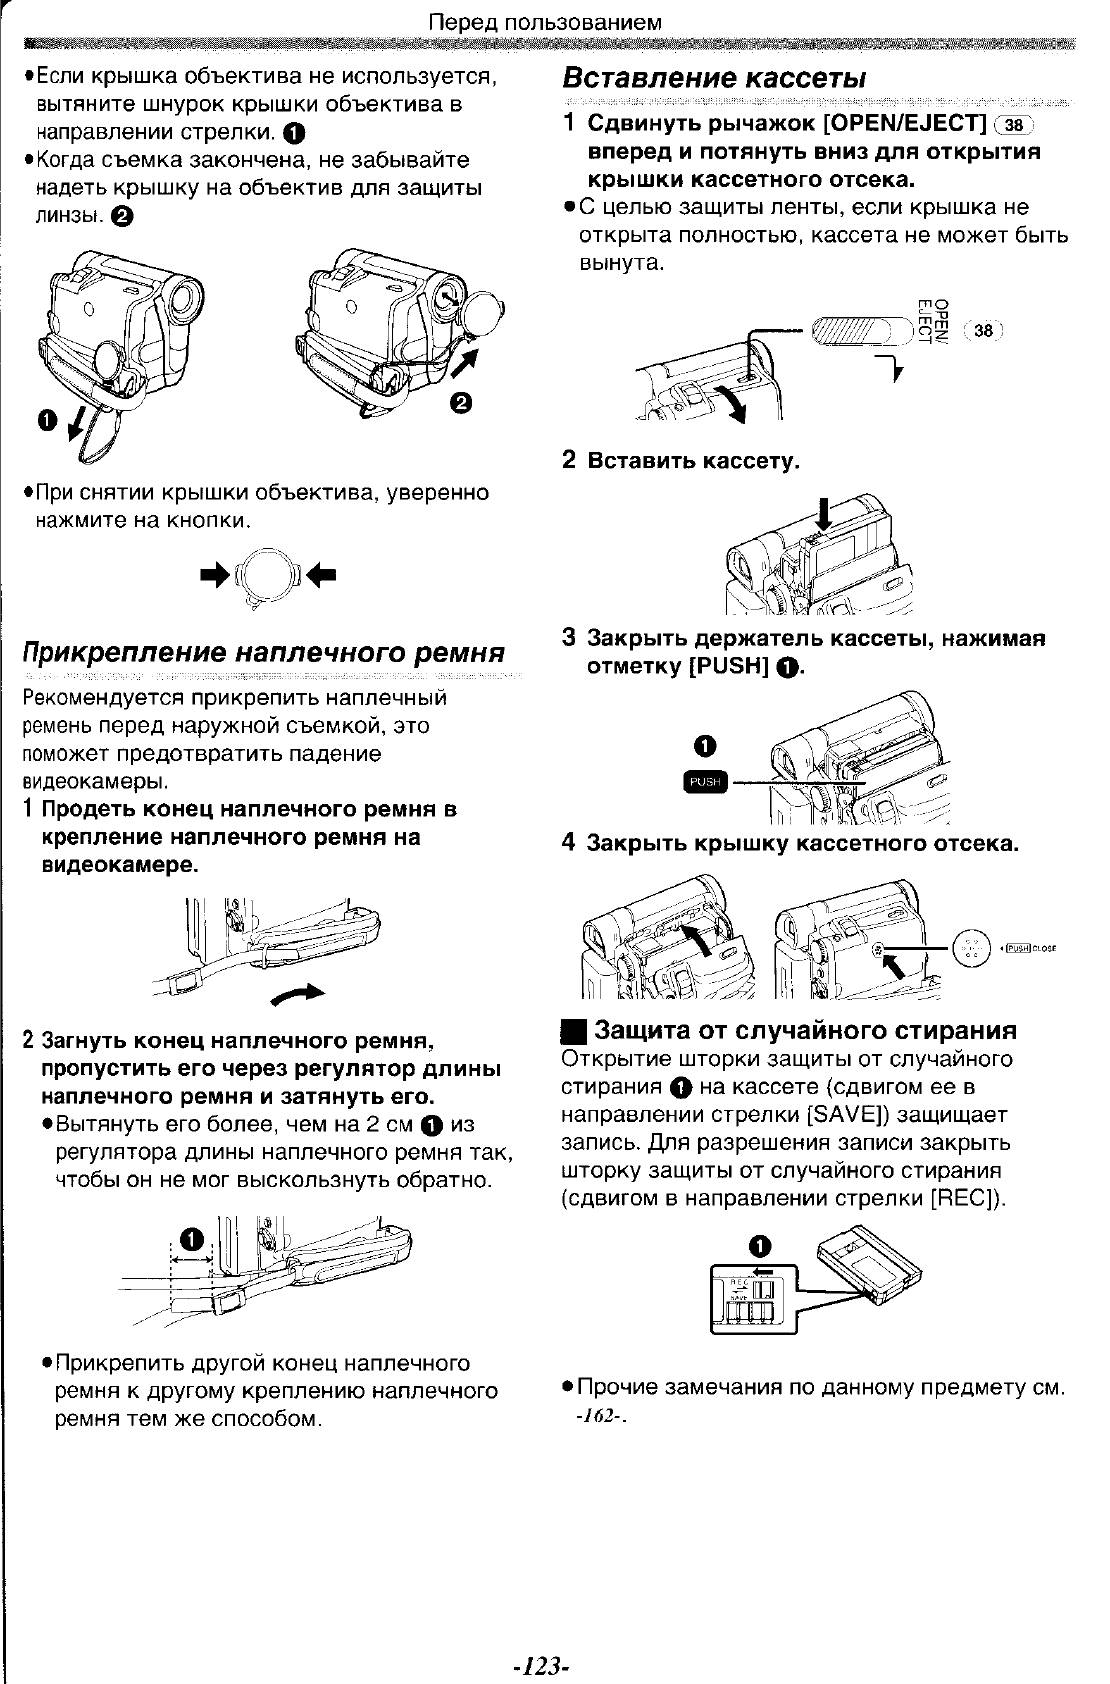
Наплечный ремень
-123-
Карта
памяти SD (поставляется с
NV-GS15)
-124-
Очиститель цифровых видеоголовок
-/79-
Набор подсоединения USB (Кабель
USB и компакт-диск)
-157-
Факультативные принадлежности
1
)
2
)
3)
4)
Адаптер переменного тока (\/\Л/-А09Е/В)
Блок аккумулятора
(Литиевый/СОР-0088/800тАИ)
Блок аккумулятора
(Литиевый/ССР-0165/1600ппАЬ)
Блок аккумулятора
{Литиевый/ССР-0283/2800тАЬ)
5)
6
)
7)
8
)
9)
Автомобильное зарядное устройство для
аккумулятора (\/\Л/-КВ02Е)
Широкоугольный объектив
(VW-LW2707N2E)
Телеобъектив (VW-LT2714N2E)
Фильтр N0 (\/\Л/-1М027Е)
Защитное устройство МС (\/У\/-ЕМС27Е)
10) Стереомикрофон (\/\/7-\/М32Е)
11) Видео свет ОС (VW-LDC10E)
12) Лампочка для видеосвета ОС (\/7-Ш0Е)
13) Адаптер для колодки (\/\Л/-ЗК11Е)
14) Штатив (У\Л/-СТ45Е)
15) Кабель ОУ (УУУ-С01Е)
16) Программа редактирования цифровых
изображений
ОУ
с платой интерфейса ОУ
{УУ7-ОТМ41Е)
Нижеуказанные принадлежности только для
модели М\/-С315.
17) Карта памяти 30
(РР-30008/РР-30016/РР-30032/
РР-ЗО064/РР-ЗО128/РР-ЗОН256/
РР-30Н512)
18) МиШМеб1аСагб (VW-MMC8E/VW-MMC16E)
19) Адаптер карты ПК для карты памяти 30
(ВМ-ЗОАВРЕ)
20) Устройство чтения/записи иЗВ для карты
памяти 30 (ВМ-ЗОСАРЕ)
• Набор факультативных принадлежностей
неодинаков для разных стран.
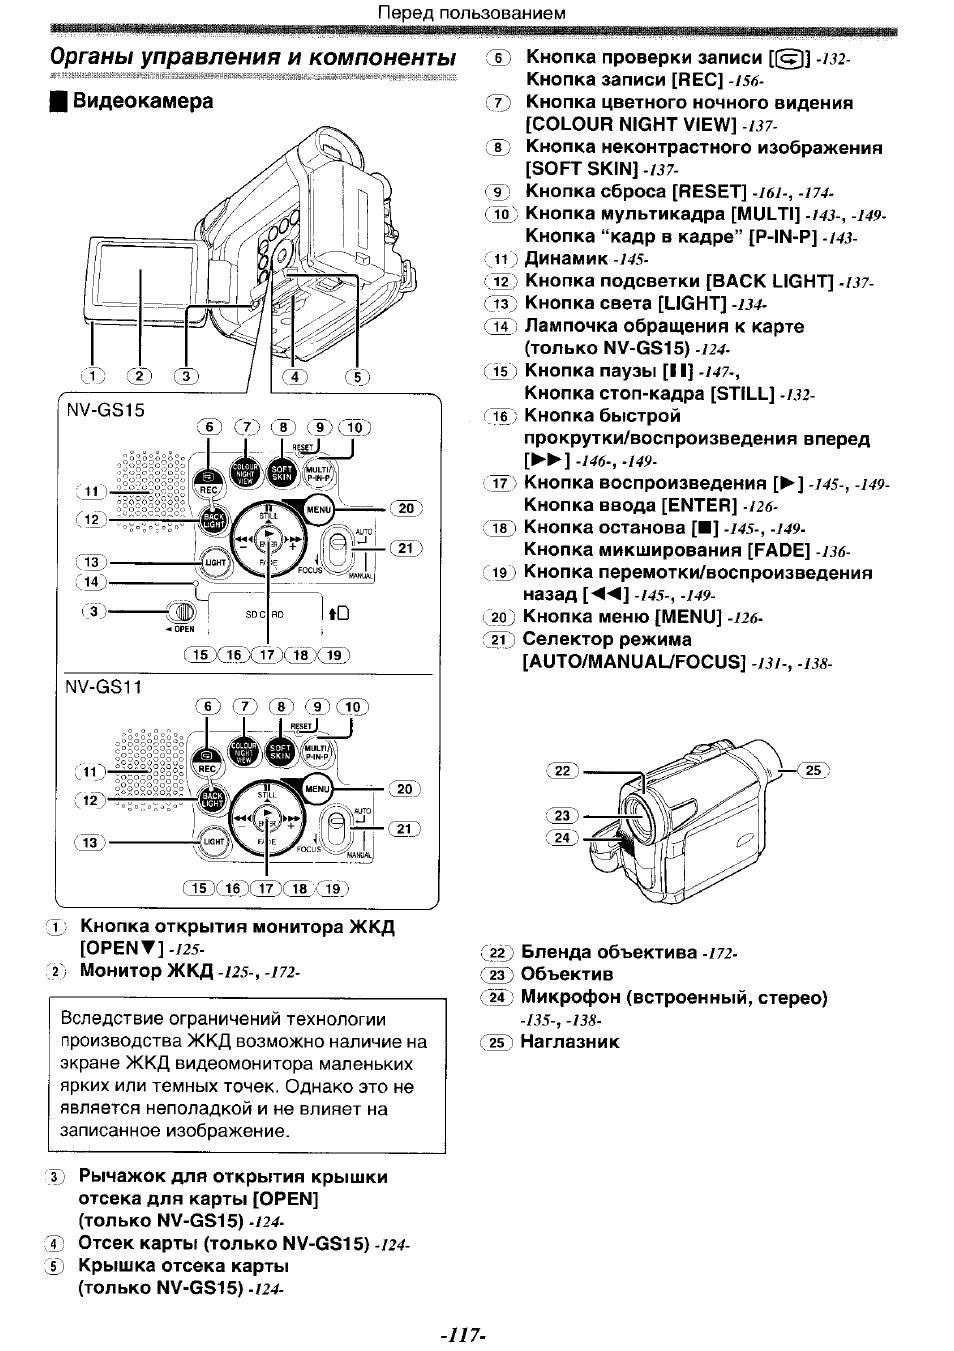
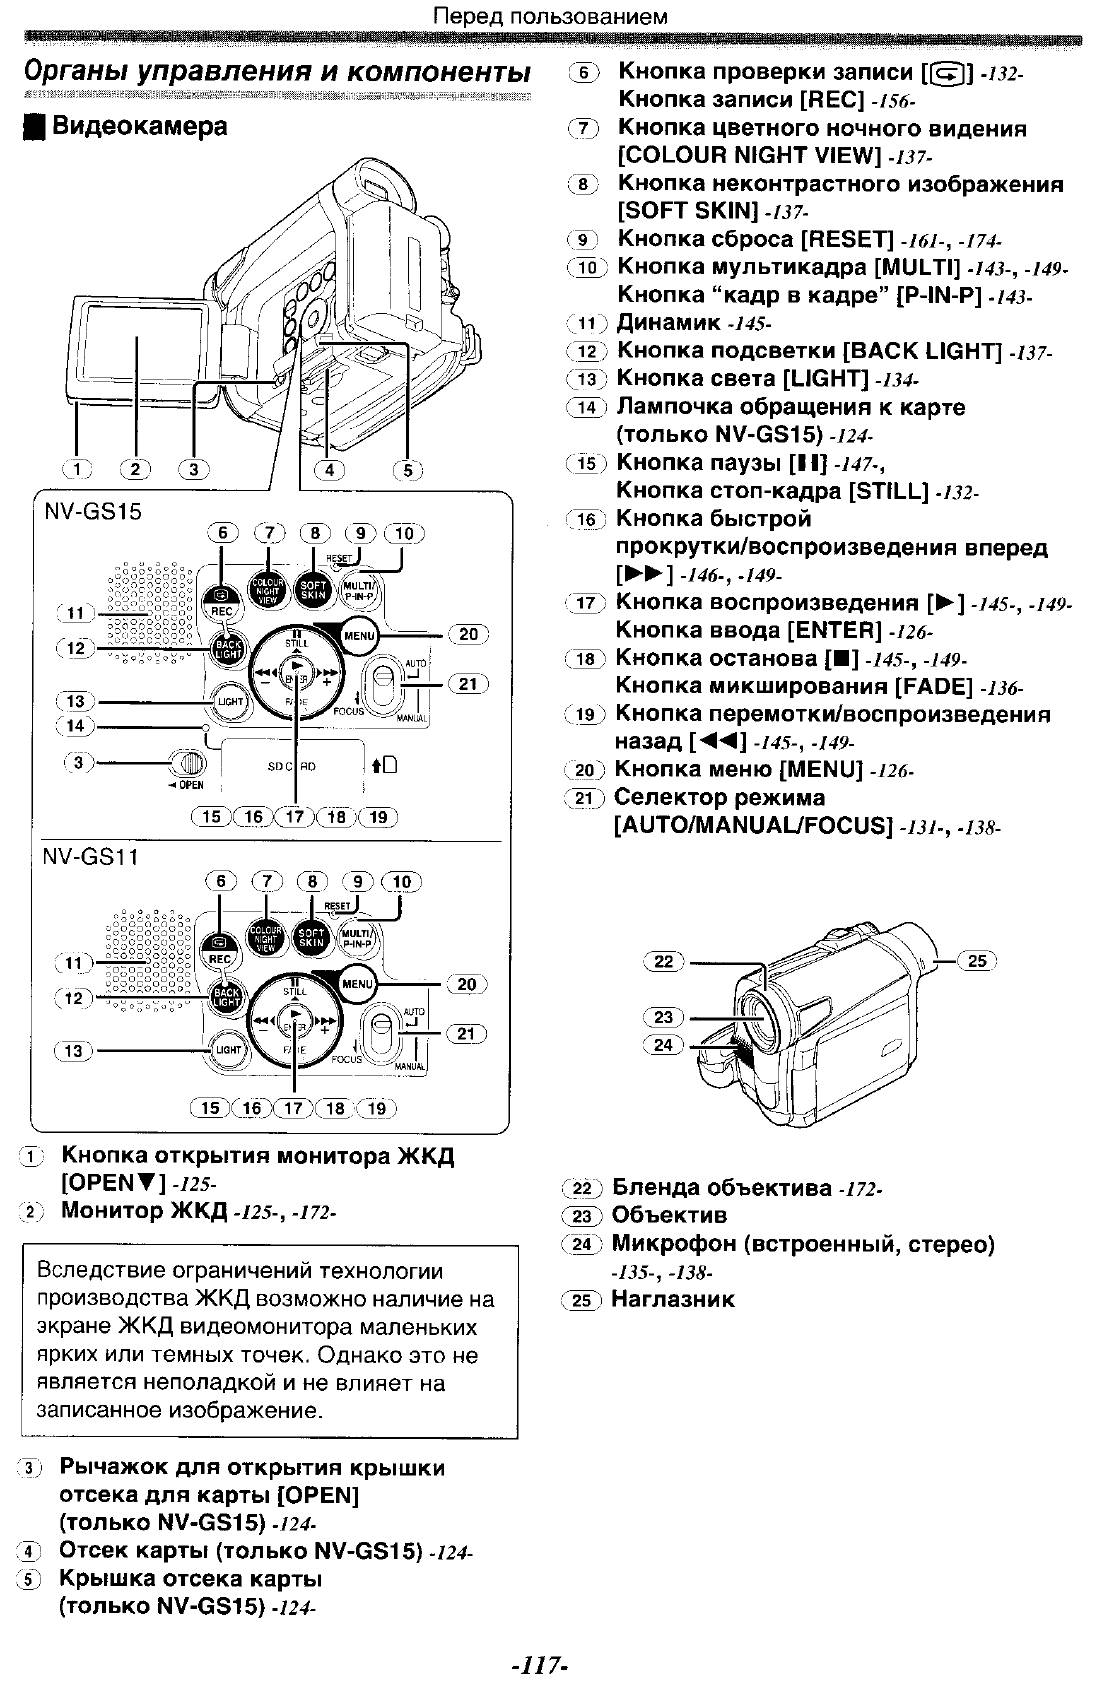
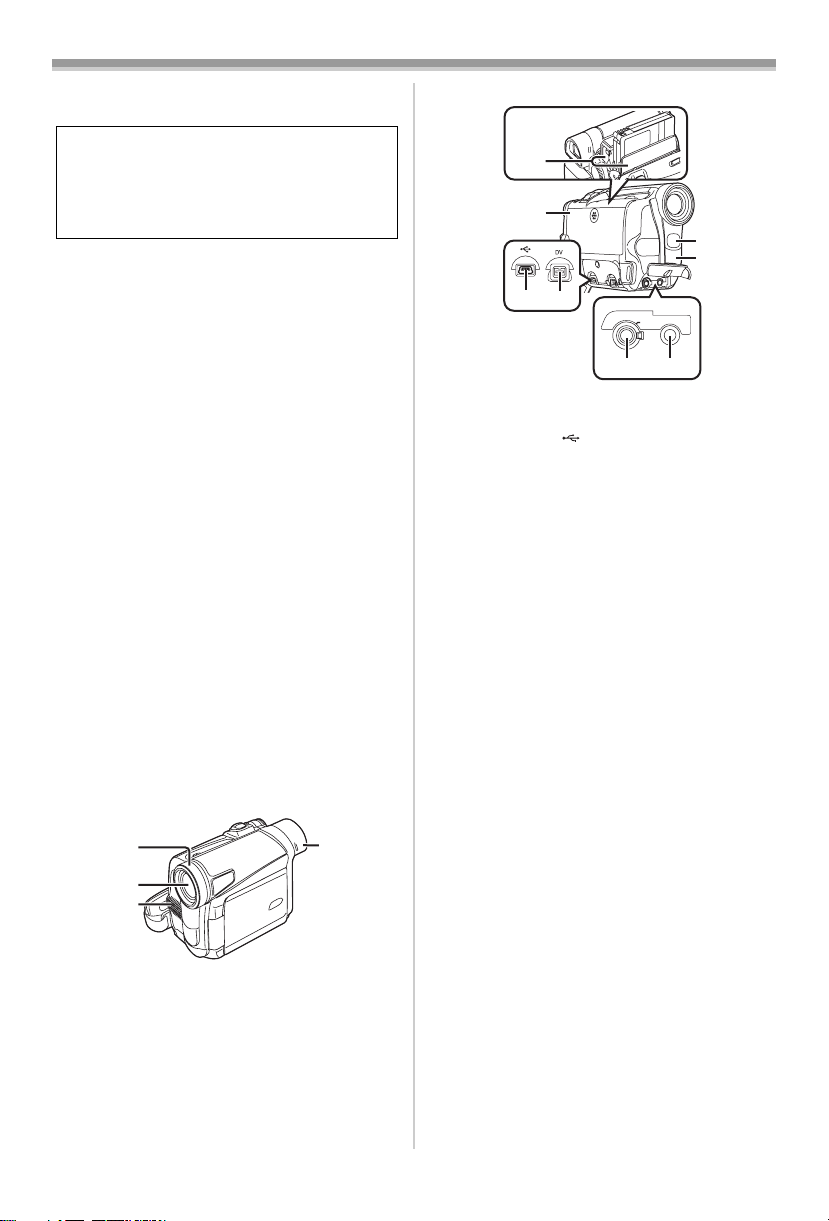
Органы управления и компоненты
■ Видеокамера
Перед пользованием
1
) Кнопка открытия монитора ЖКД
[OPENT]
-/25-
2
)
Монитор ЖКД
-725-,-772-
Вследствие ограничений технологии
производства ЖКД возможно наличие на
экране ЖКД видеомонитора маленьких
ярких или темных точек. Однако это не
является неполадкой и не влияет на
записанное изображение.
[±]
СЮ
Рычажок для открытия крышки
отсека для карты [OPEN]
(только NV-GS15)
-724-
Отсек карты (только NV-GS15)
-724-
Крышка отсека карты
(только NV-GS15)
-724-
®
СЮ’
(Ю
ою
с®
(
12
)
с®
СЗЮ)
(Ж)
(Ж)
(^)
!
18
с Ж)
.20 у
(Ж)
Кнопка проверки записи [g]]
-/52-
Кнопка записи [REC]
-156-
Кнопка
цветного ночного видения
[COLOUR NIGHT VIEW]
-757-
Кнопка неконтрастного изображения
[SOFT SKIN]
-757-
Кнопка сброса [RESET]
-767-, -774-
Кнопка мультикадра [MULTI]
-745-, -749-
Кнопка “кадр в кадре” [P-IN-P]
-/45-
Динамик
-745-
Кнопка подсветки [BACK LIGHT] -757-
Кнопка света [LIGHT] -754-
Лампочка обращения к карте
(только NV-GS15)
-724-
Кнопка паузы
[II]
-747-,
Кнопка стоп-кадра [STILL]
-752-
Кнопка быстрой
прокрутки/воспроизведения вперед
[►►] -746-, -749-
Кнопка воспроизведения [►]
-745-, -749-
Кнопка ввода [ENTER]
-726-
Кнопка останова [■]
-745-, -749-
Кнопка микширования [FADE]
-756-
Кнопка перемотки/воспроизведения
назад [◄◄]
-745-, -749-
Кнопка меню [MENU]
-726-
Селектор режима
[AUTO/MANUAL7FOCUS]
-757-, -755-
4
—(
25
(2Ю
Бленда объектива
-772-
‘(Ж) Объектив
(24′) Микрофон (встроенный, стерео)
-755-,
-138-
(Ж) Наглазник
—
117
—
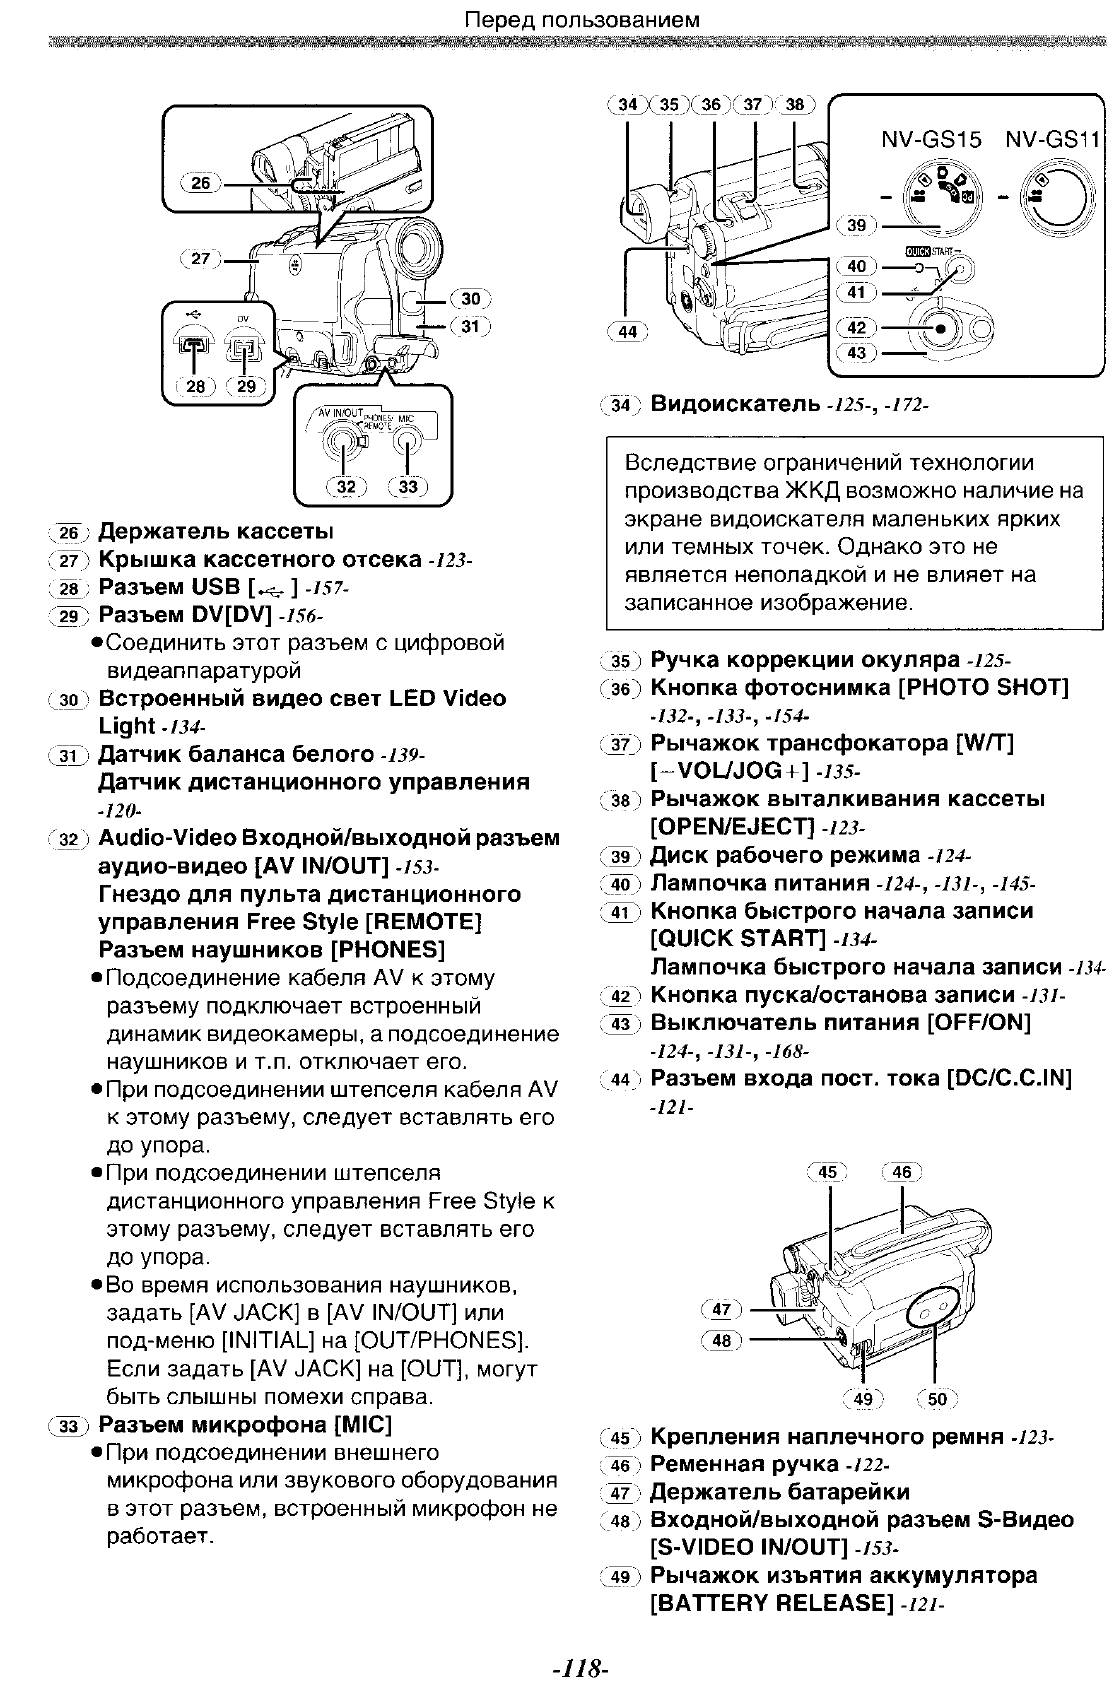
Перед пользованием
26;
(
27
)
28
(W)
30
31
32
)
33
)
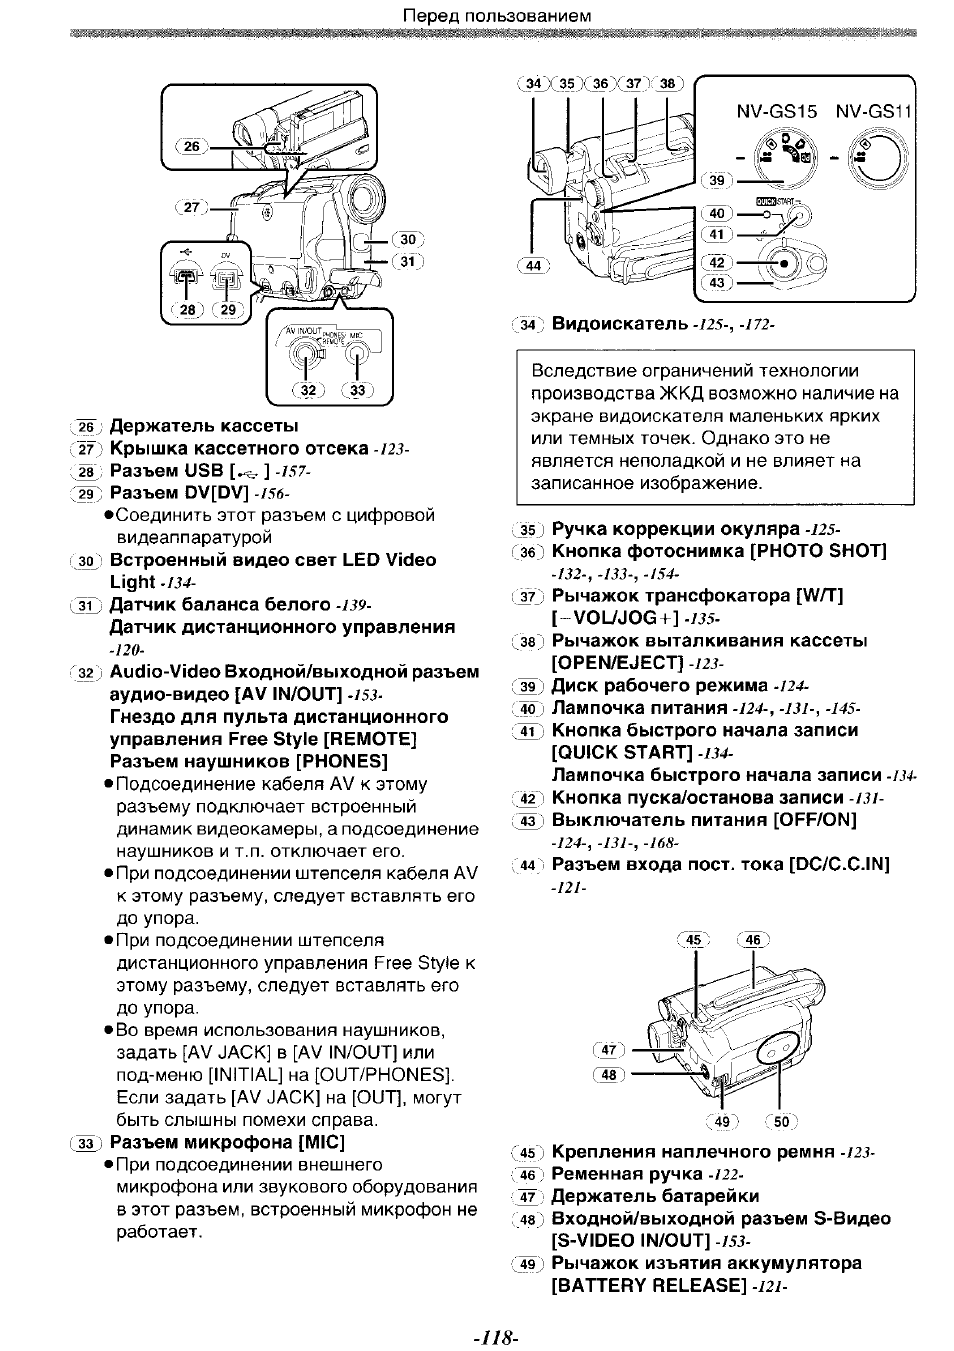
Держатель кассеты
Крышка кассетного отсека -ш-
Разъем USB ] -/57-
Разъем DV[DV]
-156-
•Соединить этот разъем с цифровой
видеаппаратурой
Встроенный видео свет LED Video
Light -/54-
Датчик баланса белого
-139-
Датчик дистанционного управления
-/20-
Audio-Video Входной/выходной разъем
аудио-видео [AV IN/OUT] -/55-
Гнездо для пульта дистанционного
управления Free Style [REMOTE]
Разъем наушников [PHONES]
• Подсоединение кабеля AV к этому
разъему подключает встроенный
динамик видеокамеры, а подсоединение
наушников и т.п. отключает его.
• При подсоединении штепселя кабеля AV
к этому разъему, следует вставлять его
до упора.
• При подсоединении штепселя
дистанционного управления Free Style к
этому разъему, следует вставлять его
до упора.
• Во время использования наушников,
задать [AV JACK] в [AV IN/OUT] или
под-меню [INITIAL] на [OUT/PHONES].
Если задать [AV JACK] на [OUT], могут
быть слышны помехи справа.
Разъем микрофона [MIC]
• При подсоединении внешнего
микрофона или звукового оборудования
в этот разъем, встроенный микрофон не
работает.
Вследствие ограничений технологии
производства ЖКД возможно наличие на
экране видоискателя маленьких ярких
или темных точек. Однако это не
является неполадкой и не влияет на
записанное изображение.
С
.
35
_;
(
36
)
(Ж)
(
38
)
(Ж)
(Ж)
Ж)
42
Ж
44
Ручка коррекции окуляра
/25-
Кнопка фотоснимка [PHOTO SHOT]
-/52-, -/55-, -/54-
Рычажок трансфокатора [W^]
[-VOL/JOG+]
-/55-
Рычажок выталкивания кассеты
[OPEN/EJECT]
-/25-
Диск рабочего режима
-/24-
Лампочка питания
-/24-,
-131-, -145-
Кнопка быстрого начала записи
[QUICK START]
-/54-
Лампочка быстрого начала записи
-134-
Кнопка пуска/останова записи
-ш-
Выключатель питания [OFF/ON]
-/24-,
-131-, -168-
Разъем входа пост, тока [DC/C.C.IN]
—
121
—
45
46
45 Крепления наплечного ремня
-123-
Ж) Ременная ручка
-122-
57) Держатель батарейки
48
)
Входной/выходной рэзъем S-Видео
[S-VIDEO IN/OUT]
-/55-
Ж)
Рычажок изъятия аккумулятора
[BATTERY RELEASE]
-121-
—
118
—
Щ пульт дистанционного управления, Щ пульт дистанционного управления free style, А, у
Пульт дистанционного управления, Кнопка, Пульт дистанционного управления free style Чат поддержки
- Изображение
- Текст
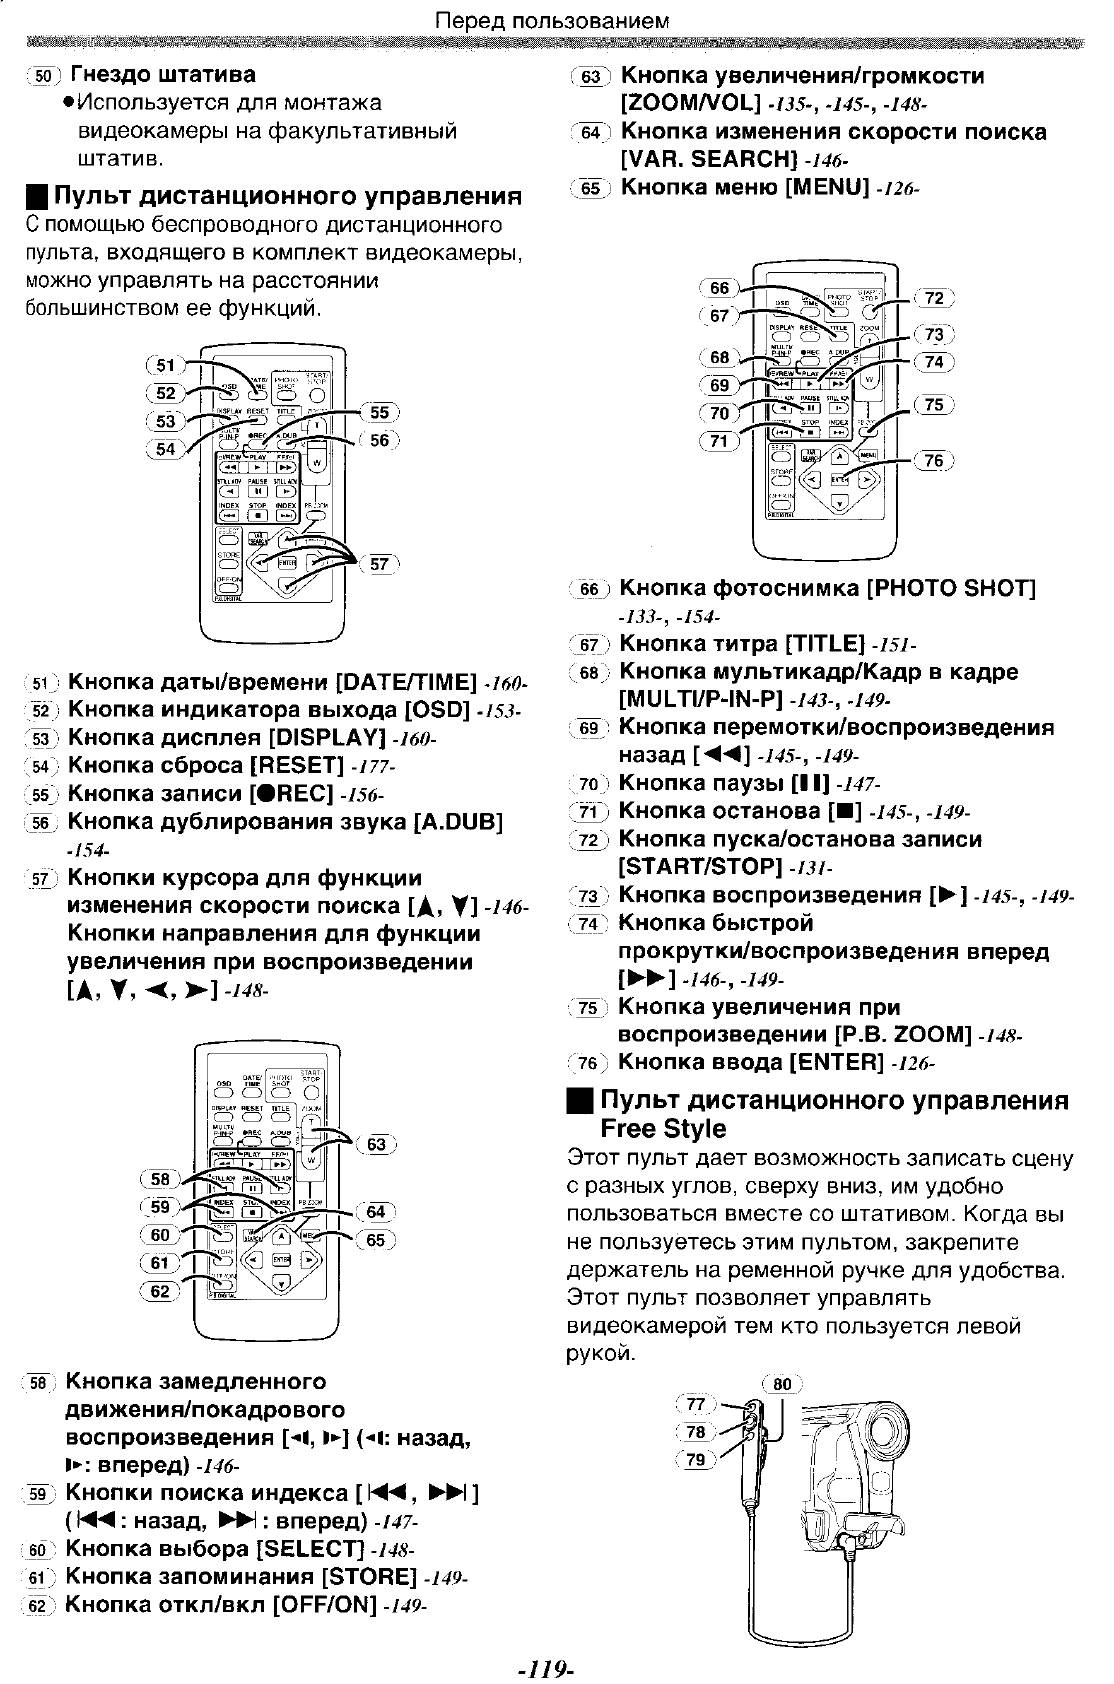
й) Гнездо штатива
• Используется для монтажа
видеокамеры на факультативный
штатив.
Перед пользованием
Щ
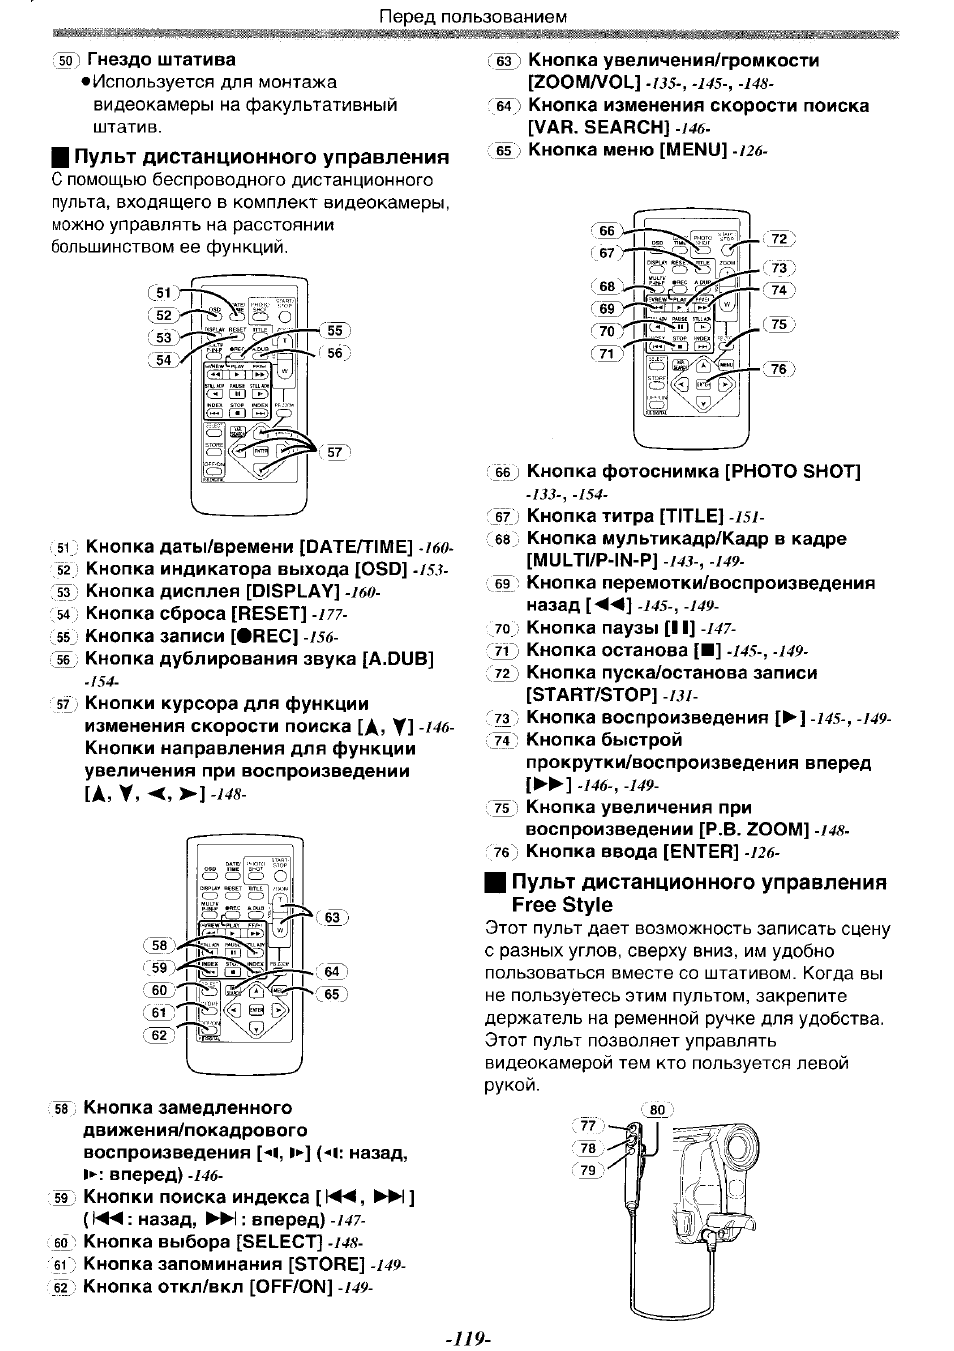
Пульт дистанционного управления
С помощью беспроводного дистанционного
пульта, входящего в комплект видеокамеры,
можно управлять на расстоянии
большинством ее функций.
Кнопка даты/времени [DATE/TIIV1E]
Кнопка индикатора выхода [OSD]
-153-
Кнопка
дисплея [DISPLAY]
-160-
Кнопка
сброса [RESET]
—
777
—
Кнопка записи [#REC]
-/56-
Кнопка дублирования звука [A.DUB]
-154-
57) Кнопки курсора для функции
изменения скорости поиска Y]
-146-
Кнопки направления для функции
увеличения при воспроизведении
[А, У,
<, ►]
-148-
58 Кнопка замедленного
движения/покадрового
воспроизведения
[М,
1»^] (^1: назад,
!►: вперед)
-146-
W) Кнопки поиска индекса [h4^, ►►!]
(: назад, : вперед)
-147-
60
) Кнопка выбора [SELECT]
-148-
61
Кнопка запоминания [STORE]
-149-
62
) Кнопка откл/вкл [OFF/ON]
-149-
W)
Кнопка увеличения/громкости
[200M/V0L]
-135-, -145-, -148-
64) Кнопка изменения скорости поиска
[VAR. SEARCH]
-146-
65
)
Кнопка меню [MENU]
-126-
72
)
73
)
,(.
75
)
Ж)
66 Кнопка фотоснимка [PHOTO SHOT]
-133-, -154-
Кнопка
титра [TITLE] -/57-
Кнопка мультикадр/Кадр в кадре
[MULTI/P-IN-P]
-143-, -149-
Кнопка
перемотки/воспроизведения
назад
[«]
-145-, -149-
Кнопка
паузы
[II]
-147-
Кнопка
останова [■]
-145-, -149-
Кнопка
пуска/останова записи
[START/STOP]
-131-
Кнопка
воспроизведения [►]
-145-, -149-
74) Кнопка быстрой
прокрутки/воспроизведения вперед
[►►]
.146-, -149-
Кнопка
увеличения при
воспроизведении [Р.В. ZOOM]
-148-
Кнопка
ввода [ENTER]
-126-
Щ
Пульт дистанционного управления
Free Style
Этот пульт дает возможность записать сцену
с разных углов, сверху вниз, им удобно
пользоваться вместе со штативом. Когда вы
не пользуетесь этим пультом, закрепите
держатель на ременной ручке для удобства.
Этот пульт позволяет управлять
видеокамерой тем кто пользуется левой
рукой.
67
68;
ж
70
71
72
73
75
76
—
119
—
Пульт дистанционного управления, Щ установка батарейки-таблетки, 1 нажав на упор выдвинуть держатель батарейки
2 вставьте батарейку-таблетку отметкой (+) вверх, Пользование дистанционным пультом Чат поддержки
- Изображение
- Текст
Перед пользованием
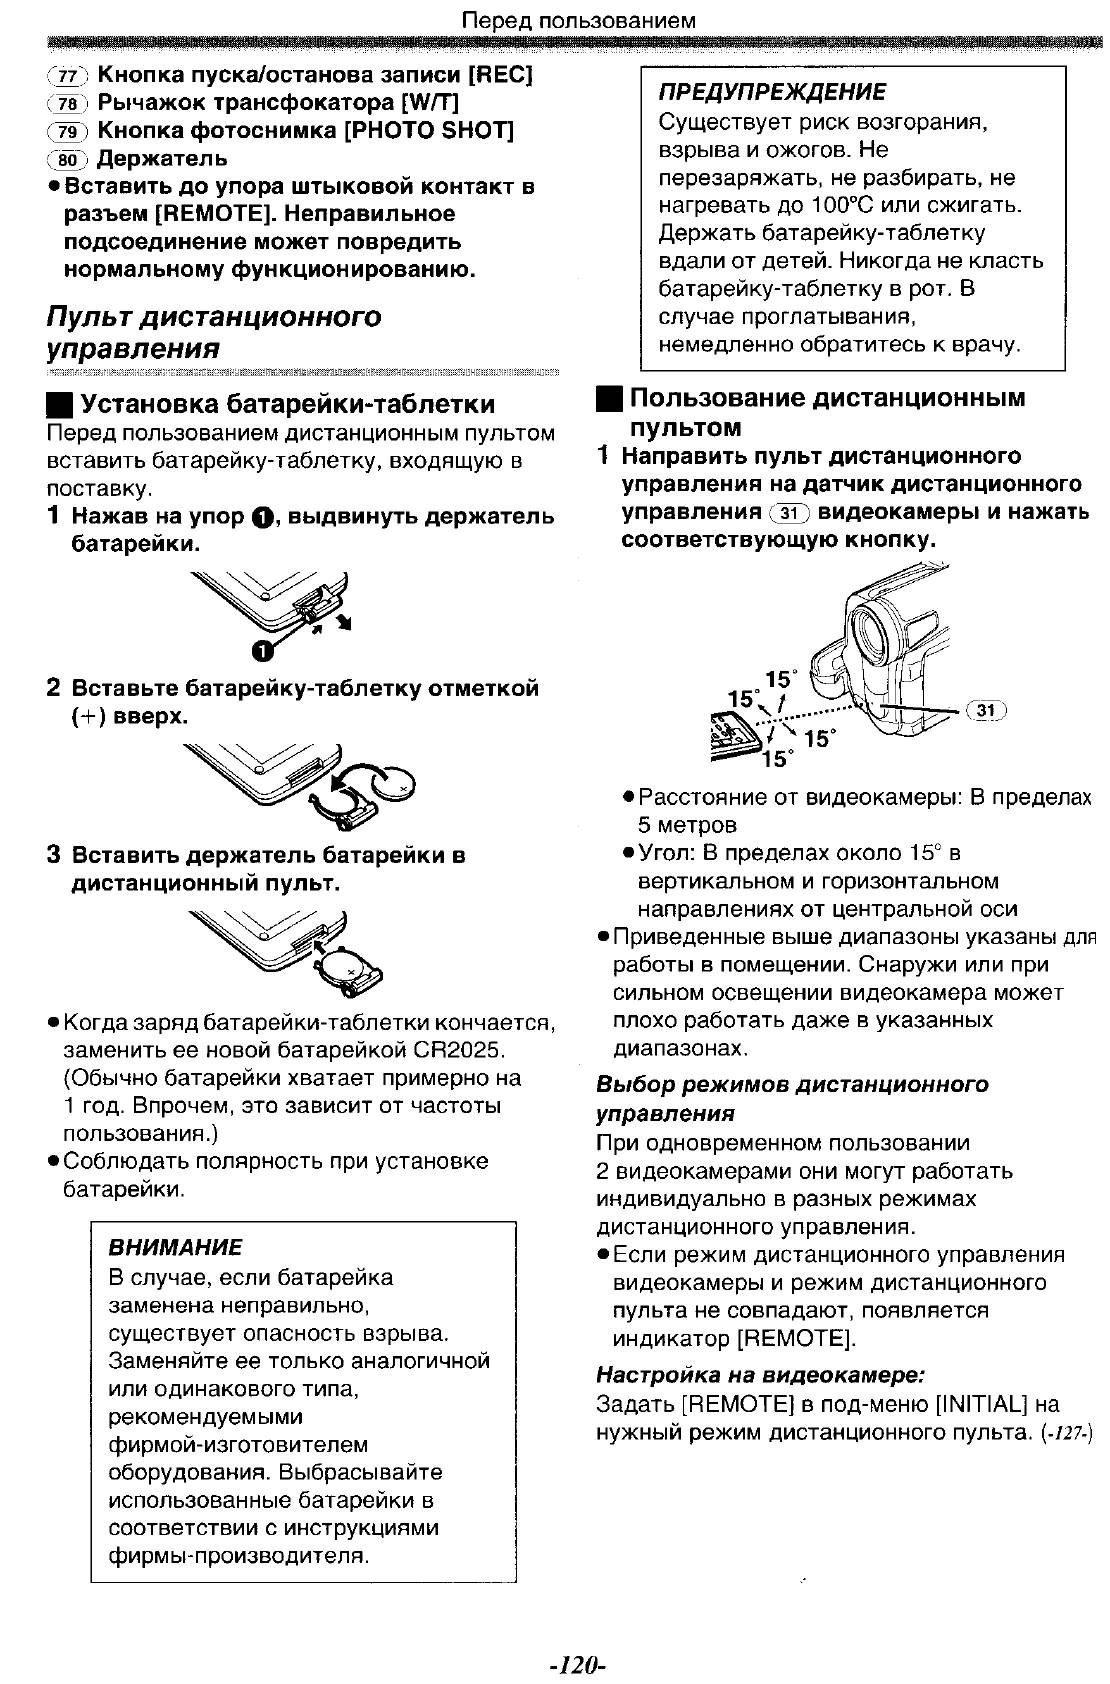
(77 ; Кнопка пуска/останова записи [REC]
(78 ) Рычажок трансфокатора [W/T]
(79) Кнопка фотоснимка [PHOTO SHOT]
(8ô) Держатель
• Вставить до упора штыковой контакт в
разъем [REMOTE]. Неправильное
подсоединение может повредить
нормальному функционированию.
Пульт дистанционного
управления
Щ
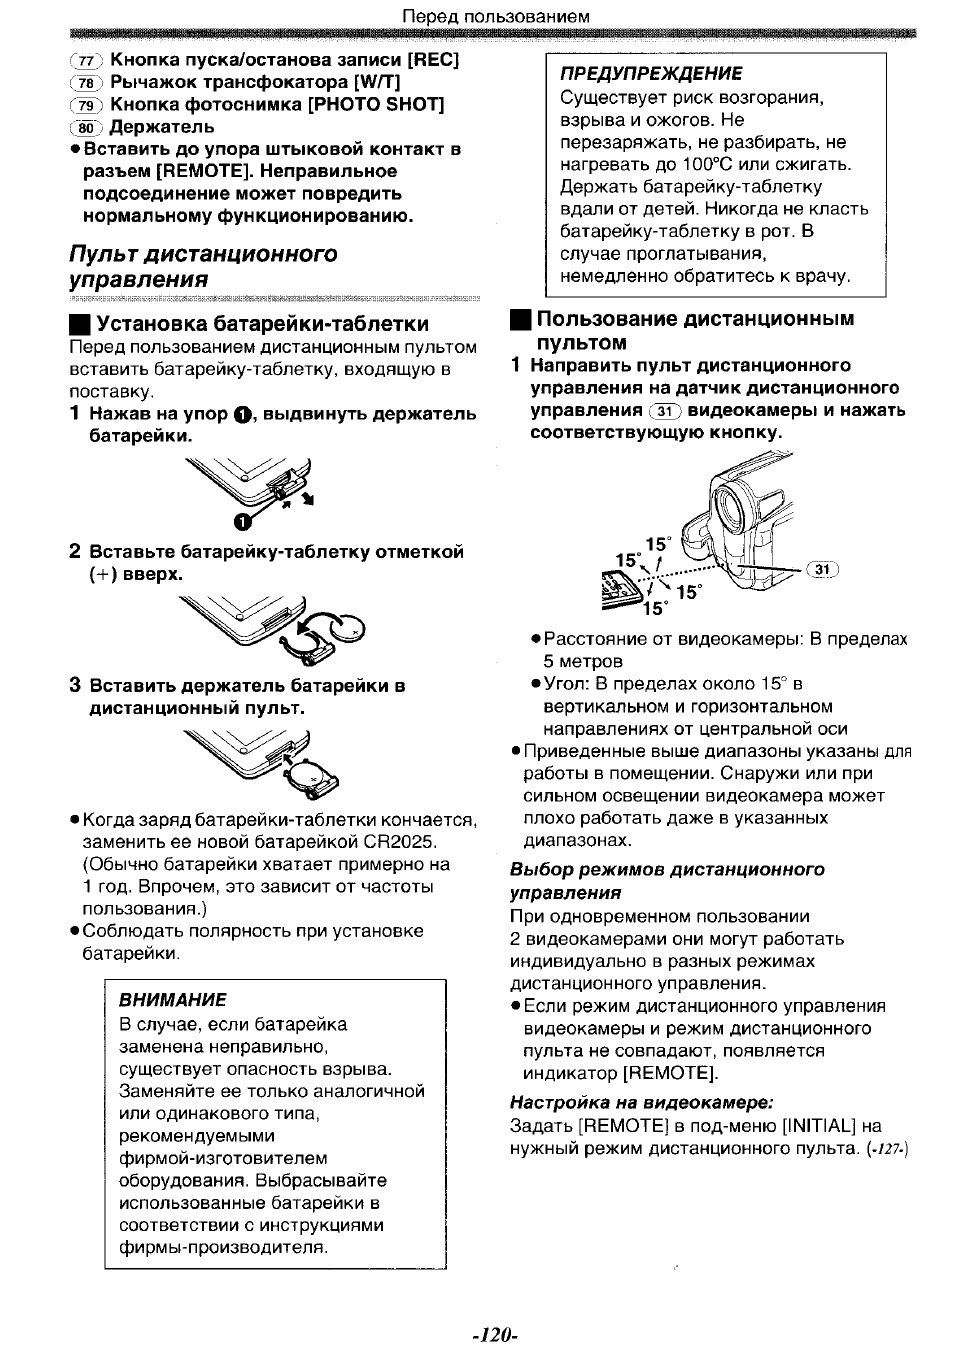
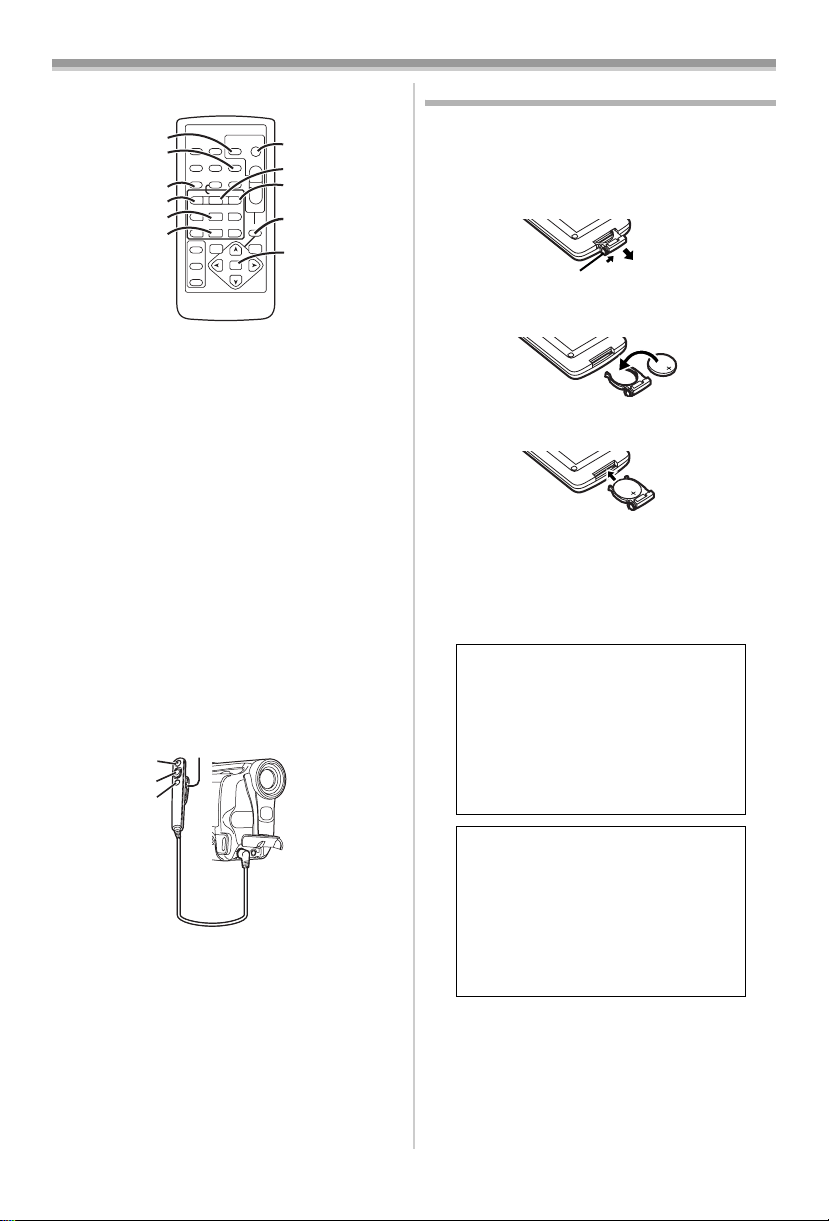
Установка батарейки-таблетки
Перед пользованием дистанционным пультом
вставить батарейку-таблетку, входящую в
поставку.
1 Нажав на упор выдвинуть держатель
батарейки.
2 Вставьте батарейку-таблетку отметкой
(+) вверх.
<s>
3 Вставить держатель батарейки в
дистанционный пульт.
• Когда заряд батарейки-таблетки кончается,
заменить ее новой батарейкой СР2025.
(Обычно батарейки хватает примерно на
1 год. Впрочем, это зависит от частоты
пользования.)
• Соблюдать полярность при установке
батарейки.
ВНИМАНИЕ
В случае, если батарейка
заменена неправильно,
существует опасность взрыва.
Заменяйте ее только аналогичной
или одинакового типа,
рекомендуемыми
фирмой-изготовителем
оборудования. Выбрасывайте
использованные батарейки в
соответствии с инструкциями
фирмы-производителя.
ПРЕДУПРЕЖДЕНИЕ
Существует риск возгорания,
взрыва и ожогов. Не
перезаряжать, не разбирать, не
нагревать до 100°С или сжигать.
Держать батарейку-таблетку
вдали от детей. Никогда не класть
батарейку-таблетку в рот. В
случае проглатывания,
немедленно обратитесь к врачу.
■ Пользование дистанционным
пультом
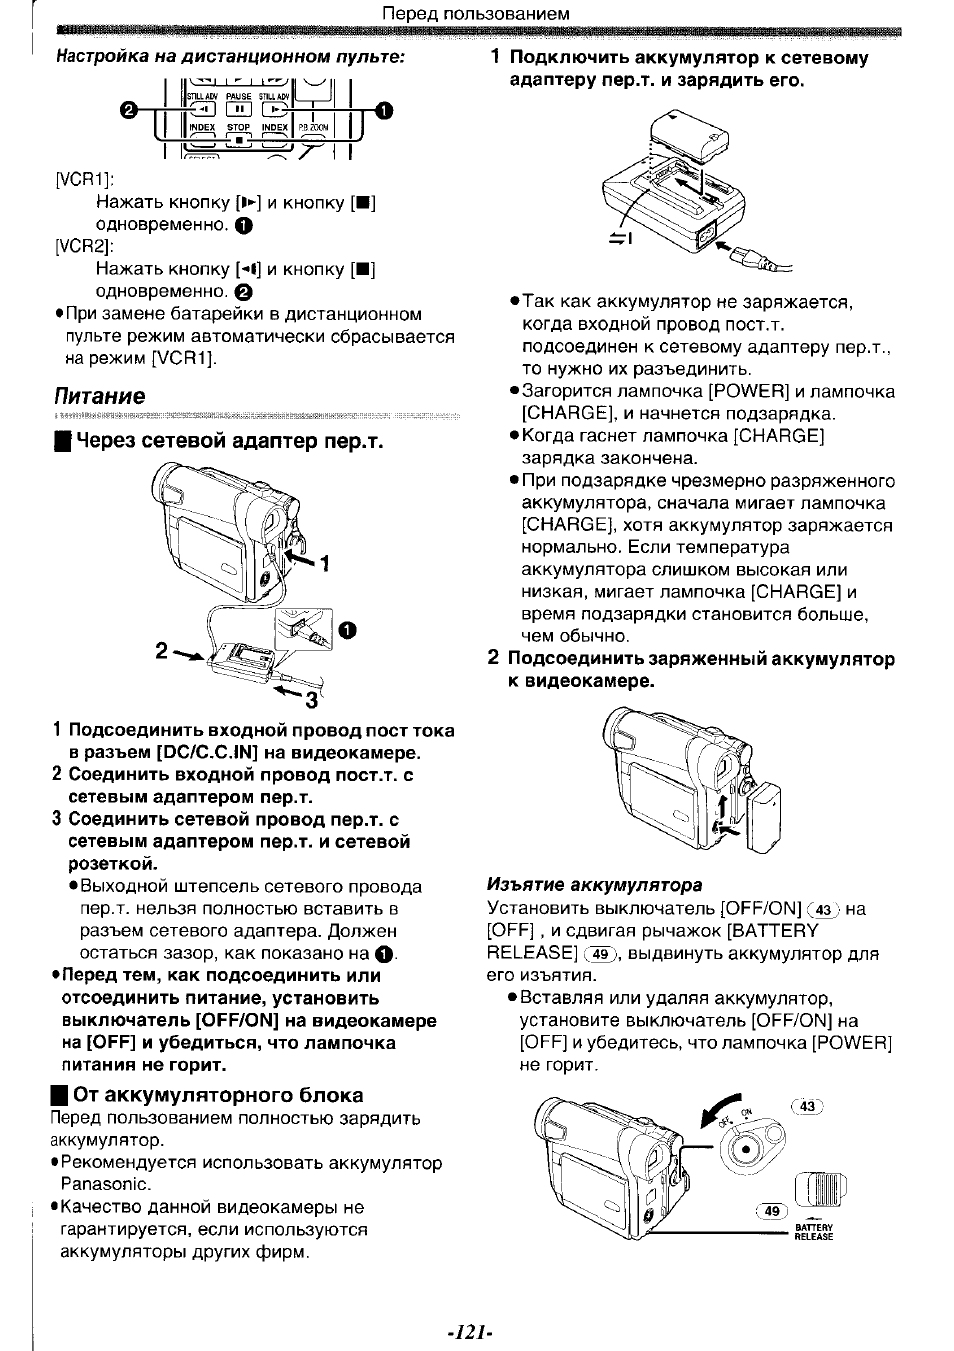
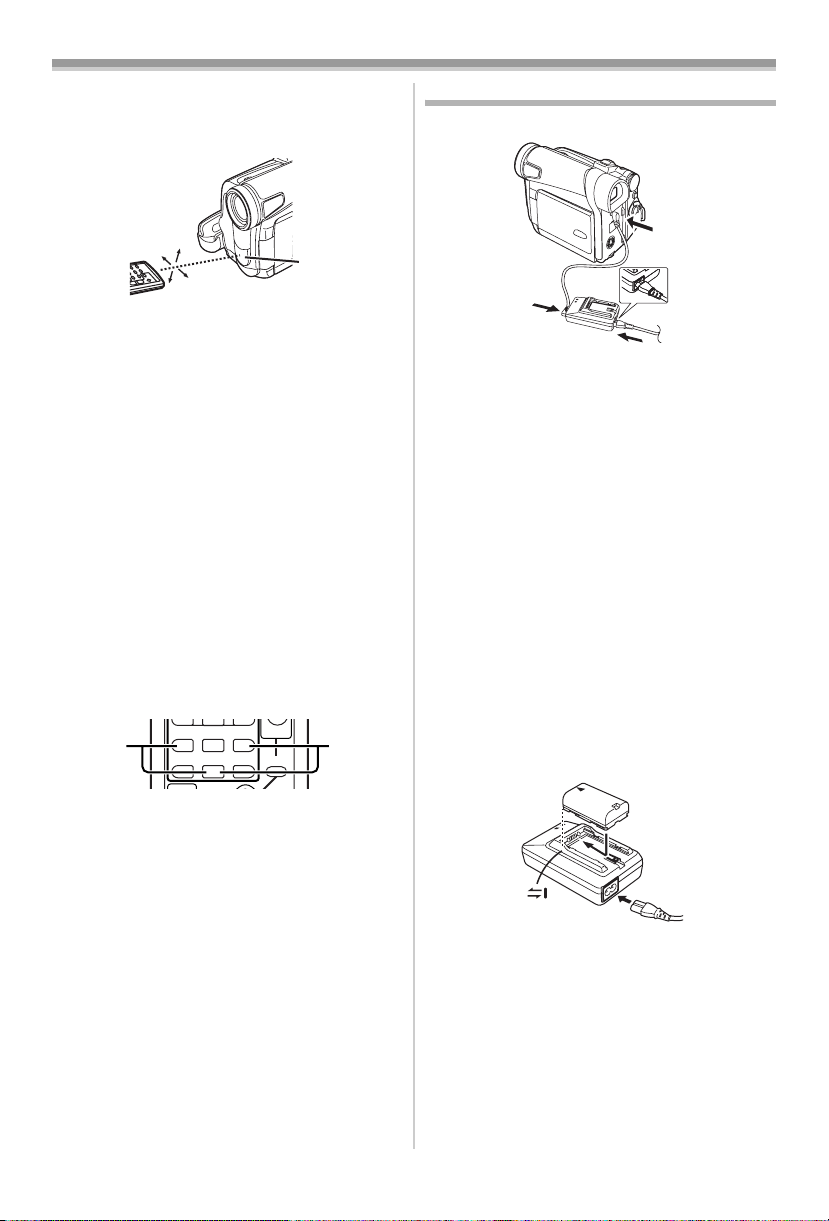
1 Направить пульт дистанционного
управления на датчик дистанционного
управления видеокамеры и нажать
соответствующую кнопку.
31
• Расстояние от видеокамеры: В пределах
5 метров
• Угол: В пределах около
в
вертикальном и горизонтальном
направлениях от центральной оси
• Приведенные выше диапазоны указаны для
работы в помещении. Снаружи или при
сильном освещении видеокамера может
плохо работать даже в указанных
диапазонах.
Выбор режимов дистанционного
управления
При одновременном пользовании
2 видеокамерами они могут работать
индивидуально в разных режимах
дистанционного управления.
• Если режим дистанционного управления
видеокамеры и режим дистанционного
пульта не совпадают, появляется
индикатор [REMOTE],
Настройка на видеокамере:
Задать [REMOTE] в под-меню [INITIAL] на
нужный режим дистанционного пульта.
(-I27-)
—
120
—
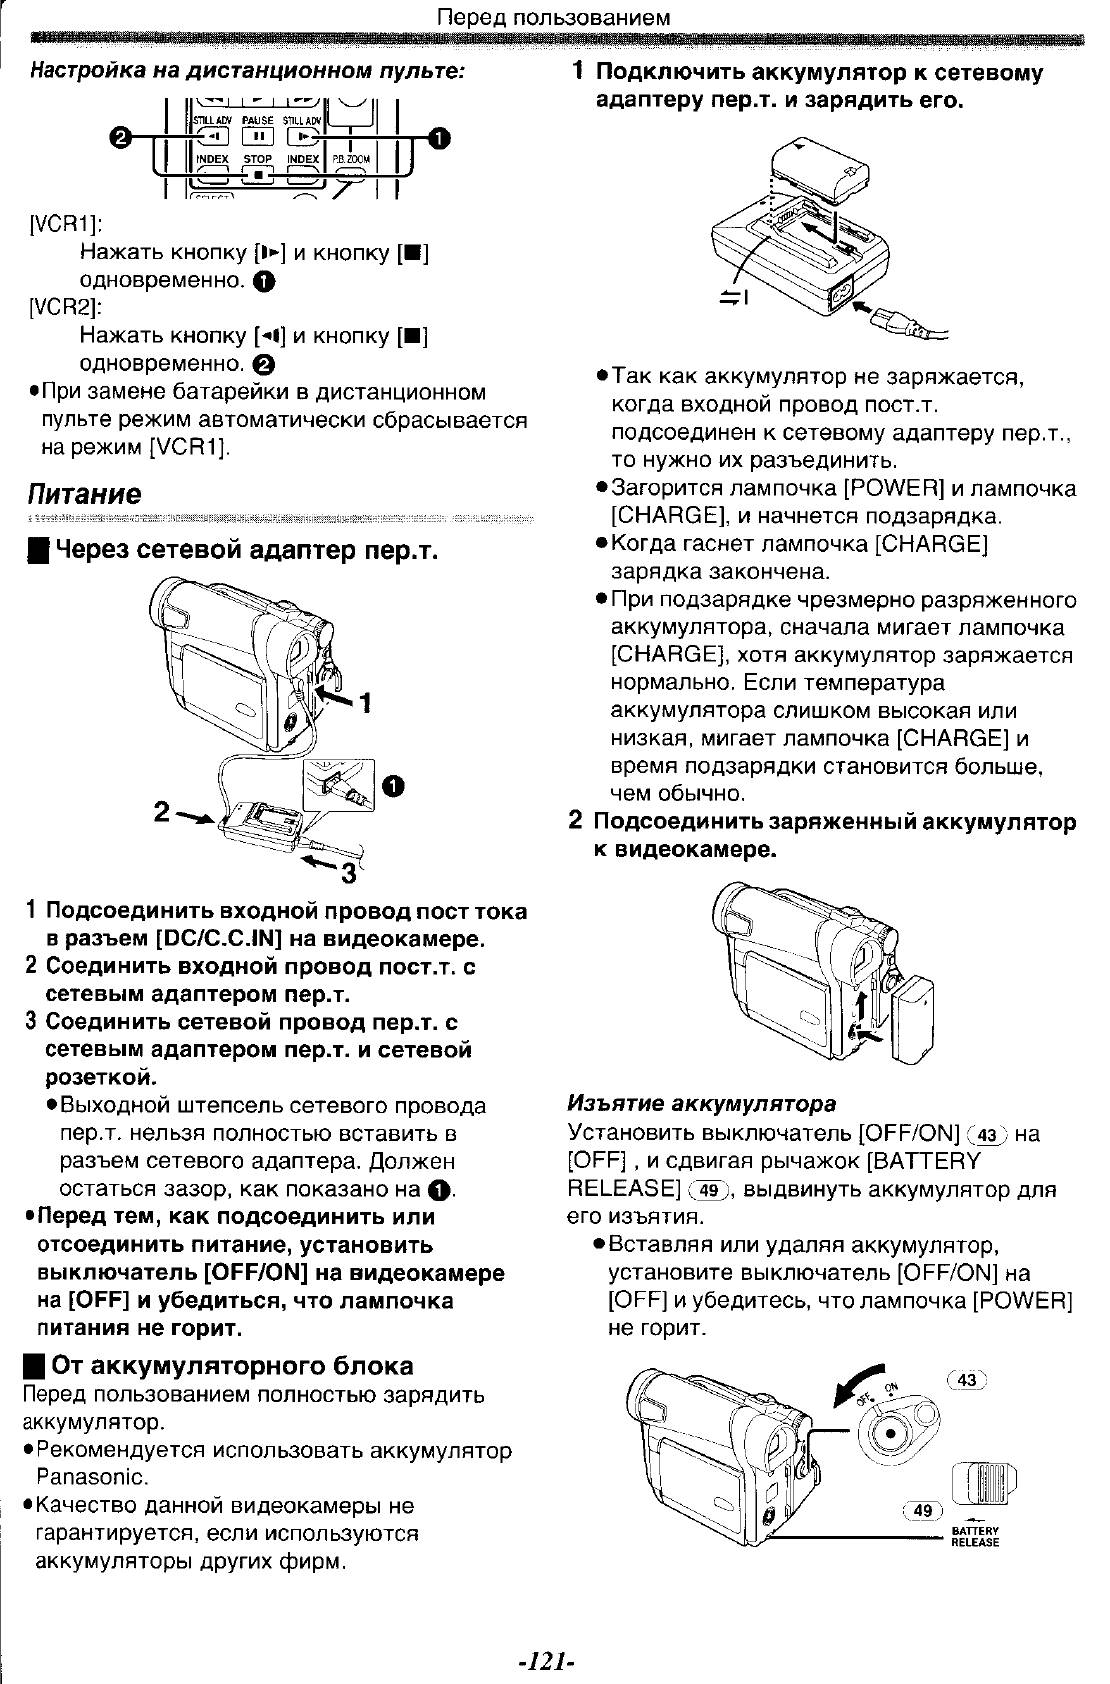
Питание, I через сетевой адаптер пер.т, Щ от аккумуляторного блока
2 подсоединить заряженный аккумулятор, Питание i через сетевой адаптер пер.т, От аккумуляторного блока Чат поддержки
- Изображение
- Текст
ш
Перед пользованием
Настройка на дистанционном пульте:
UL-L
_1_и
STILL АРУ PAUSE STILL АРУ
GD га ®
INDEX STOP INDEX
7^
[УСЯ1]:
Нажать кнопку [!►] и кнопку [■]
одновременно. О
[УСЯ2]:
Нажать кнопку [^1] и кнопку [■]
одновременно. 0
• При замене батарейки в дистанционном
пульте режим автоматически сбрасывается
на режим [\/СР1].
Питание
I
Через сетевой адаптер пер.т.
1 Подсоединить входной провод пост тока
в разъем [DC/C.C.IN] на видеокамере.
2 Соединить входной провод пост.т. с
сетевым адаптером пер.т.
3 Соединить сетевой провод пер.т. с
сетевым адаптером пер.т. и сетевой
розеткой.
• Выходной штепсель сетевого провода
пер.т. нельзя полностью вставить в
разъем сетевого адаптера. Должен
остаться зазор, как показано на
О-
• Перед тем, как подсоединить или
отсоединить питание, установить
выключатель [OFF/ON] на видеокамере
на [OFF] и убедиться, что лампочка
питания не горит.
Щ
От аккумуляторного блока
Перед пользованием полностью зарядить
аккумулятор.
• Рекомендуется использовать аккумулятор
Panasonic.
• Качество данной видеокамеры не
гарантируется, если используются
аккумуляторы других фирм.
1 Подключить аккумулятор к сетевому
адаптеру пер.т. и зарядить его.
•Так как аккумулятор не заряжается,
когда входной провод пост.т.
подсоединен к сетевому адаптеру пер.т.,
то нужно их разъединить.
• Загорится лампочка [POWER] и лампочка
[CHARGE], и начнется подзарядка.
• Когда гаснет лампочка [CHARGE]
зарядка закончена.
• При подзарядке чрезмерно разряженного
аккумулятора, сначала мигает лампочка
[CHARGE], хотя аккумулятор заряжается
нормально. Если температура
аккумулятора слишком высокая или
низкая, мигает лампочка [CHARGE] и
время подзарядки становится больше,
чем обычно.
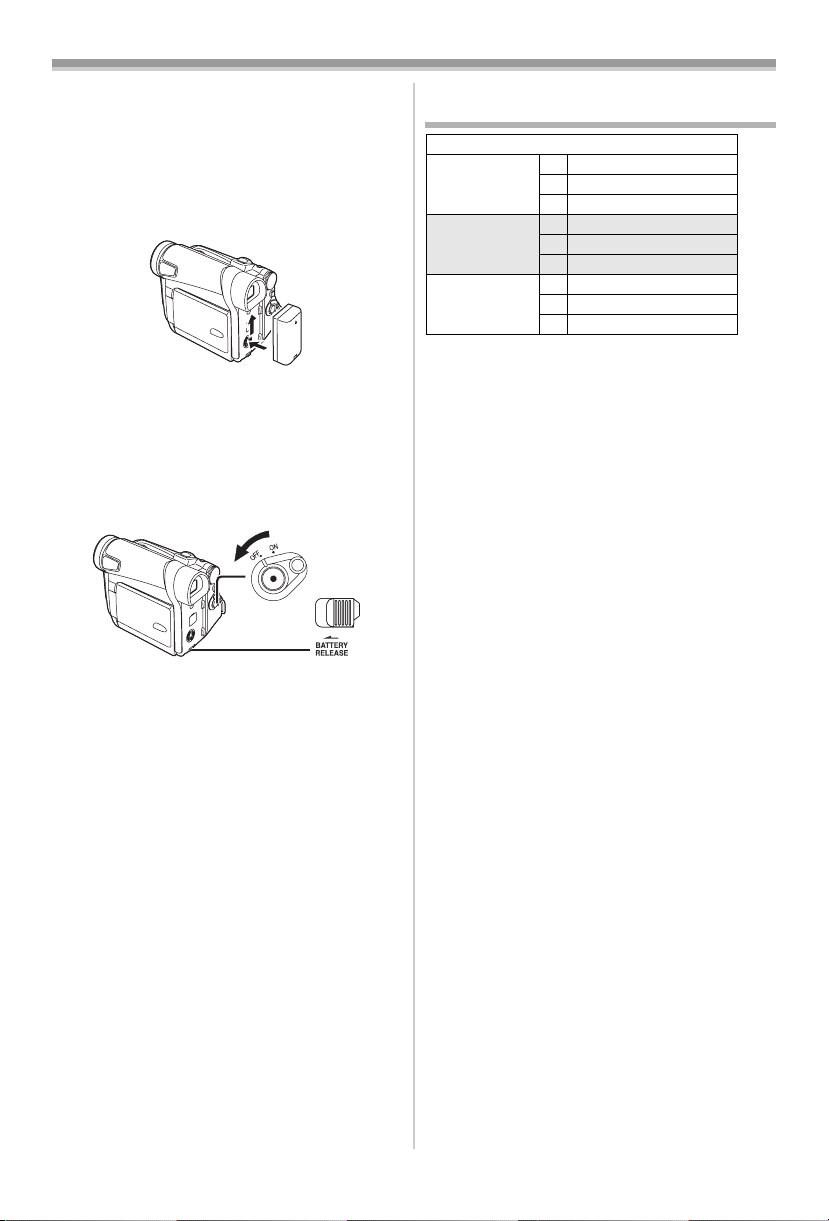
2 Подсоединить заряженный аккумулятор
к видеокамере.
Изъятие аккумулятора
Установить выключатель [OFF/ON] на
[OFF] , и сдвигая рычажок [BATTERY
RELEASE] (49), выдвинуть аккумулятор для
его изъятия.
• Вставляя или удаляя аккумулятор,
установите выключатель [OFF/ON] на
[OFF] и убедитесь, что лампочка [POWER]
не горит.
С43
BATTERY
RELEASE
—
121
—
11:55
Оцифровка видеокассет MiniDV в домашних условиях
09:37
Эволюция видеокамеры Panasonic на примере NV-GS25 VDR-D50 SDR-H41
05:32
обзор видеокамеры Panasonic nv gs-11
14:44
Panasonic nv-gs11 trying to connect to PC
08:16
Обзор видеокамеры Panasonic NV -GS15
03:24
NV GS15 USB video transfer
02:45
Ремонт аккумулятора видеокамеры panasonic NV-GS11.flv
Нажмите на кнопку для помощи
Раздел: Бытовая, кухонная техника, электроника и оборудование
Тип: Видеокамера
Характеристики, спецификации
Разрешение матрицы:
0.4 Мпикс
Функция «Оптический Zoom»:
24x
Функция «Цифровой Zoom»:
800x
Баланс белого:
автоматический, из списка, ручной
Настройки баланса белого:
в помещении, вне помещения
Режимы съемки:
автоматический, компенсация контрового света, низкая освещенность, портретная, программный, прожектор, ручной, снег и пляж, спорт
Минимальное освещение:
2 люкс
Разрешение матрицы фото:
0.41 Мпикс
Разрешения фотографий:
640 x 480
Скорость затвора:
1/8000 — 1/50 сек
Спецэффекты:
замещение, зеркало, картинка-в-картинке, микс, мозаика, мульти, негатив, растягивание, сепия, соляризация, стробоскоп, утоньшение, черно-белый
Микрофон:
направленный, стерео
Функция «WEB-камера»:
есть
Фокусное расстояние:
2.1 — 50.4 мм
Фокусное расстояние (35 мм):
39.5 — 948 мм
Светосила объектива:
F/1.8-3.6
Производитель линз:
Panasonic
Расположение дисплея:
поворотный
Количество пикселей:
105000
Интерфейсы:
AV выход, DV вход/выход, IEEE 1394 (FireWire/i.LINK), S-Video вход/выход, USB 2.0, вспышка, микрофон, наушники
Инструкция к Видеокамере Panasonic NV-GS11

LSQC0370
Цветной электронный видоискатель
Электронный Bидоискатель
Правильно
Неправильно
ВНИМАНИЕ
стр. 177
Видоискатель:
Видоискатель:
GS15 正誤 .fm 1 ページ 2004年6月1日 火曜日 午後4時21分


Аннотации для Видеокамеры Panasonic NV-GS11 в формате PDF
Топ 10 инструкций
Другие инструкции
Operating Instructions
Digital Video Camera
Model No. NV-GS11GN
NV-GS15GN
R
Before use, please read these instructions completely.
LSQT0783 A

Information for Your Safety
As this equipment gets hot during use,
operate it in a well-ventilated place; do
not install this equipment in a confined
space such as a bookcase or similar unit.
To reduce the risk of fire, electric shock
or product damage, do not expose this
equipment to rain, moisture, dripping or
splashing and ensure that no objects
filled with liquids, such as vases, shall be
placed on the equipment.
Movie Camera
≥The rating plate is on the underside of
the Movie Camera.
AC Adaptor
≥The rating plate is on the underside of
the AC Adaptor.
ª Carefully read the Operating
Instructions and use the Movie
Camera correctly.
≥Injury or material damage resulting from any
kind of use that is not in accordance with the
operating procedures explained in these
Operating Instructions are the sole
responsibility of the user.
Operating Instructions
≥These Operating Instructions apply to models
NV-GS11 and NV-GS15.
≥The illustrations used in these Operating
Instructions show model NV-GS15, however,
parts of the explanation refer to different
models.
≥Depending on the model, some functions are
not available.
Try out the Movie Camera.
Be sure to try out the Movie Camera before
recording your first important event and check
that it records properly and functions correctly.
The manufacturer is not liable for loss of
recorded contents.
The manufacturer shall in no event be liable for
the loss of recordings due to malfunction or
defect of this Movie Camera, its accessories or
cassettes.
Carefully observe copyright laws.
Recording of pre-recorded tapes or discs or other
published or broadcast material for purposes
other than your own private use may infringe
copyright laws. Even for the purpose of private
use, recording of certain material may be
restricted.
≥The Movie Camera uses copyright-protected
technologies and is protected by the patented
technologies and intellectual properties of
Japan and the U.S. To use these
copyright-protected technologies, authorization
of the Macrovision Company is required. It is
prohibited to disassemble or modify the Movie
Camera.
≥Windows is a trademark or registered
trademark of Microsoft Corporation U.S.A.
≥SD Logo is a trademark.
≥All other company and product names in the
operating instructions are trademarks or
registered trademarks of their respective
corporations.
Files recorded on a MultiMediaCard or SD
Memory Card
It may not be possible to play back the files on
this Movie Camera recorded on and created by
other equipment or vice versa. For this reason,
check the compatibility of the equipment in
advance.
≥Keep the Memory Card out of reach of children
to prevent swallowing.
Pages for reference
Pages for reference are indicated by dashes
either side of a number, for example:
-00-
ª WARNING
Do not remove the cover (or back); there are
no user serviceable parts inside.
Refer servicing to qualified service personnel.
IF THE POWER CORD OF THIS EQUIPMENT
IS DAMAGED, IT MUST BE REPLACED WITH
AN ELECTRICALLY APPROVED POWER
CORD.
Use only the recommended accessories.
-2-

Contents
Information for Your Safety………………………… 2
Before Use
Standard Accessories……………………………….. 5
Optional Accessories………………………………… 5
Controls and Components…………………………. 5
The Remote Controller ……………………………… 8
Power Supply ………………………………………….. 9
Charging Time and Available Recording
Time…………………………………………………… 10
The Grip Belt …………………………………………. 11
Re-attaching the Lens Cap………………………. 11
Attaching the Shoulder Strap……………………. 11
Inserting a Cassette………………………………… 12
Using a Card (NV-GS15 only) ………………….. 12
Turning on the Movie Camera ………………….. 13
Selecting Modes …………………………………….. 13
Using the Viewfinder/LCD Monitor ……………. 13
Using the Menu Screen …………………………… 14
List of Menus …………………………………………. 15
Setting Date and Time…………………………….. 17
Internal Lithium Battery Recharge…………….. 18
LP Mode ……………………………………………….. 18
Audio Recording Mode……………………………. 18
Recording Mode
About Recording…………………………………….. 19
Recording on a Tape………………………………. 19
Recording a Still Picture on a Tape
(Photoshot) (NV-GS11 only) ………………….. 20
Recording a Still Picture on a Card
(Photoshot) (NV-GS15 only) ………………….. 21
Recording with the Built-in LED Video
Light …………………………………………………… 21
Quick Start…………………………………………….. 22
Self-timer Recording……………………………….. 22
Zoom In/Out Functions……………………………. 22
Digital Zoom Function …………………………….. 23
Image Stabilizer Function ………………………… 23
Fade In/Out Functions …………………………….. 23
Backlight Compensation Function…………….. 24
Night View Functions………………………………. 24
Soft Skin Function ………………………………….. 24
Wind Noise Reduction Function ……………….. 25
Cinema Function ……………………………………. 25
Recording in Special Situations………………… 25
Recording in Natural Colours …………………… 26
Adjusting White Balance Manually ……………. 26
Manual Shutter Speed Adjustment……………. 27
Manual Iris Adjustment……………………………. 27
Manual Focus Adjustment ……………………….. 28
Digital Effect Functions……………………………. 28
-3-

Playback Mode
Playing Back a Tape……………………………….. 31
Finding a Scene You Want to Play Back……. 31
Slow Motion Playback ……………………………. 32
Still Playback/Still Advance Playback………… 32
Index Search Functions …………………………… 33
Playback Zoom Function ………………………… 33
Playback Digital Effect Functions……………… 34
Playing Back a Card (NV-GS15 only)………… 34
Slide Show (NV-GS15 only) …………………….. 35
Creating a Title (NV-GS15 only)……………….. 36
Adding a Title (NV-GS15 only) …………………. 36
Writing Printing Data on a Card
(NV-GS15 only)……………………………………. 37
Protecting the Files on a Card
(NV-GS15 only)……………………………………. 38
Deleting the Files Recorded on a Card
(NV-GS15 only)……………………………………. 38
Formatting a Card (NV-GS15 only) …………… 38
Playing Back on Your TV…………………………. 39
Editing Mode
Recording from a Tape onto a Card
(NV-GS15 only) …………………………………… 40
Recording Pictures from a Card onto a
Tape (NV-GS15 only) …………………………… 40
Audio Dubbing……………………………………….. 40
Copying on an S-VHS (or a VHS)
Cassette……………………………………………… 41
Recording the Contents of Other
Equipment…………………………………………… 41
Using the DV Cable for Recording ……………. 42
With a PC
Importing still pictures onto a PC
(NV-GS15 only) …………………………………… 43
Using as a Web Camera or with
DV STUDIO ………………………………………… 43
Using a Card in a Personal Computer
(NV-GS15 only) …………………………………… 43
Others
Indications …………………………………………….. 45
Initializing the Modes………………………………. 46
Warning/Alarm Indications ………………………. 46
Notes and Hints……………………………………… 47
Cautions for Use…………………………………….. 52
Before Requesting Repair
(Problems and Solutions) ……………………… 56
Using the RESET button …………………………. 58
Explanation of Terms ……………………………… 58
Specifications
Specifications ………………………………………… 60
-4-
Before Use
Before Use
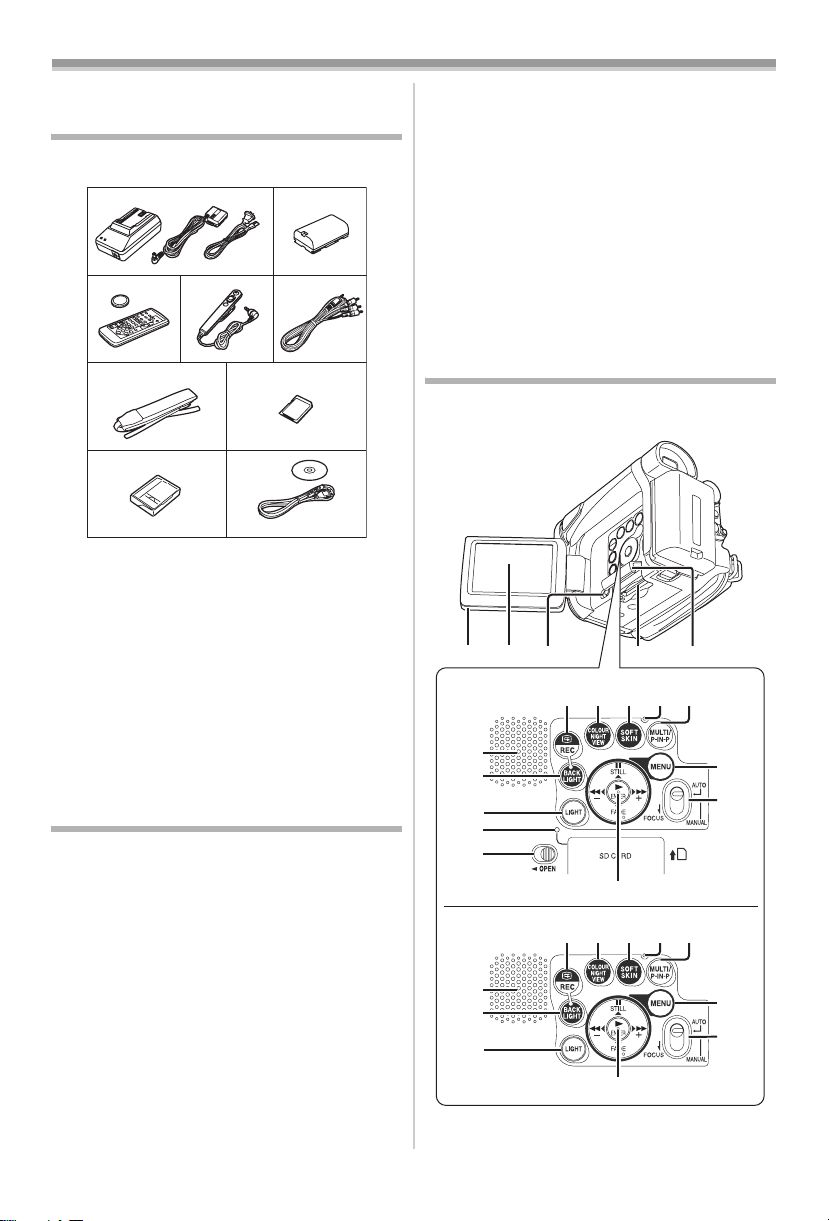
Standard Accessories
Illustrated are accessories supplied with the
Movie Camera.
1)
3)
4) 5)
1) AC Adaptor, DC Input Lead and AC Mains
-9-
Lead
2) Battery Pack -9-
3) Remote Controller and Button-Type
-7-
Battery
4) Free Style Remote Controller -8-
5) AV Cable -57-
6) Shoulder Strap -11-
7) SD Memory Card (supplied with NV-GS15)
-12-
 Digital Video Head Cleaner -54-
9) USB Connection Kit (USB Cable and
CD-ROM)
-43-
Optional Accessories
1) AC Adaptor (VW-AD9A)
2) Battery Pack (Lithium/CGR-D08S/800mAh)
3) Battery Pack (Lithium/CGR-D16S/1600mAh)
4) Battery Pack (Lithium/CGP-D28S/2800mAh)
5) Car Battery Charger (VW-KBD2E)
6) Wide Conversion Lens (VW-LW2707N2E)
7) Tele Conversion Lens (VW-LT2714N2E)
ND Filter (VW-LND27E)
9) MC Protector (VW-LMC27E)
10) Stereo Microphone (VW-VMS2E)
11) Video DC Light (VW-LDC10E)
12) Light Bulb for Video DC Light (VZ-LL10E)
13) Shoe Adaptor (VW-SK11E)
14) Tripod (VW-CT45E)
15) DV Cable (VW-CD1E)
16) DV Editing Software with DV Interface Board
(VW-DTM41E)
2)
7)6)
9)
The following is for the NV-GS15 model only.
17) SD Memory Card
(RP-SD008/RP-SD016/RP-SD032/
RP-SD064/RP-SD128/RP-SDH256/
RP-SDH512)
18) MultiMediaCard (VW-MMC8E/VW-MMC16E)
19) PC Card Adaptor for SD Memory Card
(BN-SDABPE)
20) USB Reader Writer for SD Memory Card
(BN-SDCAPE)
≥Some optional accessories may not be
available in some countries.
Controls and Components
ª Movie Camera
(4) (5)
(8) (9) (1 0)
(7)
RESET
(7)
(8) (9) (10)
RESET
-5-
(1) (2) (3)
NV-GS15
(11)
(12)
(13)
(14)
(3)
NV-GS11
(11)
(12)
(13)
(6)
(15)(16)(17)(18)(19)
(6)
(15)(16)(17)(18)(19)
(20)
(21)
(20)
(21)
(1) LCD Monitor Open Knob [OPEN4] -13-
LCD Monitor -13-, -55-
(2)
Before Use
Due to limitations in LCD production
technology, there may be some tiny bright or
dark spots on the LCD Monitor screen.
However, this is not a malfunction and does
not affect the recorded picture.
(3)
Card Slot Cover Open Lever [OPEN]
(NV-GS15 only)
(4)
Card Slot (NV-GS15 only) -12-
Card Slot Cover (NV-GS15 only) -12-
(5)
Recording Check Button [S] -20-
(6)
-12-
Recording Button [REC] -42-
Colour Night View Button
(7)
[COLOUR NIGHT VIEW]
(8)
Soft Skin Button [SOFT SKIN] -25-
Reset Button [RESET] -47-, -58-
(9)
Multi Button [MULTI] -29-, -35-
(10)
-24-
Picture-in-Picture Button [P-IN-P] -30-
Speaker -31-
(11)
Backlight Button [BACK LIGHT] -24-
(12)
(13)
Light Button [LIGHT] -21-
Card Access Lamp (NV-GS15 only) -12-
(14)
Pause Button [;] -32-
(15)
Still Button [STILL] -20-
Fast Forward/Cue Button [5] -31-, -35-
(16)
Play Button [1] -31-, -35-
(17)
Enter Button [ENTER] -14-
Stop Button [∫] -31-, -35-
(18)
Fade Button [FADE] -24-
Rewind/Review Button [6] -31-, -35-
(19)
Menu Button [MENU] -14-
(20)
Mode Selector Switch
(21)
[AUTO/MANUAL/FOCUS]
(22)
(23)
(24)
Lens Hood -56-
(22)
Lens
(23)
(24) Microphone (built-in, stereo) -23-, -25-
Eyecup
(25)
-19-, -25-
(25)
(26)
(27)
(30)
(31)
(29)(28)
(26)
Cassette Holder
(27) Cassette Compartment Cover -12-
USB Socket [ ] -43-
(28)
DV Terminal [DV] -42-
(29)
AV IN/OUT
PHONES/
REMOTE
(32) (33)
MIC
≥Connect this to the digital video equipment
(30) Built-in LED Video Light -21-
(31)
White Balance Sensor -26-
Remote Control Sensor-9-
Audio-Video Input/Output Socket
(32)
[AV IN/OUT]
-39-
Socket for Free Style Remote Controller
[REMOTE]
Headphone Socket [PHONES]
≥Connecting an AV Cable to this socket
activates the Movie Camera’s built-in
speaker, but connecting a headphone, etc.
deactivates it.
≥When connecting the pin plug of the AV
Cable to this socket, plug it in as far as it
goes.
≥When connecting the pin plug of the Free
style Remote Controller to this socket, plug
it in as far as it goes.
≥When using headphones, set [AV JACK] of
the [AV IN/OUT] or [INITIAL] sub-menu to
[OUT/PHONES]. If you set [AV JACK] to
[OUT], you may hear noises on the right.
(33) Microphone Socket [MIC]
≥When connecting an external microphone
or audio equipment to this socket, the
built-in microphone does not operate.
-6-

Before Use
(34)(35)(36)(37)(38)
NV-GS15 NV-GS11
(39)
(40)
(41)
(44)
(42)
(43)
(34) Viewfinder -13-, -56-
Due to limitations in LCD production
technology, there may be some tiny bright or
dark spots on the Viewfinder screen.
However, this is not a malfunction and does
not affect the recorded picture.
(35)
Eyepiece Corrector Knob -13-
Photoshot Button [PHOTO SHOT] — 20-,
(36)
-21-, -40-
Zoom Lever [W/T] [`VOL/JOG_] -22-
(37)
Cassette Eject Lever [OPEN/EJECT] — 12-
(38)
Mode Dial -13-
(39)
(40)
Power Lamp -13-, -19-, -31-
Quick Start Recording Button
(41)
[QUICK START]
-22-
Quick Start Recording Lamp -22-
Recording Start/Stop Button -19-
(42)
Power Switch [OFF/ON] -13-, -19-, -52-
(43)
(44)
DC Input Socket [DC/C.C.IN] -9-
(45) (46)
ª Remote Controller
Using the wireless Remote Controller that is
supplied with the Movie Camera, most of the
Movie Camera functions can be operated from a
distance.
(51)
(52)
DISPLAY
(53)
MULTI/
(54)
V
STILL ADV
OFF/ON
P.B. DI G I TA L
(51) Date/Time Button [DATE/TIME] -46-
Indication Output Button [OSD] -39-
(52)
(53)
Display Button [DISPLAY] -46-
Reset Button [RESET] -59-
(54)
Recording Button [¥REC] -42-
(55)
Audio Dubbing Button [A.DUB] -40-
(56)
Cursor Buttons for Variable Speed
(57)
Search Function [π, ∫]
Direction Buttons for Playback Zoom
Function [π, ∫, ∑, ∏]
OSD
DISPLAY
MULTI/
P-IN-P
V
STILL ADV
(58)
INDEX INDEX
(59)
SELECT
(60)
STORE
(61)
OFF/ON
(62)
P.B.DIGITAL
START/
PHOTO
DATE/
STOP
OSD
SHOT
TIME
RESET
ZOOM
TITLE
¥REC
A.DUB
P-IN-P
sVOLr
W
/REW
FF/
PLAY
615
PAUSE
STILL ADV
;
ED
P.B. ZOOM
STOP
INDEX INDEX
KL
∫
SELECT
VAR.
MENU
SEARCH
STORE
ENTER
START/
PHOTO
DATE/
STOP
SHOT
TIME
RESET
ZOOM
TITLE
¥REC
A.DUB
sVOLr
W
/REW
FF/
PLAY
615
PAUSE
STILL ADV
;
ED
P.B. ZOOM
STOP
KL
∫
VAR.
MENU
SEARCH
ENTER
(55)
T
(56)
W
(57)
-32-
-34-
T
(63)
W
(64)
(65)
(47)
(48)
(49) (50)
Shoulder Strap Holders -11-
(45)
Grip Belt -11-
(46)
Battery Holder
(47)
(48) S-Video Input/Output Socket
[S-VIDEO IN/OUT]
(49)
Battery Release Lever
[BATTERY RELEASE]
Tripod Receptacle
(50)
-39-
-10-
≥Used for mounting the Movie Camera on an
optional tripod.
(58)
Slow Motion/Still Advance Buttons [E, D]
(E: reverse, D:forward)
Index Search Buttons [:, 9]
(59)
-32-
(:: reverse, 9:forward)
Selection Button [SELECT] -34-
(60)
Store Button [STORE] -34-
(61)
(62)
Off/On Button [OFF/ON] -34-
Zoom/Volume Button [ZOOM/VOL]
(63)
-22-, -31-, -34-
Variable Speed Search Button
(64)
[VAR. SEARCH]
Menu Button [MENU] -14-
(65)
-32-
-7-
-33-
Before Use
The Remote Controller
(66)
(67)
(68)
(69)
(70)
(71)
DISPLAY
MULTI/
V
STILL ADV
OFF/ON
P.B. DI G I TA L
PHOTO
DATE/
OSD
SHOT
TIME
RESET
TITLE
¥REC
A.DUB
P-IN-P
W
/REW
FF/
PLAY
615
PAUSE
STILL ADV
;
ED
STOP
INDEX INDEX
KL
∫
SELECT
VAR.
SEARCH
STORE
ENTER
START/
STOP
ZOOM
sVOLr
P.B. ZOOM
MENU
(72)
(73)
T
(74)
W
(75)
(76)
(66) Photoshot Button [PHOTO SHOT] -21-, -40-
Title Button [TITLE] -36-
(67)
Multi-Picture/Picture-in-Picture Button
(68)
[MULTI/P-IN-P]
Rewind/Review Button [6] -31-, -35-
(69)
Pause Button [;] -32-
(70)
(71)
Stop Button [∫] -31-, -35-
Recording Start/Stop Button
(72)
[START/STOP]
Play Button [1] -31-, -35-
(73)
Fast-forward/Cue Button [5] -31- , -35-
(74)
Playback Zoom Button [P.B. ZOOM] — 33-
(75)
(76)
Enter Button [ENTER] -14-
-29-, -35-
-19-
ª Free Style Remote Controller
This controller allows the scene to be shot from
various angles, high to low, and is also
convenient when the Tripod is used. When the
controller is not in use, attach the clip to the Grip
Belt for convenience.
This controller allows the Movie Camera to be for
left-handed users.
(77)
(78)
(79)
(80)
ª Inserting a Button-type Battery
Before using the Remote Controller, insert the
supplied button-type battery.
1 While pressing the Stopper 1, pull out the
Battery Holder.
1
2 Insert the button-type battery with the (i)
marking facing upward.
3 Insert the Battery Holder into the Remote
Controller.
≥When the button-type battery is exhausted,
replace it with a new CR2025 battery. (A battery
is normally expected to last about 1 year.
However, it depends on operation frequency.)
≥Make sure to match the poles correctly when
inserting the battery.
CAUTION
Danger of explosion if battery is
incorrectly replaced. Replace only
with the same or equivalent type
recommended by the equipment
manufacturer. Discard used batteries
according to manufacturer’s
instructions.
(77) Recording Start/Stop Button [REC]
(78) Zoom Lever [W/T]
(79) Photoshot Button [PHOTO SHOT]
(80) Clip
≥Insert the plug securely into the [REMOTE]
Socket as far as it will goes. A loose
connection will spoil normal operation.
WARNING
Risk of fire, explosion and burns. Do
not recharge, disassemble, heat
above 100xC or incinerate. Keep the
Button-Type battery out of the reach
of children. Never put Button-Type
battery in mouth. If swallowed call
your doctor.
-8-
Before Use
ª Using the Remote Controller
1 Direct the Remote Controller at the Remote
Control Sensor
and press an appropriate button.
≥Distance from the Movie Camera: Within
approximately 5 metres
≥Angle: Within approximately 15o in the
vertical and horizontal directions from the
central axis
≥The above operating ranges are for indoor use.
Outdoors or under strong light, the Movie
Camera may not operate properly even within
the above ranges.
Selecting Remote Controller Modes
When 2 Movie Cameras are used
simultaneously, they can be operated individually
by selecting different Remote Controller Modes.
≥If the Remote Controller Mode of the Movie
Camera and that of the Remote Controller do
not match, [REMOTE] Indication is displayed.
Setup on the Movie Camera:
Set [REMOTE] on the [INITIAL] Sub-Menu to the
desired Remote Controller Mode. (
Setup on the Remote Controller:
21
(31) of the Movie Camera
15˚
15˚
15˚
15˚
STILL ADV
PAUS E
STILL ADV
;
ED
INDEX INDEX
STOP
KL
P.B. ZOOM
∫
(31)
-16-)
Power Supply
ª Using the AC Adaptor
1
1
2
3
1
Connect the DC Input Lead to the
[DC/C.C.IN] Socket on the Movie Camera.
2 Connect the DC Input Lead to the AC
Adaptor.
3 Connect the AC Mains Lead to the AC
Adaptor and the AC mains socket.
≥The AC Mains Lead’s outlet plug does not fit
entirely into the AC Adaptor socket. A gap will
remain as shown 1.
≥Before connecting or disconnecting the
power supply, set the [OFF/ON] Switch on
the Movie Camera to [OFF] and make sure
that Power Lamp is not lit.
ª Using the Battery
Before use, fully charge the Battery.
≥We recommend using Panasonic’s Battery.
≥We cannot guarantee the quality of this Movie
Camera when batteries of other companies are
used.
1 Attach the Battery to the AC Adaptor and
charge it.
[VCR1]:
Press the [D] Button and [∫] Button
simultaneously. 1
[VCR2]:
Press the [E] Button and [∫] Button
simultaneously. 2
≥When the battery in the Remote Controller is
replaced, the mode is automatically reset to
[VCR1] Mode.
≥Since the Battery will not be charged when
the DC Input Lead is connected to the AC
Adaptor, disconnect it from the AC Adaptor.
≥The [POWER] Lamp and [CHARGE] Lamp
lights up, and charging starts.
≥When the [CHARGE] Lamp goes off,
charging is completed.
-9-
Before Use
≥When charging the overdischarged battery,
the [CHARGE] lamp blinks at first, but the
battery is charged normally. When the
temperature of the battery is too high or low,
the [CHARGE] lamp blinks and the charging
time becomes longer than usual.
2 Attach the charged Battery to the Movie
Camera.
To Remove the Battery
Set the [OFF/ON] Switch (43) to [OFF], and while
sliding the [BATTERY RELEASE] Lever
slide the Battery to remove it.
≥When attaching or removing Battery, set the
[OFF/ON] Switch to [OFF] and make sure the
[POWER] Lamp is not lit.
(49),
(43)
(49)
ª Using the Car Battery Charger
(optional)
If you use the Car Battery Charger (VW-KBD2E;
optional), you can supply power to the Movie
Camera and charge the battery inside your car.
For further information, refer to the instruction
manual of the Car Battery Charger.
≥Be sure to start the car engine before you
connect the Car Adaptor Cord, otherwise the
fuse may blow.
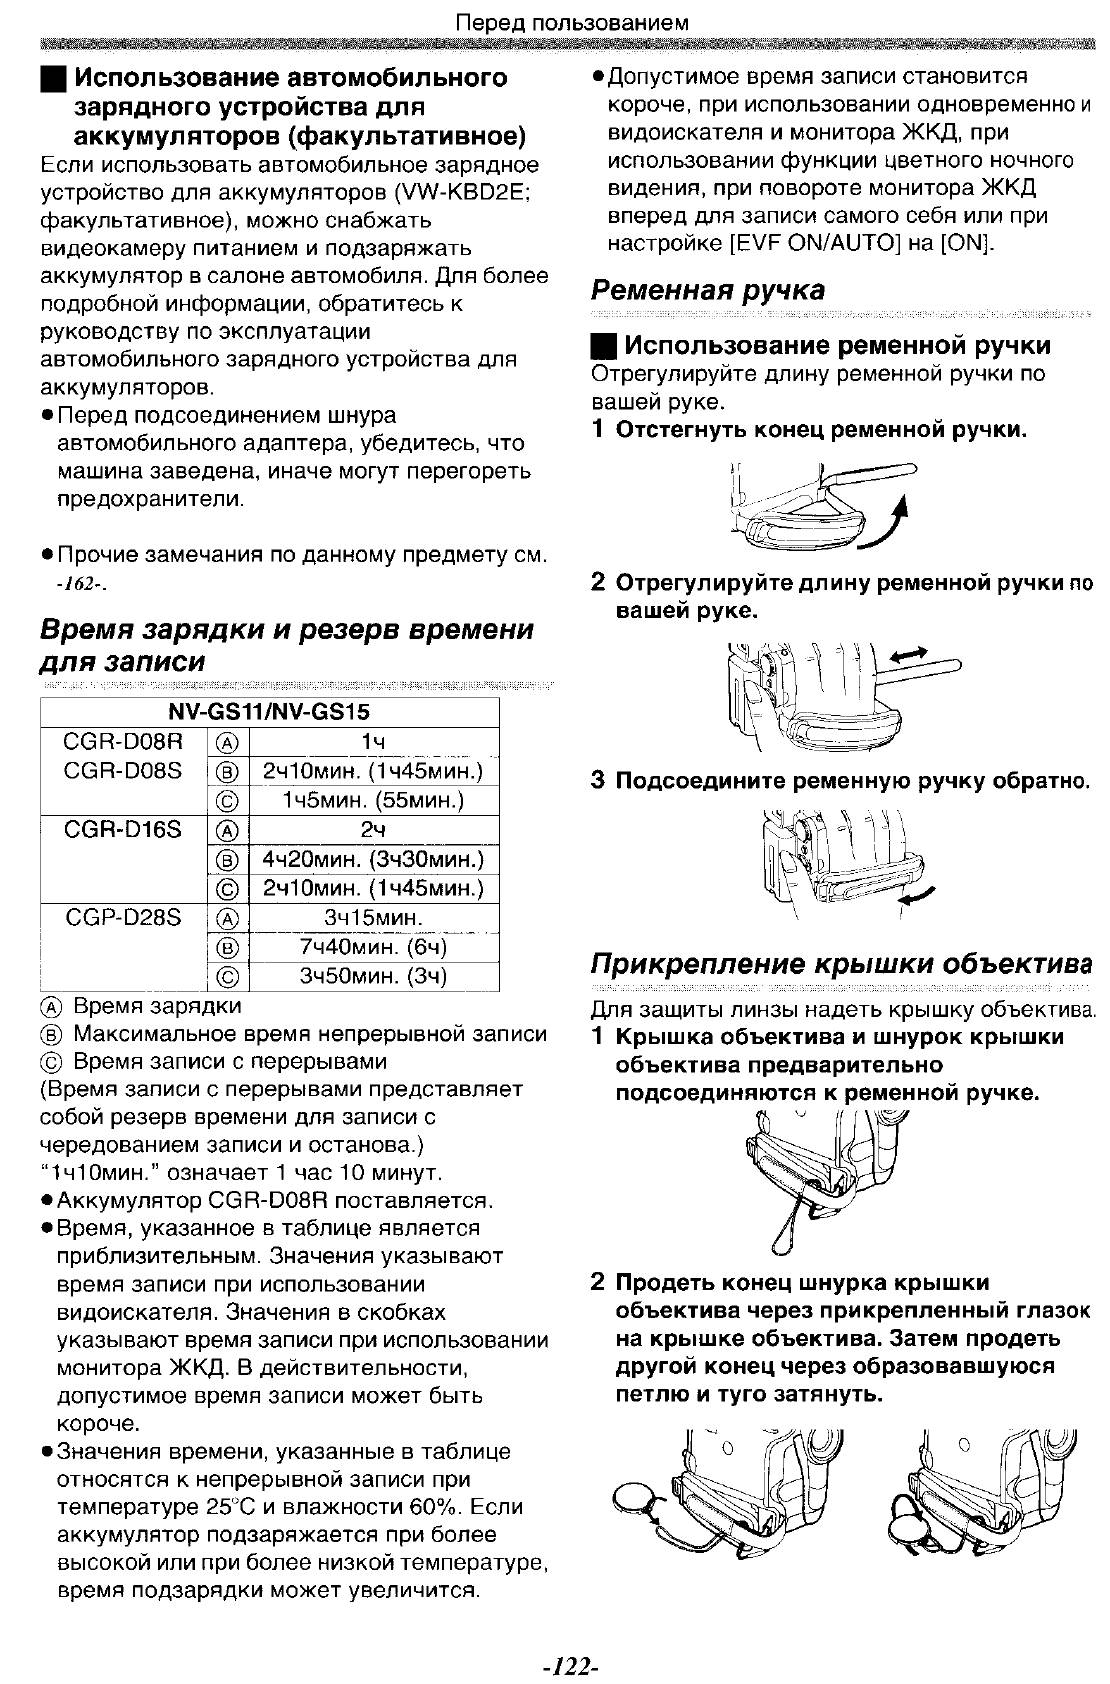
Charging Time and Available
Recording Time
CGR-D08R
CGR-D08S
CGR-D16S A 2h
CGP-D28S A 3h15min.
A Charging Time
B Maximum Continuous Recording Time
C Intermittent Recording Time
(Intermittent Recording Time is the available
recording time with repeated recording and
stopping actions.)
“1h10min.” indicates 1 hour and 10 minutes.
≥Battery CGR-D08R is supplied.
≥The times shown in the table are approximate
times. The numbers indicate the recording time
when the Viewfinder is used. The numbers in
parentheses indicate the recording time when
the LCD Monitor is used. In actual use, the
available recording time may be shorter.
≥The times shown in the table are for continuous
recording at a temperature of 25oC and humidity
of 60%. If the Battery is charged at a higher or
lower temperature, the charging time may be
longer.
≥The available recording time becomes shorter if
you use both of Viewfinder and LCD Monitor
simultaneously when using the Colour Night
View function, rotating the LCD Monitor
frontward to record yourself or setting
[EVF ON/AUTO] to [ON].
NV-GS11/NV-GS15
A 1h
B 2h10min. (1h45min.)
C 1h5min. (55min.)
B 4h20min. (3h30min.)
C 2h10min. (1h45min.)
B 7h40min. (6h)
C 3h50min. (3h)
≥For other notes concerning this item, see
-47-.
-10-
Before Use
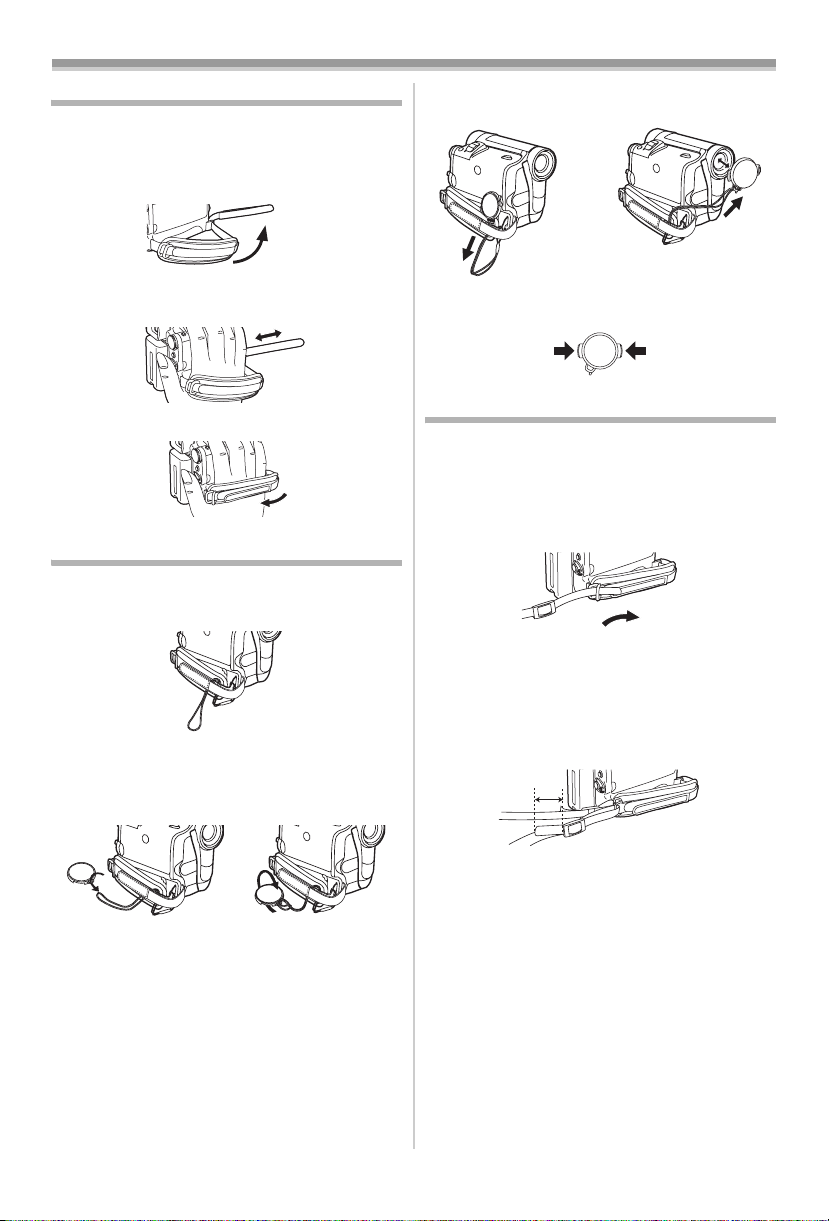
The Grip Belt
ª To Use as a Grip Belt
Adjust the length of the Grip Belt to the size of
your hand.
1 Detach the end of the Grip Belt.
2 Adjust the length of the Grip Belt to the size
of your hand.
3 Reattach the Grip Belt.
Re-attaching the Lens Cap
To protect the Lens surface, attach the Lens Cap.
1 The Lens Cap and Lens Cap Cord comes
preattached to the Grip Belt.
2 Pass the end of the Lens Cap Cord through
the attached eye on the Lens Cap. Then
pass the Lens Cap through the loop made
by itself and pull tight.
≥When you are not recording, be sure to cover
the Lens with the Lens Cap for protection.
1
≥When you remove the Lens Cap, press the
knobs firmly.
2
2
Attaching the Shoulder Strap
We recommend that you attach the Shoulder
Strap before going out of doors to record so as to
avoid dropping the Movie Camera.
1 Pull the end of the Shoulder Strap through
the Shoulder Strap Holder on the Movie
Camera.
2 Fold the end of the Shoulder Strap, run it
through the Shoulder Strap Length
Adjuster, and pull it.
≥Pull it out more than 2 cm 1 from the
Shoulder Strap Length Adjuster so that it
cannot slip off.
1
≥When not using the Lens Cap, pull the Lens
Cap Cord in the direction of the arrow. 1
≥Attach the other end of the Shoulder Strap to
the other Shoulder Strap Holder in the same
way.
-11-
Before Use
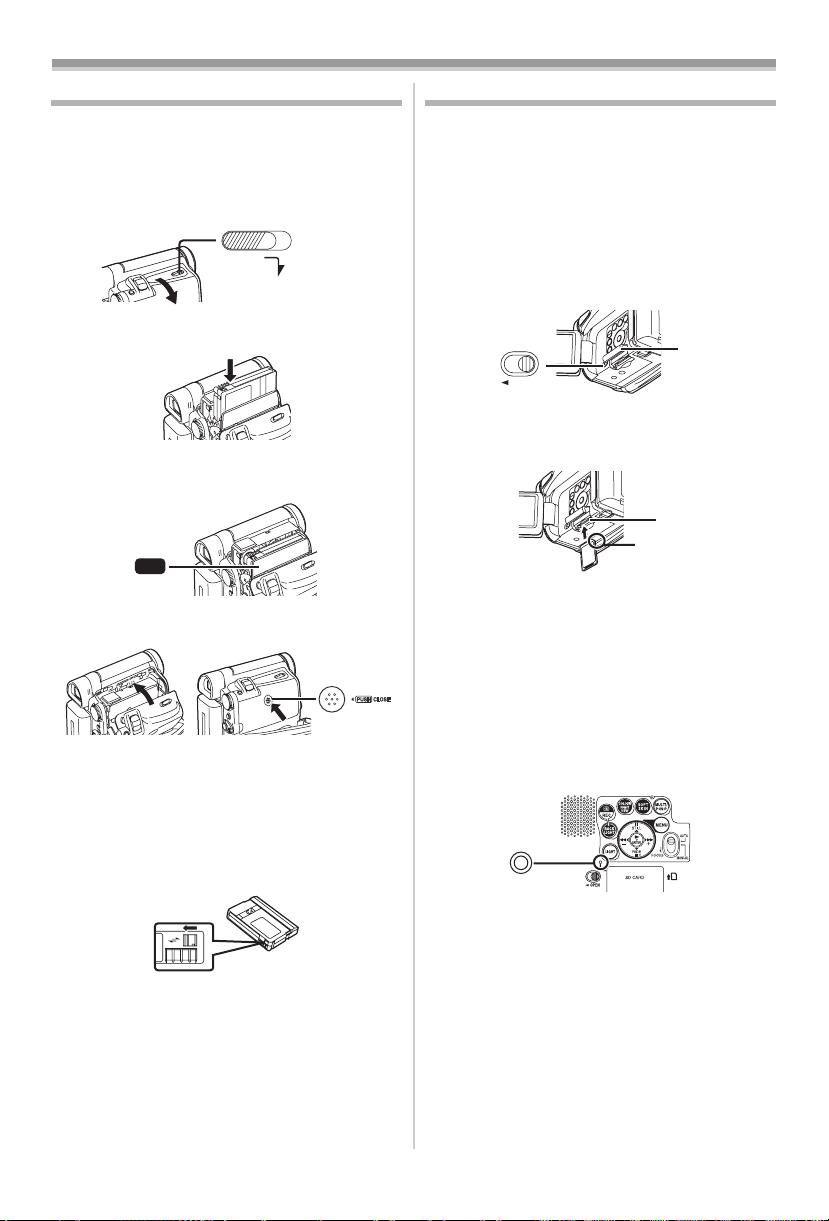
Inserting a Cassette
1 Slide the [OPEN/EJECT] Lever (38) toward
the front and pull down to fully open the
Cassette Compartment Cover.
≥To protect the tape, if the cover is not fully
opened, the cassette cannot be ejected.
2 Insert a Cassette.
3 Close the Cassette Holder by pressing the
[PUSH] mark 1.
1
PUSH
4 Close the Cassette Compartment Cover.
ª Accidental Erasure Prevention
Opening the accidental erasure prevention slider
1 on the cassette (by sliding it to the [SAVE]
arrow direction) prevents recording. To enable
recording, close the accidental erasure
prevention slider (by sliding it to the [REC] arrow
direction).
1
R E C
SAVE
≥For other notes concerning this item, see
OPEN/
EJECT
(38)
-47-.
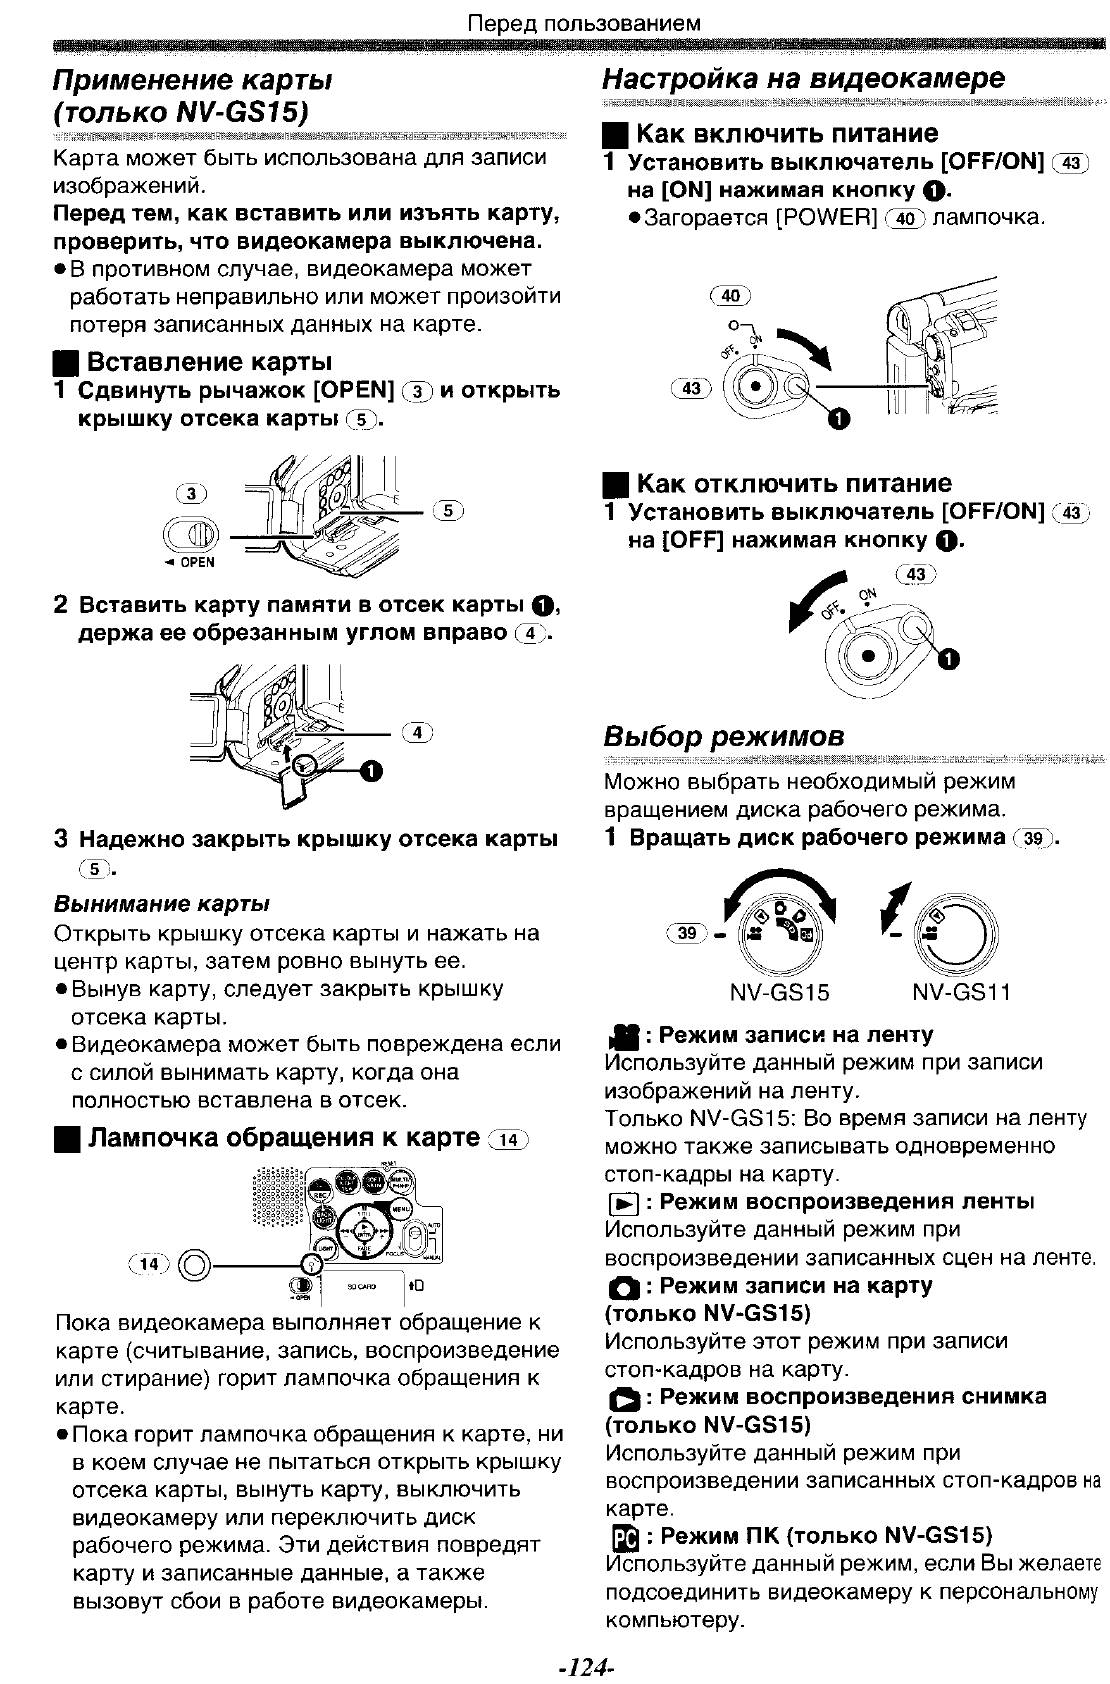
Using a Card (NV-GS15 only)
A Card can be used to record pictures.
Before inserting or removing a Card, be sure
to turn off the Movie Camera.
≥Otherwise, the Movie Camera may not function
properly or it may cause the loss of recorded
data in a Card.
ª Inserting a Card
1 Slide the [OPEN] Lever (3) to open the Card
Slot Cover
2 While holding the Memory Card with its cut
corner facing right 1, insert it into the Card
Slot
3 Close the Card Slot Cover (5) securely.
Removing the Card
Open the Card Slot Cover and press the centre of
the Card and then pull it straight out.
≥After removing the Card, close the Card Slot
Cover.
≥The Movie Camera may be damaged if the
Card is forced out when the Card is fully
inserted.
ª Card Access Lamp (14)
While the Movie Camera is accessing the Card
(reading, recording, playback or erasing), Card
Access Lamp lights up.
≥While Card Access Lamp is on, never attempt
to open the Card Slot Cover, to pull out the
Card, to turn off the Movie Camera, or to turn
the Mode Dial. Such actions will damage the
Card, and recorded data, and cause the Movie
Camera to malfunction.
(4).
(14)
(3)
OPEN
(5).
(5)
(4)
1
RESET
-12-
Before Use
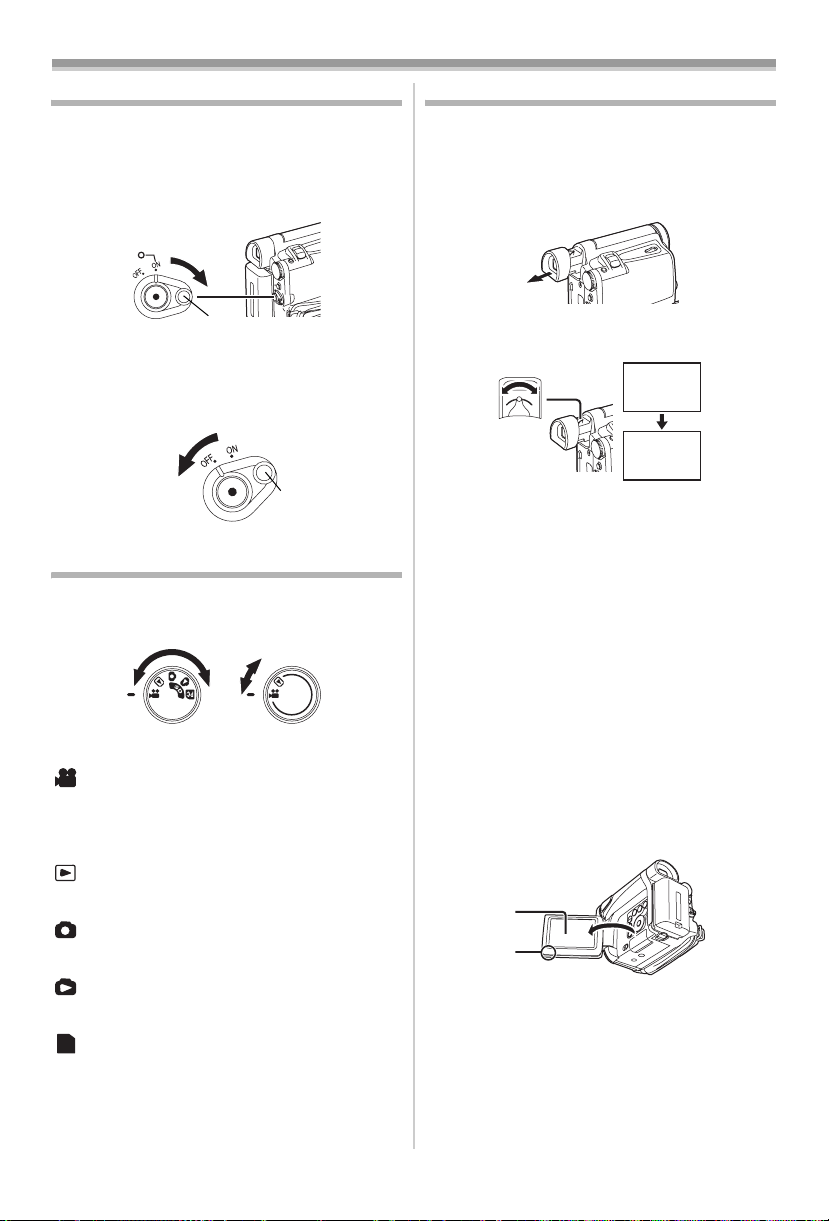
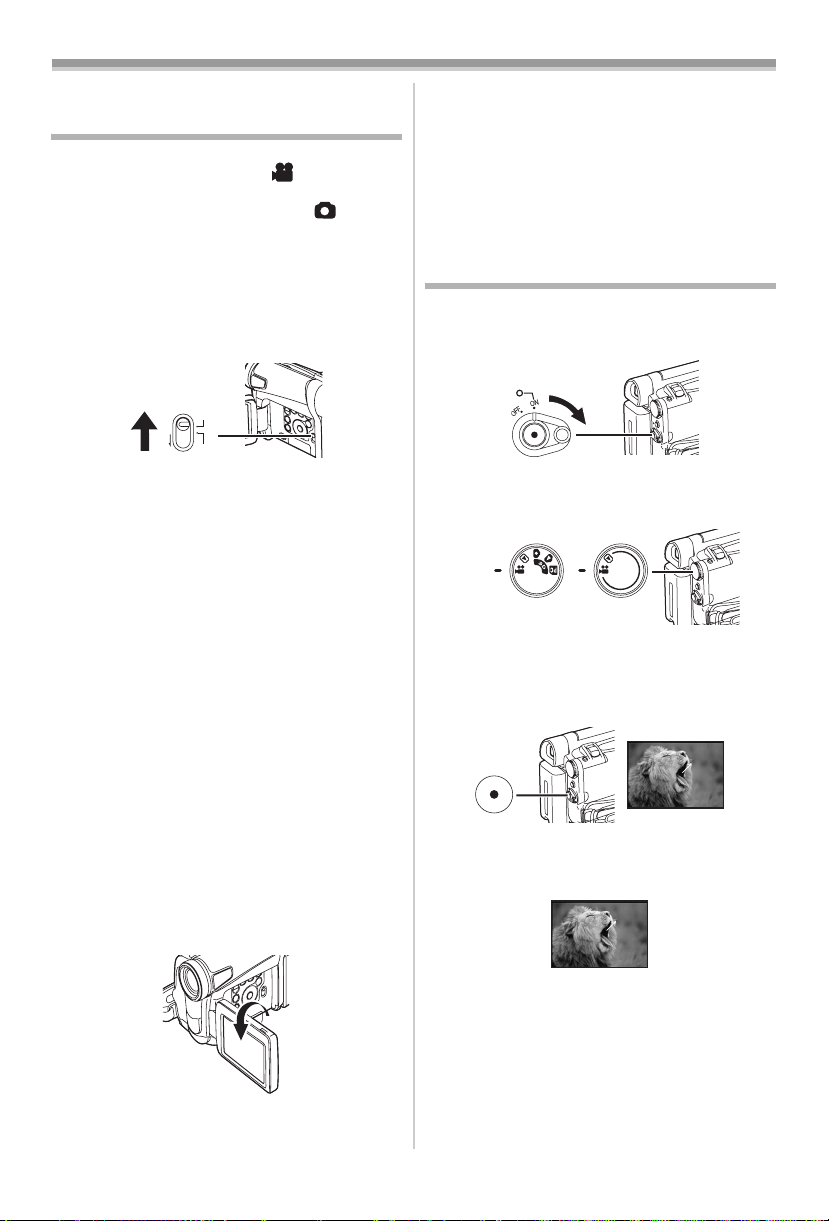
Turning on the Movie Camera
ª How to Turn on the Power
1 Set the [OFF/ON] Switch (43) to [ON] while
pressing the button 1.
≥The [POWER] Lamp
(40)
(43)
(40) lights up.
1
ª How to Turn off the Power
1 Set the [OFF/ON] Switch (43) to [OFF] while
pressing the button 1.
(43)
1
Selecting Modes
You can choose a desired mode by rotating the
Mode Dial.
1 Rotate the Mode Dial (39).
(39)
NV-GS15 NV-GS11
:Tape Recording Mode
Use this mode when recording pictures on a tape.
NV-GS15 only: Also, you can record still pictures
on the card simultaneously during recording on a
tape.
:Tape Playback Mode
Use this mode when playing back the recorded
scene on a tape.
:Card Recording Mode (NV-GS15 only)
Use this mode when recording still pictures on a
card.
:Picture Playback Mode (NV-GS15 only)
Use this mode when playing back the recorded
still picture on a card.
:PC Mode (NV-GS15 only)
PC
Use this mode when you want to connect the
Movie Camera to your Personal Computer.
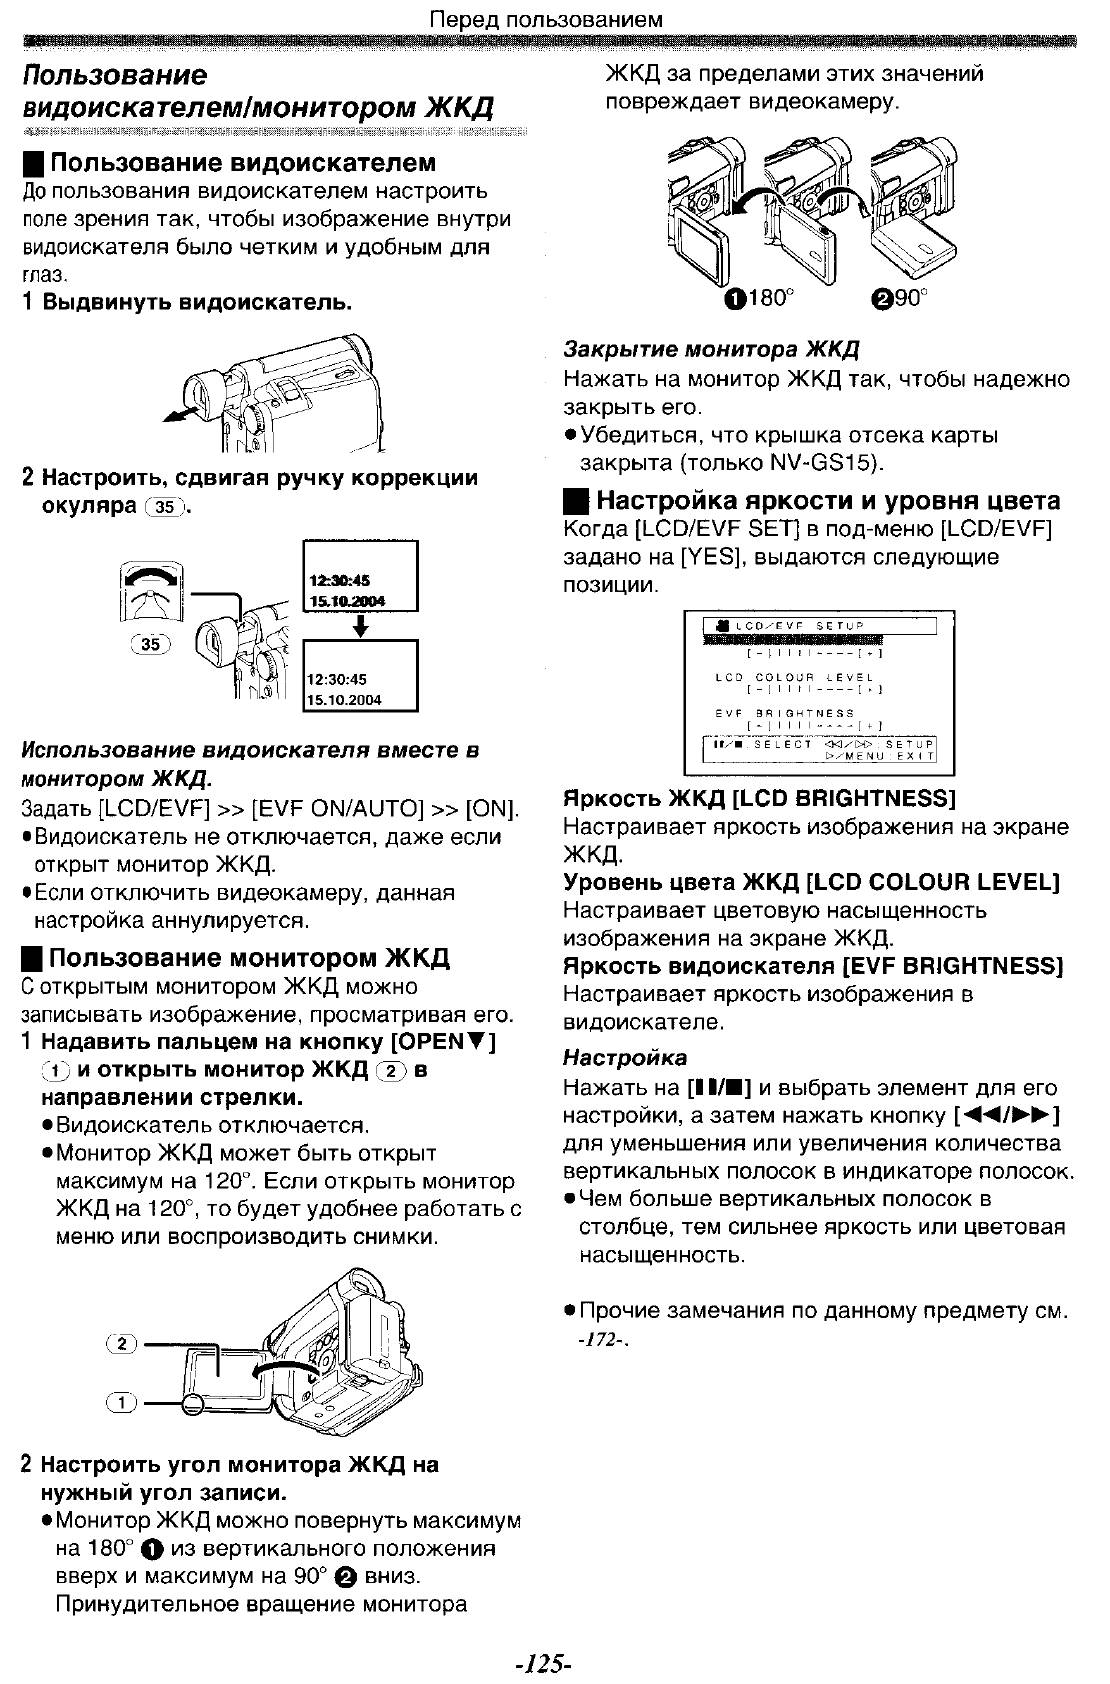
Using the Viewfinder/LCD Monitor
ª Using the Viewfinder
Before using the Viewfinder, adjust the field of
view so that the displays inside the Viewfinder
become clear and easy to read.
1 Pull the Viewfinder.
2 Adjust by turning the Eyepiece Corrector
To Use the Viewfinder at the Same Time as the
LCD Monitor
Set [LCD/EVF] >> [EVF ON/AUTO] >> [ON].
≥The Viewfinder does not turn off even if the LCD
≥When you turn the Movie Camera off, this
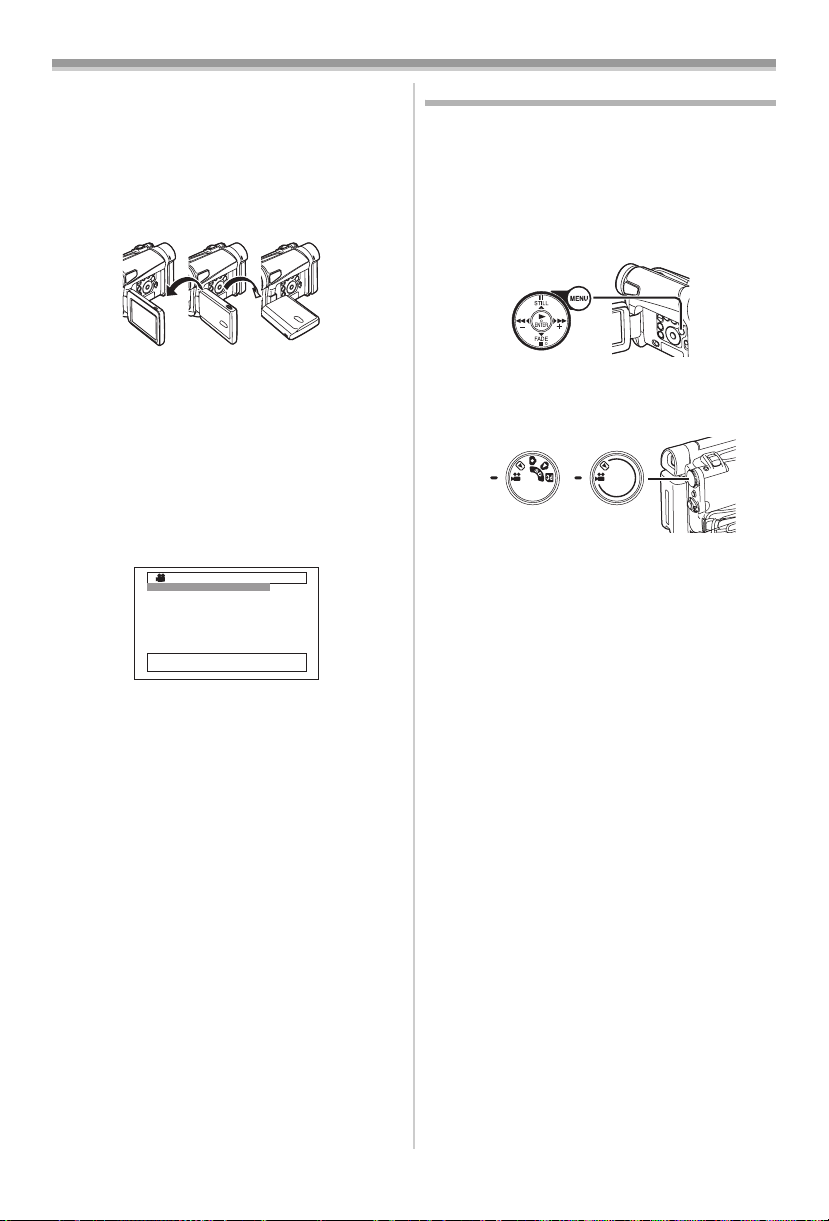
ª Using the LCD Monitor
With the LCD Monitor open, you can also record
the picture while watching it.
1 Put a finger on the [OPEN4] Knob (1) and
(35).
Knob
12:30:45
12:30:45
12:30:45
15.10.2004
15.10.2004
15.10.2004
(35)
12:30:45
15.10.2004
Monitor is opened.
setting is cancelled.
pull the LCD Monitor
(2) out in the direction
of the arrow.
≥The Viewfinder is deactivated.
≥The LCD Monitor can be opened a maximum
of 120o. If you open the LCD monitor by 120o,
it becomes convenient to operate menus or to
play back pictures.
(2)
(1)
-13-
Before Use
2 Adjust the LCD Monitor angle according to
the desired recording angle.
≥The LCD Monitor can rotate a maximum of
180o 1 from the vertical position upwards
and a maximum of 90o 2 to the downward
direction. Forcefully rotating the LCD Monitor
beyond these ranges will damage the Movie
Camera.
290o1180o
Closing the LCD Monitor
Push the LCD Monitor until it is securely locked.
≥Make sure the Card Slot Cover is closed
(NV-GS15 only).
ª Adjusting Brightness and Colour
Level
When [LCD/EVF SET] on the [LCD/EVF]
Sub-Menu is set to [YES], the following items are
displayed.
LCD/EVF SETUP
1LCD BRIGHTNESS
[-]||||—-[+]
LCD COLOUR LEVEL
[-]||||—-[+]
EVF BRIGHTNESS
[-]||||—-[+]
;/∫:SELECT &/%:SETUP
!/MENU:EXIT
LCD Brightness [LCD BRIGHTNESS]
Adjusts the brightness of the image on the LCD
screen.
LCD Colour Level [LCD COLOUR LEVEL]
Adjusts the colour saturation of the image on the
LCD screen.
Brightness of the Viewfinder
[EVF BRIGHTNESS]
Adjusts the brightness of the image in the
Viewfinder.
To Adjust
Press the [;/∫] Button and select the item to be
adjusted, and then press the [6/5] Button to
raise or lower the number of vertical bars in the
Bar Indication.
≥A larger number of vertical bars indicates
stronger brightness or colour saturation.
≥For other notes concerning this item, see
-55-.
Using the Menu Screen
To facilitate the selection of a desired function or
setup, this Movie Camera displays various
function setups on Menus.
≥When operating the menu with the Viewfinder,
set [LCD/EVF] >> [EVF ON/AUTO] >> [ON] or
rotate the LCD monitor by 180o.
1 Press the [MENU] Button (20).
(20)
≥The Menu corresponding to the Mode
selected by using the Mode Dial
displayed.
(39)
NV-GS15 NV-GS11
2 Press the [;/∫] Button to select a desired
Sub-Menu.
≥Press the [;/∫] Button to display the
highlighted item.
3 Press the [5] Button to display the
selected Sub-Menu.
4 Press the [;/∫] Button to select the item.
5 Press the [5] Button to display the
selected item.
6 Press the [;/∫] Button to select the desired
mode and press [ENTER] Button to
determine the setting.
≥While a Menu is displayed, you cannot record or
play back. Menus can be displayed during
playback but not during recording. The above
operations can be done using the [MENU]
Button, [π, ∫, ∑, ∏] Buttons and [ENTER]
Button on the Remote Controller. (
To Return the Previous Screen
Press the [6] Button.
To Exit the Menu Screen
Press the [MENU] Button again.
About the Menu Mode Setting
The setting selected on the Menu will be retained
even when the Movie Camera is turned off.
However, if the Battery or AC Adaptor is
disconnected before turning off the Movie
Camera, the selected setup may not be retained.
(The setups of [EFFECT2] (
-29-) are not retained.)
(39) is
-7-)
≥Menu operation flow is shown in this text by >>.
-14-
Before Use
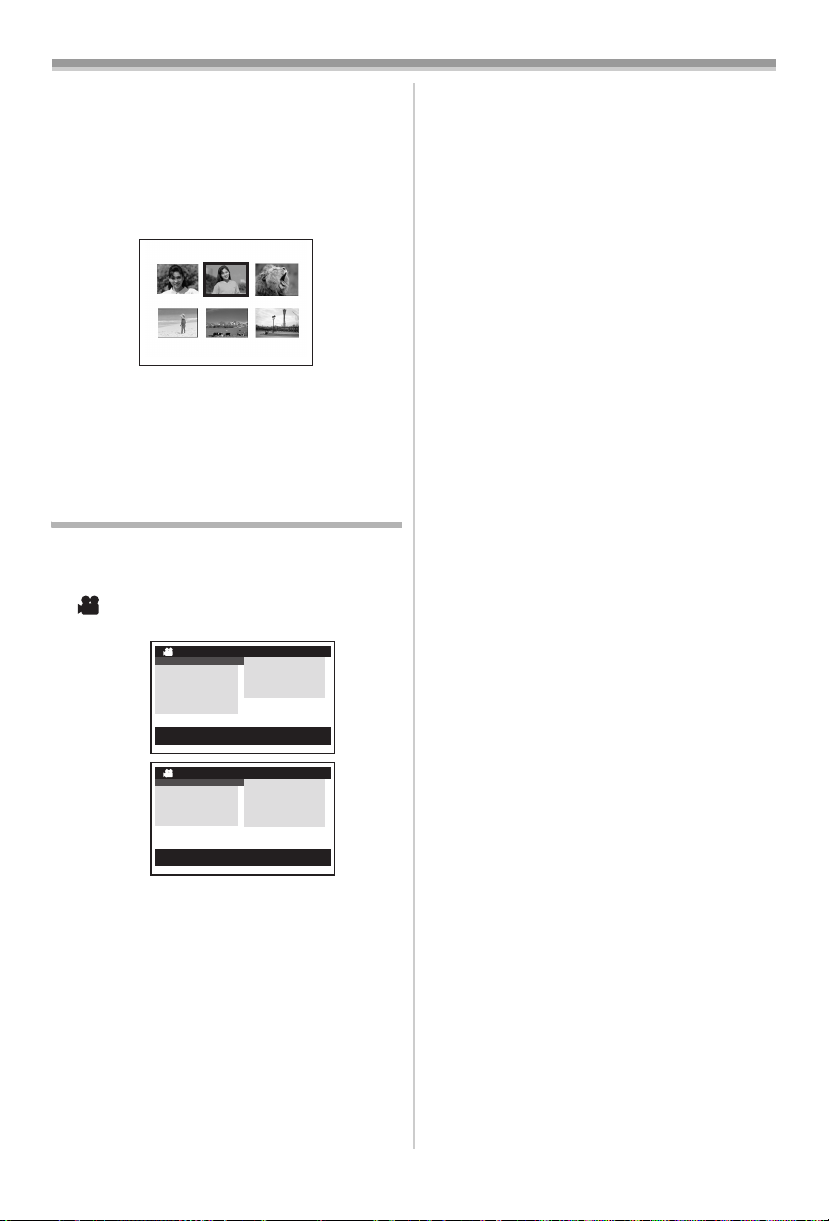
ª File Selection in the Picture Playback
Mode (NV-GS15 only)
A File Selection Operation may be necessary
during Menu Operations. In this case, carry out
the following procedure.
1 Press the [;/∫/6/5] Button and select
a file.
≥The selected file is marked by a frame.
PICTURE
No.25 100-0012
2 Press the [ENTER] Button (17) to confirm
the selection of the file.
≥After the above File Selection Procedure, carry
out the various Menu Operations. (The above
procedure will not be repeated in the following
instructions.)
List of Menus
The figures of the Menus are for explanation
purposes only, and they are different from the
actual Menus.
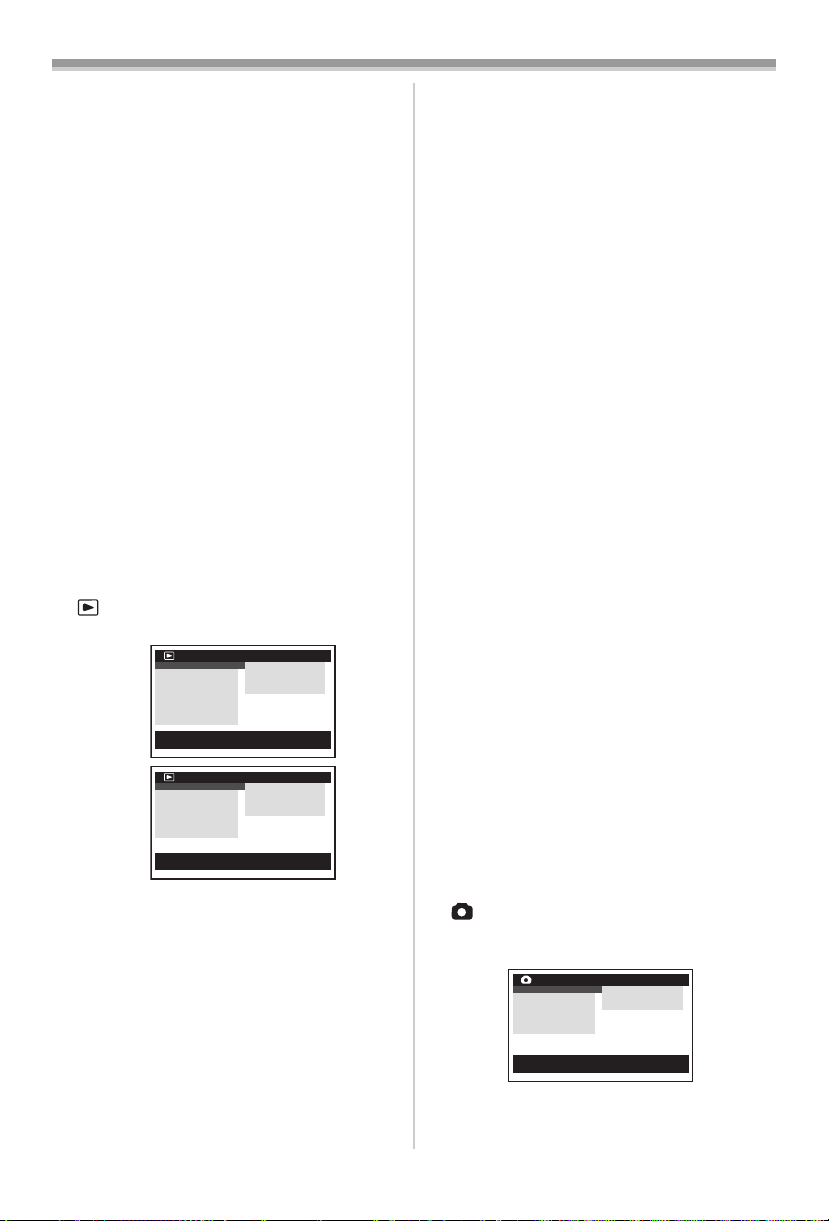
ª [TAPE RECORDING MENU]
Tape Recording Mode
NV-GS15
NV-GS11
1) [CAMERA]
Camera Setup Sub-Menu
[PROG.AE]
Auto Exposure Mode
[SIS]
Image Stabilizer
[D.ZOOM]
Digital Zoom
[SHTR EFFECT] (NV-GS11 only)
Shutter Effect
≥You can add a sound like releasing the shutter.
[SELF TIMER]
Self-timer Recording
TAPE RECORDING MENU
CAMERA !
DIGITAL
CARD
RECORDING
DISPLAY
LCD/EVF
INITIAL
;/∫:SELECT %:NEXT
MENU:EXIT
TAPE RECORDING MENU
CAMERA !
DIGITAL
RECORDING
DISPLAY
LCD/EVF
INITIAL
;/∫:SELECT %:NEXT
MENU:EXIT
PROG.AE
SIS
D.ZOOM
SELF TIMER
USB FUNCTION
PROG.AE
SIS
D.ZOOM
SHTR EFFECT
SELF TIMER
USB FUNCTION
-25-
-23-
-23-
-20-
-22-
[USB FUNCTION]
USB Functions Mode
-43-
≥If you press [6] Button, the menu changes
back to the previous screen.
2) [DIGITAL]
Digital Setup Sub-Menu
[EFFECT1]
Digital Effects 1
-28-
[EFFECT2]
Digital Effects 2
-29-
[MULTI MODE]
Multi-Picture Mode
-29-
[TITLE IN] (NV-GS15 only)
Adding a Title
-36-
3) [CARD] (NV-GS15 only)
Card Setup Sub-Menu
[PICT QUALITY]
Picture Quality
-21-
[CREATE TITLE]
Title Creation
-36-
4) [RECORDING]
Recording Setup Sub-Menu
[REC SPEED]
Recording Speed Mode
-18-
[AUDIO REC]
Audio Recording Mode
-18-
[SCENE INDEX]
Scene Index Mode
-33-
[WIND CUT]
Wind Noise Reduction
-25-
[ZOOM MIC]
Zoom Microphone
-23-
[CINEMA]
Cinema-like Format Recording
-25-
5) [DISPLAY]
Display Setup Sub-Menu
[DISPLAY]
Display Mode
-46-
[DATE/TIME]
Date and Time Indication
-46-
[C.DISPLAY]
Counter Display Mode
-46-
[C.RESET]
Counter Reset
-59-
≥It resets the counter to zero. However, it cannot
reset the Time Code.
6) [LCD/EVF]
LCD/EVF Setup Sub-Menu
[LCD/EVF SET]
LCD and Viewfinder Adjustment
-14-
[SELF REC]
Recording Yourself
-19-
[EVF ON/AUTO]
Using the Viewfinder
-13-
7) [INITIAL]
Initial Setup Sub-Menu
-15-
Before Use
[BLANK SEARCH]
Blank Search
-20-
[DEMO MODE]
Demonstration Mode
≥If no operation takes place for approximately
10 minutes after the AC Adaptor is connected to
the Movie Camera and the [OFF/ON] Switch is
turned to [ON] without inserting a Cassette or a
Card, the Movie Camera is automatically set to
Demonstration Mode for introducing its
functions. If any button is pressed or operated,
the Demonstration Mode is cancelled. The
Demonstration Mode can be started by setting
[DEMO MODE] to [ON] and by exiting the
Menu. To terminate the Demonstration Mode,
insert a Cassette or set the [DEMO MODE] to
[OFF].
[AV JACK]
AV Socket
-57-
[REMOTE]
Remote Controller Mode
-9-
[BEEP SOUND]
Beep Sound
-47-
[CLOCK SET]
Date and Time Setting
-17-
[INITIAL SET]
Initial Setting Mode
-46-
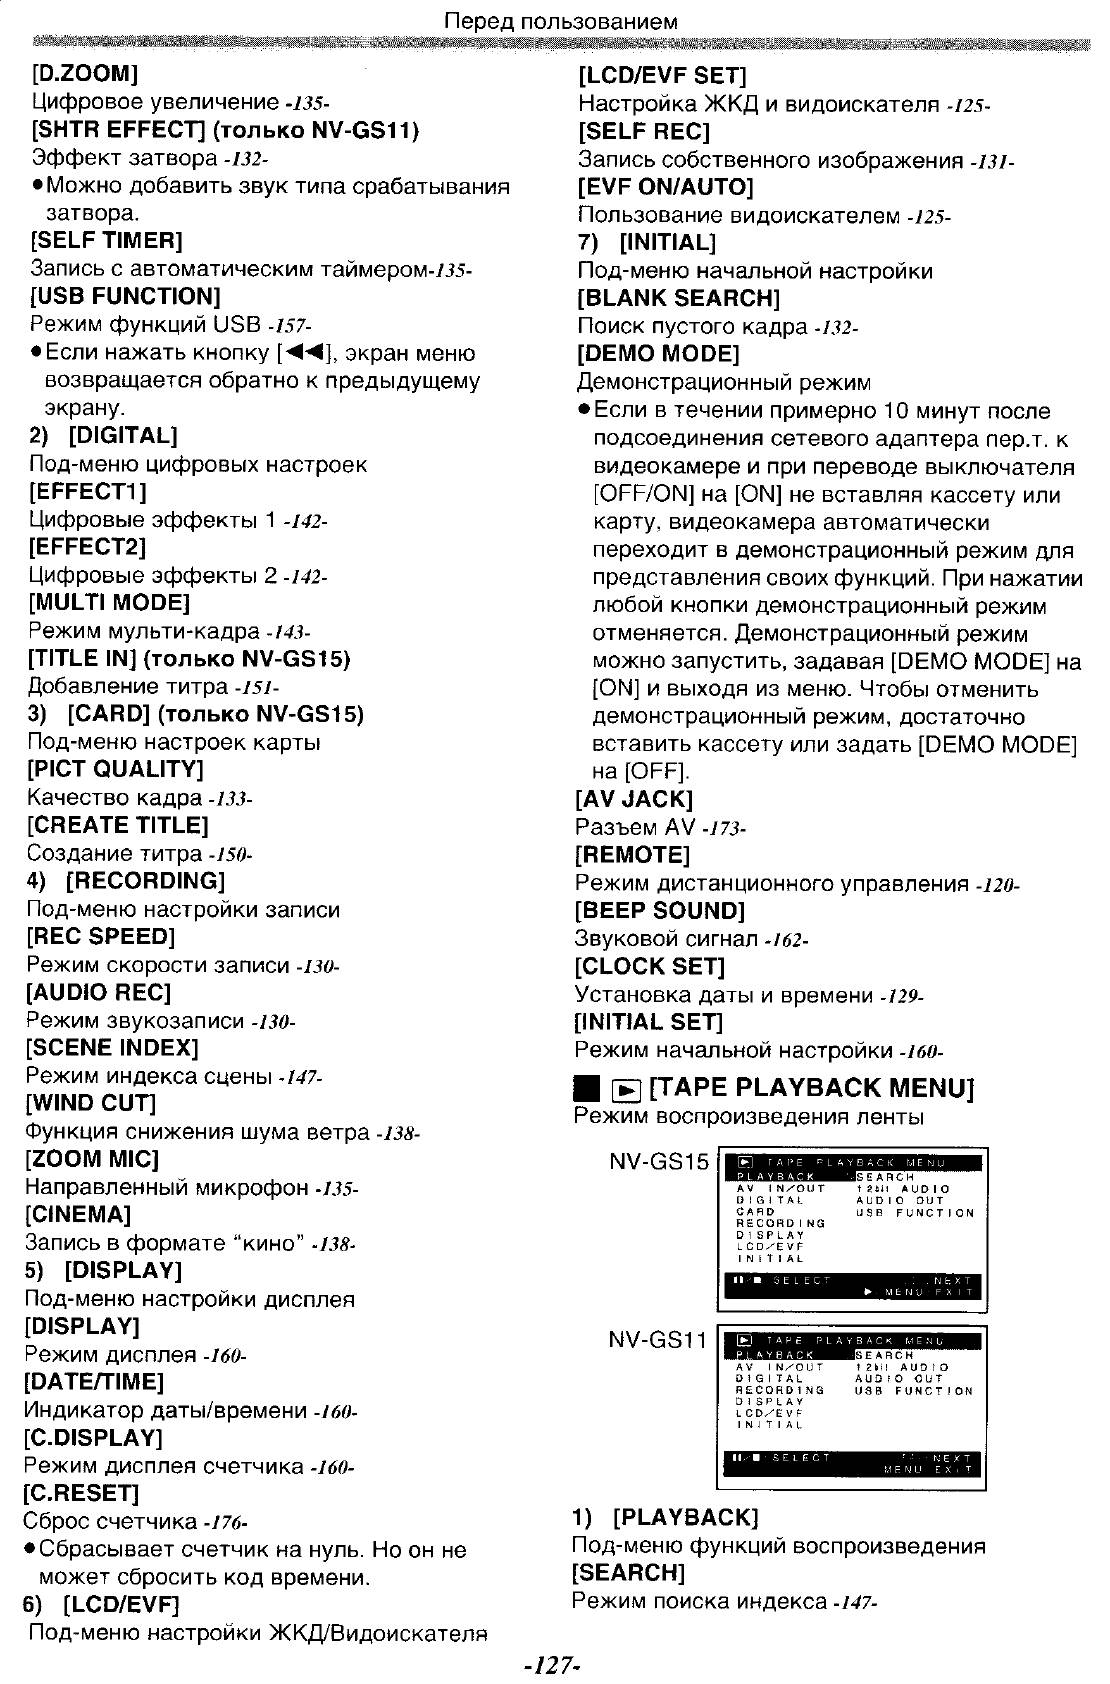
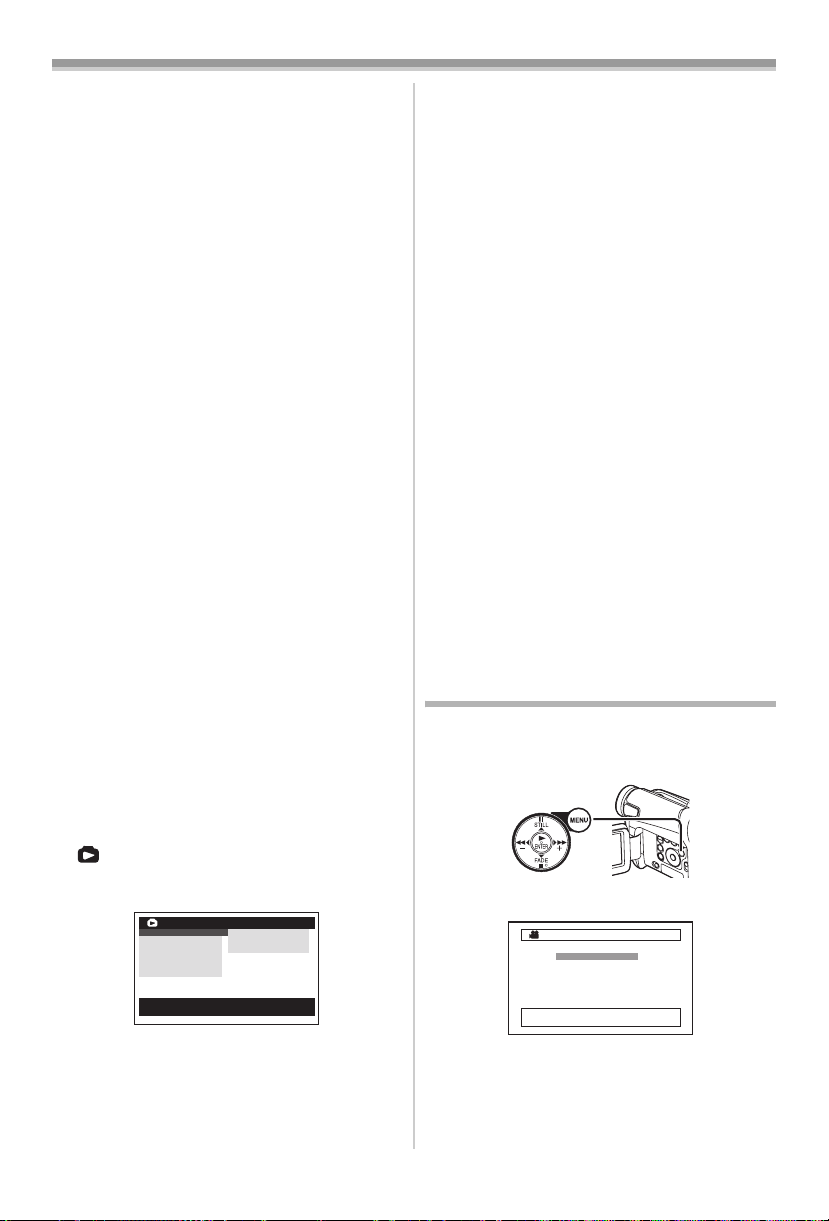
ª [TAPE PLAYBACK MENU]
Tape Playback Mode
NV-GS15
NV-GS11
1) [PLAYBACK]
Playback Functions Sub-Menu
[SEARCH]
Index Search Mode
[12bit AUDIO]
Audio Selector
[AUDIO OUT]
Audio Output Mode
[USB FUNCTION]
USB Functions Mode
2) [AV IN/OUT]
Audio-Video Input/Output Setup Sub-Menu
[AV JACK]
AV Socket
TAPE PLAYBACK MENU
PLAYBACK !
AV IN/OUT
DIGITAL
CARD
RECORDING
DISPLAY
LCD/EVF
INITIAL
;/∫:SELECT %:NEXT
MENU:EXIT
TAPE PLAYBACK MENU
PLAYBACK !
AV IN/OUT
DIGITAL
RECORDING
DISPLAY
LCD/EVF
INITIAL
;/∫:SELECT %:NEXT
MENU:EXIT
SEARCH
12bit AUDIO
AUDIO OUT
USB FUNCTION
SEARCH
12bit AUDIO
AUDIO OUT
USB FUNCTION
-33-
-41-
-51-
-43-
-40-
[A.DUB INPUT]
Audio Dubbing Input
-40-
[DV OUT]
Analog-Digital Conversion Output
-52-
3) [DIGITAL]
Playback Digital Setup Sub-Menu
[EFFECT ON]
Digital Effect On/Off
-34-
[EFFECT SEL]
Digital Effect Selection
-34-
[TITLE IN] (NV-GS15 only)
Adding a Title
-36-
4) [CARD] (NV-GS15 only)
Card Setup Sub-Menu
[PICT QUALITY]
Picture Quality
-21-
[CREATE TITLE]
Title Creation
-36-
5) [RECORDING]
Recording Setup Sub-Menu
[REC SPEED]
Recording Speed Mode
-18-
[AUDIO REC]
Audio Recording Mode
-18-
6) [DISPLAY]
Display Setup Sub-Menu
≥All of the items on the [DISPLAY] Sub-Menu are
the same as those on the [DISPLAY] Sub-Menu
of the [TAPE RECORDING MENU] Main-Menu.
7) [LCD/EVF]
Adjusting Brightness and Colour Level
[LCD/EVF SET]
LCD and Viewfinder Adjustment
-14-
[EVF ON/AUTO]
Using the Viewfinder
-13-
[INITIAL]
Initial Setup Sub-Menu
[BLANK SEARCH]
Blank Search
-20-
[REMOTE]
Remote Controller Mode
-9-
[BEEP SOUND]
Beep Sound
-47-
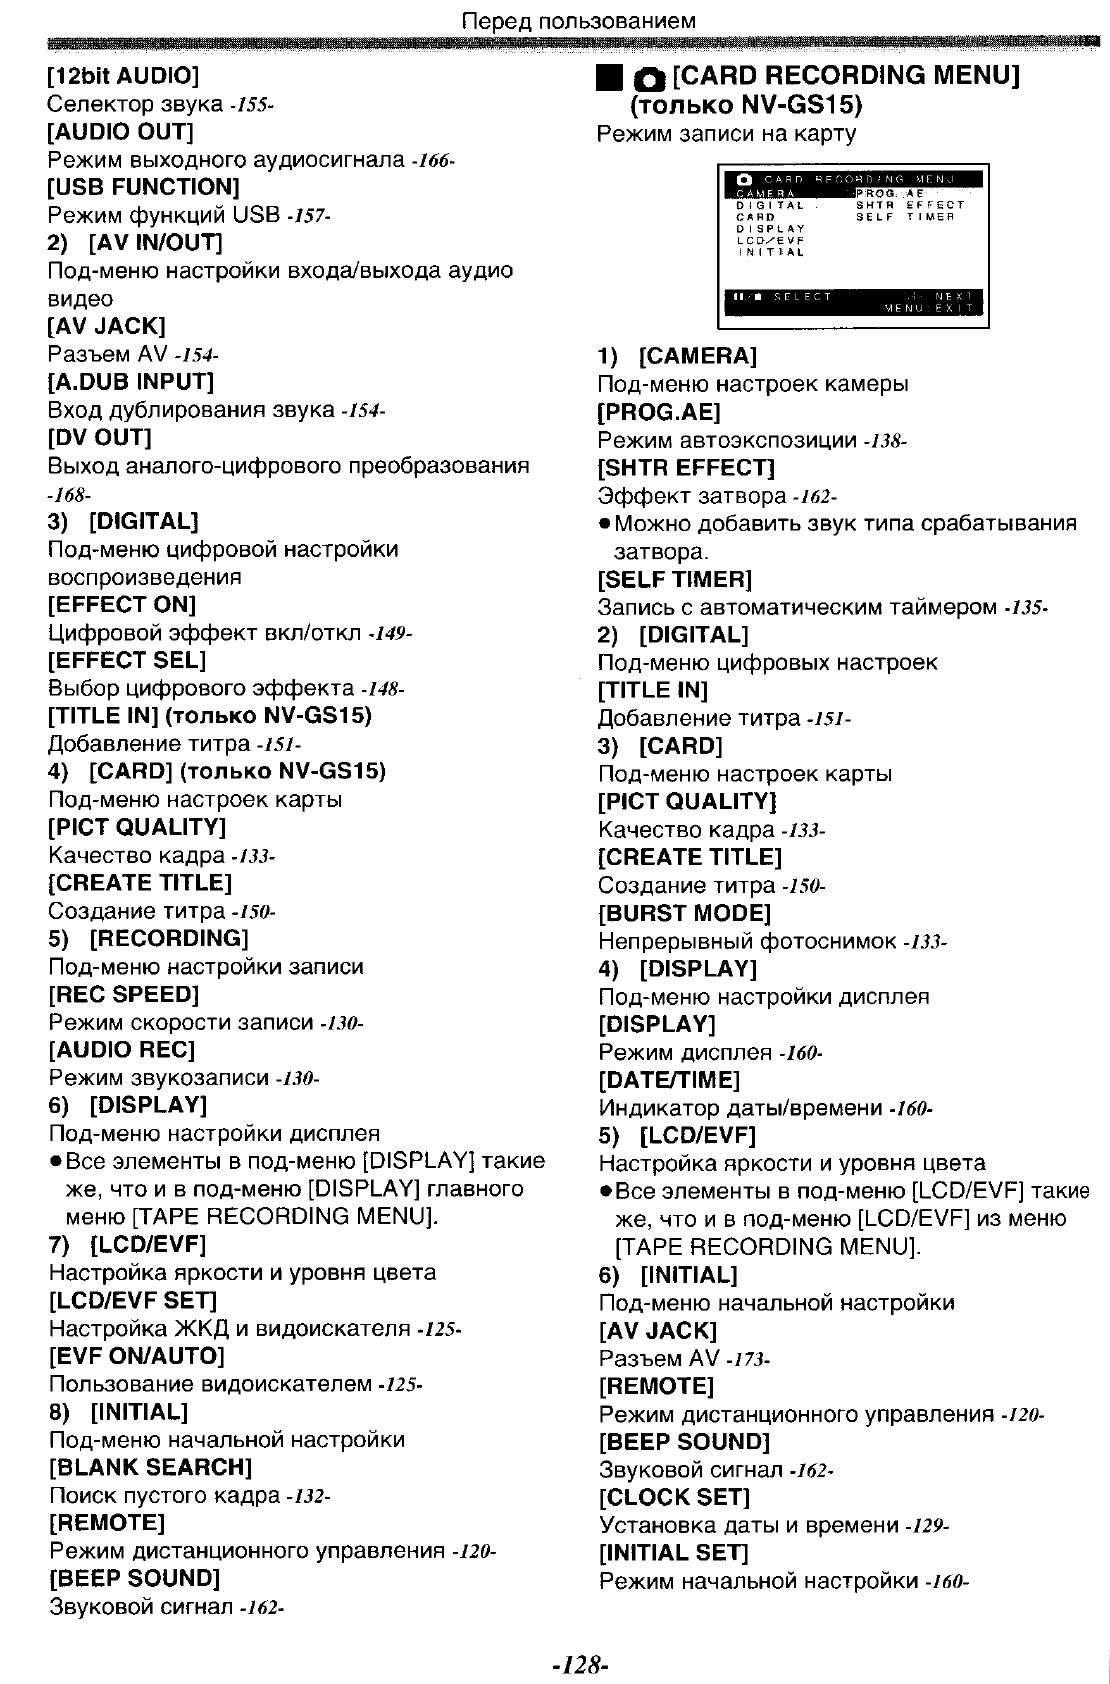
ª [CARD RECORDING MENU]
(NV-GS15 only)
Card Recording Mode
CARD RECORDING MENU
CAMERA !
DIGITAL
CARD
DISPLAY
LCD/EVF
INITIAL
;/∫:SELECT %:NEXT
MENU:EXIT
1) [CAMERA]
Camera Setup Sub-Menu
[PROG.AE]
Auto Exposure Mode
-16-
PROG.AE
SHTR EFFECT
SELF TIMER
-25-
Before Use
[SHTR EFFECT]
Shutter Effect
-48-
≥You can add a sound like releasing the shutter.
[SELF TIMER]
Self-timer Recording
-22-
2) [DIGITAL]
Digital Setup Sub-Menu
[TITLE IN]
Adding a Title
-36-
3) [CARD]
Card Setup Sub-Menu
[PICT QUALITY]
Picture Quality
-21-
[CREATE TITLE]
Title Creation
-36-
[BURST MODE]
Continuous Photoshot
-21-
4) [DISPLAY]
Display Setup Sub-Menu
[DISPLAY]
Display Mode
-46-
[DATE/TIME]
Date and Time Indication
-46-
5) [LCD/EVF]
Adjusting Brightness and Colour Level
≥All of the items on the [LCD/EVF] Sub-Menu are
the same as those on the [LCD/EVF] Sub-Menu
of the [TAPE RECORDING MENU].
6) [INITIAL]
Initial Setup Sub-Menu
[AV JACK]
AV Socket
-57-
[REMOTE]
Remote Controller Mode
-9-
[BEEP SOUND]
Beep Sound
-47-
[CLOCK SET]
Date and Time Setting
-17-
[INITIAL SET]
Initial Setting Mode
-46-
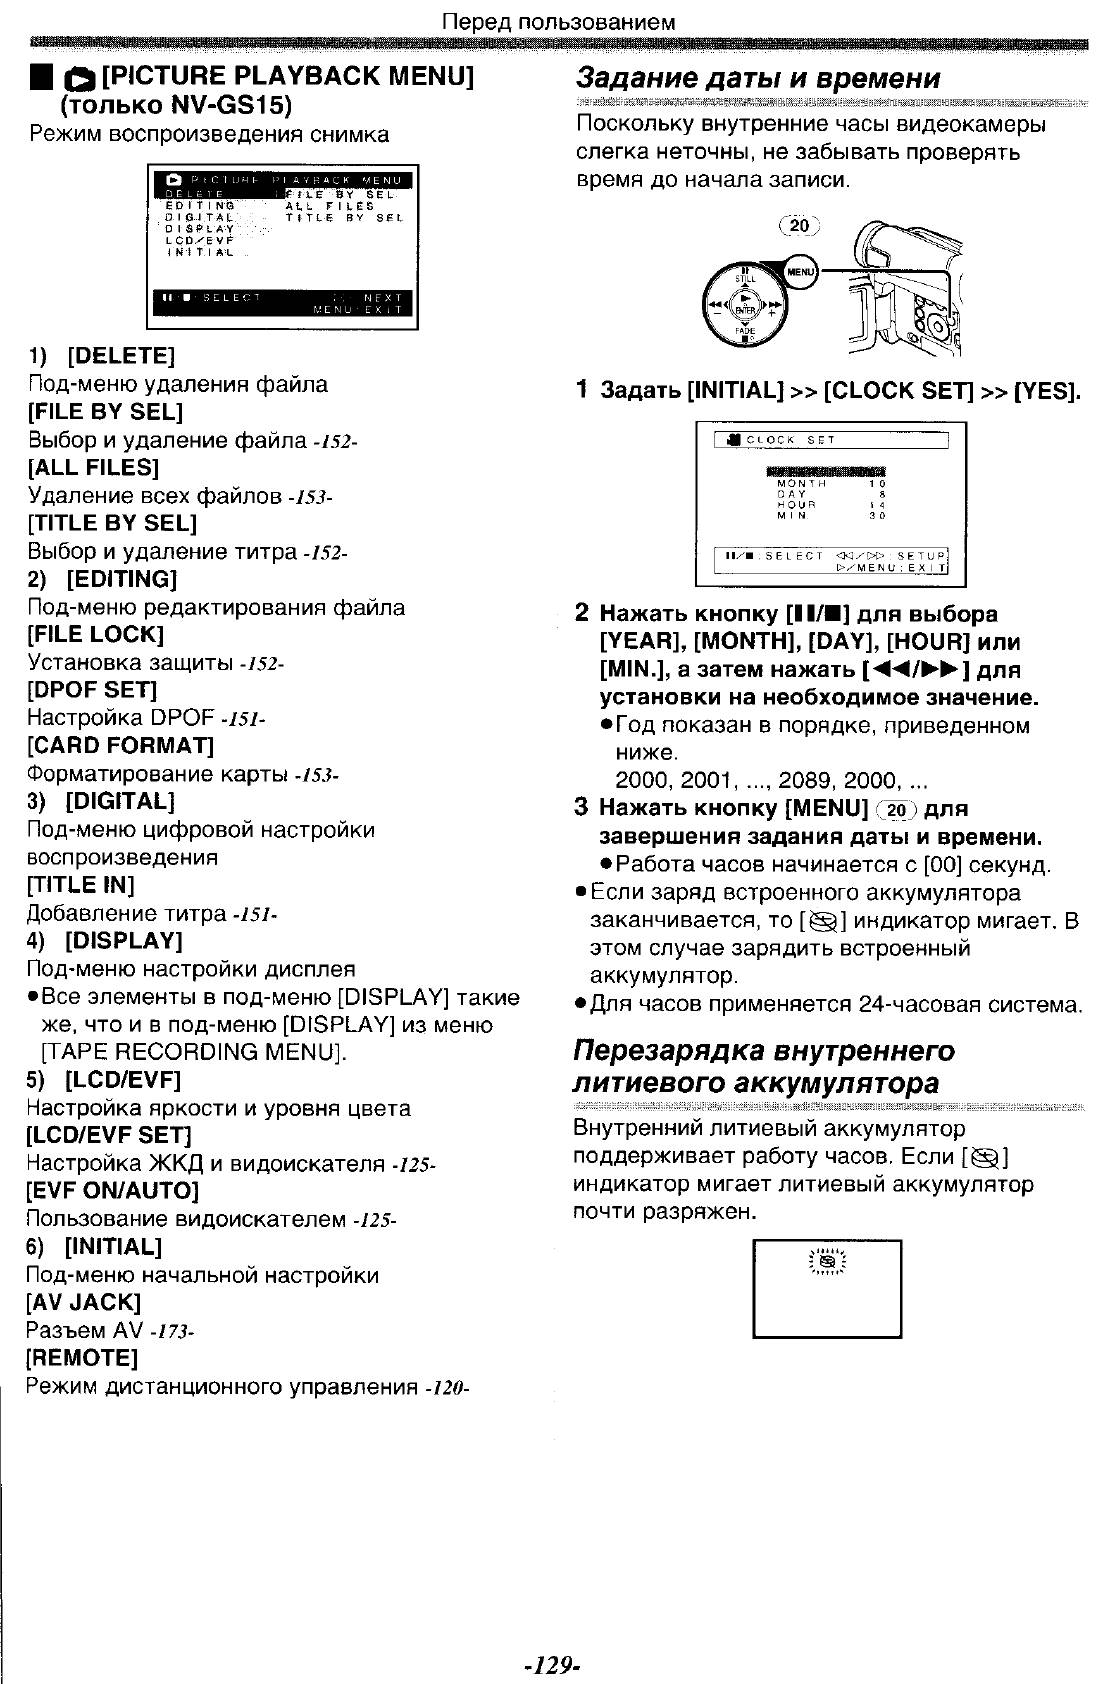
ª [PICTURE PLAYBACK MENU]
(NV-GS15 only)
Picture Playback Mode
PICTURE PLAYBACK MENU
DELETE !
EDITING
DIGITAL
DISPLAY
LCD/EVF
INITIAL
;/∫:SELECT %:NEXT
MENU:EXIT
1) [DELETE]
Deleting a File Sub-Menu
[FILEBYSEL]
Selecting and Deleting a File
[ALL FILES]
Deleting All Files
-38-
FILE BY SEL
ALL FILES
TITLE BY SEL
-38-
[TITLE BY SEL]
Selecting and Deleting a Title
-38-
2) [EDITING]
Editing a File Sub-Menu
[FILE LOCK]
Setting the Lock
-38-
[DPOF SET]
Setting DPOF
-37-
[CARD FORMAT]
Formatting a Card
-38-
3) [DIGITAL]
Playback Digital Setup Sub-Menu
[TITLE IN]
Adding a Title
-36-
4) [DISPLAY]
Display Setup Sub-Menu
≥All of the items on the [DISPLAY] Sub-Menu are
the same as those on the [DISPLAY] Sub-Menu
of the [TAPE RECORDING MENU].
5) [LCD/EVF]
Adjusting Brightness and Colour Level
[LCD/EVF SET]
LCD and Viewfinder Adjustment
-14-
[EVF ON/AUTO]
Using the Viewfinder
-13-
6) [INITIAL]
Initial Setup Sub-Menu
[AV JACK]
AV Socket
-57-
[REMOTE]
Remote Controller Mode
-9-
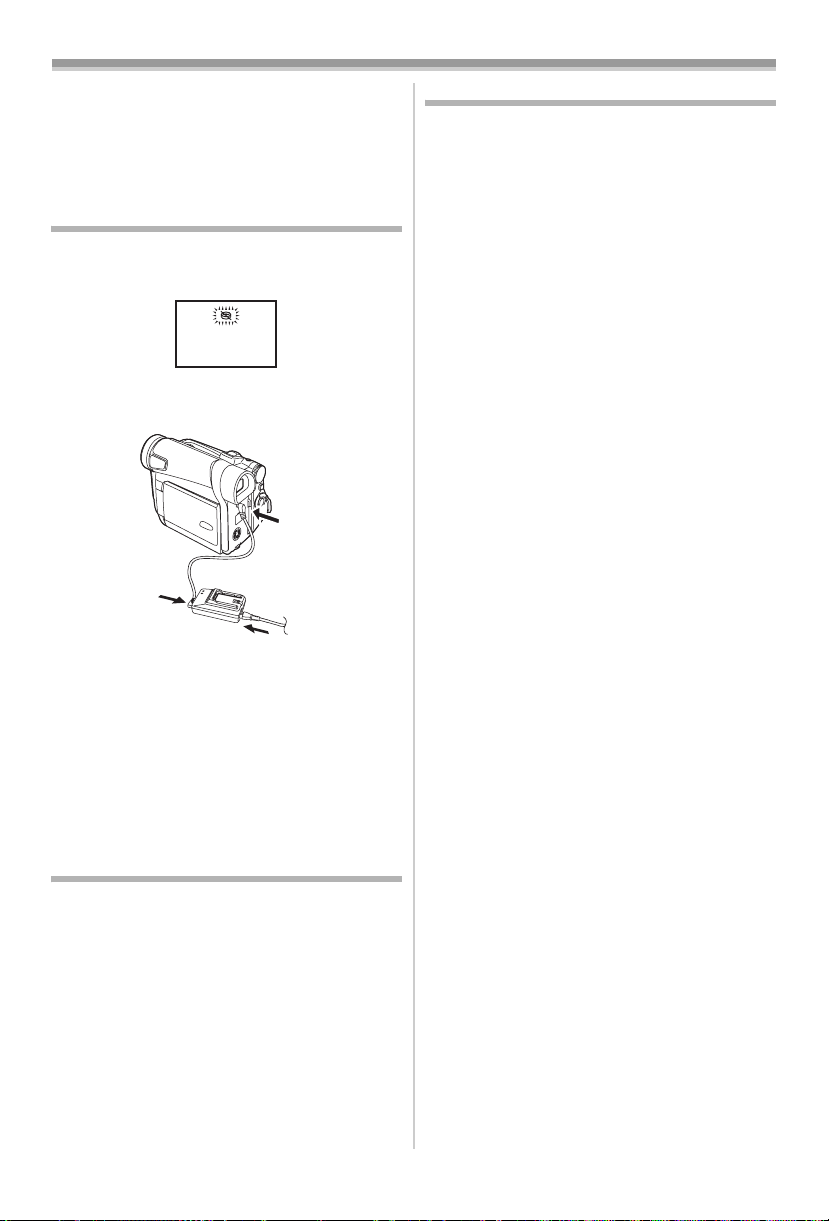
Setting Date and Time
Since the internal clock of the Movie Camera has
a slight imprecision, make sure to check the time
before recording.
(20)
1 Set [INITIAL] >> [CLOCK SET] >> [YES].
CLOCK SET
1YEAR 2004
MONTH 10
DAY 8
HOUR 14
MIN. 30
;/∫:SELECT &/%:SETUP
!/MENU:EXIT
2 Press the [;/∫] Button to select [YEAR],
[MONTH], [DAY], [HOUR] or [MIN.] and
press the [6/5] Button to set it to the
desired value.
≥Year will cycle in the order shown below.
2000, 2001, …, 2089, 2000, …
-17-
Before Use
3 Press the [MENU] Button (20) to finish
setting the date and time.
≥The clock operation starts from [00] second.
≥If the built-in battery is weak, the [0] Indication
flashes. In this case, charge the built-in battery.
≥The clock uses the 24-hour system.
Internal Lithium Battery Recharge
The internal lithium battery sustains the operation
of the clock. When the [0] Indication flashes,
the internal lithium battery is near exhaustion.
1 Connect the AC Adaptor to the Movie
Camera with the power turned off and then
connect to the AC Mains socket.
1
2
3
≥After charging for 4 hours, the built-in lithium
battery can power the clock for approximately
3 months.
WARNING
THE LITHIUM BATTERY IN THIS UNIT MUST
ONLY BE REPLACED BY QUALIFIED
PERSONNEL. IF THIS IS NECESSARY,
CONTACT THE PANASONIC CUSTOMER
CARE CENTRE ON 132600 FOR YOUR
NEAREST AUTHORIZED SERVICE CENTRE.
LP Mode
A desired recording speed can be selected with
[REC SPEED] on the [RECORDING] Sub-Menu.
If LP Mode is selected, the recording time
becomes 1.5 times longer than that of SP
Mode.
Although the image quality does not decrease
with the LP Mode recording, mosaic-pattern noise
may appear on a playback image, or some
normal functions may be restricted.
≥The contents that are recorded in LP Mode are
not completely compatible with other
equipment.
≥Audio dubbing is not possible with LP Mode.
-40-)
(
Audio Recording Mode
The sound quality of the recorded sound can be
selected with [AUDIO REC] on the
[RECORDING] Sub-Menu.
High sound-quality recording is possible with
“16 bit 48 kHz 2 track” Mode. With the “12 bit
32 kHz 4 track” Mode, the original sound can be
recorded on 2 tracks in stereo, while the other
2 tracks can be used for Audio Dubbing.
-18-
Recording Mode
Recording Mode
About Recording
When recording pictures on a tape, set the Mode
Dial to Tape Recording Mode [ ].
When recording still pictures on a card, set the
Mode Dial to Card Recording Mode [ ]
(NV-GS15 only).
When recording with the
[AUTO/MANUAL/FOCUS] Switch
[AUTO], the Movie Camera automatically adjusts
the focus and white balance. In some cases, they
cannot be adjusted automatically and need to be
FOCUS
-26-, -28-)
(21)
AUTO
MANUAL
adjusted manually. (
≥Before turning on the power, remove the
Lens Cap. If the Lens Cap is still attached
when the power is turned on, Automatic
White Balance Adjustment (
function correctly.
≥When the Recording Pause Mode continues for
more than 6 minutes, the power is turned off
automatically for tape protection and power
conservation. (If the AC Adaptor is used, the
power is turned off only when the tape is
inserted in Tape Recording Mode.) When the
tape is inserted in Tape Recording Mode and if
the Recording Pause Mode continues for more
than 6 minutes, the power is turned off
automatically.
To resume recording from this condition, turn
off, then turn on the power again.
≥When the Movie Camera is connected to a
personal computer with a USB Cable, Standby
mode is not available.
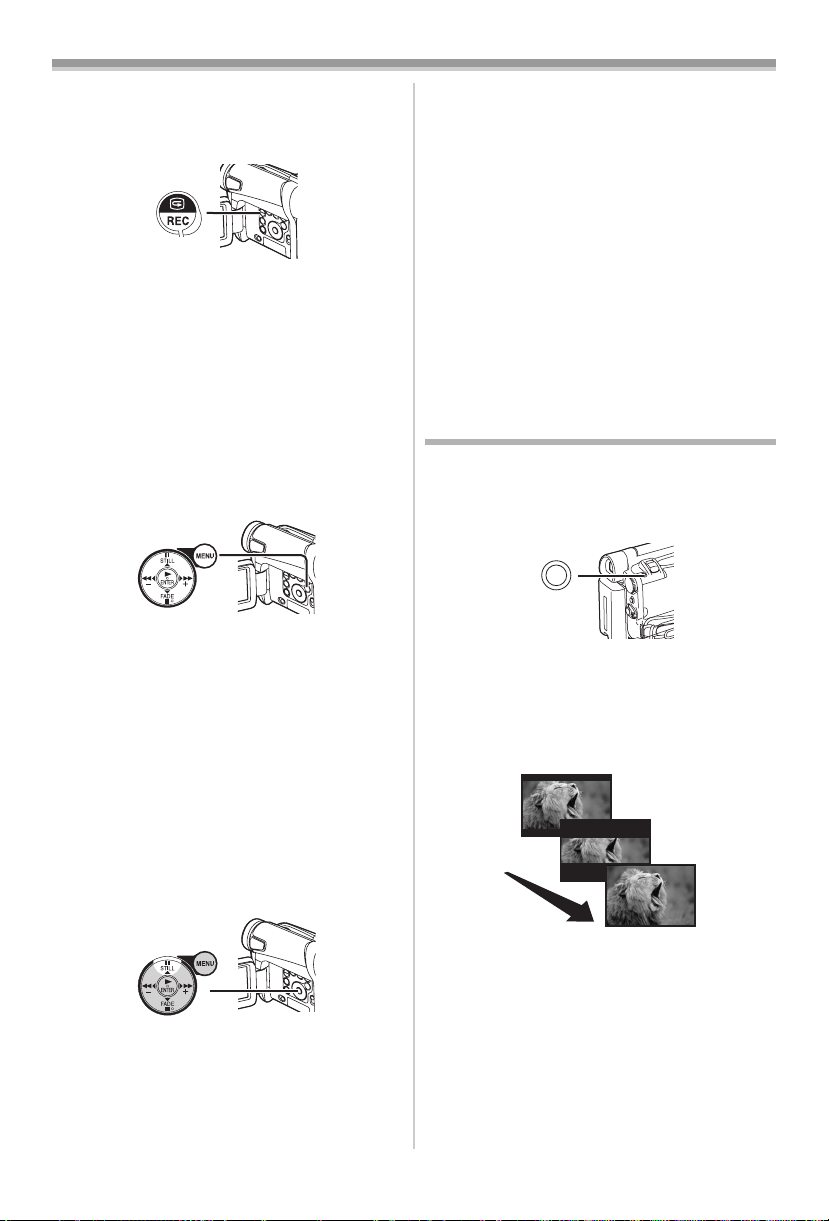
ª Recording Yourself
By opening the LCD Monitor and rotating it
frontward (to the lens side), you can let the
subject in front of the Movie Camera monitor the
shot while recording is in progress.
(21) set to
-26-) may not
≥When the LCD Monitor is opened, the
Viewfinder is disabled automatically. However,
when the LCD Monitor is rotated frontward, the
image is also shown in the Viewfinder.
≥If you prefer to have the image on the LCD
Monitor to look like an image in a mirror, set
[SELF REC] on the [LCD/EVF] Sub-Menu to
[MIRROR]. Images are recorded normally and
no left and right reversal occurs.
Recording on a Tape
1 Set the [OFF/ON] Switch (43) to [ON].
≥The [POWER] Lamp
(40)
(43)
2 Set the Mode Dial (39) to Tape Recording
Mode.
(39)
NV-GS15 NV-GS11
3 Press the Recording Start/Stop Button (42).
≥Recording starts.
≥After the [RECORD] is displayed, it changes
to [REC].
(42)
4 Press the Recording Start/Stop Button (42)
again to pause the recording.
≥The [PAUSE] Indication is displayed.
(40) lights up.
REC
RECORD
PAUSE
PAUSE
Recording ”Simultaneous Motion/Still Record
Mode” (NV-GS15 only)
≥Even if the Mode Dial is set to Tape Recording
Mode and the recording to a tape is in progress,
you can also record a still picture on a card by
pressing the [PHOTO SHOT] Button.
-19-
Recording Mode
ª To Check the Recording
By pressing the [S] Button (6) briefly in the
Recording Pause Mode, you can play back the
last few seconds of the recorded scene.
(6)
≥The [CHK] Indication is displayed. After
checking, the Movie Camera resumes the
Recording Pause Mode.
≥For other notes concerning this item, see
-48-.
ª Finding the End of Recording
(Blank Search Function)
The Blank Search Function aids you to locate the
end of the recording on the Cassette quickly.
1 Set [TAPE RECORDING MENU] or
[TAPE PLAYBACK MENU] >> [INITIAL] >>
[BLANK SEARCH] >> [YES].
(20)
≥The [BLANK] Indication appears during the
Blank Search.
≥Approximately 1 second before the last
recorded scene, the Movie Camera switches
to the Recording Pause Mode or the Still
Playback Mode.
≥If there is no blank left on the Cassette, the
Movie Camera stops at the end of the tape.
To Cancel Blank Search Before Completion
Press the [∫] Button.
ª Digital Still Picture
When the [STILL] Button (15) is pressed, images
become still pictures. When the button is pressed
again, the Digital Still Picture Mode is cancelled.
ª Progressive Photoshot
When the [æ] Indication is displayed,
Progressive Photoshot Function works.
You can record still pictures as frame still pictures
with higher quality by this function.
≥The Progressive Photoshot Function may not
be activated depending on the function you use.
-46-)
(
NV-GS15 only:
≥To record still pictures with higher quality, we
recommend setting to the Card Recording
Mode. (To activate the progressive function
regardless of the function you use)
≥When you record the tape and the card
simultaneously, the progressive function is not
activated.
Recording a Still Picture on a Tape
(Photoshot) (NV-GS11 only)
Still pictures can be recorded from the Movie
Camera lens.
1 Press the [PHOTO SHOT] Button (36) in the
Recording Pause Mode.
(36)
PHOTO SHOT
≥The Movie Camera records a still picture for
about 7 seconds and then switches back to
the Recording Pause Mode.
≥If you set [SHTR EFFECT] on the [CAMERA]
Sub-Menu to [ON], you can add image and a
sound like releasing the shutter.
PHOTO
PHOTO
PHOTO
PHOTO
(15)
≥We recommend that you press the [STILL]
Button first at the position where you wish to
record the still picture so as to enter the Digital
Still Picture Mode and then press the
[PHOTO SHOT] Button.
≥Photoshot Recording results in slightly inferior
image quality.
ª Continuous Photoshot
If you set [SHTR EFFECT] on the [CAMERA]
Sub-Menu to [ON] and keep the [PHOTO SHOT]
Button pressed, the Movie Camera will
continuously record still pictures in approximately
0.7 seconds intervals until the button is released.
≥The screen blinks and, at the same time, a
shutter clicking sound is recorded.
-20-
Loading…
Скачать
Operating Instructions
Digital Video Camera
Model No.
NV-GS11GN
NV-GS15GN
Before use, please read these instructions completely.
LSQT0783 A
R
15GN-ENG.book 1 ページ 2004年2月5日 木曜日 午後10時55分
-
Инструкции по эксплуатации
1
Panasonic NV-GS11 инструкция по эксплуатации
(87 страниц)
- Языки:Русский
-
Тип:
PDF -
Размер:
4.52 MB -
Описание:
Видеокамера
Просмотр
На NoDevice можно скачать инструкцию по эксплуатации для Panasonic NV-GS11. Руководство пользователя необходимо для ознакомления с правилами установки и эксплуатации Panasonic NV-GS11. Инструкции по использованию помогут правильно настроить Panasonic NV-GS11, исправить ошибки и выявить неполадки.