
КРАТКОЕ
Руководство пользователя
CLP-36x Series
CLP-36xW Series
КРАТКОЕ
Руководство пользователя
В данном руководстве представлена информация по установке,
основным функциям и устранению неисправностей в системе
Windows.
РАСШИРЕННОЕ
Данное руководство содержит информацию об установке, расширенной
конфигурации, эксплуатации, а также поиске и устранении неисправностей в
различных операционных системах.
Некоторые функции могут различаться в зависимости от модели и региона.

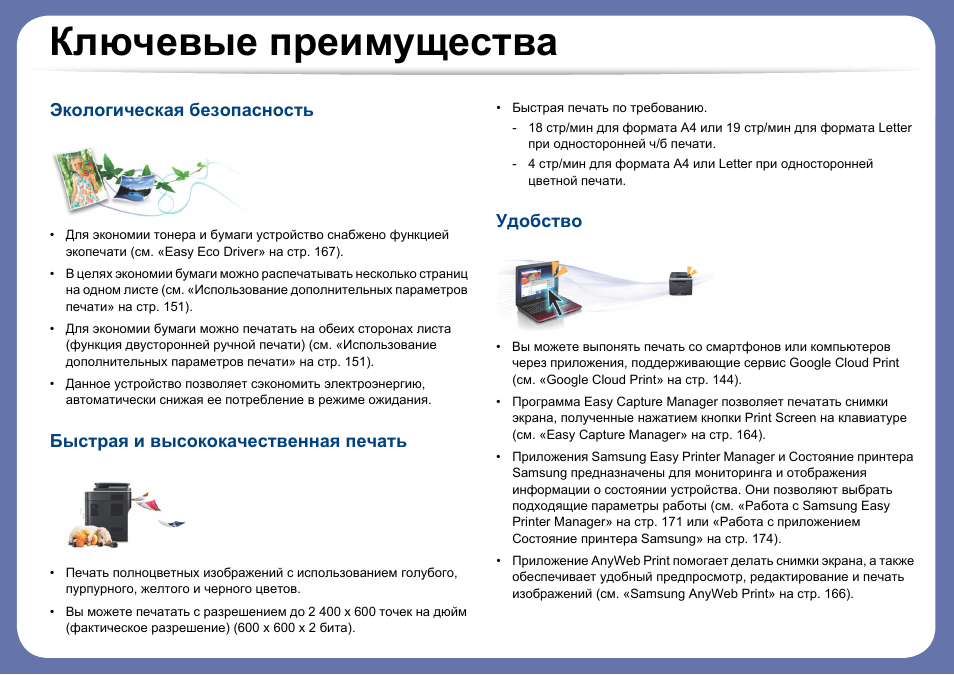
Ключевые преимущества
Экологическая безопасность
• Для экономии тонера и бумаги устройство снабжено функцией
экопечати (см. «Easy Eco Driver» на стр. 167).
• В целях экономии бумаги можно распечатывать несколько страниц
на одном листе (см. «Использование дополнительных параметров
печати» на стр. 151).
• Для экономии бумаги можно печатать на обеих сторонах листа
(функция двусторонней ручной печати) (см. «Использование
дополнительных параметров печати» на стр. 151).
• Данное устройство позволяет сэкономить электроэнергию,
автоматически снижая ее потребление в режиме ожидания.
Быстрая и высококачественная печать
• Печать полноцветных изображений с использованием голубого,
пурпурного, желтого и черного цветов.
• Вы можете печатать с разрешением до 2 400 x 600 точек на дюйм
(фактическое разрешение) (600 x 600 x 2 бита).
• Быстрая печать по требованию.
— 18 стр/мин для формата A4 или 19 стр/мин для формата Letter
при односторонней ч/б печати.
— 4 стр/мин для формата A4 или Letter при односторонней
цветной печати.
Удобство
• Вы можете выпонять печать со смартфонов или компьютеров
через приложения, поддерживающие сервис Google Cloud Print
(см. «Google Cloud Print» на стр. 144).
• Программа Easy Capture Manager позволяет печатать снимки
экрана, полученные нажатием кнопки Print Screen на клавиатуре
(см. «Easy Capture Manager» на стр. 164).
• Приложения Samsung Easy Printer Manager и Состояние принтера
Samsung предназначены для мониторинга и отображения
информации о состоянии устройства. Они позволяют выбрать
подходящие параметры работы (см. «Работа с Samsung Easy
Printer Manager» на стр. 171 или «Работа с приложением
Состояние принтера Samsung» на стр. 174).
• Приложение AnyWeb Print помогает делать снимки экрана, а также
обеспечивает удобный предпросмотр, редактирование и печать
изображений (см. «Samsung AnyWeb Print» на стр. 166).
Ключевые преимущества
• Программа Служба обновлений позволяет регулярно проверять
наличие новых версий программного обеспечения и
устанавливать их во время установки драйвера. Эта функция
доступна только для пользователей ОС Windows.
• Если у вас есть доступ в Интернет, вы можете получить справку,
поддержку, драйверы устройства, руководства и информацию о
заказе материалов на веб-сайте www.samsung.com > ваш продукт
> Поддержка и загрузка.
Широкий набор функций и поддержка
множества приложений
• Поддержка разного формата бумаги (см. «Характеристики
материала для печати» на стр. 72).
• Печать водяных знаков: В документ можно добавлять различные
надписи, например «CONFIDENTIAL» (см. «Использование
дополнительных параметров печати» на стр. 151).
• Печать плакатов: Текст и изображения на каждой странице
документа можно увеличить, распечатать на нескольких листах
бумаги и склеить (см. раздел «Использование дополнительных
параметров печати» на стр. 151).
• Печать можно выполнять из разных операционных систем (см.
«Системные требования» на стр. 75).
• Устройство оснащено интерфейсом USB и(или) сетевым
интерфейсом.
Поддержка разных методов настройки
беспроводной сети
• Использование кнопки WPS (Wi-Fi Protected Setup™)
— Вы можете легко подключить устройство к беспроводной сети
при помощи кнопки WPS на устройстве и точке доступа
(беспроводном маршрутизаторе).
• Использование USB-кабеля или сетевого кабеля
— Вы можете подключить и использовать различные
беспроводные сети посредством USB-кабеля или сетевого
кабеля.
• С помощью Wi-Fi Direct
— Вы можете легко и удобно посылать файлы на печать с ваших
мобильных устройств посредством функций Wi-Fi или Wi-Fi
Direct.
См. «Введение в методы настройки беспроводной сети.» на
стр. 117.

Функции различных моделей
Функции и комплектация устройств могут различаться в зависимости от модели и региона.
Операционная система
Операционная система
CLP-36x Series
CLP-36xW Series
Windows
●
●
Macintosh
●
●
Linux
●
●

Функции различных моделей
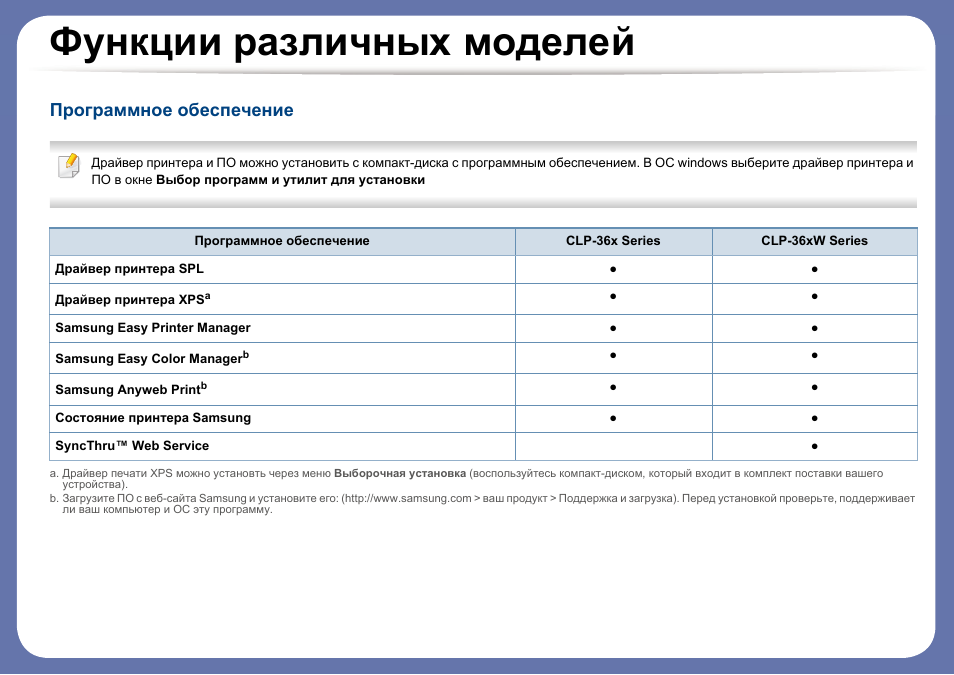
Программное обеспечение
Драйвер принтера и ПО можно установить с компакт-диска с программным обеспечением. В ОС windows выберите драйвер принтера и
ПО в окне Выбор программ и утилит для установки
Программное обеспечение
CLP-36x Series
CLP-36xW Series
Драйвер принтера SPL
●
●
Драйвер принтера XPS
a
a. Драйвер печати XPS можно установть через меню Выборочная установка (воспользуйтесь компакт-диском, который входит в комплект поставки вашего
устройства).
●
●
Samsung Easy Printer Manager
●
●
Samsung Easy Color Manager
b
b. Загрузите ПО с веб-сайта Samsung и установите его: (http://www.samsung.com > ваш продукт > Поддержка и загрузка). Перед установкой проверьте, поддерживает
ли ваш компьютер и ОС эту программу.
●
●
Samsung Anyweb Print
b
●
●
Состояние принтера Samsung
●
●
SyncThru™ Web Service
●
Функции различных моделей
Различные функции
(●: поддерживаемая функция, пустое поле: неподдерживаемая функция)
Функции
CLP-36x Series
CLP-36xW Series
Высокоскоростной интерфейс USB 2.0
●
●
Интерфейс проводной локальной сети Ethernet 10/100 Base TX
●
Беспроводной сетевой интерфейс 802.11b/g/n
a
a. Для некоторых стран платы беспроводной сети могут быть недоступны. В некоторых странах доступны только сети 802.11 b/g. Свяжитесь с местным
представителем компании Samsung или обратитесь в магазин, в котором было приобретено устройство.
●
Протокол IPv6
●
Google Cloud Print
●
Экономичная печать(Easy Eco Driver)
b
b. Настроить параметры ECO можно в окне драйвера.
●
●
Защищенная настройка Wi-Fi (WPS)
●
Дуплексная (двусторонняя) печать в ручном режиме
c
c. Только для пользователей Windows.
●
●

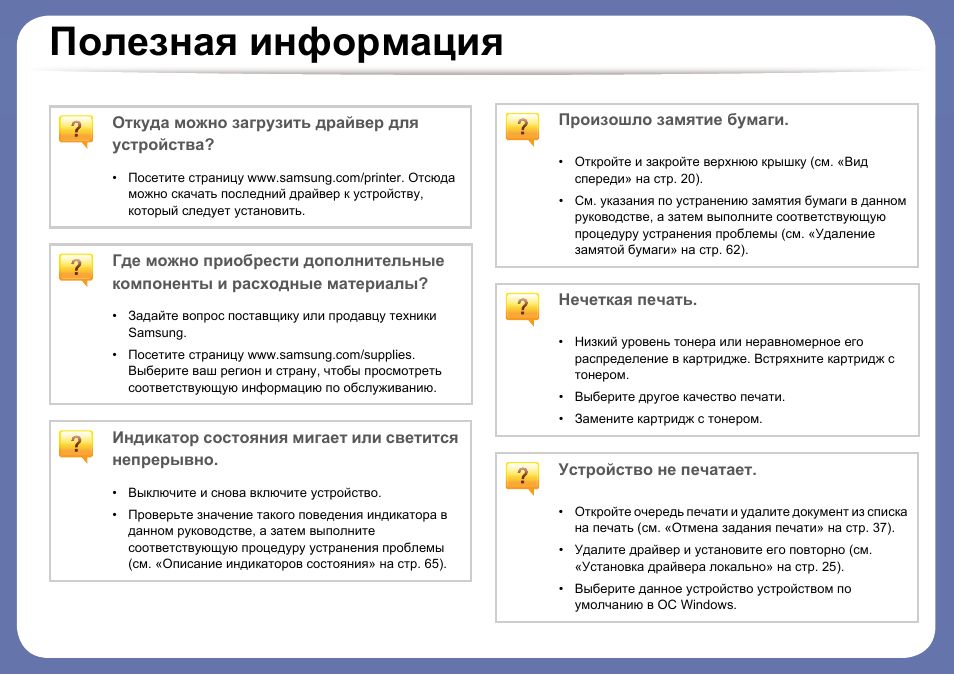
Полезная информация
Откуда можно загрузить драйвер для
устройства?
• Посетите страницу www.samsung.com/printer. Отсюда
можно скачать последний драйвер к устройству,
который следует установить.
Где можно приобрести дополнительные
компоненты и расходные материалы?
• Задайте вопрос поставщику или продавцу техники
Samsung.
• Посетите страницу www.samsung.com/supplies.
Выберите ваш регион и страну, чтобы просмотреть
соответствующую информацию по обслуживанию.
Индикатор состояния мигает или светится
непрерывно.
• Выключите и снова включите устройство.
• Проверьте значение такого поведения индикатора в
данном руководстве, а затем выполните
соответствующую процедуру устранения проблемы
(см. «Описание индикаторов состояния» на стр. 65).
Произошло замятие бумаги.
• Откройте и закройте верхнюю крышку (см. «Вид
спереди» на стр. 20).
• См. указания по устранению замятия бумаги в данном
руководстве, а затем выполните соответствующую
процедуру устранения проблемы (см. «Удаление
замятой бумаги» на стр. 62).
Нечеткая печать.
• Низкий уровень тонера или неравномерное его
распределение в картридже. Встряхните картридж с
тонером.
• Выберите другое качество печати.
• Замените картридж с тонером.
Устройство не печатает.
• Откройте очередь печати и удалите документ из списка
на печать (см. «Отмена задания печати» на стр. 37).
• Удалите драйвер и установите его повторно (см.
«Установка драйвера локально» на стр. 25).
• Выберите данное устройство устройством по
умолчанию в ОС Windows.
05:09
#49 Samsung CLP 320 / 360 / 365 сброс счетчика ленты переноса и термофиксатора | Samsung EDC CLP
08:36
Как быстро заправить катридж в цветном принтере Samsung CLP 365
02:24
Обзор Samsung CLP-365
13:02
#90 Ремонт принтера Samsung CLP-365 | Принтер не берет бумагу | Замятие бумаги в лотке 1 | CLP 365
02:49
Unboxing цветного лазерного принтера Samsung CLP-365 с тестом печати
23:08
How-to Fix Samsung CLP-360/365W, C410W/C430W • Paper Jam/Won’t Pick-up • Detailed Printer Repair!
07:14
Прошивка принтера Samsung CLP-360, CLP-365 (метод клонирования)
08:53
How to remove and clean Samsung Transfer Belt CLP-365
Нажмите на кнопку для помощи

User’s Guide
User’s Guide
BASIC
BASIC
This guide provides information concerning installation, basic operation and
troubleshooting on windows.
ADVANCED
This guide provides information about installation, advanced configuration, operation and
troubleshooting on various OS environments.
CLP-36x Series
CLP-36xW Series
Some features may not be available depending on models or countries.

Available supplies 40
1. Introduction
Key benefits 4
Features by models 6
Useful to know 9
About this user’s guide 10
Safety information 11
Machine overview 16
Control panel overview 19
Turning on the machine 21
Installing the driver locally 22
Reinstalling the driver 23
2. Learning the Basic Usage
Available maintenance parts 42
Storing the toner cartridge 43
Redistributing toner 45
Replacing the toner cartridge 47
Replacing the waste toner container 49
Replacing the imaging unit 51
Cleaning the machine 53
Tips for moving & storing your machine 55
4. Troubleshooting
Tips for avoiding paper jams 57
Clearing paper jams 58
Understanding the status LED 63
Printing a demo page 25
Media and tray 26
Basic printing 33
3. Maintenance
Ordering supplies and accessories 39
5. Appendix
Specifications 67
Regulatory information 76
Copyright 86
2

1. Introduction
This chapter provides information you need to know before using the machine.
•Key benefits 4
• Features by models 6
• Useful to know 9
• About this user’s guide 10
• Safety information 11
• Machine overview 16
• Control panel overview 19
• Turning on the machine 21
• Installing the driver locally 22
• Reinstalling the driver 23

Key benefits
Environmentally friendly
• To save toner and paper, this machine supports the Eco feature (see «Easy
Eco Driver» on page 153).
• To save paper, you can print multiple pages on a single sheet of paper (see
«Using advanced print features» on page 138).
• To save paper, you can print on both sides of the paper (manual doublesided printing) (see «Using advanced print features» on page 138).
• To save electricity, this machine automatically conserves electricity by
substantially reducing power consumption when not in use.
Print with excellent quality and speed
• You can print in a full range of colors using cyan, magenta, yellow, and black.
• You can print with a resolution of up to 2,400 x 600 dpi effective output (600
x 600 x 2 bit).
• Fast, on-demand printing.
— For single-side black and white printing, 18 ppm (A4) or 19 ppm (Letter).
— For single-side color printing, 4 ppm (A4 or Letter).
Convenience
• You can print on the go from your smartphone or computer using Google
Cloud Print enabled apps (see «Google Cloud Print» on page 132).
• Easy Capture Manager allows you to easily edit and print whatever you
captured using the Print Screen key on the keyboard (see «Easy Capture
Manager» on page 150).
• Samsung Easy Printer Manager and Samsung Printer Status are a program
that monitors and informs you of the machine’s status and allows you to
customize the machine’s settings (see «Using Samsung Easy Printer
Manager» on page 157 or «Using Samsung Printer Status» on page 160).
• AnyWeb Print helps you screen-capture, preview, scrap, and print the
screen more easily than when you use the ordinary program (see «Samsung
AnyWeb Print» on page 152).
• Smart Update allows you to check for the latest software and install the
latest version during the printer driver installation process. This is available
only for Windows OS users.
• If you have Internet access, you can get help, support application, machine
drivers, manuals, and order information from the Samsung website,
www.samsung.com > find your product > Support or Downloads.

Key benefits
Wide range of functionality and application support
• Supports various paper sizes (see «Print media specifications» on page 69).
• Print watermark: You can customize your documents with words, such as
“CONFIDENTIAL” (see «Using advanced print features» on page 138).
• Print posters: The text and pictures of each page of your document are
magnified and printed across the multiple sheets of paper and can then be
taped together to form a poster (see «Using advanced print features» on
page 138).
• You can print in various operating systems (see «System requirements» on
page 72).
• Your machine is equipped with a USB interface and/or a network interface.
Supports various wireless network setting method
• Using the WPS (Wi-Fi Protected Setup™) button
— You can easily connect to a wireless network using the WPS button on
the machine and the access point (a wireless router).
• Using the USB cable or a network cable
— You can connect and set various wireless network settings using a USB
cable or a network cable.
• Using the Wi-Fi Direct
— You can conveniently print from your mobile device using the Wi-Fi or
Wi-Fi Direct feature.
See «Introducing wireless set up methods» on page 109.

Features by models
Some features and optional goods may not be available depending on model or country.
Operating System
Operating System CLP-36x Series CLP-36xW Series
Windows ● ●
Macintosh ● ●
Linux ● ●

Features by models
Software
You can install the printer driver and software when you insert the software CD into your CD-ROM drive.
For windows, select the printer driver and software in the Select Software to Install window.
Software CLP-36x Series CLP-36xW Series
SPL printer driver ● ●
XPS printer driver
a
● ●
Samsung Easy Printer Manager ● ●
Samsung Easy Color Manager
Samsung Anyweb Print
b
b
● ●
● ●
Samsung Printer Status ● ●
SyncThru™ Web Service ●
a. For XPS driver, You can install the XPS printer driver in the Custom Installation window (Refer to Software CD that was
provided with your machine).
b. Download the software from the Samsung website and install it: (http://www.samsung.com > find your product > Support or
Downloads). Before installing, check whether your computer’s OS support the software.

Features by models
Variety feature
(●: Included, Blank: Not available)
Features CLP-36x Series CLP-36xW Series
Hi-Speed USB 2.0 ● ●
Network Interface Ethernet 10/100 Base TX wired LAN ●
Network Interface 802.11b/g/n wireless LAN
a
a. Depending on your country, wireless LAN card may not be available. For some counties, only 802.11 b/g can be applied.
Contact your local Samsung dealer or the retailer where you bought your machine.
●
IPv6 ●
Google Cloud Print ●
Eco printing(Easy Eco Driver)
b
b. Setting the ECO settings is available from the windows driver.
● ●
Wi-Fi Protected Setup™ (WPS) ●
Manual duplex (2-sided) printing
c
c. Available for Windows OS users only.
● ●

Useful to know
Where can I download the machine’s driver?
• Visit www.samsung.com/printer to download the latest
machine’s driver, and install it on your system.
Where can I purchase accessories or supplies?
• Inquire at a Samsung distributor or your retailer.
• Visit www.samsung.com/supplies. Select your country/region
to view product service information.
The status LED flashes or remains constantly on.
• Turn the product off and on again.
• Check the meanings of LED indications in this manual and
troubleshoot accordingly (see «Understanding the status LED»
on page 63).
Printouts are blurry.
• The toner level might be low or uneven. Shake the toner
cartridge.
• Try a different print quality setting.
• Replace the toner cartridge.
The machine does not print.
• Open the print queue list and remove the document from the
list (see «Canceling a print job» on page 34).
• Remove the driver and install it again (see «Installing the driver
locally» on page 22).
• Select your machine as your default machine in your Windows.
A paper jam has occurred.
• Open and close the top cover (see «Front view» on page 17).
• Check the instructions on removing jammed paper in this
manual and troubleshoot accordingly (see «Clearing paper
jams» on page 58).

About this user’s guide
This user’s guide provides information for your basic understanding of the
machine as well as detailed steps to explain machine usage.
• Read the safety information before using the machine.
• If you have a problem using the machine, refer to the troubleshooting
chapter.
• Terms used in this user’s guide are explained in the glossary chapter.
• All illustrations in this user’s guide may differ from your machine depending
on its options or model you purchased.
• The screenshots in this user’s guide may differ from your machine
depending on the machine’s firmware/driver version.
• The procedures in this user’s guide are mainly based on Windows 7.
1
Conventions
2
General icons
Icon Text Description
Gives users information to protect the machine from
Caution
Note
possible mechanical damage or malfunction.
Provides additional information or detailed
specification of the machine function and feature.
Some terms in this guide are used interchangeably, as below:
• Document is synonymous with original.
• Paper is synonymous with media, or print media.
• Machine refers to printer or MFP.
1. Introduction
10

Safety information
These warnings and precautions are included to prevent injury to you and
others, and to prevent any potential damage to your machine. Be sure to read
and understand all of these instructions before using the machine. After reading
this section, keep it in a safe place for future reference.
3
Important safety symbols
Explanation of all icons and signs used in this chapter
Warning
Caution
Hazards or unsafe practices that may result in severe
personal injury or death.
Hazards or unsafe practices that may result in minor
personal injury or property damage.
4
Operating environment
Warning
Do not use if the power cord is damaged or if the electrical outlet is
not grounded.
This could result in electric shock or fire.
Do not place anything on top of the machine (water, small metal or
heavy objects, candles, lit cigarettes, etc.).
This could result in electric shock or fire.
• If the machine gets overheated, it releases smoke, makes
strange noises, or generates an odd odor, immediately turn off
the power switch and unplug the machine.
Do not attempt.
• The user should be able to access the power outlet in case of
emergencies that might require the user to pull the plug out.
This could result in electric shock or fire.
Do not bend, or place heavy objects on the power cord.
Stepping on or allowing the power cord to be crushed by a heavy
object could result in electric shock or fire.
Do not remove the plug by pulling on the cord; do not handle the
plug with wet hands.
This could result in electric shock or fire.
1. Introduction
11

Safety information
5
Caution
During an electrical storm or for a period of non-operation,
remove the power plug from the electrical outlet.
This could result in electric shock or fire.
Be careful, the paper output area is hot.
Burns could occur.
If the machine has been dropped, or if the cabinet appears
damaged, unplug the machine from all interface connections and
request assistance from qualified service personnel.
Otherwise, this could result in electric shock or fire.
If the machine does not operate properly after these instructions
have been followed, unplug the machine from all interface
connections and request assistance from qualified service
personnel.
Operating method
Caution
Do not forcefully pull the paper out during printing.
It can cause damage to the machine.
Be careful not to put your hand between the machine and paper
tray.
You may get injured.
This machine’s power reception device is the power cord.
To switch off the power supply, remove the power cord from the
electrical outlet.
Otherwise, this could result in electric shock or fire.
If the plug does not easily enter the electrical outlet, do not
attempt to force it in.
Call an electrician to change the electrical outlet, or this could
result in electric shock.
Do not allow pets to chew on the AC power, telephone or PC
interface cords.
This could result in electric shock or fire and/or injury to your pet.
Be care when replacing paper or removing jammed paper.
New paper has sharp edges and can cause painful cuts.
When printing large quantities, the bottom part of the paper
output area may get hot. Do not allow children to touch.
Burns can occur.
When removing jammed paper, do not use tweezers or sharp metal
objects.
It can damage the machine.
1. Introduction
12

Safety information
Do not allow too many papers to stack up in the paper output tray.
It can damage the machine.
Do not block or push objects into the ventilation opening.
This could result in elevated component temperatures which can
cause damage or fire.
Use of controls or adjustments or performance of procedures other
than those specified herein may result in hazardous radiation
exposure.
6
Installation / Moving
Warning
Do not place the machine in an area with dust, humidity, or water
leaks.
This could result in electric shock or fire.
Caution
Before moving the machine, turn the power off and disconnect all
cords. The information below are only suggestions based on the
units weight.
If you have a medical condition that prevents you from lifting, do
not lift the machine. Ask for help, and always use the appropriate
amount of people to left the device safety.
Then lift the machine:
• If the machine weighs under 20 kg (44.09 lbs), lift with 1 person.
• If the machine weighs 20 kg (44.09 lbs) — 40kg (88.18 lbs), lift
• If the machine weighs more than 40 kg (88.18 lbs), lift with 4 or
The machine could fall, causing injury or machine damage.
Do not place the machine on an unstable surface.
The machine could fall, causing injury or machine damage.
Use only No.26 AWG
Otherwise, it can cause damage to the machine.
with 2 people.
more people.
a
or larger, telephone line cord, if necessary.
1. Introduction
13

Safety information
Use the power cord supplied with your machine for safe
operation. If you are using a cord which is longer than 2 meters (6
feet) with a 110 V machine, then the gauge should be 16 AWG or
larger.
7
Maintenance / Checking
Otherwise, it can cause damage to the machine, and could result
in electric shock or fire.
Make sure you plug the power cord into a grounded electrical
outlet.
Otherwise, this could result in electric shock or fire.
Do not overload wall outlets and extension cords.
This can diminish performance, and could result in electric shock
or fire.
Do not put a cover over the machine or place it in an airtight
location, such as a closet.
If the machine is not well-ventilated, this could result in fire.
The machine should be connected to
the power level which is specified on the label.
If you are unsure and want to check the power level you are using,
contact the electrical utility company.
a. AWG: American Wire Gauge
Caution
Unplug this product from the wall outlet before cleaning the
inside of the machine. Do not clean the machine with benzene,
paint thinner or alcohol; do not spray water directly into the
machine.
This could result in electric shock or fire.
When you are working inside the machine replacing supplies or
cleaning the inside, do not operate the machine.
You could get injured.
Keep cleaning supplies away from children.
Children could get hurt.
Do not disassemble, repair or rebuild the machine by yourself.
It can damage the machine. Call a certified technician when the
machine needs repairing.
1. Introduction
14

Safety information
8
Supply usage
• Do not remove any covers or guards that are fastened with
screws.
• Fuser units should only be repaired by a certified service
technician. Repair by non-certified technicians could result in
fire or electric shock.
• The machine should only be repaired by a Samsung service
technician.
To clean and operate the machine, strictly follow the user’s guide
provided with the machine.
Otherwise, you could damage the machine.
Keep the power cable and the contact surface of the plug clean
from dust or water.
Otherwise, this could result in electric shock or fire.
Do not burn any of the supplies such as toner cartridge or fuser
unit.
This could cause an explosion or uncontrollable fire.
When storing supplies such as toner cartridges, keep them away
from children.
Toner dust can be dangerous if inhaled or ingested.
When changing the toner cartridge or removing jammed paper,
be careful not to let toner dust touch your body or clothes.
Toner dust can be dangerous if inhaled or ingested.
When toner gets on your clothing, do not use hot water to wash
it.
Hot water sets toner into fabric. Use cold water.
Using recycled supplies, such as toner, can cause damage to the
machine.
In case of damage due to the use of recycled supplies, a service
fee will be charged.
Caution
Do not disassemble the toner cartridge.
Toner dust can be dangerous if inhaled or ingested.
1. Introduction
15

Machine overview
9
Accessories
Power cord Quick installation guide
Software CD
a. The software CD contains the printer drivers and software applications.
b. Miscellaneous accessories included with your machine may vary by country of purchase and specific model.
a
Misc. accessories
b
1. Introduction
16

Machine overview
10
Front view
• This illustration may differ from your machine depending on its model.
• Some features and optional goods may not be available depending on model or country (see «Features by models» on page 6).
1 2 3
8
7
4
6
9
10
5
1 Output tray 2 Output support 3 Top cover 4 Control Panel 5 Tray
6 Front cover 7 Front cover release button 8 Toner cartridges 9 Waster toner container 10 Imaging unit
1. Introduction
17

Machine overview
11
Rear view
• This illustration may differ from your machine depending on its model.
• Some features and optional goods may not be available depending on model or country (see «Features by models» on page 6).
1
Rear cover
a. CLP-36xW only.
2
Power receptacle
3
USB port
4
Network port
a
1. Introduction
18

Control panel overview
This control panel may differ from your machine depending on its model.
There are various types of control panels.
3
screen)
• Prints the screen
— Press this button and the green LED will start
blinking. If you want to print only the active screen,
release the button when the green LED stops
blinking. If you want to print the whole screen,
release the button while it’s blinking.
— Manual print
▪ Press this button each time you load a sheet of
paper in the tray if you have selected Manual
Feeder for Source in your printer driver.
• Print Screen can only be used in the Windows
and Macintosh operating systems.
b
• You can only use this function with USBconnected machine.
1 Toner LED Shows the status of the toner (see «Status LED» on page 64).
2
Eco
Turn into eco mode to reduce toner consumption and
paper usage when pc-printing only (see «Eco printing» on
page 36).
3
Configures the wireless network connection easily without
a computer (see «Wireless network setup» on page 108).
• Manual print
(WPS)
a
— Press this button each time you load a sheet of paper
in the tray if you have selected Manual Feeder for
Source in your printer driver.
• When printing the active window/whole
monitor screen using the print screen button,
the machine may use more toner depending on
what is being printed.
• You can only use this function if the machine’s
Easy Printer Manager program is installed if you
are a macintosh OS user, you need to enable
Screen Print Settings from the Easy Printer
Manager to use the Print Screen feature.
1. Introduction
19

Control panel overview
4
5
6
(Cancel)
(Power/
Wakeup)
You can stop an operation at any time. You also can do the
following functions.
• Configuration sheet
— Press and hold this button for about 2 seconds until
the green LED blinks slowly, and release.
• Prints event log report / usage counter
— Press and hold this button for about 4 seconds until
the green LED blinks quickly, and release.
• Prints supplies info report
— Press and hold this button for about 6 seconds until
the green LED on, and release.
You can turn the power off or wake the machine up from
the sleep mode with this button.
Shows the status of your machine (see «Status LED» on
page 64).
(Status LED)
a. CLP-36xW only
b. CLP-36x only
1. Introduction
20

Turning on the machine
Connect the machine to the electricity supply first.
1
1
2
press (Power/Wakeup) on the control panel.
2
If you want to turn the power off, press (Power/Wakeup) on the control panel.
1. Introduction
21

Installing the driver locally
A locally connected machine is a machine directly attached to your computer
using the cable. If your machine is attached to a network, skip the following
steps below and go on to installing a network connected machine’s driver (see
Advanced Guide).
• If you are a Macintosh or Linux operating systems user, refer to the
«Installation for Macintosh» on page 90 or «Installation for Linux» on page
92.
• The installation window in this User’s Guide may differ depending on the
machine and interface in use.
• Only use a USB cable no longer than 3 meters (118 inches).
12
Windows
Make sure that the machine is connected to your computer and
1
powered on.
Select Install Now.
3
If the “Found New Hardware Wizard” appears during the installation
procedure, click Cancel to close the window.
Insert the supplied software CD into your CD-ROM drive.
2
Follow the instructions in the installation window.
4
You can select the software applications in the Select Software to Install
Window.
The software CD should automatically run and an installation window
will appear.
1. Introduction
22

Reinstalling the driver
If the printer driver does not work properly, follow the steps below to reinstall
the driver.
13
Windows
Make sure that the machine is connected to your computer and
1
powered on.
From the Start menu, select Programs or All Programs > Samsung
2
Printers > your printer driver name > Uninstall.
Follow the instructions in the installation window.
3
Insert the software CD into your CD-ROM drive and install the driver
4
again (see «Installing the driver locally» on page 22).
1. Introduction
23

2. Learning the Basic Usage
After installation is complete, you may want to set the machine’s default settings. Refer to the next section if you would
like to set or change values. This chapter provides information about the overall menu structure and the basic setup
options.
• Printing a demo page 25
• Media and tray 26
• Basic printing 33

Printing a demo page
Print a demo page to make sure that the machine is operating correctly (Windows only).
To print a demo page:
• Open the Printing Preferences (see «Opening printing preferences» on page 34) > Samsung tab > Demo page.
2. Learning the Basic Usage
25

Media and tray
This chapter provides information on how to load print media into your
machine.
• Using print media that does not meet these specifications may cause
• Make sure not to use the inkjet photo paper with this machine. It could
• Using inflammable print media can cause a fire.
• Use designated print media (see «Print media specifications» on page
The use of inflammable media or foreign materials left in the printer may
lead to overheating of the unit and, in rare cases may cause a fire.
1
problems or require repairs. Such repairs are not covered by Samsung’s
warranty or service agreements.
cause damage to the machine.
69).
21
3
4
1 Paper cover
2 Guide lock
3 Paper length guide
4 Paper width guide
If you do not adjust the guide, it may cause paper registration, image skew,
or jamming of the paper.
Tray overview
To change the size, you need to adjust the paper guide.
2. Learning the Basic Usage
26

Media and tray
2
Loading paper in the tray
Pull out the paper tray (see «Tray overview» on page 26).
1
Open the paper cover.
2
Press and unlatch the guide lock in the tray, pull the tray out manually.
3
Then adjust the paper length guide and paper width guide.
1
2
3
2
Flex or fan the edge of the paper stack to separate the pages before
4
loading papers.
2. Learning the Basic Usage
27

Media and tray
Place the paper with the side you want to print facing up.
5
1
2
For paper smaller than Letter-sized, press and unlatch the guide lock in
the tray, push the tray in manually. Then adjust the paper length guide
and paper width guide.
1
2
For paper longer than Legal-sized, press and unlatch the guide lock in
the tray, pull the tray out manually. Then adjust the paper length guide
and paper width guide.
• Do not push the paper width guide too far causing the media to warp.
• Do not use a paper with a leading-edge curl, it may cause a paper jam or
the paper can be wrinkled.
• If you do not adjust the paper width guide, it may cause paper jams.
2. Learning the Basic Usage
28

Media and tray
Squeeze the paper width guide and slide it to the edge of the paper stack
6
without causing it to bend.
Close the paper cover.
7
Insert the paper tray.
8
When you print a document, set the paper type and size for the tray (see
9
«Setting the paper size and type» on page 32).
The settings made from the machine driver override the settings on the
control panel.
a To print in application, open an application and start the print menu.
b Open Printing Preferences (see «Opening printing preferences» on
page 34).
c Press the Paper tab in Printing Preferences, and select an appropriate
paper type.
For example, if you want to use a label, set the paper type to Label.
d Select Auto Select (or Manual Feeder) in paper source, then press OK.
e Start printing in application.
2. Learning the Basic Usage
29

Media and tray
3
Printing on special media
Types
Tray
CardStock ●
a
The table below shows the special media usable in each tray.
The media types are shown in the Printing Preferences. To get the higest
printing quality, select the proper media type from the Printing Preferences
window > Paper tab > Paper Type (see «Opening printing preferences» on page
34).
For example, if you want to print on labels, select Labels for Paper Type.
When using special media, we recommend you feed one sheet at a time (see
«Print media specifications» on page 69).
To see for paper weights for each sheet, refer to «Print media specifications» on
page 69.
Types
Tray
a
Labels ●
Preprinted ●
Cotton ●
Recycled ●
Archive ●
Glossy Photo ●
Matte Photo ●
a. The paper types available manual feeding in tray.
(●: Included, Blank: Not available)
Plain ●
Thick ●
Thin ●
Bond ●
Color ●
2. Learning the Basic Usage
30

Media and tray
Labels
To avoid damaging the machine, use only labels designed for use in laser
printers.
• When selecting labels, consider the following factors:
— Adhesives: Should be stable at your machine’s fusing temperature.
Check your machine’s specifications to view the fusing temperature
(about 170°C (338°F)).
• Make sure that there is no exposed adhesive material between labels.
Exposed areas can cause labels to peel off during printing, which can cause
paper jams. Exposed adhesive can also cause damage to machine
components.
• Do not run a sheet of labels through the machine more than once. The
adhesive backing is designed for only a single pass through the machine.
• Do not use labels that are separating from the backing sheet or are wrinkled,
bubbled, or otherwise damaged.
Card stock/ Custom-sized paper
— Arrangement: Only use labels with no exposed backing between them.
Labels can peel off sheets that have spaces between the labels, causing
serious jams.
— Curl: Must lie flat with no more than 5 mm of curl in any direction.
— Condition: Do not use labels with wrinkles, bubbles, or other
indications of separation.
• In the software application, set margins at least 6.4 mm (0.25 inches) away
from the edges of the material.
2. Learning the Basic Usage
31

Media and tray
Preprinted paper
When loading preprinted paper, the printed side should be facing up with an
4
Setting the paper size and type
uncurled edge at the front. If you experience problems with paper feeding, turn
the paper around. Note that print quality is not guaranteed.
• Must be printed with heat-resistant ink that will not melt, vaporize, or
release hazardous emissions when subjected to the machine’s fusing
temperature for 0.1 second (about 170°C (338°F)).
• Preprinted paper ink must be non-flammable and should not adversely
affect machine rollers.
After loading paper in the paper tray, set the paper size and type.
Open the Printing Preferences (see «Opening printing preferences» on page
34) and set the paper size and type in the Paper tab.
If you want to use special-sized paper such as billing paper, select Custom
in the Paper tab in the Printing Preferences (see «Opening printing
preferences» on page 34).
• Before you load preprinted paper, verify that the ink on the paper is dry.
During the fusing process, wet ink can come off preprinted paper, reducing
print quality.
2. Learning the Basic Usage
32

Basic printing
For special printing features, refer to the Advanced Guide (see «Using
advanced print features» on page 138).
5
Printing
If you are a Macintosh or Linux user, refer to the «Macintosh printing» on
page 145 or «Linux printing» on page 147.
The following Printing Preferences window is for Notepad in Windows 7.
Open the document you want to print.
1
Select your machine from the Select Printer list.
3
Select Print from the File menu.
2
The basic print settings including the number of copies and print range
4
are selected within the Print window.
To take advantage of the advanced printing features, click Properties or
Preferences from the Print window (see «Opening printing preferences» on
page 34).
To start the print job, click OK or Print in the Print window.
5
2. Learning the Basic Usage
33

Basic printing
6
Canceling a print job
If the print job is waiting in the print queue or print spooler, cancel the job as
follows:
• You can access this window by simply double-clicking the machine icon
( ) in the Windows task bar.
• You can also cancel the current job by pressing (Cancel) on the control
panel.
7
Opening printing preferences
Open the document you want to print.
1
Select Print from the file menu.
2
Select your machine from the Select Printer.
3
Click Properties or Preferences.
4
• The Printing Preferences window that appears in this user’s guide may
differ depending on the machine in use. However, the composition of
the Printing Preferences window is similar.
• When you select an option in Printing Preferences, you may see a
warning mark or . An mark means you can select that certain
option but it is not recommended, and an mark means you cannot
select that option due to the machine’s setting or environment.
2. Learning the Basic Usage
34

Basic printing
•You can apply Eco features to save paper and toner before printing (see
«Easy Eco Driver» on page 153).
• You can check the machine’s current status using the Printer Status
button (see «Using Samsung Printer Status» on page 160).
Using a favorite setting
The Favorites option, which is visible on each preferences tab except for the
Samsung tab, allows you to save the current preferences for future use.
To save a Favorites item, follow these steps:
Change the settings as needed on each tab.
1
Enter a name for the item in the Favorites input box.
2
Click Save.
3
Enter name and description, and then select the desired icon.
4
Click OK. When you save Favorites, all current driver settings are saved.
5
To use a saved setting, select it in the Favorites tab. The machine is now set
to print according to the settings you have selected.
To delete saved settings, select it in the Favorites tab and click Delete.
2. Learning the Basic Usage
35

Basic printing
8
Using help
Click the option you want to know on the Printing Preferences window and
press F1 on your keyboard.
9
Eco printing
The Eco function cuts toner consumption and paper usage. The Eco function
allows you to save print resources and lead you to eco-friendly printing.
Setting Eco mode on the control panel
If you press the Eco button from the control panel, eco mode is enabled. The
default setting of Eco mode is Multiple Pages per Side (2) and Toner Save.
The settings set from the machine’s driver override the settings on the
control panel.
Setting eco mode on the driver
Open the Eco tab to set Eco mode. When you see the eco image ( ), that
means the eco mode is currently enabled.
Another way for Eco printing is to use the Easy Eco Driver application. See «Easy
Eco Driver» on page 153.
Eco options
• Printer Default: Follows the settings from the machine’s control panel.
• None: Disables Eco mode.
• Eco Printing: Enables eco mode. Activate the various Eco items you want to
use.
You can set the machine’s settings by using the Device Settings in
Samsung Easy Printer Manager program.
• Password: If the administrator fixed to enable the Eco mode, you have to
enter the password to change the status.
• For Windows and Macintosh users, you set from Samsung Easy Printer
Manager > (Switch to advanced mode) > Device Settings, see
«Device Settings» on page 158.
2. Learning the Basic Usage
36

Basic printing
Password button: You can set from SyncThru™ Web Service (Settings tab >
Machine Settings > System > Eco > Settings) or Samsung Easy Printer
Manager (Device Settings > Eco), the password button is activated. To
change the print settings, click on this button, enter the password or need
to contact the administrator.
Result simulator
Result Simulator shows the results of reduced emission of carbon dioxide, used
electricity, and the amount of saved paper in accordance with the settings you
selected.
• The results are calculated on the basis that the total number of printed
paper is one hundred without a blank page when the Eco mode is disabled.
• Refers to the calculation coefficient about CO2, energy, and paper from IEA,
the index of Ministry of Internal Affairs and Communication of Japan and
www.remanufacturing.org.uk. Each model has a different index.
• The power consumption in printing mode refers to the average printing
power consumption of this machine.
• The actual amount displayed is only an estimate as the actual amount may
differ depending on the operating system used, computing performance,
application software, connection method, media type [thickness], media
size, job complexity, etc.
2. Learning the Basic Usage
37

3. Maintenance
This chapter provides information about purchasing supplies, accessories and maintenance parts available for your
machine.
• Ordering supplies and accessories 39
• Available supplies 40
• Available maintenance parts 42
• Storing the toner cartridge 43
• Redistributing toner 45
• Replacing the toner cartridge 47
• Replacing the waste toner container 49
• Replacing the imaging unit 51
• Cleaning the machine 53
• Tips for moving & storing your machine 55

Ordering supplies and accessories
Available accessories may differ from country to country. Contact your sales representatives to obtain the list of available supplies, and maintenance parts.
To order Samsung-authorized supplies, accessories, and maintenance parts, contact your local Samsung dealer or the retailer where you purchased your machine.
You can also visit www.samsung.com/supplies, and then select your country/region to obtain the contact information for service.
3. Maintenance
39

Available supplies
When supplies reach the end of their life spans, you can order the following types of supplies for your machine:
Type
Average yield
Toner cartridge • Average continuous black cartridge yield: Approx. 1,500 standard pages (Black)
• Average continuous color cartridge yield: Approx. 1,000 standard pages (Yellow/Magenta/Cyan)
a
Part name
• K406 (CLT-K406S): Black
• C406 (CLT-C406S): Cyan
• M406 (CLT-M406S): Magenta
• Y406 (CLT-Y406S): Yellow
Imaging unit
Waste toner container
a. Declared yield value in accordance with ISO/IEC 19798. The number of pages may be affected by operating environment, printing interval, graphics, media type and media size.
b. Image counts based on one color on each page. If you print documents in full color (Cyan, Magenta, Yellow, Black), the life of this item will be reduced by 25%.
Approx. 16,000 images
Approx. 7,000 images
b
b
CLT-R406
CLT-W406
Depending on the options, percentage of image area, and job mode used, the toner cartridge’s lifespan may differ.
When purchasing new toner cartridges or other supplies, these must be purchased in the same country as the machine you are using. Otherwise, new toner
cartridges or other supplies will be incompatible with your machine due to different configurations of toner cartridges and other supplies according to the specific
country conditions.
3. Maintenance
40

Available supplies
Samsung does not recommend using non-genuine Samsung toner
cartridge such as refilled or remanufactured toner. Samsung cannot
guarantee non-genuine Samsung toner cartridge’s quality. Service or repair
required as a result of using non-genuine Samsung toner cartridges will not
be covered under the machine’s warranty.
3. Maintenance
41

Available maintenance parts
To purchase maintenance parts, contact the source where you bought the machine. Replacing maintenance parts can be performed only by an authorized service
provider, dealer, or the retailer where you bought the machine. The warranty does not cover the replacement of any maintenance parts once it has reached its
“Average yield”.
Maintenance parts are replaced at specific intervals to avoid print quality and paper feed problems resulting from worn parts, see table below. The purpose of which
is to maintain your machine in top working condition. The maintenance parts below should be replaced when the life span of each item has been met.
Parts
Fuser unit Approx. 20,000 pages for black and white mode or 5,000 pages for color mode
Transfer roller Approx. 20,000 pages
Feed roller Approx. 20,000 pages
Pickup roller Approx. 20,000 pages
Intermediate Transfer Belt (ITB) Approx. 20,000 pages for black and white mode or 5,000 pages for color mode
a. It will be affected by the operating system used, computing performance, application software, connecting method, media type, media size and job
complexity.
Average yield
a
3. Maintenance
42

Storing the toner cartridge
Toner cartridges contain components that are sensitive to light, temperature and humidity. Samsung suggests users follow these recommendations to ensure
optimal performance, highest quality, and longest life from your new Samsung toner cartridge.
Store this cartridge in the same environment in which the printer will be used. This should be in controlled temperature and humidity conditions. The toner cartridge
should remain in its original and unopened package until installation – if original packaging is not available, cover the top opening of the cartridge with paper and
store in a dark cabinet.
Opening the cartridge package prior to use dramatically shortens its useful shelf and operating life. Do not store on the floor. If the toner cartridge is removed from
the printer, follow the instructions below to store the toner cartridge properly.
• Store the cartridge inside the protective bag from the original package.
• Store lying flat (not standing on end) with the same side facing up as if it were installed in the machine.
• Do not store consumables in any of the following conditions:
— Temperature greater than 40°C (104°F).
— Humidity range less than 20% and greater than 80%.
— An environment with extreme changes in humidity or temperature.
— Direct sunlight or room light.
— Dusty places.
— A car for a long period of time.
— An environment where corrosive gases are present.
— An environment with salty air.
3. Maintenance
43

Storing the toner cartridge
1
Handling instructions
• Do not touch the surface of the photoconductive drum in the cartridge.
• Do not expose the cartridge to unnecessary vibrations or shock.
• Never manually rotate the drum, especially in the reverse direction; this can
cause internal damage and toner spillage.
2
Toner cartridge usage
Samsung Electronics does not recommend or approve the use of non-Samsung
brand toner cartridges in your printer including generic, store brand, refilled, or
remanufactured toner cartridges.
3
Estimated cartridge life
Estimated cartridge life the life of the toner cartridge (or imaging unit) yield
depends on the amount of toner that print jobs require. The actual print yield
may vary depending on the print density of the pages you print on, operating
environment, percentage of image area, printing interval, media type and/or
media size. For example, if you print a lot of graphics, the consumption of the
toner is higher and you may need to change the cartridge more often.
Samsung’s printer warranty does not cover damage to the machine caused
by the use of a refilled, remanufactured, or non-Samsung brand toner
cartridges.
3. Maintenance
44

Redistributing toner
When the toner cartridge is near the end of its life:
• White streaks or light printing occurs and/or density variation side to side.
• The Toner LED blinks orange.
If this happens, you can temporarily improve print quality by redistributing the remaining toner in the cartridge. In some cases, white streaks or light printing will still
occur even after you have redistributed the toner.
• Before opening the top cover, close the output support first.
• If toner gets on your clothing, wipe it off with a dry cloth and wash clothing in cold water. Hot water sets toner into fabric.
• Printing even after the toner empty status can cause serious damage to your machine.
3. Maintenance
45

Redistributing toner
3. Maintenance
46

Replacing the toner cartridge
Click this link to open an animation about replacing a toner cartridge.
• Before opening the top cover, close the output support first.
• Do not use sharp objects such as a knife or scissors to open the toner cartridge package. They might scratch the drum of the cartridge.
• If toner gets on your clothing, wipe it off with a dry cloth and wash clothing in cold water. Hot water sets toner into fabric.
• Shake the toner cartridge thoroughly, it will increase the initial print quality.
• Do not touch the green underside of the toner cartridge. Use the handle on the cartridge to avoid touching this area.
• Printing even after the toner empty status can cause serious damage to your machine.
3. Maintenance
47

Replacing the toner cartridge
When a toner cartridge has reached the end of life, the Printing Status window appears on the computer, indicating the toner cartridge needs to be placed.
3. Maintenance
48

Replacing the waste toner container
When the life span of the waste toner container has expired, the Smart Panel program window appears on the computer, indicating the waste toner container needs
to be placed. Otherwise your printer stops printing.
• Toner particles can be released inside the machine but it does not mean the machine is damaged. Contact a service representative when print quality problems
occur.
• When you pull out the waste toner container out of the machine, move the container carefully not to drop it from your hands.
• Make sure that you lay the waste toner container on a flat surface so that the toner does not spill.
Do not tilt or turn over the container.
3. Maintenance
49

Replacing the waste toner container
The order information is provided for optional accessories (see «Available supplies» on page 40).
3. Maintenance
50

Replacing the imaging unit
When the life span of the imaging unit has expired, the Smart Panel program window appears on the computer, indicating the imaging unit needs to be placed.
Otherwise, your machine stops printing.
• Don’t use sharp objects such as a knife or scissors to open the imaging unit package. You could damage the surface of the imaging unit.
• Be careful not to scratch the surface of the imaging unit.
• To prevent damage, do not expose the imaging unit to light for more than a few minutes. Cover it with a piece of paper to protect it if necessary.
• Before closing the front cover, make sure all toner cartridges are installed properly.
3. Maintenance
51

Replacing the imaging unit
3. Maintenance
52

Cleaning the machine
If printing quality problems occur or if you use your machine in a dusty environment, you need to clean your machine regularly to keep it in the best printing
condition and use your machine longer.
• Cleaning the cabinet of the machine with cleaning materials containing large amounts of alcohol, solvents, or other strong substances can discolor or distort the
cabinet.
• If your machine or the surrounding area is contaminated with toner, we recommend you use a cloth or tissue dampened with water to clean it. If you use a vacuum
cleaner, toner blows in the air and might be harmful to you.
• During the printing process, paper, toner, and dust particles can accumulate inside the machine. This buildup can cause print quality problems, such as toner
specks or smearing. Cleaning the inside of the machine clears and reduces these problems.
4
Cleaning the outside
Clean the machine cabinet with a soft, lint-free cloth. Dampen the cloth slightly with water, but be careful not to let any water drip onto or into the machine.
5
Cleaning the inside
During the printing process, paper, toner, and dust particles can accumulate inside the machine. This buildup can cause print quality problems, such as toner specks
or smearing. Cleaning the inside of the machine clears and reduces these problems.
3. Maintenance
53

Cleaning the machine
• Use a dry lint-free cloth to clean the machine.
• If your machine has a power switch, turn the power switch off before cleaning the machine.
• Before opening the top cover, close the output support first.
1
2
3. Maintenance
54

Tips for moving & storing your machine
• When moving the machine, do not tilt or turn it upside down. Otherwise, the inside of the machine may be contaminated by toner, which can cause damage to
the machine or reduce print quality.
• When moving the machine, make sure at least two people are holding the machine securely.
3. Maintenance
55

4. Troubleshooting
This chapter gives helpful information for what to do if you encounter an error.
• Tips for avoiding paper jams 57
• Clearing paper jams 58
• Understanding the status LED 63
This chapter gives helpful information for what to do if you encounter an error.
If your machine has a display screen, check the message on the display screen first to solve the
error. If you cannot find a solution to your problem in this chapter, refer to the
Troubleshooting chapter in the Advanced User’s Guide (see «Troubleshooting» on page 165).
If you cannot find a solution in the User’s Guide or the problem persists, call for service.

Tips for avoiding paper jams
By selecting the correct media types, most paper jams can be avoided. To avoid paper jams, refer to the following guidelines:
• Ensure that the adjustable guides are positioned correctly (see «Tray overview» on page 26).
• Do not overload the tray. Ensure that the paper level is below the paper capacity mark on the inside of the tray.
• Do not remove paper from the tray while your machine is printing.
• Flex, fan, and straighten paper before loading.
• Do not use creased, damp, or highly curled paper.
• Do not mix paper types in a tray.
• Use only recommended print media (see «Print media specifications» on page 69).
4. Troubleshooting
57

Clearing paper jams
To avoid tearing the paper, pull the jammed paper out slowly and gently.
4. Troubleshooting
58

Clearing paper jams
1
In tray
Click this link to open an animation about clearing a jam.
4. Troubleshooting
59

Clearing paper jams
4. Troubleshooting
60

Clearing paper jams
2
Inside the machine
Click this link to open an animation about clearing a jam.
• The fuser area is hot. Take care when removing paper from the machine.
3
In exit area
Click this link to open an animation about clearing a jam.
4. Troubleshooting
61

Clearing paper jams
• The fuser area is hot. Take care when removing paper from the machine.
4. Troubleshooting
62

Understanding the status LED
The color of the LED indicates the machine’s current status.
• Some LEDs may not be available depending on model or country (see «Control panel overview» on page 19).
• To resolve the error, look at the error message and its instructions from the troubleshooting part (see «Troubleshooting» on page 165).
• You also can resolve the error with the guideline from the computers’s Samsung Printing Status program window (see «Using Samsung Printer Status» on page
160).
• If the problem persists, call a service representative.
4. Troubleshooting
63

Understanding the status LED
4
Status LED
Status Description
Off The machine is off-line or save mode.
(Status LED)
Green
Red
Orange
Blinking
On The machine is on-line and can be used.
Blinking The machine is on manual printing or manual duplex printing.
On
Blinking Upgrading firmware.
On A paper jam has occurred (see «Clearing paper jams» on page 58).
• The machine is receiving data from the computer.
• The machine is printing data.
• The cover is opened. Close the cover (see «Machine overview» on page 16).
• There is no paper in the tray when receiving or printing data. Load paper in the tray (see «Loading paper in the
tray» on page 27).
• The machine has stopped due to a major error.
4. Troubleshooting
64

Understanding the status LED
5
Toner / WPS / Power / Eco LED
Status Description
Small amount of toner is left in the cartridge. The estimated cartridge life of toner is close. Prepare a new
Blinking
cartridge for replacement. You may temporarily increase the printing quality by redistributing the toner (see
«Redistributing toner» on page 45).
Orange
(Toner LED)
Blue
(WPS LED)
(Power/Wakeup LED)
Eco Green
a. Estimated cartridge life means the expected or estimated toner cartridge life, which indicates the average capacity of print-outs and is designed pursuant to ISO/IEC 19798. The
number of pages may be affected by operating environment, printing interval, graphics, media type and media size. Some amount of toner may remain in the cartridge even when
red LED is on and the printer stops printing.
b. Wireless model only (see «Features by models» on page 6).
b
Blue
On
Off All toner cartridges are at normal capacity.
Blinking The machine is connecting to a wireless network.
On
Off The machine is disconnected from a wireless network.
On The machine is in power save mode.
Off
On Eco mode is on (see «Eco printing» on page 36).
Off Eco mode is off.
• A toner cartridge has almost reached its estimated cartridge life
cartridge (see «Replacing the toner cartridge» on page 47).
• The toner cartridge is not installed or the wrong toner cartridge is installed (see «Replacing the toner
cartridge» on page 47).
The machine is connected to a wireless network (see «Using the WPS button» on page 110).
The machine is in ready mode or the machine’s power is off.
a
. It is recommended to replace the toner
4. Troubleshooting
65

5. Appendix
This chapter provides product specifications and information concerning applicable regulations.
•Specifications 67
• Regulatory information 76
•Copyright 86

Specifications
1
General specifications
The specification values listed below are subject to change without notice. See www.samsung.com for possible changes in information.
Items Description
Dimension Width x Length x Height 382 x 309 x 211 mm (15.0 x 12.2 x 8.3 inches)
Weight Machine with consumables 9.84 kg (21.69 lbs)
Ready mode background noise level
Noise Level
a
Temperature
Humidity
Power rating
Print mode
• color printing: Less than 45 dB (A)
• black and white printing: Less than 48 dB (A)
Operation 10 to 32°C (50 to 90°F)
Storage (packed) 0 to 40°C (32 to 104°F)
Operation 20 to 80% RH
Storage (packed) 10 to 90% RH
b
110 volt models AC 110 — 127 V
220 volt models AC 220 — 240 V
5. Appendix
67

Specifications
Items Description
Power consumption
Wireless
a. Sound Pressure Level, ISO 7779. Configuration tested: basic machine installation, A4 paper, simplex printing.
b. See the rating label on the machine for the correct voltage (V), frequency (hertz) and type of current (A) for your machine.
c. Wireless model only (see «Features by models» on page 6).
c
Average operating mode Less than 290W
Ready mode Less than 60 W
Power save mode Less than 1.0 W (CLP-36x Series), Less than 1.4 W (CLP-36xW Series)
Power off mode 0.45 W
Module
SPW-B4319S
5. Appendix
68

Specifications
2
Print media specifications
Type Size Dimensions
Plain paper
Letter 216 x 279 mm (8.5 x 11 inches)
Legal 216 x 356 mm (8.5 x 14 inches)
US Folio 216 x 330 mm (8.5 x 13 inches)
A4 210 x 297 mm (8.27 x 11.69 inches)
Oficio 216 x 343 mm (8.5 x 13.5 inches)
JIS B5 182 x 257 mm (7.17 x 10.12 inches)
ISO B5 176 x 250 mm (6.93 x 9.84 inches)
Executive 184 x 267 mm (7.25 x 10.5 inches)
A5 148 x 210 mm (5.83 x 8.27 inches)
A6 105 x 148 mm (4.13 x 5.83 inches)
Print media weight/Capacity
2
60 to 85 g/m
(16 to 23 lbs bond)
• 150 sheets of 75 g/m
Tray
2
(20 lbs bond)
a
Thick paper
Thin paper
Refer to the Plain
paper section
Refer to the Plain
paper section
Refer to the Plain paper section
Refer to the Plain paper section
86 to 120 g/m
2
(23 to 32 lbs bond)
• 5 sheets
60 to 70 g/m
2
(16 to 19 lbs bond)
• 150 sheets of 60 g/m
2
(16 lbs bond)
5. Appendix
69

Specifications
Type Size Dimensions
Cotton
Colored,
Pre-printed,
Recycled
Labels
b
Card stock
Refer to the Plain
paper section
Refer to the Plain
paper section
Letter, Legal, Oficio,
US Folio, A4, JIS B5,
ISO B5, Executive,
A5
Letter, Legal, Oficio,
US Folio, A4, JIS B5,
ISO B5, Executive,
A5,
Refer to the Plain paper section
Refer to the Plain paper section
Refer to the Plain paper section
Refer to the Plain paper section
Print media weight/Capacity
75 to 90 g/m
2
(20 to 24 lbs bond)
• 150 sheets of 75 g/m
60 to 85 g/m
2
(16 to 24 lbs bond)
• 150 sheets of 75 g/m
120 to 150 g/m
2
(32 to 40 lbs bond)
• 5 sheets
121 to 163 g/m
2
(32 to 43 lbs bond)
• 5 sheets
Tray
2
(20 lbs bond)
2
(20 lbs bond)
a
Bond paper
Archive
Glossy Photo,
Matte Photo
Postcard 4×6
Refer to the Plain
paper section
Refer to the Plain
paper section
Letter, A4,
Postcard 4×6
Refer to the Plain paper section
Refer to the Plain paper section
Refer to the Plain paper section
105 to 120 g/m
• 10 sheets
70 to 90 g/m
2
• 100 sheets
111 to 220 g/m
• 1 sheets
2
(28 to 32 lbs bond)
(18.6 to 24 lbs bond)
2
(30 to 58 lbs bond)
5. Appendix
70

Specifications
Type Size Dimensions
Minimum size (custom) 76 x 152 mm (3 x 6 inches)
60 to 120 g/m
2
Maximum size (custom) 216 x 356 mm (8.5 x 14 inches)
a. Maximum capacity may differ depending on media weight, thickness, and environmental conditions.
b. The smoothness of the labels used in this machine is 100 to 250 (sheffield). This means the numeric level of smoothness.
If media weight is over 120 g/m2 (32 lbs bond), load a paper into the tray one by one.
Print media weight/Capacity
Tray
(16 to 32 lbs bond)
a
5. Appendix
71

Specifications
3
System requirements
Microsoft® Windows®
Requirement (recommended)
Operating system
CPU RAM free HDD space
Windows® XP Intel® Pentium® III 933 MHz (Pentium IV 1 GHz) 128 MB (256 MB) 1.5 GB
Windows Server® 2003 Intel® Pentium® III 933 MHz (Pentium IV 1 GHz) 128 MB (512 MB) 1.25 GB to 2 GB
Windows Server® 2008 Intel® Pentium® IV 1 GHz (Pentium IV 2 GHz) 512 MB (2 GB) 10 GB
Windows Vista® Intel® Pentium® IV 3 GHz 512 MB (1 GB) 15 GB
Intel® Pentium® IV 1 GHz 32-bit or 64-bit processor or higher 1 GB (2 GB) 16 GB
Windows® 7
• Support for DirectX® 9 graphics with 128 MB memory (to enable the Aero theme).
•DVD—R/W Drive
Windows Server® 2008 R2 Intel® Pentium® IV 1 GHz (x86) or 1.4 GHz (x64) processors (2 GHz or faster) 512 MB (2 GB) 10 GB
5. Appendix
72

Specifications
• Internet Explorer 6.0 or higher is the minimum requirement for all Windows operating systems.
• Users who have administrator rights can install the software.
• Windows Terminal Services is compatible with your machine.
Macintosh
Operating system
Requirements (Recommended)
CPU RAM Free HDD space
Mac OS X 10.4
• Intel® processors
•PowerPC G4/ G5
• 128 MB for a powerPC based Mac
(512 MB)
1 GB
• 512 MB for an Intel-based Mac (1 GB)
Mac OS X 10.5
• Intel® processors
• 867 MHz or faster Power PC G4/
512 MB (1 GB) 1 GB
G5
Mac OS X 10.6 • Intel® processors 1 GB (2 GB) 1 GB
Mac OS X 10.7 • Intel® processors 2 GB 4 GB
5. Appendix
73

Specifications
Linux
Items Requirements
Fedora 5~13 (32/ 64 bit)
OpenSuSE® 10.2, 10.3, 11.0, 11.1, 11.2 (32/64 bit)
SuSE 10.1 (32 bit)
Ubuntu 6.06, 6.10, 7.04, 7.10, 8.04, 8.10, 9.04, 9.10, 10.04 (32/64 bit)
Operating system
Mandriva 2007, 2008, 2009, 2009.1, 2010 (32/64 bit)
Debian 4.0, 5.0 (32/64 bit)
Redhat® Enterprise Linux WS 4, 5 (32/64 bit)
SuSE Linux Enterprise Desktop 10, 11 (32/64 bit)
CPU Pentium IV 2.4GHz (Intel Core™2)
RAM 512 MB (1 GB)
Free HDD space 1 GB (2 GB)
5. Appendix
74

Specifications
4
Network environment
Network and wireless models only (see «Features by models» on page 6).
You need to set up the network protocols on the machine to use it as your network machine. The following table shows the network environments supported by the
machine.
Items Specifications
Network interface •802.11b/g/n Wireless LAN
Network operating system
Network protocols
Wireless security
•Windows
®
XP, Windows Server® 2003, Windows Vista®, Windows® 7, Windows Server® 2008 R2
•Various Linux OS
• Mac OS X 10.4 ~ 10.7
•TCP/IPv4
• DHCP, BOOTP
• DNS, WINS, Bonjour, SLP, UPnP
• Standard TCP/IP Printing (RAW), LPR, IPP, WSD
• SNMPv 1/2/3, HTTP
• TCP/IPv6 (DHCP, DNS, RAW, LPR, SNMPv 1/2/3, HTTP)
• Authentication: Open System, Shared Key, WPA Personal, WPA2 Personal (PSK)
• Encryption: WEP64, WEP128, TKIP, AES
5. Appendix
75

Regulatory information
This machine is designed for a normal work environment and certified with
several regulatory statements.
5
Laser safety statement
The printer is certified in the U.S. to conform to the requirements of DHHS 21
CFR, chapter 1 Subchapter J for Class I(1) laser products, and elsewhere is
certified as a Class I laser product conforming to the requirements of IEC 608251 : 2007.
Class I laser products are not considered to be hazardous. The laser system and
printer are designed so there is never any human access to laser radiation above
a Class I level during normal operation, user maintenance or prescribed service
condition.
Warning
When using this product, these basic safety precautions should always be
followed to reduce risk of fire, electric shock, and injury to persons:
6
Ozone safety
Never operate or service the printer with the protective cover removed from
laser/scanner assembly. The reflected beam, although invisible, can damage
your eyes.
This product’s ozone emission rate is under 0.1 ppm. Because
ozone is heavier than air, keep the product in a place with good
ventilation.
5. Appendix
76

Regulatory information
7
Power saver
8
9
China only
This printer contains advanced energy conservation technology
that reduces power consumption when it is not in active use.
When the printer does not receive data for an extended period of
time, power consumption is automatically lowered.
ENERGY STAR and the ENERGY STAR mark are registered U.S.
marks.
For more information on the ENERGY STAR program see http://
www.energystar.gov
For ENERGY STAR certified models, the ENERGY STAR label will be
on your machine. Check if your machine is ENERGY STAR
certified.
Recycling
Recycle or dispose of the packaging material for this product in an
environmentally responsible manner.
5. Appendix
77

Regulatory information
10
Correct disposal of this product (Waste electrical &
The United States of America only
electronic equipment)
(Applicable in the european union and other
european countries with separate collection
systems)
This marking on the product, accessories or literature indicates that the
product and its electronic accessories (e.g. charger, headset, USB cable)
should not be disposed of with other household waste at the end of
their working life. To prevent possible harm to the environment or
human health from uncontrolled waste disposal, please separate these
items from other types of waste and recycle them responsibly to
promote the sustainable reuse of material resources.
Household users should contact either the retailer where they
purchased this product, or their local government office, for details of
where and how they can take these items for environmentally safe
recycling.
Dispose unwanted electronics through an approved recycler. To find the nearest
recycling location, go to our website:www.samsung.com/recyclingdirect Or call,
(877) 278 — 0799
11
Radio frequency emissions
FCC information to the user
This device complies with Part 15 of the FCC Rules. Operation is subject to the
following two conditions:
• This device may not cause harmful interference, and
• This device must accept any interference received, including interference
that may cause undesired operation.
Business users should contact their supplier and check the terms and
conditions of the purchase contract. This product and its electronic
accessories should not be mixed with other commercial wastes for
disposal.
5. Appendix
78

Regulatory information
This equipment has been tested and found to comply with the limits for a Class
B digital device, pursuant to Part 15 of the FCC Rules. These limits are designed
to provide reasonable protection against harmful interference in a residential
installation. This equipment generates, uses and can radiate radio frequency
energy and, if not installed and used in accordance with the instructions, may
cause harmful interference to radio communications. However, there is no
guarantee that interference will not occur in a particular installation. If this
equipment does cause harmful interference to radio or television reception,
which can be determined by turning the equipment off and on, the user is
encouraged to try to correct the interference by one or more of the following
measures:
• Reorient or relocate the receiving antenna.
• Increase the separation between the equipment and receiver.
• Connect the equipment into an outlet on a circuit different from that to
which the receiver is connected.
• Consult the dealer or experienced radio TV technician for help.
Canadian radio interference regulations
This digital apparatus does not exceed the Class B limits for radio noise
emissions from digital apparatus as set out in the interference-causing
equipment standard entitled “Digital Apparatus”, ICES-003 of the Industry and
Science Canada.
Cet appareil numérique respecte les limites de bruits radioélectriques
applicables aux appareils numériques de Classe B prescrites dans la norme sur le
matériel brouilleur: “Appareils Numériques”, ICES-003 édictée par l’Industrie et
Sciences Canada.
12
United states of america
Federal communications commission (FCC)
Intentional emitter per FCC Part 15
Change or modifications not expressly approved by the manufacturer
responsible for compliance could void the user’s authority to operate the
equipment.
Low power, Radio LAN type devices (radio frequency (RF) wireless
communication devices), operating in the 2.4 GHz/5 GHz Band, may be present
(embedded) in your printer system. This section is only applicable if these
devices are present. Refer to the system label to verify the presence of wireless
devices.
Wireless devices that may be in your system are only qualified for use in the
United States of America if an FCC ID number is on the system label.
5. Appendix
79

Regulatory information
The FCC has set a general guideline of 20 cm (8 inches) separation between the
device and the body, for use of a wireless device near the body (this does not
include extremities). This device should be used more than 20 cm (8 inches)
from the body when wireless devices are on. The power output of the wireless
device (or devices), which may be embedded in your printer, is well below the
RF exposure limits as set by the FCC.
This transmitter must not be collocated or operation in conjunction with any
other antenna or transmitter.
Operation of this device is subject to the following two conditions: (1) This
device may not cause harmful interference, and (2) this device must accept any
interference received, including interference that may cause undesired
operation of the device.
Wireless devices are not user serviceable. Do not modify them in any way.
Modification to a wireless device will void the authorization to use it.
Contact manufacturer for service.
FCC statement for wireless LAN use:
While installing and operating this transmitter and antenna combination
the radio frequency exposure limit of 1m W/cm2 may be exceeded at
distances close to the antenna installed. Therefore, the user must maintain
a minimum distance of 20cm from the antenna at all times. This device
cannot be colocated with another transmitter and transmitting antenna.
13
Russia only
14
Germany only
5. Appendix
80

Regulatory information
15
Turkey only
16
Thai only
17
Replacing the fitted plug (for UK only)
The 13 amp plug is the most widely used type in the UK and should be suitable.
However, some buildings (mainly old ones) do not have normal 13 amp plug
sockets. You need to buy a suitable plug adaptor. Do not remove the moulded
plug.
If you cut off the moulded plug, get rid of it straight away.
You cannot rewire the plug and you may receive an electric shock if you
plug it into a socket.
Important warning:
You must earth this machine.
The wires in the mains lead have the following color code:
• Green and Yellow: Earth
Important
The mains lead for this machine is fitted with a standard (BS 1363) 13 amp plug
and has a 13 amp fuse. When you change or examine the fuse, you must re-fit
the correct 13 amp fuse. You then need to replace the fuse cover. If you have lost
the fuse cover, do not use the plug until you have another fuse cover.
Contact the people from you purchased the machine.
• Blue: Neutral
• Brown: Live
If the wires in the mains lead do not match the colors marked in your plug, do
the following:
You must connect the green and yellow wire to the pin marked by the letter “E”
or by the safety ‘Earth symbol’ or colored green and yellow or green.
You must connect the blue wire to the pin which is marked with the letter “N” or
colored black.
5. Appendix
81

Regulatory information
You must connect the brown wire to the pin which is marked with the letter “L”
or colored red.
You must have a 13 amp fuse in the plug, adaptor, or at the distribution board.
18
Declaration of conformity (European countries)
Approvals and Certifications
• Hereby, Samsung Electronics, declares that this [CLP-36x Series] is
in compliance with the essential requirements and other relevant
provisions of Low Voltage Directive (2006/95/EC), EMC Directive
(2004/108/EC).
• Hereby, Samsung Electronics, declares that this [CLP-36xW Series]
is in compliance with the essential requirements and other
relevant provisions of R&TTE Directive 1999/5/EC.
The declaration of conformity may be consulted at
www.samsung.com, go to Support > Download center and enter
your printer (MFP) name to browse the EuDoC.
March 9, 1999: Council Directive 1999/5/EC on radio equipment and
telecommunications terminal equipment and the mutual recognition of their
conformity. A full declaration, defining the relevant Directives and referenced
standards can be obtained from your Samsung Electronics Co., Ltd.
representative.
EC Certification
Certification to 1999/5/EC Radio Equipment & Telecommunications Terminal
Equipment Directive (FAX)
This Samsung product has been self-certified by Samsung for pan-European
single terminal connection to the analogue public switched telephone network
(PSTN) in accordance with Directive 1999/5/EC. The product has been designed
to work with the national PSTNs and compatible PBXs of the European
countries:
In the event of problems, you should contact the Euro QA Lab of Samsung
Electronics Co., Ltd. in the first instance.
The product has been tested against TBR21. To assist in the use and application
of terminal equipment which complies with this standard, the European
January 1, 1995: Council Directive 2006/95/EC Approximation of the laws of
the member states related to low voltage equipment.
January 1, 1996: Council Directive 2004/108/EC, approximation of the laws of
the Member States related to electromagnetic compatibility.
Telecommunication Standards Institute (ETSI) has issued an advisory document
(EG 201 121) which contains notes and additional requirements to ensure
network compatibility of TBR21 terminals. The product has been designed
against, and is fully compliant with, all of the relevant advisory notes contained
in this document.
5. Appendix
82

Regulatory information
European radio approval information (for products
fitted with EU-approved radio devices)
Low power, Radio LAN type devices (radio frequency (RF) wireless
communication devices), operating in the 2.4 GHz/5 GHz band, may be present
(embedded) in your printer system which is intended for home or office use. This
section is only applicable if these devices are present. Refer to the system label
to verify the presence of wireless devices.
Wireless devices that may be in your system are only
qualified for use in the European Union or associated
areas if a CE mark with a Notified Body Registration
Number and the Alert Symbol is on the system label.
The power output of the wireless device or devices that may be embedded in
you printer is well below the RF exposure limits as set by the European
Commission through the R&TTE directive.
European states qualified under wireless approvals:
EU countries
No limitations at this time
19
Regulatory compliance statements
Wireless guidance
Low power, Radio LAN type devices (radio frequency (RF) wireless
communication devices), operating in the 2.4 GHz/5 GHz Band, may be present
(embedded) in your printer system. The following section is a general overview
of considerations while operating a wireless device.
Additional limitations, cautions, and concerns for specific countries are listed in
the specific country sections (or country group sections). The wireless devices in
your system are only qualified for use in the countries identified by the Radio
Approval Marks on the system rating label. If the country you will be using the
wireless device in, is not listed, contact your local Radio Approval agency for
requirements. Wireless devices are closely regulated and use may not be
allowed.
The power output of the wireless device or devices that may be embedded in
European states with restrictions on use:
EU
In France, this equipment may only be used indoors.
EEA/EFTA countries
your printer is well below the RF exposure limits as known at this time. Because
the wireless devices (which may be embedded into your printer) emit less
energy than is allowed in radio frequency safety standards and
recommendations, manufacturer believes these devices are safe for use.
Regardless of the power levels, care should be taken to minimize human contact
during normal operation.
5. Appendix
83

Regulatory information
As a general guideline, a separation of 20 cm (8 inches) between the wireless
device and the body, for use of a wireless device near the body (this does not
include extremities) is typical. This device should be used more than 20 cm (8
inches) from the body when wireless devices are on and transmitting.
This transmitter must not be collocated or operation in conjunction with any
other antenna or transmitter.
Some circumstances require restrictions on wireless devices. Examples of
common restrictions are listed below:
Radio frequency wireless communication can interfere with equipment
on commercial aircraft. Current aviation regulations require wireless
devices to be turned off while traveling in an airplane. IEEE 802.11 (also
known as wireless Ethernet) and Bluetooth communication devices are
examples of devices that provide wireless communication.
In environments where the risk of interference to other devices or
services is harmful or perceived as harmful, the option to use a wireless
device may be restricted or eliminated. Airports, Hospitals, and Oxygen
or flammable gas laden atmospheres are limited examples where use of
wireless devices may be restricted or eliminated. When in environments
where you are uncertain of the sanction to use wireless devices, ask the
applicable authority for authorization prior to use or turning on the
wireless device.
Every country has different restrictions on the use of wireless devices.
Since your system is equipped with a wireless device, when traveling
between countries with your system, check with the local Radio
Approval authorities prior to any move or trip for any restrictions on the
use of a wireless device in the destination country.
If your system came equipped with an internal embedded wireless
device, do not operate the wireless device unless all covers and shields
are in place and the system is fully assembled.
Wireless devices are not user serviceable. Do not modify them in any
way. Modification to a wireless device will void the authorization to use
it. Contact manufacturer for service.
Only use drivers approved for the country in which the device will be
used. See the manufacturer System Restoration Kit, or contact
manufacturer Technical Support for additional information.
20
Israel only
5. Appendix
84

Regulatory information
21
China only
5. Appendix
85

Copyright
© 2012 Samsung Electronics Co., Ltd. All rights reserved.
This user’s guide is provided for information purposes only. All information included herein is subject to change without notice.
Samsung Electronics is not responsible for any direct or indirect damages, arising from or related to use of this user’s guide.
• Samsung and the Samsung logo are trademarks of Samsung Electronics Co., Ltd.
• Microsoft, Windows, Windows Vista, Windows 7, and Windows Server 2008 R2 are either registered trademarks or trademarks of Microsoft Corporation.
• Microsoft, Internet Explorer, Excel, Word, PowerPoint, and Outlook are either registered trademarks or trademarks of Microsoft Corporation in the United States
and other countries.
• Google, Picasa, Google Docs, Android and Gmail are either registered trademarks or trademarks of Google Inc.
• Google Cloud Print is a trademark of Google Inc.
• iPad, iPhone, iPod touch, TrueType, Mac and Mac OS are trademarks of Apple Inc., registered in the U.S and other countries.
• AirPrint and the AirPrint logo are trademarks of Apple Inc.
• TrueType, LaserWriter, and Macintosh are trademarks of Apple Computer, Inc.
• All other brand or product names are trademarks of their respective companies or organizations.
Refer to the ‘LICENSE.txt‘ file in the provided CD-ROM for the open source license information.
REV. 1.10
5. Appendix
86

User’s Guide
User’s Guide
ADVANCED
ADVANCED
This guide provides information about installation, advanced configuration,
operation and troubleshooting on various OS environments.
Some features may not be available depending on models or countries.
BASIC
CLP-36x Series
CLP-36xW Series
This guide provides information concerning installation, basic operation and troubleshooting
on windows.

Setting your machine as a default machine 137
1. Software installation
Installation for Macintosh 90
Reinstallation for Macintosh 91
Installation for Linux 92
Reinstallation for Linux 93
2. Using a network-connected
machine
Useful network programs 95
Wired network setup 96
Installing driver over the network 99
IPv6 configuration 105
Wireless network setup 108
Using advanced print features 138
Macintosh printing 145
Linux printing 147
4. Useful management tools
Easy Capture Manager 150
Samsung Easy Color Manager 151
Samsung AnyWeb Print 152
Easy Eco Driver 153
Using SyncThru™ Web Service 154
Using Samsung Easy Printer Manager 157
Using Samsung Printer Status 160
Using the Linux Unified Driver Configurator 162
Samsung MobilePrint 131
Google Cloud Print 132
3. Special features
Altitude adjustment 135
Changing the default print settings 136
5. Troubleshooting
Paper feeding problems 166
Power and cable connecting problems 167
Printing problems 168
Printing quality problems 172
Operating system problems 180
88

1. Software installation
This chapter provides instructions for installing essential and helpful software for use in an environment where the
machine is connected via a cable. A locally connected machine is a machine directly attached to your computer using
the cable. If your machine is attached to a network, skip the following steps below and go on to installing a network
connected machine’s driver (see Installing driver over the network99).
• Installation for Macintosh 90
• Reinstallation for Macintosh 91
• Installation for Linux 92
• Reinstallation for Linux 93
• If you are a Windows OS user, refer to the «Installing the driver locally» on page 22 for
installing the machine’s driver.
• Only use a USB cable no longer then 3 meter (118 inches).

Installation for Macintosh
Make sure that the machine is connected to your computer and
1
powered on.
Insert the supplied software CD into your CD-ROM drive.
2
Double-click the CD-ROM icon that appears on your Macintosh desktop.
3
Double-click the MAC_Installer folder > Installer OS X icon.
4
Click Continue.
5
Read the license agreement and click Continue.
6
Click Agree to agree to the license agreement.
7
When the message that warns that all applications will close on your
8
computer appears, click Continue.
Click Continue on the User Options Pane.
9
14
15
16
17
Open the Applications folder > Utilities > Print Setup Utility.
• For Mac OS X 10.5 -10.7, open the Applications folder > System
Preferences and click Print & Fax.
Click Add on the Printer List.
• For Mac OS X 10.5 -10.7, click the “+” folder icon; a display window
will pop up.
Click Default Browser and find the USB connection.
• For Mac OS X 10.5-10.7, click Default and find the USB connection.
For Mac OS X 10.4, if Auto Select does not work properly, select Samsung
in Print Using and your machine name in Model.
• For Mac OS X 10.5-10.7, if Auto Select does not work properly, select
Select a driver to use… and your machine name in Print Using.
Your machine appears on the Printer List, and is set as the default
machine.
10
11
12
13
Click Install. All components necessary for machine operations will be
installed.
If you click Customize, you can choose individual components to install.
Enter the password and click OK.
Installing software requires you to restart your computer. Click Continue
Installation.
After the installation is finished, click Close.
18
Click Add.
1. Software installation
90

Reinstallation for Macintosh
If the printer driver does not work properly, uninstall the driver and reinstall it.
Make sure that the machine is connected to your computer and
1
powered on.
Insert the supplied software CD into your CD-ROM drive.
2
Double-click the CD-ROM icon that appears on your Macintosh desktop.
3
Double-click the MAC_Installer folder > Uninstaller OS X icon.
4
Enter the password and click OK.
5
When the uninstall is done, click OK.
6
If a machine has already been added, delete it from the Print Setup Utility
or Print & Fax.
1. Software installation
91

Installation for Linux
You need to download Linux software packages from the Samsung website to
install the printer software (http://www.samsung.com > find your product >
Support or Downloads).
1
Installing the Unified Linux Driver
Make sure that the machine is connected to your computer and
1
powered on.
When the Administrator Login window appears, type “root” in the
2
Login field and enter the system password.
You must log in as a super user (root) to install the machine software. If you
are not a super user, ask your system administrator.
The installation program added the Unified Driver Configurator desktop icon
and the Unified Driver group to the system menu for your convenience. If you
have any difficulties, consult the on-screen help that is available through your
system menu or from the driver package Windows applications, such as Unified
Driver Configurator or Image Manager.
From the Samsung website, download the Unified Linux Driver package
3
to your computer.
Right-click the Unified Linux Driver package and extract the package.
4
Double click cdroot > autorun.
5
When the welcome screen appears, click Next.
6
When the installation is complete, click Finish.
7
1. Software installation
92

Reinstallation for Linux
If the printer driver does not work properly, uninstall the driver and reinstall it.
Make sure that the machine is connected to your computer and
1
powered on.
When the Administrator Login window appears, type “root” in the
2
Login field and enter the system password.
You must log in as a super user (root) to uninstall the printer driver. If you
are not a super user, ask your system administrator.
Open the Terminal program. When the Terminal screen appears, type in
3
the following.
[root@localhost root]#cd /opt/Samsung/mfp/uninstall/
[root@localhost uninstall]#./uninstall.sh
4
5
Click Next.
Click Finish.
1. Software installation
93

2. Using a networkconnected machine
This chapter gives you step-by-step instructions for setting up a network connected machine and software.
• Useful network programs 95
• Wired network setup 96
• Installing driver over the network 99
• IPv6 configuration 105
• Wireless network setup 108
• Samsung MobilePrint 131
• Google Cloud Print 132
Supported optional devices and features may differ according to your model (see «Features by
models» on page 6).

Useful network programs
There are several programs available to setup the network settings easily in a
network environment. For the network administrator especially, managing
several machines on the network is possible.
• Before using the programs below, set the IP address first.
• Some features and optional goods may not be available depending on
model or country (see «Features by models» on page 6).
1
SyncThru™ Web Service
The web server embedded on your network machine allows you to do the
following tasks (see «Using SyncThru™ Web Service» on page 107):
• Check the supplies information and status.
2
SyncThru™ Web Admin Service
Web-based machine management solution for network administrators.
SyncThru™ Web Admin Service provides you with an efficient way of managing
network devices and lets you remotely monitor and troubleshoot network
machines from any site with corporate internet access.
• Download this program from http://solution.samsungprinter.com.
3
SetIP
This utility program allows you to select a network interface and manually
configure the IP addresses for use with the TCP/IP protocol.
• See «IPv4 configuration using SetIP (Windows)» on page 96.
• Customize machine settings.
• Set the email notification option. When you set this option, the machine
status (toner cartridge shortage or machine error) will be sent to a certain
person’s email automatically.
• Configure the network parameters necessary for the machine to connect to
various network environments.
• See «IPv4 configuration using SetIP (Macintosh)» on page 97.
• See «IPv4 configuation using SetIP (Linux)» on page 98.
• The machine that does not support the network interface, it will not
be able to use this feature (see «Rear view» on page 18).
• TCP/IPv6 is not supported by this program.
2. Using a network-connected machine
95

Wired network setup
You must set up the network protocols on your machine to use it on your
network.
You can use network after connecting network cable to a corresponding port on
your machine.
• For models that do not have the display screen on the control panel, use the
SyncThru™ Web Service or SetIP program.
— See «Using SyncThru™ Web Service» on page 154.
— See «Setting IP address» on page 96.
4
Printing a network configuration report
You can print Network Configuration Report from the machine’s control panel
that will show the current machine’s network settings. This will help you to set
up a network.
• The machine does not have the display screen: Press the (Cancel or
Stop/Clear) button for two seconds on the control panel.
Using this Network Configuration Report, you can find your machine’s MAC
address and IP address.
For example:
• MAC Address: 00:15:99:41:A2:78
5
Setting IP address
• The machine that does not support the network interface, it will not
be able to use this feature (see «Rear view» on page 18)
• TCP/IPv6 is not supported by this program.
First, you have to set up an IP address for network printing and managements.
In most cases a new IP address will be automatically assigned by a DHCP
(Dynamic Host Configuration Protocol) server located on the network.
IPv4 configuration using SetIP (Windows)
Before using the SetIP program, disable the computer firewall from Control
Panel > Security Center > Windows Firewall.
Install this program from the supplied CD-ROM by double-click
1
Application > SetIP > Setup.exe.
Follow the instructions in the installation window.
2
Connect your machine to the network with a network cable.
3
• IP Address: 165.254.192.192
Turn on the machine.
4
2. Using a network-connected machine
96

Wired network setup
From the Windows Start menu, select All Programs > Samsung
5
Printers > SetIP > SetIP.
Click the icon (third from left) in the SetIP window to open the TCP/IP
6
configuration window.
Enter the machine’s new information into the configuration window as
7
follows. In a corporate intranet, you may need to have this information
assigned by a network manager before proceeding.
Click Apply, and then click OK. The machine will automatically print the
8
Network Configuration Report. Confirm that all the settings are
correct.
IPv4 configuration using SetIP (Macintosh)
Before using the SetIP program, disable the computer firewall from System
Preferences > Security > Firewall.
The following instructions may differ for your model.
Connect your machine to the network with a network cable.
1
Insert the Installation CD-ROM, and open the disk window, select
2
MAC_Installer > MAC_Printer > SetIP > SetIPapplet.html.
Double-click the file and Safari will automatically open, then select
3
Trust. The browser will open the SetIPapplet.html page that shows the
Find the machine’s MAC address from the Network Configuration Report
(see «Printing a network configuration report» on page 96) and enter it
without the colons. For example, 00:15:99:29:51:A8 becomes
0015992951A8.
printer’s name and IP address information.
Click the icon (third from left) in the SetIP window to open the TCP/
4
IP configuration window.
Enter the machine’s new information into the configuration window. In
5
a corporate intranet, you may need to have this information assigned by
a network manager before proceeding.
2. Using a network-connected machine
97

Wired network setup
Find the machine’s MAC address from the Network Configuration Report
(see «Printing a network configuration report» on page 96) and enter it
without the colons. For example, 00:15:99:29:51:A8 becomes
0015992951A8.
Select Apply, then OK, and OK again.
6
Quit Safari.
7
IPv4 configuation using SetIP (Linux)
Before using the SetIP program, disable the computer firewall from System
Preferences or Administrator.
The following instructions may vary from your model or operating systems.
Find the machine’s MAC address from the Network Configuration Report
(see «Printing a network configuration report» on page 96) and enter it
without the colons. For example, 00:15:99:29:51:A8 becomes
0015992951A8.
The machine will automatically print the Network Configuration
5
Report.
Open /opt/Samsung/mfp/share/utils/.
1
Double-click the SetIPApplet.html file.
2
Click to open the TCP/IP configuration window.
3
Enter the machine’s new information into the configuration window. In
4
a corporate intranet, you may need to have this information assigned by
a network manager before proceeding.
2. Using a network-connected machine
98

Installing driver over the network
• Some features and optional goods may not be available depending
• The machine that does not support the network interface, it will not
• You can install the printer driver and software when you insert the
6
Windows
Make sure that the machine is connected to the network and powered
1
on. Also, your machine’s IP address should have been set (see «Setting IP
address» on page 96).
on model or country (see «Features by models» on page 6).
be able to use this feature (see «Rear view» on page 18).
software CD into your CD-ROM drive.
For windows, select the printer driver and software in the Select
Software to Install window.
Select Install Now.
3
Insert the supplied software CD into your CD-ROM drive.
2
The Custom Installation allows you to select the machine’s connection and
choose individual components to install. Follow the instructions on the
window.
Read License Agreement, and select I accept the terms of the License
4
Agreement. Then, click Next.
If your machine is not found on the network or locally, an error message
appears. Select the option you want and click Next.
2. Using a network-connected machine
99

Installing driver over the network
Choose the option in Using Enhanced Features and Participating in
5
Printer Usage Information Collection Program. Then, click Next.
Select Network connection on the Printer Connection Type screen.
6
If the Connect Device window appears, check that the machine is
7
connected to your network. Then, click Next.
The firewall software might be blocking network communication. Before
connecting the device to the network, disable the computer’s firewall.
The searched machines will be shown on the screen. Select the one you
8
wish to use and click OK.
Follow the instructions in the installation window.
9
Silent installation Mode
Silent installation mode is an installation method that does not require any user
intervention. Once you start the installation, the machine driver and software
are automatically installed on you computer. You can start the silent installation
by typing /s or /S in the command window.
Following command-line are effective and operated when command is
used with /s or /S. But /h, /H or /? are exceptional commands that can be
operated solely.
Command- line Definition Description
/s or
/S
/p”<port name>” or
/P”<port name>”
Starts silent installation. Installs machine drivers
without prompting any UIs
or user intervention.
Specifies printer port.
Network Port will
be created by use
of Standard TCP/
IP Port monitor.
For local port, this
port must exist on
system before
being specified
by command.
Printer port name can be
specified as IP address,
hostname, USB local port
name or IEEE1284 port
name.
For example
• /p”xxx.xxx.xxx.xxx” in
where, “xxx.xxx.xxx.xxx”
means IP address for
network printer. /
p”USB001”, /P”LPT1:”, /
p”hostname”
Command-line Parameters
Following table shows commands that can be used in the command window.
2. Using a network-connected machine
100
Loading…
This incredibly compact color laser printer stands for impressively brilliant color quality and easy operation. With its small dimensions, Samsung CLP-365 is one of the smallest color laser printers currently on the market and adorns every desk with its sophisticated two-tone design. With its own “Print Screen” button, what is shown on the screen is printed at the touch of a button.
The Samsung CLP-365 is a compact color laser printer that uses the new ReCP technology to ensure razor-sharp prints. The newly developed polymerized toner powder is finer than conventional toner powder. This gives the prints vivid colors and the paper remains smoother. The Samsung CLT-406C series toner cartridge is used. Since this is a semi-permanent system, the image drum (Samsung CLT-R406) is available as an extra component. A waste toner container (Samsung CLT-W406) must be replaced every 7,000 pages.
The Eco Save button ensures even less toner, paper and energy consumption on Samsung CLP-365.
Samsung CLP-365 driver and manual
Samsung CLP-365 Printer Features
Check below for technical features of the printer:
- Processor: 300 MHz
- Media type: Labels, plain paper, photo paper, glossy, card
- Total media capacity: 150 sheets
- Print speed: Up to 18 ppm – black & white – A4
- Max. resolution (color): 2400 x 600 dpi
- Monthly capacity (max. ): 20000 images
- Interface: USB
- Printer language: SPL (Samsung Printer Language)
Read Also: Samsung CLP-325W Driver and Manual
Download the Samsung CLP-365 Driver and Manuals
Before downloading and installing the Samsung CLP-365 driver, read this printer manual to set up your printer properly.
Samsung CLP-365 Printer User Guide Download
Filename: c05783941.pdf
File Size: 23.06 MB
Download the Samsung CLP-365 Driver
Windows driver:
Samsung CLP-365 Series Print Driver Download
Filename: CLP-365_Series_WIN_SPL_V3.13.06.00.32.exe
File Size: 26.7 MB
Version: V3.13.06.00:32
Samsung CLP-365 Universal Print Driver Download
Filename: SamsungUniversalPrintDriver3.exe
File Size: 27.2MB
Version: V3.00.16.01:01
macOS driver:
Samsung CLP-365 Driver for MacOS Download
Filename: CLP-365_Series_Mac_PrinterDriver_V5.02.00.zip
File Size: 7.6 MB
Version: V5.02.00
-
Page 1
BASIS Gebruikershandleiding CLP-36x Series CLP-36xW Series BASIS Gebruikershandleiding Deze handleiding geeft informatie met betrekking tot de installatie, normaal gebruik en het oplossen van problemen in Windows. GEAVANCEERD Deze handleiding geeft informatie over de in stallatie, geavanceerde instelling, gebruik en het oplossen van problemen in ve[…]
-
Page 2
2 BA S I S 1 . Inleiding Belangrijkste voordelen 4 Functies per model 7 Nuttig om te weten 9 Informatie over deze gebruikershandleiding 10 Veiligheidsinformatie 11 Apparaatoverzicht 16 Overzicht van het bedieningspaneel 19 Het apparaat inschakelen 21 Lokaal installeren van het stuurprogramma 22 Het stuurprogramma opnieuw insta lleren 23 2 . De basi[…]
-
Page 3
1. Inleiding In dit hoofdstuk staat informatie die u nodig heeft om het apparaat te ge bruiken. • Belangrijkste voordelen 4 • Functies per model 7 • Nuttig om te weten 9 • Informatie over deze gebruikershandleiding 10 • Veiligheidsinformatie 11 • Apparaatoverzicht 16 • Overzicht van het bedieningspaneel 19 • Het apparaat inschakelen[…]
-
Page 4
Belangrijkste voordelen Milieuvriendelijk • Dit apparaat beschikt over een Eco-functie waarmee u toner en papier kunt sparen ( zie «Easy Eco Drive r» op pagina 155). • U kunt meerdere pagina’s op één vel afdrukken om papier te be sparen (zie «Geavanceerde afdrukfuncties gebruiken» op pagina 139). • Om papier te bespare[…]
-
Page 5
Belangrijkste voordelen Gemak • Met voor Google Cloud Print i ngeschakelde ap ps (zie «Googl e Cloud Print» op pagina 132) kunt u vanaf uw smartphone of co mputer documenten afd rukken, waar u ook b ent. • Met Easy Captu re Manager ku nt u gemakkel ijk bewerken en afdrukken wat u met de toets Print Screen op het toe tsenbord hebt vast[…]
-
Page 6
Belangrijkste voordelen Ondersteund verschillende instellingsmethoden voor draadloze netwerken. • De WPS (Wi-Fi Protected Se tup™)-knop gebruike n — U ku nt gemakkelijk verbinding maken met e en draadloos netwerk door de WPS-knop op het appa raat en op h et toegangspun t (een draadloz e router) te gebr uiken. • De USB-kabel of ne twerkkabel g[…]
-
Page 7
Functies per model Sommige functies en optionele onderdelen zijn mogelijk niet beschikbaar afhank elijk van model of land. Besturingssysteem Software U kunt het printerst uurprogramma en de software installe ren wanneer u de softwa re-cd in het cd-rom-st ation van uw computer plaatst. Voor Windows selec teert u het prin terstuurprogramma en de soft[…]
-
Page 8
Functies per model Verschillende functies ( ● : beschikbaar. Leeg: Niet beschikbaar) functies CLP-36x Series CLP-36xW Series Hi-Speed USB 2.0 ● ● Netwerkinterface Ethernet 10 /100 Base TX bedraad LAN ● Netwerkinterface 802.11b/g/n draadloos LAN a a. Draadloze netwerkinterfacekaarten (LAN-kaarten) zijn niet in alle landen verkrijgbaar. In so[…]
-
Page 9
Nuttig om te weten Waar kan ik het stuu rprogramma van de printer downloaden? • Kijk op www.samsun g.com/prin ter voor de laaste versie van het stuurprogr amma van de printer en installeer deze op uw systeem. Waar kan ik ac cessoires of verbruiksartikelen kopen? • Vraag na bij een Sa msung-distributeur of uw detailhandela ar. • Kijk op www.sa[…]
-
Page 10
10 1. Inleiding Informatie over deze gebruikershandleiding Deze gebruikershandleidi ng bevat basisinformatie over het apparaat en biedt tevens gedetailleerde informatie over de ve rschillende procedures die doorlopen moeten worden bij he t gebruik van het apparaat. • Lees de veiligheidsinformatie voor u het apparaat in gebruik neemt. • Raadplee[…]
-
Page 11
11 1. Inleiding Veiligheidsinformatie Deze waarschuwingen en voorzorgen moeten eventuele bes chadigingen aan uw apparaat en verwo ndingen aan uzelf of anderen voorkomen. Lees deze instructies aandac htig voor u het apparaat in gebruik neemt. Bewaar dit document goed nadat u het hebt gelezen. 3 Belangrijke veiligheidssymbolen Verklaring van alle pic[…]
-
Page 12
Veiligheidsinformatie 12 1. Inleiding Opgepast 5 Bedieningswijze Opgepast Haal de stekker uit h et stopcontact tijdens on weer of als u het apparaat niet ge bruikt. Dit kan een elektrische schok of brand veroorzake n. Opgelet, h et papier uitvoergebie d is heet. U kunt brandwon den oplopen. Als het apparaat is g evallen of als de behu izing beschad[…]
-
Page 13
Veiligheidsinformatie 13 1. Inleiding 6 Installatie/verplaatsen Waarschuwing Opgepast Gebruik geen tang of sch erpe metalen voorwe rpen om vastgelopen pap ier te verwijderen . Dit kan het apparaat bes chadigen. Vermijd het stapel en van te vee l papier in de papie ruitvoerlad e. Dit kan het apparaat bes chadigen. Blokkeer de ventilatieopen ing niet[…]
-
Page 14
Veiligheidsinformatie 14 1. Inleiding 7 Onderhoud/contro le Opgepast Gebruik vo or een veilige bediening het netsnoe r dat met uw apparaat werd mee geleverd. Als u ee n snoer gebruikt dat langer is dan 2 m eter voor een apparaat van 110 V, moet h et snoer mins tens 16 AW G dik zij n. Zo niet kan he t apparaat beschadigd raken en een elektrische sch[…]
-
Page 15
Veiligheidsinformatie 15 1. Inleiding 8 Gebruik van verbruiksartikelen Opgepast • Verwijde r geen klep pen of beve iligingselem enten die vastgeschroefd zijn. • Fixeereenhe den mogen alleen worden hersteld door een gekwalificeerd e servicemedewerke r. Reparatie door niet- gekwalificeerd e technici kan bra nd of elektrische sc hokken veroorzaken[…]
-
Page 16
16 1. Inleiding Apparaatoverzicht 9 Toebehoren Netsnoer Beknopte insta llatiehandl eiding Software-cd a a. De software-cd bevat de stuurprogramma’s van de printer en programma’s. Div. accessoires b b. Diverse, bij uw printer geleverde accessoires kunn en verschillen per land van a ankoop en specifiek model.[…]
-
Page 17
Apparaatoverzicht 17 1. Inleiding 10 Voorkant • Deze afbeeldi ng kan afhankel ijk van het model afwij ken van uw apparaat. • Sommige func ties en optionel e onderdelen zijn mogelijk ni et beschikbaar a fhankelijk van mod el of land (zie «Fun cties per model » op pagina 7). 1 Uitvoerlade 2 Papieruitvoersteu n 3 Bovenklep 4 Configuratie[…]
-
Page 18
Apparaatoverzicht 18 1. Inleiding 11 Achterkant • Deze afbeeldi ng kan afhankel ijk van het model afwij ken van uw apparaat. • Sommige func ties en optionel e onderdelen zijn mogelijk ni et beschikbaar a fhankelijk van mod el of land (zie «Fun cties per model » op pagina 7). 1 Achterklep 2 Aansluiting netsnoer 3 USB-poort 4 Netwerkpoo[…]
-
Page 19
19 1. Inleiding Overzicht van het bedieningspaneel Dit bedieningspa neel kan afhank elijk van het model afw ijken van uw apparaat. Er zijn versc hillende ty pes bedienin gspanelen. 1 Tonerlampjes Toont de status van de toner (zie «Statu s-LED» op pagina 60). 2 Eco Overschakele n naar de eco-mo dus voor het besparen van toner en pa pier, a[…]
-
Page 20
Overzicht van het bedieningspaneel 20 1. Inleiding 4 (Annuleren) U kunt op elk moment een taak on derbreken. Tevens kunt u de volgende fu ncties uitvoeren. • Configuratiepagina — Houd deze kn op ongeveer twee seconden ingedrukt tot d e groene LED la ngzaam gaat knipperen en laat de knop los. • Rapport met gebeurtenislogboek/ gebruiksteller afdr[…]
-
Page 21
21 1. Inleiding Het apparaat inschakelen 1 Sluit de printer eers t op de netvoeding aan. 2 Druk op ( Aan/uit/ontwaken ) op het bedieningspaneel. Als u de stroom wilt uitsch akelen, drukt u op ( Aan/uit/ontwaken ) op het be dieningspaneel. 1 2[…]
-
Page 22
22 1. Inleiding Lokaal installeren van het stuurprogramma Een lokale printer is een printer di e via een kabel rechtstreeks op uw computer is aangesloten. Als uw app araat met een netw erk is verbonden, slaat u de onderstaande st appen over en gaat u verd er met de installatie van het stuurprogramma v oor een netwerkapparaat (zie de handleiding Gea[…]
-
Page 23
23 1. Inleiding Het stuurprogramma opnieuw installeren Als het printerstuurprog ramma niet naar behoren werkt, volg dan de onderstaande stappen om het stuurprogramma opnieuw te installeren. 13 Windows 1 Controleer of de printer op uw computer is aangesloten en ingeschakeld is. 2 Selecteer in het menu Start achtereenvolgens Programma’s of Alle pro[…]
-
Page 24
2. De basisfuncties leren kennen Nadat de installatie is voltooid, kunt u de standaardinstellingen van het apparaa t opgeven. Raadple eg het volgende hoofdstuk om waarden in te stellen of te wijzigen. Dit ho ofdstuk levert informatie over de a lgemene menustructuur en de opties voor de basisinstellinge n. • Een testpagina afdrukken 25 • Afdrukm[…]
-
Page 25
25 2. De basisfuncties l eren kennen Een testpagina afdrukken Om te controleren of het apparaat juist werkt, kunt u een testpagina afdrukken (alleen voor Windows). Een testpagina afdrukken: • Open Voorkeursinstellingen voor afdrukken (zie «Voorkeursinstellingen open en» op pagina 34) > tabblad Samsung > Demopagina .[…]
-
Page 26
26 2. De basisfuncties l eren kennen Afdrukmateriaal en lade In dit hoofdstuk wordt ui tgelegd hoe u afdrukmedi a in uw apparaat plaatst. • Wanneer u afdruk materiaa l gebruikt dat niet vo ldoet aan deze specificaties, kan dit problemen veroorzaken waarvoor reparatie vereist is. Zulke rep araties worden niet gedekt door de g arantie of serviceove[…]
-
Page 27
Afdrukmateriaal en lade 27 2. De basisfuncties leren kenn en 2 Papier in de lade plaatsen 1 Open de papierlade (zie «Lade overzicht» op pagina 26). 2 Open de papierklep. 3 Haal de lade handmatig ui t het apparaa t door de geleidervergrendeling in de lade in te drukken en te ontgrendelen. Stel vervolgens de papierleng te- en papierbreedteg[…]
-
Page 28
Afdrukmateriaal en lade 28 2. De basisfuncties l eren kennen 5 Plaats het papier in de lade met de te bedru kken zijde naar boven. Bij papier met een klei ner formaat dan Letter-f ormaat ontgrendelt u de geleider van de l ade en duwt u de lade naar binnen. Stel vervolgens de papierlengte- en papierbreedt egeleider in. Bij papier dat langer is dan L[…]
-
Page 29
Afdrukmateriaal en lade 29 2. De basisfuncties l eren kennen 6 Houd de breedtegeleider ingedrukt en schuif deze tegen de stapel papier, zonder het papier te buigen. 7 Sluit de papierklep. 8 Plaats de papierlade. 9 Stel het papiertype en -formaat voor de la de in als u een documen t wilt afdrukken (zie » Papie rformaat en p apiertype instellen&[…]
-
Page 30
Afdrukmateriaal en lade 30 2. De basisfuncties l eren kennen 3 Afdrukken op speciale afdrukmedia De onderstaande tabel toont de te gebruiken speciale afdrukmedia in elke lade. De mediatypes worden getoond in de Voorkeursinstellingen . Voor de beste afdrukkwaliteit, selecteert u het juiste mediatype in het venster Voorkeursinstellingen > tabblad […]
-
Page 31
Afdrukmateriaal en lade 31 2. De basisfuncties l eren kennen Etiketten Om beschadigingen aan het apparaat te voorkomen, gebruikt u uitsluitend etiketten die speciaal zijn ontworpen voor laserprinters. • Bij de keuze van etiketten dien t u rekening te houden met de volgende factoren: — Kleefstoffen: Bestand tegen de fixeer temperatuur van het appa[…]
-
Page 32
Afdrukmateriaal en lade 32 2. De basisfuncties l eren kennen Voorbedrukt papier Bij het plaatsen van v oorbedrukt papier moet de bedrukte zijde bovenaan liggen en mag de voorzijde ni et gekruld zijn. Bij invoerproblemen draait u het papier om. Er zijn geen garanties wat de afdrukkwal iteit betreft. • Briefhoofden moeten afgedrukt worden met hitte[…]
-
Page 33
33 2. De basisfuncties l eren kennen Eenvoudige afdruktaken Raadpleeg de handleidin g Geavanceerd (zie «Geavanceerde afdrukfunct ies gebruiken» op pagina 139) voor speciale afdrukfuncties. 5 Tijdens het afdrukken Wanneer u gebr uik maak t van Macintosh o f Linux, raadpl eegt u «Afdrukken in Ma cintosh» op pagina 1 47 of «Af[…]
-
Page 34
Eenvoudige afdruktaken 34 2. De basisfuncties l eren kennen 6 Een afdruktaak annuleren Een afdruktaak die in een afdrukrij of afdrukspooler wacht om afgedrukt te worden, annuleert u op de volgende manier: • U kunt toegang krijgen tot dit v enster door te dubbel klikken op het pictogram van het apparaat ( ) in de taakbalk van Windows. • U kunt d[…]
-
Page 35
Eenvoudige afdruktaken 35 2. De basisfuncties l eren kennen • U kunt voorda t u gaat afdr ukken eco -f uncties toe passen om papier en toner te bespare n (zie «Easy Eco Driver» op pagina 155). • U kunt de huidige sta tus van het apparaa t controleren d oor op de knop Printerstatus te dr ukken (zie «Samsung-printerstatus gebruiken[…]
-
Page 36
Eenvoudige afdruktaken 36 2. De basisfuncties l eren kennen 8 Help gebruiken Klik op de optie waar over u meer wilt weten op het venster Voorkeursinstellingen en druk op F1 op uw toetsenbord. 9 Eco-afdruk Met de functie Eco spaart u toner en pap ier uit. De functie Eco spaart natuurlijke hulpbronnen en helpt u milieuv riendelijke afdrukken te maken[…]
-
Page 37
Eenvoudige afdruktaken 37 2. De basisfuncties l eren kennen Eco-opties • Standaardinstelling printer: Volg de instellingen op het bedieningspaneel van de printer. • Geen: Schakelt Eco-modus uit. • Afdrukken in ecomodus: Schakelt eco-modus in. Activeer de verschillende Eco-onderdelen die u wilt gebruiken. • Wachtwoord: Als de beheerder heeft[…]
-
Page 38
3. Onderhoud In dit hoofdstuk wordt beschreven hoe u verbruiksartikel en, accessoires en o nderdelen voor het on derhoud van uw apparaat kunt aankopen. • Verbruiksartikelen en toebehoren bestellen 39 • Beschikbare verbruiksartikelen 40 • Verkrijgbare onderdelen voor onderhoud 41 • De tonercassette bewaren 42 • Toner herverdelen 44 • De […]
-
Page 39
39 3. Onderhoud Verbruiksartikelen en toebehoren bestellen De verkrijgbare accesso ires kunnen versch illen van lan d tot land. Neem cont act op met uw verkoper voor de lijst me t beschikbare verbruiksart ikelen en onderdelen . Als u door Samsung goedgekeur de verbruiksartikelen, a ccessoires of reserveonder delen wilt bestellen, neemt u contact op[…]
-
Page 40
40 3. Onderhoud Beschikbare verbruiksartikelen Als de verbruiksartikelen het ei nde van hun gebruiksduur naderen, kunt u de volgende verbrui ksartikelen voor uw apparaat bestel len: De levensduur van de tonercassette kan variëren afhankelijk van de opties, h et percentage a fbeeldingen en de t aakmodus. Als u nieuwe tonercassettes of ve rbruiksart[…]
-
Page 41
41 3. Onderhoud Verkrijgbare onderdelen voor onderhoud Neem contact op met de winkel waar u het apparaat hebt gekocht om rese rveonderdelen te bestellen. La at onderhoudsonderdelen all een vervangen door een erkende servicemedewerker, de leverancie r of personeel van de winkel waar u het appa raat hebt gekocht. De vervanging van on derdelen waarvan[…]
-
Page 42
42 3. Onderhoud De tonercassette bewaren Tonercassettes bevatten componenten die gevoelig zijn voor lich t, temperatuur en vochtigheid. Sa msung raadt u aan deze aanbevel ingen te volgen met het oog op optimale presta ties, de hoogste kwaliteit en de langste gebruiksd uur van uw nieuwe Samsung-tonercassette. Bewaar deze cassette op de plaats waar d[…]
-
Page 43
De tonercassette bewaren 43 3. Onderhoud 1 Behandelingsinstructies • Raak het oppervlak van de fotogeleid ende drum in de cassette niet aan. • Stel de cassette niet bloot aa n onnodige trillingen of schokken. • Roteer de drum niet handmatig, voor al in de tegengeste lde richting. Dit kan interne schade en een tonerlek veroorzaken. 2 Gebruik t[…]
-
Page 44
44 3. Onderhoud Toner herverdelen Als de tonercassett e bijna leeg is: • Witte strepen, onduidelijke afdruk en/of verschillende dichtheid aan beide kanten. •D e Toner -LED knippert oranje. In dat geval kunt u de afdrukkwaliteit ti jdelijk verbeteren door de re sterende toner in de tonercasse tte opnieuw te verdelen. S oms blijven die witte stre[…]
-
Page 45
Toner herverdelen 45 3. Onderhoud[…]
-
Page 46
46 3. Onderhoud De tonercassette vervangen • Voordat u de voorkle p opent, moet u eerst de uitvoersteun sluiten . • Gebruik geen scherpe voorwerpen zoals een mes of ee n schaar om de verpakking van de tonercassette te ope nen. Scherpe voorwerp e n veroorzaken mogelijk krassen op het oppervla k van de cassette . • Krijgt u per ongeluk toner op[…]
-
Page 47
De tonercassette vervangen 47 3. Onderhoud Als een tonercassette het einde van de levensduur bereikt hee ft, wordt het venster Printerstatu s weergegeven op de computer, wa arin wordt aangegeven dat er een tonercassette moet worden geplaatst.[…]
-
Page 48
48 3. Onderhoud De cassette voor gebruikte toner vervangen Wanneer de opvangbak voor gebr uikte toner is versleten, versch ijnt het Smart Panel-programmavens ter op het computerscherm om aa n te geven dat de cassette voor gebruikte toner moet worden vervangen. Anders stopt het apparaat met afdrukken. • Er kunnen tonerdee ltjes loskomen i n het ap[…]
-
Page 49
De cassette voor gebruikte toner vervangen 49 3. Onderhoud Voor het bestellen van optionele accessoires zijn bestelgegevens beschikbaar (zie «Beschikbare verbruiksa rtikelen» op pagina 40 ).[…]
-
Page 50
50 3. Onderhoud De beeldeenheid vervangen Wanneer de beeldeenheid is versleten, verschijnt het Smart Panel- programmavenster op het computer scherm om aan te geven dat de beeldeenheid moet worden vervangen. Anders stopt het apparaat met afdrukken. • Gebruik geen scherpe voor werpen, zoals een mes of schaar, om de b eeldeenheid uit de verpakkin g […]
-
Page 51
De beeldeenheid vervangen 51 3. Onderhoud[…]
-
Page 52
52 3. Onderhoud Het apparaat reinigen Als er zich problemen voordoen me t de afdrukkwaliteit of als u uw apparaat in een stofrijke omgeving gebr uikt, moet u uw appara at regelmatig schoonmaken om de beste afdrukkwalitei t te blijven garanderen en de gebruiksduur van uw apparaat te verlengen. • Als u de behu izing van het appa raat reinigt met re[…]
-
Page 53
Het apparaat reinigen 53 3. Onderhoud • Gebruik een nie t-pluizende do ek om het apparaat te reinigen. • Als uw apparaat een aan/uit-schakel aar heeft, zet u de aan/uit-schakelaar uit voordat u het apparaat reinigt. • Voordat u de voorkle p opent, moet u eerst de uitvoersteun sluiten . 1 2 1 2[…]
-
Page 54
54 3. Onderhoud Tips voor het verplaatsen en opbergen van uw apparaat • U mag het apparaat bij het verplaatsen niet ondersteboven of op zijn kant houden. Er kan immers toner vrijkomen binnenin het a pparaat waardoor er schade aan het apparaat kan ont staan of de afdrukkwalit eit kan verslechteren. • Als u het apparaat verplaat st, moet u ervoor[…]
-
Page 55
4. Problemen oplossen In dit hoofdstuk vindt u nuttige informatie over wat u moet doen als er een problee m optreedt. • Tips om papierstoringen te voorkomen 56 • Papierstoringen verhelpen 57 • Informatie over de status-LED 60 Dit hoofdstuk bied t nuttige informatie voo r als u een foutmelding opmerkt. Als uw apparaat beschikt over een display[…]
-
Page 56
56 4. Problemen oplossen Tips om papierstoringen te voorkomen U kunt de meeste pap ierstoringen voorkomen door he t juiste type afdrukmedia te gebruiken. Zie de volgende tips om storingen met vastzittend papier te voorkomen: • Zorg ervoor dat de verstelbare gel eiders correct zijn ingesteld (z ie «Lade overzicht» op pagina 26). • Plaa[…]
-
Page 57
57 4. Problemen oplossen Papierstoringen verhelpen Trek het vastgelopen pa pier voorzichtig en lang za am naar buiten om te voorkomen dat het scheurt. 1 In de papierlade[…]
-
Page 58
Papierstoringen verhelpen 58 4. Problemen oplossen 2 Binnenin het apparaat • Het gebied rond de fixeereenheid is he et. Wees voorzichtig wanneer u pap ier uit het appara at verwijdert.[…]
-
Page 59
Papierstoringen verhelpen 59 4. Problemen oplossen 3 In het uitvoergebied • Het gebied rond de fixeereenheid is he et. Wees voorzichtig wanneer u pap ier uit het appara at verwijdert.[…]
-
Page 60
60 4. Problemen oplossen Informatie over de status-LED De kleur van de LED geeft de huidi ge status van het apparaat aan. • Afhankelijk van het mode l of land zijn enkele LED´s mogelijk ni et beschikbaar (zie «Overzich t van het bedienin gspaneel» op pag ina 19). • Zie de foutmelding en de bijbehorend e instructies om de fout op te l[…]
-
Page 61
Informatie over de status-LED 61 4. Problemen oplossen 5 LED’s voor toner / WPS / aan/uit/ Eco Status Omschrijving (Tonerlampjes) Oranje Knippert De tonercassette is bi jna leeg. Het eind e van de geschatte levensduur va n de cassette is bijn a bereikt. Bereid een nieuwe cassette voor ter vervanging van de oude. U kunt de a fdrukkwalite it tij[…]
-
Page 62
5. Bijlage In dit hoofdstuk staan productspecificaties en in formatie met betrekkin g tot toepasbare regelgeving. • Specificaties 63 • Informatie over wettelijke voorschriften 72 • Copyright 83[…]
-
Page 63
63 5. Bijlage Specificaties 1 Algemene specificaties De specificaties hieron der kunnen zonder vo orafgaande kennisg eving worden gewijzigd. Ga naar www.samsung.com voor mogelijk gewi jzigde informatie. Items Omschrijving Afmetingen Breedte x Lengte x Hoogte 382 x 309 x 211 mm Gewicht Apparaat inclusief verbruiksa rtikelen 9,84 kg Geluidsniveau a S[…]
-
Page 64
Specificaties 64 5. Bijlage Stroomverbruik Gemiddeld vermogen Minder d an 290 W Stand-bymodus Minder d an 60 Watt Energiebesparende modus Minder dan 1,0 W (CLP-3 6x Series), minde r dan 1,4 W (CLP-36xW Se ries) Uitgeschakelde toestand 0,45 W Draadloos c Module SPW-B4319S a. Geluidsdrukniveau, ISO 7779. Geteste configura tie: basisi nstallatie app a[…]
-
Page 65
Specificaties 65 5. Bijlage 2 Specificaties van de afdrukmedia Type Formaat Afmetingen Gewicht/capacite it afdrukmedia a Lade Normaal papier Letter 216 x 279 mm 60 tot 85 g/m 2 (bankpostpap ier) • 150 vellen van 75 g/m 2 (bankpostpap ier). Legal 216 x 356 mm US Folio 216 x 330 mm A4 210 x 297 mm Oficio 216 x 343 mm JIS B5 182 x 257 mm ISO B5 176 […]
-
Page 66
Specificaties 66 5. Bijlage Katoen Zie Normaal papier Zie Normaal pa pier 75 tot 90 g/m 2 (bankpostpapie r) • 150 vellen van 75 g/m 2 (bankpostpap ier). Gekleurd, voorbedrukt, kringlooppapier Zie Normaal papier Zie Normaal pa pier 60 tot 85 g/m 2 (bankpostpapie r) • 150 vellen van 75 g/m 2 (bankpostpap ier). Etiketten b Letter, Legal, Oficio, U[…]
-
Page 67
Specificaties 67 5. Bijlage Plaats de vellen e en voor een in de la de als het gewicht van het afdrukmateria al groter is dan 12 0 g/m 2 . Minimaal formaat (aangepast) 76 x 152 mm 60 tot 120 g /m 2 (bankpostpapie r) Maximaal formaa t (aangepast) 216 x 356 mm a. De maximumcapaciteit kan verschillen en is afhankelijk van het gewic ht en de dikte van […]
-
Page 68
Specificaties 68 5. Bijlage 3 Systeemvereisten Microsoft ® Windows ® • Internet Explorer 6.0 of hoger is minim um vereist voor alle Windows-b esturingssystemen . • Gebruikers ku nnen de software instal leren als ze beheerdersre chten hebben. • Windows Terminal Services is compatibel met uw apparaat. Besturingssysteem Vereisten (aanbevolen) […]
-
Page 69
Specificaties 69 5. Bijlage Macintosh Besturingssysteem Vereisten (aanbevolen) Processor RAM Vrije schijfruimte Mac OS X 10.4 •I n t e l ® -processoren •P o w e r P C G 4 / G 5 • 128 MB voor Mac met Powe rPC (512 MB) • 512 MB voor een Mac o p basis van Intel (1 GB) 1 GB Mac OS X 10.5 •I n t e l ® -processoren • 867 MHz of sneller Powe[…]
-
Page 70
Specificaties 70 5. Bijlage Linux Items Vereisten Besturingssysteem Fedora 5~13 (32/64 bit) OpenSuSE ® 10.2, 10.3, 11.0, 11 .1, 11.2 (32/64 bit) SuSE 10.1 (32 bits) Ubuntu 6.06, 6.10, 7.04, 7.10, 8.04, 8.10, 9.04, 9.10 , 10.04 (32/64 bits) Mandriva 2007, 2008, 2009, 2009.1, 2010 (32/64 bit) Debian 4.0, 5.0 (32 /64 bit) Redhat ® Enterprise Linux W[…]
-
Page 71
Specificaties 71 5. Bijlage 4 Netwerkomgeving Alleen voor draa dloze en netwerkmodelle n (zie «Fu ncties per model» op pa gina 7). U moet de netwerkprotocollen inst alleren op het apparaat om het als netwerkprinter te kunnen ge bruiken. In de volgende tabel wo rden de netwerkomgevingen vermeld die door het apparaat wo rden ondersteund. It[…]
-
Page 72
72 5. Bijlage Informatie over wettelijke voorschriften Dit apparaat is ontwor pen voor een normale werkomgeving en is gecertificeerd conform versch illende veiligheid svoorschriften. 5 Verklaring inzake laserveiligheid De printer is in de Ve renigde Staten gecertifi ceerd als zijnde in overeenstemming met de vereisten van DHHS 21 CFR, hoofdstuk 1, […]
-
Page 73
Informatie over wettelijke voorschriften 73 5. Bijlage 7 Energiebesparingsmodus 8 Recycleren 9 Alleen voor China Deze printer is uitgeru st met een gea vanceerde energiebesparend e technologie d ie het stroomverbruik vermindert wann eer het apparaa t niet wordt gebruikt. Als de printer gedurende e nige tijd geen gegevens on tvangt, wordt het stroom[…]
-
Page 74
Informatie over wettelijke voorschriften 74 5. Bijlage 10 Correcte verwijdering van dit product (afgedankte elektr ische en elektronische apparatuur) (Van toepassing in de Europese Unie en andere Europese landen met gescheiden inzamelingssystemen voor batterijen) Alleen voor de Verenigde Staten Verwijder elektronica doo r deze naar een goedge keurd[…]
-
Page 75
Informatie over wettelijke voorschriften 75 5. Bijlage Dit apparaat is getest en voldoet aan de limieten voo r digitale apparaten van klasse B, zoals vastgelegd in deel 15 van de FCC-voorschriften. Deze beperkingen zijn bedoeld om een redelijke bescherming te bieden tegen schadelijke interferenti e binnenshuis. Dit appara at genereert, gebruikt en […]
-
Page 76
Informatie over wettelijke voorschriften 76 5. Bijlage De FCC heeft een algemene richtlij n uitgevaardigd waarin wordt aangegeven dat de afstand tu ssen een draadloos appar aat en het lichaam minstens 20 cm moet bedragen, bij gebruik va n het apparaat nabij het lichaam (uitstekende delen niet m eegerekend). Dit apparaat moet op meer dan 20 cm van h[…]
-
Page 77
Informatie over wettelijke voorschriften 77 5. Bijlage 15 Alleen voor Turkije 16 Alleen Thailand 17 De stekker van het netsnoer vervangen (alleen voor het VK) Belangrijk Het netsnoer van dit apparaat is voorzien van een standaardstekker (BS 1363) van 13 ampère en een zekering va n 13 ampère. Als u de zekering vervangt, moet u het juiste type van […]
-
Page 78
Informatie over wettelijke voorschriften 78 5. Bijlage Belangrijke waa rschuwing: Ga als volgt te werk als de kleuren van de aders in het netsnoer niet overeenstemmen met die va n de stekker. Sluit de geel-groene aard ed raad aan op de pool die gemarkeerd is met de letter «E», het aar dingssymbool, en geel-groen of groen is gekleurd. Slui[…]
-
Page 79
Informatie over wettelijke voorschriften 79 5. Bijlage 9 maart 1999: Richtlijn 1999/5/EC van de Raad inzake radioapparatuur en eindapparatuur voor tele communicatie en de onde rlinge herkenning van hun conformiteit. U kunt bij uw vertegenwoordiger van Samsung Electronics Co., Lt d. een volledige ve rklaring krijgen w aarin de relevante richtlijnen […]
-
Page 80
Informatie over wettelijke voorschriften 80 5. Bijlage Europese landen met gebruiksbeperkingen: EU In Frankrijk mag deze apparatuu r alleen binnenshuis worden gebruikt. EEA/EFTA-landen Geen beperkingen op dit ogenblik. 19 Mededelingen aangaande normen Draadloze geleiding Mogelijk bevat uw printer radi o-LAN-apparaten me t een laag vermogen (radiofr[…]
-
Page 81
Informatie over wettelijke voorschriften 81 5. Bijlage 20 Alleen voor Israël Draadloze RF-communica tie kan interfer entie veroorz aken met apparatuur aa n boord van burg erluchtvaar ttoestellen. De hui dige luchtvaartreglementeringe n eisen dat dra adloze toestellen aan boord van een vliegtuig worde n ui tgeschakeld tijde ns de vlucht. IEEE 802.1[…]
-
Page 82
Informatie over wettelijke voorschriften 82 5. Bijlage 21 Alleen voor China[…]
-
Page 83
83 5. Bijlage Copyright © 2012 Samsung Electronics Co., Ltd. Alle re chten voorbehouden. Deze gebruikershandleiding dient uitsluitend ter informatie. Alle informatie in deze gebruike rshandleiding kan zonder voorafgaa nde kennisgeving worden gewijzigd. Samsung Electronics kan niet aansprakelijk worden gesteld voor directe of indirecte schade als g[…]
-
Page 84
GEAVANCEERD Gebruikershandleiding CLP-36x Series CLP-36xW Series GEAVANCEERD Gebruikershandleiding Deze handleiding geeft informatie over de installatie, geavanceerde instelling, gebruik en het oplossen van problemen in verschillende besturingssystemen. Afhankelijk van het model of land zijn enkele functies mogelijk niet beschikbaar. BASIS Deze han[…]
-
Page 85
85 G EAVAN C EERD 1 . Installatie van de software Installatie voor de Macintosh 88 Opnieuw installeren voor Macintosh 89 Installatie voor Linux 90 Opnieuw installeren voor Linux 91 2 . Een via een netwerk aangesloten apparaat gebruiken Nuttige netwerkprogramma’s 93 Instelling bekabeld netwerk 94 Installeren van een stuurprogramma over het netwerk[…]
-
Page 86
86 G EAVAN C EERD 5 . Problemen oplossen Problemen met papierinvoer 168 Problemen met de voeding en het netsnoer 169 Afdrukproblemen 170 Problemen met de afdrukkwaliteit 174 Problemen met het besturingssysteem 182[…]
-
Page 87
1. Installatie van de software Dit hoofdstuk levert instructies voor het installeren van essen t iële en nuttige software vo or gebruik in een opstelling waa rbij het apparaat via een kabel aangesloten is. Een lokale printer is een printe r die via een kabel rechtst reeks op uw computer is aangesloten. Als uw apparaat aan een n etwerk is verbonden[…]
-
Page 88
88 1. Installatie van de software Installatie voor de Macintosh 1 Controleer of de printer op uw computer is aangesloten en ingeschakeld is. 2 Plaats de meegeleverde softwa re-cd in uw cd-romstation. 3 Dubbelklik op het pict ogram in de vorm v an een cd-rom op het bureaublad van uw Macintosh-computer. 4 Dubbelklik in de map MAC_Installer op het pic[…]
-
Page 89
89 1. Installatie van de software Opnieuw installeren voor Macintosh Als het printerbesturingsbe stand niet correct werkt, maakt u de installatie van het besturingsbe stand ongedaan en installeert u het opnieuw. 1 Controleer of de printer op uw computer is aangesloten en ingeschakeld is. 2 Plaats de meegeleverde softwa re-cd in uw cd-romstation. 3 […]
-
Page 90
90 1. Installatie van de software Installatie voor Linux U moet Linux-softwarepakketten down loaden van de websit e van Samsung om de printersoftware te installer en (http://www.samsung.com > vind uw product > Service en downloads). 1 Het Unified Linux-stuurprogramma installeren 1 Controleer of de printer op uw computer is aangesloten en inge[…]
-
Page 91
91 1. Installatie van de software Opnieuw installeren voor Linux Als het printerstuur programma niet correct werkt, maakt u de installatie van het stuurprogramma ongedaan en installeert u het opnieuw. 1 Controleer of de printer op uw computer is aangesloten en ingeschakeld is. 2 Wanneer het venster Administrator Login verschijnt, typt u «root&[…]
-
Page 92
2. Een via een netwerk aangesloten apparaat gebruiken In dit hoofdstuk wordt stap vo or stap uitgelegd hoe u een apparaat instelt dat via het netwerk aangesloten is e n hoe u de software instelt. • Nuttige netwerkprogramma’s 93 • Instelling bekabeld netwerk 94 • Installeren van een stuurprogramma over het netwerk 97 • IPv6-configuratie 10[…]
-
Page 93
93 2. Een via een netwerk aangesl oten apparaat gebruiken Nuttige netwerkprogramma’s Er zijn verschillende pr ogramma’s voorhanden om in een netwerkomgeving de netwerkinstellingen op een eenvoudige m anier in te voeren. Zo kan de netwerkbeheerder diverse apparat en in het net werk beheren. • Voordat u on derstaande pr ogramma’s gaat gebruik[…]
-
Page 94
94 2. Een via een netwerk aangesl oten apparaat gebruiken Instelling bekabeld netwerk U moet de netwerkprotocol len op uw apparaat instel len om het apparaat in uw netwerk te kunnen gebruiken. U kunt het netwerk gebruiken nadat u een netwe rkkabel hebt aangesloten op de desbetreffende poort op uw computer. • Gebruik het programma SyncThru™ Web […]
-
Page 95
Instelling bekabeld netwerk 95 2. Een via een netwerk aangesl oten apparaat gebruiken 4 Schakel het apparaat in. 5 In het menu Start van Windows selecteert u Alle pro gramma’s > Samsung Printers > SetIP > SetIP . 6 Klik op het pictogram (derde van links) in het scherm SetIP om het TCP/IP-configuratievenster te openen. 7 Voer als volgt[…]
-
Page 96
Instelling bekabeld netwerk 96 2. Een via een netwerk aangesl oten apparaat gebruiken 5 Voer de nieuwe apparaatgegevens in het configuratievenster in. In een bedrijfsintrane t moeten deze gegevens mogelijk worden toegewezen door een net werkbeheerder voordat u verder kunt gaan. Zoek het MAC-adres in het netwerkconfiguratierapport en voer het hier i[…]
-
Page 97
97 2. Een via een netwerk aangesl oten apparaat gebruiken Installeren van een stuurprogramma over het netwerk • Sommige func ties en option ele onderdel en zijn mogel ijk niet beschikbaar afhankelijk van mo del of lan d (zie «Functies per model» op pagina 7). • De machine onde rsteunt de netwerki nterface niet, he t kan deze functie n[…]
-
Page 98
Installeren van een stuurprogramma over het netwerk 98 2. Een via een netwerk aangesl oten apparaat gebruiken Als het apparaat nie t in het netwerk of lokaal wordt gevonden , verschijnt er een foutbe richt. Selecteer de gewenste optie en klik op Vo lgende . 5 Kies de optie in Gebruik van verbeterde functies en deelname aan het verzamelprogramma v o[…]
-
Page 99
Installeren van een stuurprogramma over het netwerk 99 2. Een via een netwerk aangesl oten apparaat gebruiken /p»<poortnaam>» of /P»<poortn aam>» Specificeert de printerpoort. Er wordt een netwerkpoort gemaakt aa n de hand van de standaard TCP/ IP-poortmonitor. Voor een lo kale poort moet deze poort op het systeem be[…]
-
Page 100
Installeren van een stuurprogramma over het netwerk 100 2. Een via een netwerk aangesl oten apparaat gebruiken /x of /X Maakt ge bruik van bestaande apparaatstuurprogr am mabestanden om de printerinstantie te maken als deze al is geïnstalleerd. Deze opdrach t biedt een mogelijkheid om een printerinstantie te installeren die gebruikmaakt van geïns[…]
-
Page 101
Installeren van een stuurprogramma over het netwerk 101 2. Een via een netwerk aangesl oten apparaat gebruiken 7 Macintosh 1 Controleer of het apparaat met uw netwerk is verbonden en ingeschakeld is. 2 Plaats de meegeleverde softwa re-cd in uw cd-romstation. 3 Dubbelklik op het pict ogram in de vorm v an een cd-rom op het bureaublad van uw Macintos[…]
-
Page 102
Installeren van een stuurprogramma over het netwerk 102 2. Een via een netwerk aangesl oten apparaat gebruiken 16 In Mac OS X 10.4 klikt u op IP-printer . • In Mac OS X 10.5- 10.7 klikt u op IP . 17 Selecteer HP Jetdirect — Socket in Protocol . Als u een documen t van vele pagi na’s afdrukt, kun t u de prestaties va n de printer verbet eren doo[…]
-
Page 103
Installeren van een stuurprogramma over het netwerk 103 2. Een via een netwerk aangesl oten apparaat gebruiken 9 Selecteer uw app araat en klik op Next . 10 Voer de beschrijving van de printer in en klik op Next . 11 Nadat de software is toegevoegd klikt u op Finish . 12 Nadat de installatie is voltooid, klikt u op Finish . Een netwerkprinter toevo[…]
-
Page 104
104 2. Een via een netwerk aangesl oten apparaat gebruiken IPv6-configuratie IPv6 wordt alleen juist ondersteund in Windows Vista of late re versies. Als het IPv6-netwerk niet lijkt te we rken, zet u alle netwerkinstellingen terug naar de fabr ieksinstell ingen en probee rt u het opnieuw met behulp van Instel. wissen . Volg in een IPv6-netwerkomgev[…]
-
Page 105
IPv6-configuratie 105 2. Een via een netwerk aangesl oten apparaat gebruiken IPv6-adressen instellen Het apparaat ondersteunt de volgende IPv6-adressen voor het afdrukken vanaf het netwerk en voor netwerkbeheer. • Link-local Address : zelfgeconfigureerde loka le IPv6-adressen (adres begint met FE80). • Stateless Address : automatisch door een n[…]
-
Page 106
IPv6-configuratie 106 2. Een via een netwerk aangesl oten apparaat gebruiken 6 Schakel het selectievakje Manual Address in. Vervolgens wordt het tekstvak Address/Prefix geactiveerd. 7 Voer de rest van het adres in (bijv. 3FFE:10:88:194:: AAAA . «A» is de hexadecimaal 0 tot 9, A tot F). 8 Selecteer de DHCPv6-configuratie. 9 Klik op de knop[…]
-
Page 107
107 2. Een via een netwerk aangesl oten apparaat gebruiken Draadloos netwerk instellen • Controleer of uw appara at een draadloos netwerk ondersteunt. Afhankelijk van he t model is een draadl oos netwerk mogelij k niet beschikbaar (zie «Functies per model» op pa gina 7). • Als het IPv6-netwerk niet lijkt te werken, zet u alle netwerki[…]
-
Page 108
Draadloos netwerk instellen 108 2. Een via een netwerk aangesl oten apparaat gebruiken 12 Methoden voor het instellen van een draadloos netwerk U kunt de instel lingen van uw draadloze netwerk configureren vanaf het appar aat of de computer. Kies de instellingsmethode uit de onderstaande tabel. Sommige installatiemetho den voor het draa dloze netwe[…]
-
Page 109
Draadloos netwerk instellen 109 2. Een via een netwerk aangesl oten apparaat gebruiken 13 De knop WPS gebruiken Als uw printer en een toegangspunt (of draadloze r outer) Wi-Fi Protected Setup™ (WPS) ondersteunen, kunt u de instellingen voor het draadloze netwerk eenvoudig en z onder computer conf igureren door op het bedieningspaneel op de knop ([…]
-
Page 110
Draadloos netwerk instellen 110 2. Een via een netwerk aangesl oten apparaat gebruiken Apparaten met een display Aansluiten in PBC-modus 1 Druk meer dan twee seconden op de knop (WPS) op het configuratiescherm. De machine wacht maximaal twee minuten tot u op de knop WPS (of PBC) op het toegangspunt (of de draadloze router ) hebt gedrukt. 2 Druk op […]
-
Page 111
Draadloos netwerk instellen 111 2. Een via een netwerk aangesl oten apparaat gebruiken Apparaten zonder een display Aansluiten in PBC-modus 1 Houd de knop (WPS) op het configuratiesc herm ingedrukt totdat de status-LED snel begint te knipperen (na ongeveer 2 — 4 seconden). Er wordt verbinding gemaakt met het draadloze netwerk. De LED knippert maxim[…]
-
Page 112
Draadloos netwerk instellen 112 2. Een via een netwerk aangesl oten apparaat gebruiken 4 Plaats de meegeleverde software-cd in het cd-romstation en volg de instructies op het scherm om het draadloze netwerk in te stellen. Opnieuw verbinding ma ken met een netwerk Wanneer de draadloze netwerkfunctie is uitgeschakeld, wordt automatisch opnieuw geprob[…]
-
Page 113
Draadloos netwerk instellen 113 2. Een via een netwerk aangesl oten apparaat gebruiken Nadat de verbind ing met het draa dloze netwerk is ge maakt, moet u e en apparaatstuurpro gramma installeren o m vanuit een toepassi ng te kunnen afdrukken (zie «Installeren van een st uurprogramma over het netwerk» op pagina 9 7). 1 Druk op de knop ( M[…]
-
Page 114
Draadloos netwerk instellen 114 2. Een via een netwerk aangesl oten apparaat gebruiken Opzetten van de netwerkinfrastructuur 1 Controleer of de USB-kabel op het apparaat is aangesloten. 2 Zet de computer, het toegang spunt en het apparaat aan. 3 Plaats de meegeleverde softwa re-cd in uw cd-romstation. 4 Klik op Nu installeren . 5 Lees de Gebruiksre[…]
-
Page 115
Draadloos netwerk instellen 115 2. Een via een netwerk aangesl oten apparaat gebruiken Als het toegangsp unt is beveilig d, verschijnt het beveiligingsvenster voor het draadloos n etwerk. Voer het netwerkwa chtwoord van he t toegangspunt (of de router) in. 9 Als het venster van de netwerkverbinding ver schijnt, verwijdert u de netwerkkabel. Klik da[…]
-
Page 116
Draadloos netwerk instellen 116 2. Een via een netwerk aangesl oten apparaat gebruiken Ad-hoc via USB-kabel Als u geen toegangspunt hebt, kunt u de printer al snog draadloos met uw computer verbinden door een draadloos ad- hocnetwerk in te stellen. Volg hiervoor de volgende eenvoudige stappen. Wat u nodig hebt • Een computer die verbonden is met […]
-
Page 117
Draadloos netwerk instellen 117 2. Een via een netwerk aangesl oten apparaat gebruiken Het beveiligingsve nster voor het draadloze ne twerk verschijn t als de beveilgi ng van he t ad-hocne twerk is i ngeschake ld. Selecteer Open syst. of Ged. sleutel voor de verificatie en klik op Volgende . • WEP (Wired Equivalent Privacy) is een beveiligings pr[…]
-
Page 118
Draadloos netwerk instellen 118 2. Een via een netwerk aangesl oten apparaat gebruiken 12 Klik op Volgende als het venster Printers gevonden verschijnt. 13 Selecteer de onderdelen die u wilt installeren. Klik op Volgende . 14 Nadat u de onderdelen hebt geselecteerd, kunt u ook de naam van het apparaat wijzi gen, het apparaat instellen om in het net[…]
-
Page 119
Draadloos netwerk instellen 119 2. Een via een netwerk aangesl oten apparaat gebruiken 11 Na de zoekactie toont het venster de draadloze netw erkapparaten. Selecteer de naam (SSID) van het toegangspunt dat u wilt gebruiken en klik op Next . Als het draadloze netwerk al is i ngesteld, verschijnt het venster Informatie draadloos netwerk . Selecteer I[…]
-
Page 120
Draadloos netwerk instellen 120 2. Een via een netwerk aangesl oten apparaat gebruiken •M e t Samsung Easy Printe r Manager kunt u Wi-Fi Dir ect opbouwen (zie «Wi-Fi Direct instal leren» op pagi na 126). • Netwerknaam (SSID) : De stan daard netwerknaam is de modelnaam en is maxi maal 22 teke ns lang (exclusi ef «DIRECT-«). ?[…]
-
Page 121
Draadloos netwerk instellen 121 2. Een via een netwerk aangesl oten apparaat gebruiken 9 Op het computerscherm versch ijnt een waarschuwing dat alle toepassingen worden afge sloten. Klik op Ga door . 10 Klik op Instelling van draadloos netwerk in het paneel Gebruikersopties . 11 Er verschijnt een lijst met de draadloze netwerken die het apparaat he[…]
-
Page 122
Draadloos netwerk instellen 122 2. Een via een netwerk aangesl oten apparaat gebruiken • Voor de methode Statisch Als de toewijzingsm ethode voor het IP-ad res Statisch is, controleert u of Statisch wordt vermeld in het venster Bevestiging van instelling van draadloos netwerk . Als DHCP wordt vermeld, klikt u op de knop TCP/IP wijzigen om het IP-[…]
-
Page 123
Draadloos netwerk instellen 123 2. Een via een netwerk aangesl oten apparaat gebruiken Wat u nodig hebt • Toegangspunt • Netwerkcomputer • Software-cd die bij het apparaat is geleverd • Een apparaat met een daar op geïnstalleerde inte rface voor draadloze netwerken • Netwerkkabel Een netwerkconfiguratierapport afdrukken U kunt bepalen we[…]
-
Page 124
Draadloos netwerk instellen 124 2. Een via een netwerk aangesl oten apparaat gebruiken 3 Klik op Login in de rechterbovbenhoek van de SyncThru™ Web Service-website. 4 Als u zich voor he t eerst aanmeldt bij SyncThru™ Web Service , moet u zich als beheerder aanmelden. Geef de standaard-ID en het standaardwachtwoord op die hiero nder worden weerg[…]
-
Page 125
Draadloos netwerk instellen 125 2. Een via een netwerk aangesl oten apparaat gebruiken 10 Plaats de meegeleverde software-cd in het cd-romstation en volg de instructies op het scherm om het draadloze netwerk in te stellen. 18 Het Wi-Fi-netwerk in- of uitschakelen Als uw apparaat een LCD-displa y heeft, kunt u Wi-Fi ook in-/ uitschakelen via h et me[…]
-
Page 126
Draadloos netwerk instellen 126 2. Een via een netwerk aangesl oten apparaat gebruiken • U kunt uw mobiele app araat niet verb inden met het inter net via Wi- Fi Direct op uw printer. • De lijst met ond ersteunde protoc ollen kan ve rschillen per mo del. Wi- Fi Direct-netwerken onde rsteunen niet IPv6-, net werkfilterings-, IPSec-, WINS- en SLP[…]
-
Page 127
Draadloos netwerk instellen 127 2. Een via een netwerk aangesl oten apparaat gebruiken Vanaf een computer met netwerkverbinding Wanneer uw printer een netwerkkabel of een draadl oos toegangspunt gebruikt, kunt u Wi-Fi Direct insc hakelen en configureren via SyncThru™ Web Service. • Ga naar SyncThru™ Web Service , kies Settings > Network Se[…]
-
Page 128
Draadloos netwerk instellen 128 2. Een via een netwerk aangesl oten apparaat gebruiken Verbindingsprobleem — SSID niet gevonden • De printer kan de door u gesel ecteerde of ingev oerde netwerknaam (SSID) niet vinden. Controleer de netwerknaam (SSID) op uw toegangspunt en probeer opnieuw verbinding te maken. • Uw toegangspunt is uitgeschak eld. […]
-
Page 129
Draadloos netwerk instellen 129 2. Een via een netwerk aangesl oten apparaat gebruiken d In Windows XP/200 3/2008/Vista sele cteert u Eigenschappen . In Windows 7 e n Windows Server 2008 R2 selecteert u Eigenschappen van printer in het snelme nu. Als bij het item Eigenschappen van printer het teken ► st aat, kunt u andere printerstuurprog ramma?[…]
-
Page 130
Draadloos netwerk instellen 130 2. Een via een netwerk aangesl oten apparaat gebruiken • Controleer of het IP-adr es van het apparaat juis t is toegewezen. U kunt het IP-adres controler en door het netwerkconfi guratierapport af te drukken. • Controleer of het t oegangspunt (of de draadl oze router) met een wachtwoord beveiligd is. Als er een w[…]
-
Page 131
131 2. Een via een netwerk aangesl oten apparaat gebruiken Samsung MobilePrint 21 Wat is Samsung MobilePrint? Samsung MobilePrint is een gratis toepassing waarmee gebruikers foto’s, documenten en webpagina’s direct van hun smartph one of tablet kunnen afdrukken. Samsung MobilePrint is niet alleen co mpatibel met uw Android-, Windows- en i[…]
-
Page 132
132 2. Een via een netwerk aangesl oten apparaat gebruiken Google Cloud Print Google Cloud Print™ is een service waarmee u met uw mobiele telefoon, tablet en alle andere apparaten met webverbi nding een document op een printer kunt afdrukken. U hoeft alleen uw Google-account bij de printer te registreren om de service Google Cloud Print te kunnen[…]
-
Page 133
Google Cloud Print 133 2. Een via een netwerk aangesl oten apparaat gebruiken Als u de browser hebt inge steld op het blokkere n van pop-upvensters , wordt het bevestigingsvenster niet weer gegeven. Sta toe dat er pop- ups op de website wor den weergegeven. 10 Klik op Finish printer registration . 11 Klik op Manage your printers . Uw printer is nu […]
-
Page 134
Google Cloud Print 134 2. Een via een netwerk aangesl oten apparaat gebruiken Afdrukken vanuit de Chrome-browser De volgende stappen zijn een voorbeeld van het gebruik van de Chrome- browser. 1 Voer Chrome uit. 2 Open het document of de e-ma il die u wilt afdrukken. 3 Klik op het moersleutelpictogram ( ) in de rechterbovenhoek van de browser. 4 Kli[…]
-
Page 135
3. Speciale functies In dit hoofdstuk worden specia le afdrukfuncties ve rklaard. • Aanpassing aan luchtdruk of hoogte 136 • De standaardafdrukinstellingen wijzigen 137 • Uw apparaat instellen als standaardprinter 138 • Geavanceerde afdrukfuncties gebruiken 139 • Afdrukken in Macintosh 147 • Afdrukken in Linux 149 De procedures i n dit […]
-
Page 136
136 3. Speciale functies Aanpassing aan luchtdruk of hoogte De afdrukkwaliteit word t beïnvloed door de atmosfer ische druk, die wordt bepaald door de hoogte bov en zeeniveau waar het apparaat staat. De volgende informatie zal u helpen bij de instelling van uw apparaat voor de beste afdrukkwaliteit. Ga na op welke hoogte u zich bevindt en stel de […]
-
Page 137
137 3. Speciale functies De standaardafdrukinstellingen wijzigen 1 Klik op het menu Start van Windows. 2 Als u Windows XP/Server 2003 gebruikt, selecteert u Printers en faxapparaten . • Als u Windows Server 2008/ Vista gebruikt, selecteert u Configuratiescherm > Hardware en geluiden > Printers . • In Windows 7 selecteert u Configuratiesch[…]
-
Page 138
138 3. Speciale functies Uw apparaat instellen als standaardprinter 1 Klik op het menu Start van Windows. 2 Als u Windows XP/Server 2003 gebruikt, selecteert u Printers en faxapparaten . • Als u Windows Server 2008/ Vista gebruikt, selecteert u Configuratiescherm > Hardware en geluiden > Printers . • In Windows 7 selecteert u Configuratie[…]
-
Page 139
139 3. Speciale functies Geavanceerde afdrukfuncties gebruiken XPS-printerstuurprogramma : wordt gebruikt om af te drukken in een XPS-bestandsindeling • zie «Functies per mo del» op pagi na 7. • Het XPS-printerstu urprogramma kan allee n geïnstalleerd worden op Windows Vista OS of een re centere versi e. • Installeer extra geheugen[…]
-
Page 140
Geavanceerde afdrukfuncties gebruiken 140 3. Speciale functies 2 Speciale afdrukfuncties verklaard U kunt geavanceerde af drukfuncties gebruik en voor uw printer. Om de printerfuncties van uw printers tuurprogramma te gebruiken, klikt u op Eigenschappen of Voorkeuren in het venster Afdrukken van de toepassing om de afdrukinstellingen te wijzi gen. […]
-
Page 141
Geavanceerde afdrukfuncties gebruiken 141 3. Speciale functies Poster afdrukk en U kunt een document van één en kele pagina op 4 (poste r van 2×2), 9 (poster van 3×3) of 16 vellen (poster van 4x 4) papier druk ke n om ze aan elkaar te plakken en er een poster van te ma ken. Selecteer de waarde Poster overlap . Geef de Posteroverlap op in mi llime[…]
-
Page 142
Geavanceerde afdrukfuncties gebruiken 142 3. Speciale functies • Dubbelzijdig afdrukken a • Dubbelzijdig afdrukken (handmatig) a U kunt op beide zijden van een vel papier afdrukken (dubbelz ijdig). Voor u afdrukt, moet u de gew enste afdruk stand van het document opgeve n. • U kunt deze functie g ebruiken met papier va n het formaat Letter, L[…]
-
Page 143
Geavanceerde afdrukfuncties gebruiken 143 3. Speciale functies Papieropties Wijzigt de afmetingen van ee n document zodat deze kleine r of groter op het vel afgedrukt wordt, door een perce ntage in te voere n waarmee het d ocument vergroot of verkleind wordt. Watermerk Met de optie Watermerk kunt u tekst afd rukken over een best aand document, U ge[…]
-
Page 144
Geavanceerde afdrukfuncties gebruiken 144 3. Speciale functies Watermerk ( Een watermerk verwijderen ) a Als u de afdruk instellingen va nuit de softwa retoepassing wilt wijzigen, opent u Voorkeursinstellingen . b Klik op het tabblad Geavanceerd en selecteer Bewerke n in de vervolgkeuzelijst Wa termerk . Het venster Waterm erken bewerken wordt geop[…]
-
Page 145
Geavanceerde afdrukfuncties gebruiken 145 3. Speciale functies Overlay ( Een nieuwe paginaoverlay maken ) a Ga naar de Voorkeursinstellingen als u het document als een ov erlay wilt opslaan. b Klik op het tabblad Geavanceerd en selecteer Bewerke n in de vervolgkeuzelijst Tekst . H et venster Overlay bewerken verschijnt. c Klik in het venster Overla[…]
-
Page 146
Geavanceerde afdrukfuncties gebruiken 146 3. Speciale functies Overlay ( Een paginaoverlay verwijderen ) a Klik in het venster Voorkeursinstellingen voor afdrukken op het tabblad Geavanceerd . b Selecteer Bewerken in de vervolgkeuzelijst Tekst . c Selecteer in het vak Overzicht overlays de overlay d ie u wilt verwijde ren. d Klik op Verwijderen . e[…]
-
Page 147
147 3. Speciale functies Afdrukken in Macintosh Afhankelijk van het model of opties zijn enkele fu ncties mogelij k niet beschikbaar. Dit bete kent dat de functies nie t worden ondersteund. 3 Een document afdrukken Als u afdrukt met een Macint osh-computer moet u in elke toepassing die u gebruikt de instellingen van het printerstuurprogramma contro[…]
-
Page 148
Afdrukken in Macintosh 148 3. Speciale functies 6 Dubbelzijdig afdrukken Afhankelijk van het model of opties zijn enkele fu ncties mogelij k niet beschikbaar. Dit bete kent dat de functies nie t worden ondersteund. Voordat u dubbelzijdig af drukt, moet u aangeven langs welke rand u de pagina’s wilt inbinden. De bindopties zijn: • Lange kant bin[…]
-
Page 149
149 3. Speciale functies Afdrukken in Linux Afhankelijk van het model of opties zijn enkele fu ncties mogelij k niet beschikbaar. Dit bete kent dat de functies nie t worden ondersteund. 8 Afdrukken vanuit een toepassing Vanuit een groot aantal Linux-toepassi ngen kunt u afdr ukken met Common UNIX Printing System (C UPS). U kunt vanuit al deze toepa[…]
-
Page 150
Afdrukken in Linux 150 3. Speciale functies 9 Bestanden afdrukken U kunt een groot aantal bestandstypen afdrukk en op dit apparaat door de standaard-CUPS-methode direct vanaf de opdrachtr egel toe te passen. Met het CUPS-lpr-hulpgramma kunt u dat doen, maar he t programma uit het besturingsbestand vervang het st andaard lpr-hulpprogramma door een v[…]
-
Page 151
4. Nuttige beheerprogramma’s Dit hoofdstuk introduceert beheerprogramma’s waarmee u de mogelijkhe den van uw apparaat maximaal kunt benutten. • Easy Capture Manager 152 • Samsung Easy Color Manager 153 • Samsung AnyWeb Print 154 • Easy Eco Driver 155 • SyncThru™ Web Service gebruiken 156 • Samsung Easy Printer Manager gebruiken[…]
-
Page 152
152 4. Nuttige beheerpro gramma’s Easy Capture Manager • Deze functie is mogelijk niet besch ikbaar afhankelijk van mo del of optionele onderdelen (zie «Softw are» op pagina 7). • Alleen beschi kbaar voor gebr uikers met Wi ndows-besturi ngssystemen (zie «Softwar e» op pagi na 7). Maak een schermafbeelding en start Easy[…]
-
Page 153
153 4. Nuttige beheerpro gramma’s Samsung Easy Color Manager Samsung Easy Color Manager helpt gebruikers om subtiele wijzigingen aan te brengen met behulp van 6 kleu rtonen en andere eigens chappen, zoals helderheid, contrast en verzadigi ng. Wijzigingen van kleurtoon ku nnen worden opgeslagen als profiel en worden gebruikt vanaf he t stuurpro[…]
-
Page 154
154 4. Nuttige beheerpro gramma’s Samsung AnyWeb Print Alleen beschikbaar voor gebruikers met Windows- en Macintosh-besturingssystemen. Met dit hulpprogramma kunt u van schermen een schermopname of afdr ukvoorbeeld maken en afdrukken, op een veel eenvoudigere mani er d an in het gebruikelijke programma. Download de software van de website van […]
-
Page 155
155 4. Nuttige beheerpro gramma’s Easy Eco Driver Met Easy Eco Driver kunt u ecofuncties toepassen om papier en toner te besparen voorda t u afdrukt. Als u deze toepassing wilt g ebruiken, moet u het selectievakje Easy Eco Driver starten v oordat taak wordt afgedrukt in de printereigenschappen inschakelen. Met Easy Eco Driver kunt u ook eenvou[…]
-
Page 156
156 4. Nuttige beheerpro gramma’s SyncThru™ Web Service gebruiken •V o o r SyncThru™ Web Service is minimaal Internet Explorer 6.0 o f hoger vereist. • De uitleg over SyncThru™ Web Service in deze gebruikersha ndleiding kan a fhankelijk zi jn van de opti es en het model, en komt mogelij k niet helemaal overeen met uw apparaat. • Al[…]
-
Page 157
SyncThru™ Web Service gebruiken 157 4. Nuttige beheerpro gramma’s Het tabblad Information Op dit tabblad wordt al gemene informatie over het apparaat weergegeven. U kunt diverse gegevens controle ren, waaronder de resterende hoeveelheid toner. U kunt ook r apporten afdrukken, zoals een foutenrapport. • Active Alerts: Toont de waarschuwinge[…]
-
Page 158
SyncThru™ Web Service gebruiken 158 4. Nuttige beheerpro gramma’s 3 Informatie over de systeembeheerder instellen Deze instelling is nod ig om gebruik te kunnen maken van de optie e- mailmelding. 1 Open een webbrowser in Windows, zoals Internet Explorer. Typ het IP-adres van het apparaat (http://xxx.xxx.xxx.xxx) in het adresveld en druk op d[…]
-
Page 159
159 4. Nuttige beheerpro gramma’s Samsung Easy Printer Manager gebruiken Samsung Easy Printer Manager is e en programma waarbinnen alle printerinstellingen van Samsung op een enkele plaats samengebracht zijn. Samsung Easy Printer Manager combi neert printerinstellingen met omgevingsfactoren, instellingen/taak opties en startoptie s. Met al dez[…]
-
Page 160
Samsung Easy Printer Manager gebruiken 160 4. Nuttige beheerpro gramma’s Klik achtere envolgens op de knop Help ( ) rechtsboven in het venster en de optie waarover u me er wilt weten. 2 Printerinfor- matie In dit kader staat algeme ne informatie over u w apparaat. U kunt deze informatie controle ren, zoals de naam van het p rintermodel, het IP[…]
-
Page 161
Samsung Easy Printer Manager gebruiken 161 4. Nuttige beheerpro gramma’s 5 Overzicht interface instellingen voor gevorderde gebruikers De interface voor gevorderde gebru ikers is bedoeld voor de beheerder van het netwerk en de printers. Apparaatinstellingen U kunt verschillend e apparaatinstellingen zoals pap ier, indeling, emulatie, netwerk e[…]
-
Page 162
162 4. Nuttige beheerpro gramma’s Samsung-printerstatus gebruiken Samsung-printerstatus is een program ma dat de status van de printer controleert en u daar van op de hoogte houdt. • Beschikbaar voor Windo ws-gebruikers. • Het venster Samsung-printerstatus en de inhoud die in deze gebruikersha ndleiding wor den getoond, kunne n verschillen[…]
-
Page 163
Samsung-printerstatus gebruiken 163 4. Nuttige beheerpro gramma’s 1 Tonerniveau Hier wordt het rest erende tonern iveau in de cassette(s) weergegeven. He t apparaat en het aantal tonercassette( s) in het bovens taande venster kunnen versc hillen afhank elijk van de gebruikte pr inter. Niet al le appara ten beschi kken over deze func tie. 2 Opt[…]
-
Page 164
164 4. Nuttige beheerpro gramma’s De Linux Unified Driver Configurator gebruiken Unified Linux Driver Conf igurator is een hulpprogr amma dat hoofdzakelijk bestemd is voor de configuratie van apparaten. U moet Unif ied Linux Driver installeren om Unified Driver Configurator te kunnen gebruiken (zie «Installatie voor Linux» op pagina […]
-
Page 165
De Linux Unified Driver Configurator gebruiken 165 4. Nuttige beheerpro gramma’s 8 Printers configuration Printers configuration bevat twee tabbladen: Printers en Classes . Het tabblad Printers Klik op het pictogram van het apparaat links in het venster Unified Driver Configurat or om de printerconfiguratie va n het huidige systeem weer te gev[…]
-
Page 166
De Linux Unified Driver Configurator gebruiken 166 4. Nuttige beheerpro gramma’s Het tabblad Classes Op het tabblad Classes wordt een lij st met beschikbare apparaatklassen weergegeven. • Refresh: vernieuwt de lijst met klassen. • Add Class: hiermee kunt u een nieuw e apparaatklasse toevoegen. • Remove Class: hiermee verwijdert u de gese[…]
-
Page 167
5. Problemen oplossen In dit hoofdstuk vindt u nuttige informatie over wat u moet doen als er een problee m optreedt. • Problemen met papierinvoer 168 • Problemen met de voeding en het netsnoer 169 • Afdrukproblemen 170 • Problemen met de afdrukkwaliteit 174 • Problemen met het besturingssysteem 182[…]
-
Page 168
168 5. Problemen oplossen Problemen met papierinvoer Toestand Voorgestelde oplossing Het papier loopt vast tijdens het afdrukken. Verwijder he t vastgelopen papier. Papier kleeft aan elk aar. • Controleer de maxim ale papiercapaciteit van de lade. • Zorg dat u een g eschikte papiersoort gebruikt. • Haal het pap ier uit de lade en buig het of […]
-
Page 169
169 5. Problemen oplossen Problemen met de voeding en het netsnoer Toestand Voorgestelde oplossing Het apparaat krijgt geen stroom, of de verbindingskabel tussen de computer en het apparaat is niet goed aangesloten. • Sluit de machin e eerst aan op h et stopcontact e n druk op de knop ( Aan/uit/ontwaken ) op het bedieningspane el. • Maak de kab[…]
-
Page 170
170 5. Problemen oplossen Afdrukproblemen Toestand Mogelijke oorzaak Voorgestelde oplossing Het apparaat drukt niet af. Het apparaat krijgt gee n stroom. Controleer of het netsnoer is aangesloten. Controleer de aan/uit-sc hakelaar en het stopcontact. Het apparaat is niet als standa ardprinter geselecteerd. Selecteer uw p rinter als standaardprint e[…]
-
Page 171
Afdrukproblemen 171 5. Problemen oplossen Het apparaat drukt niet af. Mogelijk is het printerstuu rprogramma niet goed geïnstalleerd . Deïnstalleer het st uurprogramm a van uw printe r en installeer het program ma opnieuw. Het apparaat werkt niet g oed. Kijk of het display van het bedieningspa neel een systee mfout aangeeft. Neem contact op met e[…]
-
Page 172
Afdrukproblemen 172 5. Problemen oplossen Het apparaat drukt wel af, maar de tekst is niet correct, vervorm d of niet volledig. De kabel van het apparaa t zit los of is defect. M aak de kabel van het apparaat los en sluit hem opnieuw aan. Druk een d ocument af dat u eerder wel c orrect hebt kun nen afdrukken. Sl uit de ka bel en het appar aat indie[…]
-
Page 173
Afdrukproblemen 173 5. Problemen oplossen Het apparaat drukt het PDF-bestand niet juist af. Sommige delen van afbeeldingen, tekst of illustraties ontbreken. Incompatib iliteit tusse n het PDF-besta nd en de Acrobat-product en. Het bestand kan worden afg edrukt door het PDF-bestand af te drukken als een afbeelding. Schakel Afdrukken als afbeelding u[…]
-
Page 174
174 5. Problemen oplossen Problemen met de afdrukkwaliteit Vuil aan de binnenkant van het ap paraat of verkeerd geplaatst pap ier kan leiden tot een verminderd e afdrukkwaliteit. Raadpleeg de onderstaande tabel om het probleem te verhelpen. Toestand Voorgestelde oplossing Lichte of vage afdrukken • Als u een vertica le witte strook of va ag gedee[…]
-
Page 175
Problemen met de afdrukkwaliteit 175 5. Problemen oplossen Tonervlekken • Mogelijk vo ldoet het papier n iet aan de specificaties. Het papier kan bijvoorbeeld te voc htig of te ruw zijn. • Mogelijk is de tra nsportrol vuil. Reinig de binnen kant va n het apparaat (zie «Het appa raat reinigen» op pa gina 52). • Het papierpa d is moge[…]
-
Page 176
Problemen met de afdrukkwaliteit 176 5. Problemen oplossen Verticale strepen Als de pagina zwarte, verticale stre pen vertoont: • Er zitten mogelijk krassen op het oppervlak (drum gedeelte) van de beeldeenheid in het apparaat. Verwijder d e tonercassette en plaats een nieuwe (zie «De beeldeenheid ve rvangen» op pag ina 50). Als de pagin[…]
-
Page 177
Problemen met de afdrukkwaliteit 177 5. Problemen oplossen Verticaal terugkerende afwijkingen Als de bedrukte zijde van de pagina met g elijke intervallen afwijkingen ve rtoont: • De beeldeenhe id is mogelijk beschad igd. Als de proble men zi ch na het afdrukken b lijven voordo en, vervangt u de oude beeldeenheid door een n ieuwe (zie «De be[…]
-
Page 178
Problemen met de afdrukkwaliteit 178 5. Problemen oplossen Misvormde tekst • Als tekst er vervormd uitzie t («uitgehold» effect) is het papier mogeli jk te glad. Probeer e en ander soort papier. Papier schuin • P laats het papier op de ju iste manier in de la de. • Controlee r de papiersoo rt en de kwaliteit van het papie r. • Let[…]
-
Page 179
Problemen met de afdrukkwaliteit 179 5. Problemen oplossen Vouwen of kreuken • Plaats het papier o p de juiste ma nier in de lade. • Controlee r de papiersoo rt en de kwaliteit van het papie r. • Draai de stapel papi er in de lade om. Probeer oo k eens om het papier 180° te draaien in de lade. Achterkant van afdrukken is vuil • Mogelijk le[…]
-
Page 180
Problemen met de afdrukkwaliteit 180 5. Problemen oplossen Losse toner • Reinig de bi nnenkant van he t apparaat (zie «Het appar aat reinigen» op pagina 52). • Controlee r de papiersoo rt en de kwaliteit van het papie r. • Verwijder de beeldee nheid en plaats een nieuwe (zie «De beeldee nheid vervangen» op pa gina 50). Los[…]
-
Page 181
Problemen met de afdrukkwaliteit 181 5. Problemen oplossen Krullen Als het afgedrukte papier opkrult of als het pap ier niet wordt ingevoerd, doet u het vo lgende: • Draai de stapel papi er in de lade om. Probeer oo k eens om het papier 180° te draaien in de lade. • Wijzig de papierinstellin g op de printer en probe er het opnieuw. Ga na ar de[…]
-
Page 182
182 5. Problemen oplossen Problemen met het besturingssysteem 1 Algemene Windows-problemen Raadpleeg de gebruikershand leiding van Microsof t Windows die bij uw computer is geleverd voor me er informatie over fout meldinge n in Windows. Toestand Voorgestelde oplossing Tijdens de installatie verschijnt het bericht «Bestand in gebruik». Slu[…]
-
Page 183
Problemen met het besturingssysteem 183 5. Problemen oplossen 2 Algemene Macintosh-problemen Raadpleeg de gebruikershandleidin g van Macintosh die met uw computer is meegeleverd voor meer informatie over Ma cintosh-foutmel dingen. Toestand Voorgestelde oplossing Het apparaat drukt het PDF-bestand niet juist af. Sommige delen van afbeeldingen, tekst[…]
-
Page 184
Problemen met het besturingssysteem 184 5. Problemen oplossen 3 Algemene Linux-problemen Toestand Voorgestelde oplossing Het apparaat drukt niet af. • Controleer of het printer stuurprogramma is g eïnstalleerd. Open Unified Driver Configurat or en selectee r het tabbla d Printers in Printers configuration om de lijst met beschikbare printers wee[…]
-
Page 185
Problemen met het besturingssysteem 185 5. Problemen oplossen Raadpleeg de gebruikershandleid ing van Linux d ie bij uw comp uter werd g eleverd voor meer informatie over Linux-foutbe richten. Bepaalde kleurafbeeldingen worden volledig zwart afgedrukt. Dit is een bekende bug in Gh ostscript (tot GNU Ghostscript versie 7.05) a ls de basiskleurruimte[…]
-
Page 186
186 Verklarende woordenlijst Verklarende woordenlijst De onderstaande wo ordenlij st helpt u vertrouwd te raken met he t product en de te rminologie die in deze gebruikersh andleiding wordt gebruikt en verb and houdt met afdru kken. 802.11 802.11 bevat een reeks standaarden v oor draadloze-netwerkcommunicatie (WLAN) ontwikkeld door het IEEE LAN/MAN[…]
-
Page 187
Verklarende woordenlijst 187 Verklarende woordenlijst BOOTP Bootstrap-protocol. Een netwerkpro tocol dat wordt gebruikt door een netwerkclient om automat isch het IP-adres op te halen. Dit gebeurt doorgaans in het bootstrapproces van computer s of de daarop uitgevoerde besturingssystemen. De BOOTP-server s wijzen aan iedere client een IP- adres toe[…]
-
Page 188
Verklarende woordenlijst 188 Verklarende woordenlijst Standaard De waarde of instelling die van kr acht is wanneer de printer uit de verpakking wordt gehaald, opnieuw wordt ingesteld of wordt geïnitialiseerd. DHCP Een DHCP (Dynamic Host Confi guration Protocol) is een client/ servernetwerkprotocol. Een DHCP-ser ver stuurt confi guratieparameters n[…]
-
Page 189
Verklarende woordenlijst 189 Verklarende woordenlijst Duplex Een mechanisme dat een vel papier automatisch omkeert zodat het apparaat beide zijden van het vel kan bedrukken (of scannen). Een printer met een duplexeenheid ka n afdrukken op beide zi jden van een vel papier tijdens één printcyclus. Afdrukvolume Het afdrukvolume bestaat uit de hoevee[…]
-
Page 190
Verklarende woordenlijst 190 Verklarende woordenlijst FDI Interface extern apparaat (FDI) is een kaart die in het apparaat is geïnstalleerd zodat andere apparaten van derden, bijvoorbeeld een muntautomaat of een kaartlezer, kunnen worden aangesloten. Met deze apparaten kunt u laten bet alen voor afdrukservices d ie worden uitgevoerd met uw apparaa[…]
-
Page 191
Verklarende woordenlijst 191 Verklarende woordenlijst IEEE 1284 De 1284-norm voor de paral lelle poort is ontwikkeld door het IEEE (Institute of Electrical and Electronics Engineer s). De term «1284-B» verwijst naar een bepaald type connector aan het uitein de van de parallelle kabel die kan worden aangesloten op he t randapparaat (bijvoo[…]
-
Page 192
Verklarende woordenlijst 192 Verklarende woordenlijst ITU-T De Internationale Telecommunicatie Un ie is een inter nationale organisatie die is opgericht voor de standaardisering en reguler ing van internationale radio- en telecommunicatie. De belangrijkste taken omvatten standaardisering, de toewijzing van het radiospectrum en de organisatie van on[…]
-
Page 193
Verklarende woordenlijst 193 Verklarende woordenlijst MH MH (Modified Huffma n) is een compressiemetho de voor het beperken van de hoeveelheid gegevens di e tussen faxapparat en worden verzonden om een afbeelding te versturen. MH wordt aanbevolen do or IT U-T T.4. MH is een op een codeboek gebaseerd lengtecoderingsschema dat geoptimaliseerd werd om[…]
-
Page 194
Verklarende woordenlijst 194 Verklarende woordenlijst OSI OSI (Open Systems Interconnection) is een communicatiemodel dat is ontwikkeld door de ISO (I nternational Organizati on for Standardization). OSI biedt een standaard modulaire benadering van netwerkontwerp waarmee de vereiste set complexe functies wordt opgesplitst in hanteerbare, op zichzel[…]
-
Page 195
Verklarende woordenlijst 195 Verklarende woordenlijst Protocol Een conventie of standaard die de verbinding, co mmunicatie en het gegevensverkeer tussen twee computers inschakelt of controleert. PS Zie PostScript . PSTN Openbaar telefoonnet (PSTN) is het netwerk van openbare circuitgeschakelde telefoonnetwe rken wereldwijd dat in een bedrijfsomgevi[…]
-
Page 196
Verklarende woordenlijst 196 Verklarende woordenlijst TCP/IP TCP (Transmission Control Protocol) en IP (Internet Protocol): de set communicatieprotocollen die de protocolstack implementeren waarop het internet en de meeste comm erciële netwerken draaien. TCR Verzendrapport (TCR) geeft de details van elke ve rzending weer, zoals de taakstatus, het […]
-
Page 197
Verklarende woordenlijst 197 Verklarende woordenlijst URL URL (Uniform Resource Locator) is het internationale adres van documenten en informatiebronnen op inter net. Het eerste deel van het adres geeft aan welk protocol moet worden gebruikt en het tweede deel geeft het IP-adres of de domeinnaam aan waar de info rmatiebron zich bevindt. USB USB (Un[…]
-
Page 198
Verklarende woordenlijst 198 Verklarende woordenlijst WPA-PSK WPA-PSK (vooraf gedeelde WPA-sleutel) is een speciale WPA-modus voor kleine ondernemingen en thuisgebruikers. Een gedeelde sleutel of een gedeeld wachtwoord wordt geconfiguree rd in het draa dloze toegangspunt (WAP) en draadloze laptop- of de sktopapparaten. W PA-PSK genereert een unieke[…]
-
Page 199
199 Contact SAMSUNG worldwide Contact SAMSUNG worldwide If you have any comments or ques tions regarding Samsung products, contact the Samsung cu stomer care center. Country/Region Customer Care Ce nter Web Site ALBANIA 42 27 5755 ARGENTINE 080 0-333-37 33 www.samsun g.com ARMENIA 0-800-05-555 AUSTRALIA 1300 362 603 www.samsu ng.com AUSTRIA 0810-SA[…]
-
Page 200
Contact SAMSUNG worldwide 200 Contact SAMSUNG worldwide GERMANY 01805 — SAMSUNG (726-7864 € 0,14/m in) www.sams ung.com GEORGIA 8-800-555-555 GREECE IT and Mobile : 80111- SAMSUNG (801 11 7267864) from land line, local ch arge/ from mobile, 210 6897691 Cameras, Camcorders, Televisions and Household AppliancesFrom mobile a nd fixed 210629 3100 www[…]
-
Page 201
Contact SAMSUNG worldwide 201 Contact SAMSUNG worldwide NIGERIA 080-SAMSUNG(726-7 864) www.samsun g.com NETHERLANDS 0900-SAMSUNG (0900-726786 4) (€ 0,10/min) www.sams ung.com NEW ZEALAND 0800 SAMSUNG (0800 72 6 786) www.sams ung.com NICARAGUA 00-180 0-5077267 www.samsu ng.com NORWAY 815-56 48 0 www.samsu ng.com OMAN 800-SAMSUNG (726-786 4) www.sa[…]
-
Page 202
Contact SAMSUNG worldwide 202 Contact SAMSUNG worldwide THAILAND 1800-29-3232 02-689-3232 www.sams ung.com TRINIDAD & TOBAGO 1-800-SAMSUNG (726 -7864) w ww.samsung.co m TURKEY 444 77 1 1 www.samsung.com U.A.E 800-SAMSUNG (726-7864) www. samsung.com U.K 0330 SAMSUNG (726-7864) w ww.samsung.com U.S.A 1-800-SAMSUNG (726 -7864) w ww.samsung. com UK[…]
-
Page 203
203 Index Index A achterkant 18 afdrukken afdrukken naar een bestand 139 de standaardafdrukinstellingen wijzigen 137 dubbelzijdig afdrukken Macintosh 148 een document afdrukken Windows 33 Linux 149 Macintosh 147 meerdere paginas afdrukken op één vel papier Macintosh 147 mobiel besturingssysteem 131 mobileprint 131 afdrukmedia etiketten 31 kartonp[…]
-
Page 204
Index 204 Index instellingen voor favorieten voor afdrukken 35 L lade breedte en lengte instellen 26 de grootte van de lade aanpassen 26 Linux afdrukken 149 algemene Linuxproblemen 184 besturingsbestand opnieuw installeren voor een via een USBkabel verbonden apparaat 91 installatie van het stuurprogramma voor het verbonden netwerk 102 printereigens[…]
-
Page 205
Index 205 Index printervoorkeursinstellingen Linux 150 problemen afdrukproblemen 170 problemen met betrekking tot netvoeding 169 problemen met de afdrukkwaliteit 174 problemen met papierinvoer 168 R reinigen binnenkant 52 buitenkant 52 S service contact numbers 199 speciale afdrukfuncties 135 specificaties 63 afdrukmedia 65 stoptoets 20 SyncThru We[…]