
Скачать
Operating Instructions
Upright Vacuum Cleaner
S 7000
To prevent accidents
and machine damage,
read these instructions
before
installation and use.
M.-Nr. 07 450 381
en — US, CA
Operating Instructions Upright Vacuum cleaner
Instructions d’utilisation Aspirateur vertical
S 7000
en, fr — US, CA
HS08
M.-Nr. 09 591 990
Only Miele FilterBags, filters and accessories with
the «Original Miele» logo can be used with this
vacuum. Only then can the suction power of the
vacuum cleaner reach its optimum potential creating
the best possible cleaning results.
USE OF NON-MIELE COMPONENTS MAY VOID
THE WARRANTY.
The use of FilterBags made of paper or a similar
,
material, or FilterBags with a cardboard retaining
plate can lead to serious damage to the vacuum
cleaner and may void the warranty, just as with the
use of FilterBags without the «Original Miele» logo.
The «Original Miele» Logo will appear on the
packaging or directly on the FilterBag.
Purchasing new FilterBags and filters
Original Miele FilterBags and filters can be purchased
from an authorized Miele vacuum dealer or by visiting the
Miele store at www.mieleusa.com.
2
en — Contents
Guide to the vacuum cleaner
IMPORTANT SAFETY INSTRUCTIONS
Before the first use
Included accessories
Use
Power cord. . . . . . . . . . . . . . . . . . . . . . . . . . . . . . . . . . . . . . . . . . . . . . . . . . . . . . . . 9
Rewinding the power cord. . . . . . . . . . . . . . . . . . . . . . . . . . . . . . . . . . . . . . . . . . . . 9
Release the vacuum cleaner . . . . . . . . . . . . . . . . . . . . . . . . . . . . . . . . . . . . . . . . . 10
Turning the vacuum cleaner On/Off . . . . . . . . . . . . . . . . . . . . . . . . . . . . . . . . . . . 10
«Automatic» setting . . . . . . . . . . . . . . . . . . . . . . . . . . . . . . . . . . . . . . . . . . . . . . . . . 11
Vacuum hose . . . . . . . . . . . . . . . . . . . . . . . . . . . . . . . . . . . . . . . . . . . . . . . . . . . . . 11
Telescopic wand . . . . . . . . . . . . . . . . . . . . . . . . . . . . . . . . . . . . . . . . . . . . . . . . . . 12
Powerbrush . . . . . . . . . . . . . . . . . . . . . . . . . . . . . . . . . . . . . . . . . . . . . . . . . . . . . . 12
Turning the Powerbrush On/Off . . . . . . . . . . . . . . . . . . . . . . . . . . . . . . . . . . . . . . . 12
Maintenance and care
Purchasing new FilterBags and filters. . . . . . . . . . . . . . . . . . . . . . . . . . . . . . . . . . . 13
Which FilterBags and filters are the right ones? . . . . . . . . . . . . . . . . . . . . . . . . . . 13
When to change the FilterBag . . . . . . . . . . . . . . . . . . . . . . . . . . . . . . . . . . . . . . . . 14
Changing the FilterBag . . . . . . . . . . . . . . . . . . . . . . . . . . . . . . . . . . . . . . . . . . . . . 14
When to change the dust compartment filter (pre-motor filter) . . . . . . . . . . . . . . . 15
Changing the dust compartment filter . . . . . . . . . . . . . . . . . . . . . . . . . . . . . . . . . . 15
When to change the exhaust filter . . . . . . . . . . . . . . . . . . . . . . . . . . . . . . . . . . . . . 15
Exhaust filter change indicator . . . . . . . . . . . . . . . . . . . . . . . . . . . . . . . . . . . . . . . 15
Replacing the «Air Clean» filter . . . . . . . . . . . . . . . . . . . . . . . . . . . . . . . . . . . . . . . . 15
Replacing the «Active Air Clean» filter and the «Active HEPA» filter . . . . . . . . . . . . 16
Exchanging exhaust filters. . . . . . . . . . . . . . . . . . . . . . . . . . . . . . . . . . . . . . . . . . . 16
Removing hair and threads from the Powerbrush . . . . . . . . . . . . . . . . . . . . . . . . . 17
Blockages . . . . . . . . . . . . . . . . . . . . . . . . . . . . . . . . . . . . . . . . . . . . . . . . . . . . . . . 17
Cleaning and care
Frequently asked questions
Technical service
Optional accessories
Caring for the environment
LIMITED WARRANTY — VACUUM CLEANERS USA
3
en — Guide to the vacuum cleaner
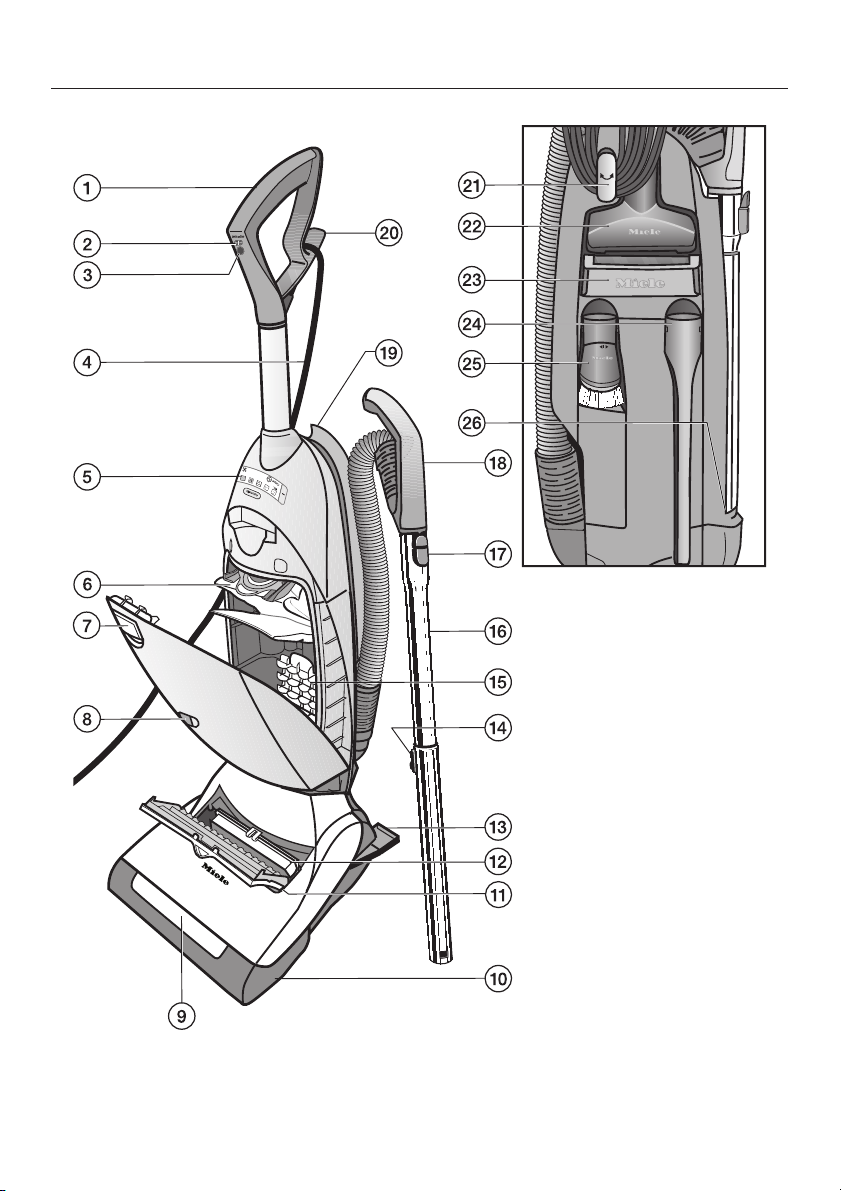
The illustration shows the vacuum cleaner with all available options.
Options vary depending on model.
4

en — Guide to the vacuum cleaner
a Hand piece
b On/Off switch
c Carpet/Floor Powerbrush selector
d Power cord
e Control panel
f FilterBag
g Dust compartment lid release
h Airflow indicator
i Headlight *
j Powerbrush
k Exhaust filter compartment
l Exhaust filter *
m Foot pedal to recline vacuum
n Telescopic wand release button
o Dust compartment filter (pre-motor filter)
p Telescopic wand
q Release button
r Vacuum hose with handle
s Hose clip
t Power cord hook (upper)
The features marked * may vary or not be available on your model.
Back of vacuum cleaner
u Adjustable power cord hook (lower)
v Upholstery tool
w Carrying handle
x Crevice nozzle
y Dust brush
z Bracket for telescopic wand
5

en — IMPORTANT SAFETY INSTRUCTIONS
When using an electrical appliance, basic precautions should always be followed,
including the following:
READ ALL INSTRUCTIONS BEFORE
USING THIS APPLIANCE
WARNING-
To reduce the risk of fire, electric
shock or injury:
Before using
Check the voltage rating of the
~
vacuum cleaner before connecting the
power cord to an electrical outlet. The
power source should correspond with
the voltage rating plate of the vacuum
cleaner. Use only household AC
outlets. Never use DC power sources. If
you are not sure of your home’s voltage
supply, consult a qualified electrician.
Connecting the vacuum cleaner to a
higher voltage may result in damage or
injury.
To reduce the risk of electric shock,
~
this appliance has a polarized plug
(one blade is wider than the other). This
plug will fit in a polarized outlet only one
way. If the plug does not fit fully in the
outlet, reverse the plug. If it still does
not fit, contact a qualified electrician to
install the proper outlet. Do not alter the
plug in any way.
The electrical outlet must be fitted
~
with a 15 A fuse.
A damaged vacuum cleaner can be
~
dangerous. Check the packaging,
vacuum cleaner and accessories for
any signs of damage. Do not use a
damaged appliance.
Do not use with a damaged cord or
~
plug. If the appliance is not working as
it should, has been dropped, damaged,
left outdoors or submerged in water,
bring it to a service center.
6

en — IMPORTANT SAFETY INSTRUCTIONS
Use
Do not use on people or animals.
~
Do not use outdoors or on wet
~
surfaces. Only dry surfaces should be
vacuumed.
Use only as described in this
~
manual with Miele recommended
accessories.
This appliance is intended for
~
household use only.
Do not allow the vacuum cleaner to
~
be used as a toy. Close attention is
necessary when used near children.
Be aware, the cord clip can become
~
loose over time. Do not allow children to
come in contact with this small part.
Choking hazard.
Never use the vacuum cleaner
~
without the dustbag or filters in place. It
may cause damage.
If a dustbag is not inserted, the dust
~
compartment lid will not close. Do not
force it shut.
Do not leave the vacuum cleaner
~
plugged in. Unplug it from the outlet
when not in use and before servicing.
This vacuum cleaner should not be
~
used to entrap or retain any hazardous
materials.
Do not use the vacuum cleaner to
~
pick up liquids or damp dirt. This could
impair the electrical safety of the
vacuum cleaner. Wait for freshly
shampooed carpets to dry.
Do not vacuum anything that is
~
burning or smoking such as cigarettes,
matches or hot ashes. The vacuum
cleaner could catch fire.
Do not vacuum toner dust. Toner,
~
such as that used in printers and
photocopiers, can conduct electricity.
Do not vacuum flammable or
~
combustible liquids, such as gasoline,
or use in areas where they may be
present.
Do not vacuum items which are
~
heavy, hard or have sharp edges. They
could cause a blockage and damage
the appliance.
Do not pull or carry by the cord, use
~
the cord as a handle, close a door on
the cord, or pull the cord around sharp
edges or corners. Do not run the
appliance over the cord. Keep the cord
away from heated surfaces.
Do not unplug the vacuum cleaner
~
by pulling on the cord. To unplug,
grasp the plug, not the cord.
Do not handle the plug or vacuum
~
cleaner with wet hands.
Keep the power cord, hair, loose
~
clothing, fingers and other parts of the
body away from openings and moving
parts.
Do not place anything into the
~
openings of the vacuum cleaner. Do
not use if any openings are blocked;
keep them free of dust, lint, hair, or
anything that may reduce air flow.
7

en — IMPORTANT SAFETY INSTRUCTIONS
Turn off all controls before
~
unplugging.
Use extra care when cleaning on
~
stairs.
The hose, wand and accessories
~
must not be used at head level to avoid
injury to eyes and ears.
Monitor the airflow indicator and
~
inspect all filters regularly. For best
performance, the FilterBags and filters
should be replaced when necessary. A
full bag or blocked filter will reduce the
vacuum cleaner’s suction power. A
temperature limiter automatically
switches the vacuum cleaner off if it
gets too hot, see «Frequently asked
questions».
Using accessories
Unplug the vacuum cleaner when
~
changing accessories.
To avoid the risk of injury when
~
vacuuming do not touch the beater bar.
Danger of injury.
Do not use the vacuum hose or
~
telescopic wand without an accessory
attached. The rim could be damaged
and injuries could result from sharp
edges.
Miele FilterBags are disposable and
~
intended to be used only once. Do not
attempt to reuse them. An over stuffed
FilterBag will reduce the efficiency of
the vacuum cleaner.
Cleaning, maintenance and
repairs
Turn the vacuum cleaner off after
~
each use and before every cleaning/
maintenance. Pull the plug from the
outlet.
Never submerge the vacuum
~
cleaner in water. Clean only with a dry
or slightly damp cloth when
disconnected from the mains supply. If
moisture gets into the appliance there
is a risk of electric shock.
Repairs must only be performed by
~
an authorized service agent in
accordance with national and local
safety regulations. Repairs by
unqualified persons could be
dangerous. The manufacturer cannot
be held responsible for unauthorized
work.
If the power cord is damaged it
~
should be replaced with a genuine
Miele cord by Technical Service.
Disposing of an old appliance
Before discarding an old vacuum
~
cleaner, please cut off the power cord
and render the plug useless. Ensure
the appliance presents no danger to
children while being stored for
disposal.
SAVE THESE
Only use genuine Miele FilterBags
~
with the Miele quality signet and
original Miele filter and accessories.
Only then can the manufacturer
guarantee its safety.
8
INSTRUCTIONS
The illustrations referred to in the text
are shown on the fold-out pages at the
end of these operating instructions.
en
Dust brush with natural bristles
(see fig. 5)
For cleaning moldings, ornate and
carved articles, delicate items, etc.
Before the first use
Assembly (see fig. 1)
^ Put the vacuum cleaner in an upright
position.
^ Push the handle down into the body
of the vacuum cleaner until it
engages (see illustration).
Included accessories (see fig. 2)
The following accessories are mounted
on the rear of the vacuum cleaner.
a Upholstery tool
b Crevice nozzle, 12″ (300 mm)
c Dust brush with natural bristles
Attach the accessory you wish to use to
the handle on the vacuum hose or the
telescopic wand.
Upholstery tool (see fig. 3)
For cleaning upholstery, mattresses,
cushions, draperies, etc.
Crevice nozzle, 12″ (300 mm)
(see fig. 4)
For cleaning folds, crevices, corners
and tight spaces.
The brush head can be turned to attain
the optimal cleaning position.
Use
Power cord (see fig. 6)
The lower cord hook can be rotated.
^ Rotate the hook upward to release
the power cord.
Rewinding the power cord (see fig. 7)
When the vacuum cleaner is not in use,
the power cord can be wound around
the two cord hooks.
^
To prevent the cord from unwinding
press it into the locking groove of the
plug (see insert).
Plug in the vacuum cleaner (see fig. 
^
Guide the power cord through the
notch at the side and over the upper
cord hook (see illustration).
This will keep the cord in an optimal
position so that it will not interfere with
vacuuming. It also keeps the power
cord from becoming caught in the
handle.
9

en
Release the vacuum cleaner
(see fig. 9)
Briefly press the foot pedal and
^
recline the body of the vacuum
cleaner to a comfortable position.
Turning the vacuum cleaner On/Off
(see fig. 10)
Always follow the flooring
manufacturer’s cleaning and care
instructions.
Press the On/Off button on the
^
handle.
The vacuum cleaner turns on.
ComfortLine Models:
The «On» indicator on the control panel
lights yellow.
PremiumLine Models:
The suction power levels on the control
panel light yellow.
Lighting (depending on model)
The headlight turns on automatically.
Control panels
Depending on the model, your vacuum
cleaner will include one of the following
control panels.
ComfortLine Models (see fig. 11)
a Vacuum «On» indicator
b Operation/Blockage protection
indicator
Yellow: the Powerbrush was turned
on using the Carpet/Floor button on
the hand piece.
Red: the beater bar is blocked
c Rotary selector
Selecting the suction power setting
You can adjust the suction power to suit
your preference.
Rotary selector (see fig. 12)
^ Turn the suction power selector to the
desired setting.
10

en
PremiumLine Models (see fig. 13)
a «Automatic» button
b +/— controls, to set the desired
suction power setting
c § «Thermo» indicator
d Blockage protection indicator
e Exhaust filter change indicator
(reset button)
f «Carpet» indicator, the Powerbrush
was turned on using the Carpet/Floor
button on the hand piece.
+/- Controls (see fig. 14)
The symbols on the control panel
indicate what each setting is
recommended for:
a curtains, lightweight fabrics
b upholstery, cushions
c thick pile carpets, rugs and
runners
( energy saving, daily vacuuming
with low noise level
e low pile carpets
f hard flooring and intensive
cleaning of carpets.
^
To select a higher power setting,
press the + button.
^
To select a lower power setting,
press the — button.
The selected power level is displayed
with a yellow light.
«Automatic» setting (see fig. 15)
(models with +/- controls)
If the «Automatic» setting is selected,
the vacuum cleaner will automatically
adjust the suction power level to suit
the surface being cleaned.
Press the «Automatic» button.
^
The button lights yellow.
To deactivate the setting, press the
«Automatic» button again.
Do not use the this setting to
,
vacuum draperies or other
lightweight fabrics. Excessive
suction may cause damage.
Note (see fig. 16):
To adjust to changing floor heights,
e.g. carpet edges, thresholds, etc.,
briefly step on the release button to
raise the front of the vacuum cleaner.
Vacuum hose (see fig. 17 + 18)
,
Do not use the vacuum hose or
wand at head level. Injury can occur.
Do not use the vacuum hose or
telescopic wand without an
accessory attached. The rim could
be damaged and injuries could
result from sharp edges.
When vacuuming stairs, ensure that
the vacuum is placed on a lower
step. Risk of injury.
^
Place the vacuum in an upright
position.
11

en
Press the release button on the
^
telescopic wand and pull the vacuum
hose handle upwards.
To increase the stability of the
^
vacuum cleaner, slip the elbow over
the vacuum hose so it engages.
For regular vacuuming, you will
need to snap the handle back into
the telescopic wand and place the
wand back into the bracket (see the
upper illustration).
Telescopic wand (see fig. 19 + 20)
^ Place the vacuum in an upright
position.
^ To unhook the telescopic wand from
the bracket, pull upward on the
handle.
^ To increase the stability of the
vacuum cleaner, slip the elbow over
the vacuum hose so it engages (see
fig. 18).
Powerbrush
Recommended use
Always follow the flooring
manufacturer’s cleaning and care
instructions.
The Powerbrush is particularly suitable
for cleaning and restoring crushed
carpet pile of wall to wall carpeting and
floor coverings subject to hard wear,
especially in high traffic areas.
Do not use the Powerbrush to
,
vacuum high quality, hand knotted
rugs, for example Berber or Persian
rugs, as well as extremely long piled
area rugs and carpets, e.g. shag.
There is a danger of the threads
being pulled out. Turn the
Powerbrush off to vacuum these
types of floor coverings and use
only low suction power.
The telescopic wand is composed of
two interlocking tubes that can be
adjusted to the desired length.
^
Press the telescopic wand release
button (see arrow) to release the
tubes and adjust to the desired
height.
To store the wand, adjust the tubes
to the shortest length and place it
back into the bracket (see the upper
illustration).
12
,
Do not use the Powerbrush on
floors with a variable or uneven
surface. The brush could come in
contact with the floor and cause
damage.
Turning the Powerbrush On/Off
(see fig. 21)
The beater bar in the Powerbrush is
driven by a separate motor, which can
be switched on and off.
^
Press the «Carpet/Floor» button on the
handle.
The Powerbrush turns on. The indicator
on the control panel lights yellow.
You can also use the button to switch
off the Powerbrush while vacuuming,
for example when moving from carpet
to hard floors.
The Powerbrush automatically shuts
off anytime the body of the vacuum
cleaner is placed into the full upright
position.
For best results, move the
^
Powerbrush slowly back and forth
over the area you wish to clean.
Maintenance and care
Turn off and unplug the vacuum
,
cleaner before performing any
maintenance work.
The Miele filter system consists of the
following three components.
– FilterBag
– Exhaust filter
en
The use of FilterBags made of
,
paper or a similar material, or
FilterBags with a cardboard
retaining plate can lead to serious
damage to the vacuum cleaner and
possibly voiding the warranty, just
as with the use of filter bags without
the «Original Miele» logo.
Purchasing new FilterBags and filters
Original Miele FilterBags and filters can
be purchased from an authorized Miele
vacuum dealer or by visiting the Miele
store at http://store.miele.com.
Which FilterBags and filters are the
right ones?
This vacuum cleaner uses Original
Miele FilterBags Type U and an Original
Miele filters, the «Original Miele» Logo
will appear on the packaging or directly
on the FilterBag.
–
Dust compartment filter
Each of these components must be
changed periodically to maintain the
vacuum cleaner’s efficiency.
Only use Miele FilterBags, filters and
accessories with the «Original Miele»
logo. Only then can the suction
power of the vacuum cleaner reach
its optimum potential creating the
best possible cleaning results.
An «Air Clean» exhaust filter and a dust
compartment filter are supplied with
every box of Miele filter bags.
If you would like to purchase additional
Miele filters separately, contact your
vacuum dealer or Miele, please quote
the model number of your Miele
vacuum cleaner to ensure correct parts
are ordered. These parts are also
available to order from the online Miele
store.
13

en
The exhaust filter supplied with the
vacuum cleaner can be exchanged
with another type of Original Miele filter
(see «Exchanging exhaust filters»).
When to change the FilterBag
(see fig. 22)
Change the FilterBag when the colored
marker in the airflow indicator fills the
display.
Miele FilterBags are disposable and
made to be used only once. Do not
attempt to reuse.
Check the airflow indicator
^ Place the body of the vacuum
cleaner into the full upright position.
^ Use the On/Off button on the handle
to switch the vacuum cleaner on,
then select the highest suction
setting.
^ Tip the vacuum cleaner until you can
read the color marker in the indicator
window. The electrobrush will be
lifted up at the front.
If the color marker completely fills the
indicator window, the FilterBag needs
to be changed.
How the airflow indicator works
The airflow indicator is designed to
show when the bag is full of common
household dust. It also measures the
amount of air flow through the FilterBag.
Normal household dust is a mixture of
dust, hair, carpet fluff, threads, etc.
However, if fine dust, such as drill dust,
sand, plaster or flour is vacuumed, the
pores of the FilterBag may become
blocked. The marker will indicate that
the bag is «full» even though it does not
look «full». The FilterBag should still be
changed, as the suction power is
greatly reduced.
If the bag is bulging with pet fur, hair,
carpet fluff, etc. the indicator may not
register «full». This is because the air
flow of the FilterBag may still be high
enough not to activate the marker to
show maximum. The FilterBag should
still be changed.
Changing the FilterBag
(see fig. 23, 24 + 25)
^ Place the body of the vacuum
cleaner into the full upright position.
^ Lift the release button for the dust
compartment lid and open until it
clicks into place.
^
Pull the tab on the collar and swing
the FilterBag up and away from the
suction socket before taking it out of
the frame.
The FilterBag has a flap that
automatically closes to prevent dust
from escaping when the bag is
removed.
^
Do not unfold the FilterBag when you
first remove it from the box. Insert the
new FilterBag as far as it will go into
the holder.
^
Unfold the FilterBags in the dust
compartment.
14

en
Close the dust compartment lid until
^
it clicks into place, taking care not to
catch the FilterBag in the lid. The
FilterBag is automatically aligned with
the vacuum hole.
An empty-operation-barrier
,
blocks the dust compartment lid
from closing if no FilterBag is
inserted or if it is not inserted
correctly. Do not force it closed.
When to change the dust
compartment filter (pre-motor filter)
Whenever you start a new box of Miele
FilterBags, you should change the dust
compartment filter. A new filter is
included in every box.
Changing the dust compartment filter
(see fig. 26)
^ Open the dust compartment lid.
^ Open the filter frame, use the clean
corner to remove the filter.
^
Insert a new filter.
^
Close the filter frame.
^
Close the dust compartment lid until
it clicks into place.
b Active Air Clean (black)
c Active HEPA (blue)
These filters should be changed
approximately once a year. You can
make a note of the date directly on the
exhaust filter.
Be sure to have a replacement filter on
hand.
Exhaust filter change indicator
(see fig. 28)
Certain models are equipped with an
indicator (reset button), to show you
when to change the Active Air Clean b
or Active HEPA c filter.
The indicator will turn red after
approximately 50 hours of operation,
which is equivalent to about one year of
average use. Once the indicator light
comes on, you can still continue to use
the vacuum cleaner. However, the filter
performance and suction power will be
reduced.
If an Air Clean filter is being used, the
filter change indicator can be
disregarded but should be reset when
it does light. The indicator goes out
when the reset button is pressed.
When to change the exhaust filter
Depending on the model, your vacuum
cleaner will use one of the following ex
haust filters (see fig. 27):
a Air Clean
Whenever you start a new box of Miele
FilterBags, you should change this
exhaust filter. A new Air Clean exhaust
filter is included in every box of Miele
FilterBags.
Replacing the «Air Clean» filter
(see fig. 29, 30 + 31)
Do not use more than one filter at a
time.
^
Open the exhaust filter compartment
lid.
^
Remove the filter frame.
15

en
Open the filter frame and use one of
^
the two clean corners to remove the
used Air Clean filter.
Insert a new Air Clean filter.
^
If you wish to replace the Air Clean
filter with an Active Air Clean filter or
Active HEPA filter see «Maintenance
and care — Exchanging exhaust
filters».
Close the filter frame and insert it
^
back into the compartment.
Close the exhaust filter compartment
^
lid.
Replacing the «Active Air Clean»
filter and the «Active HEPA»filter
(see fig. 32 + 33)
Do not use more than one filter at a
time.
^ Open the exhaust filter compartment
lid.
^
Remove the exhaust filter.
^
Insert a new exhaust filter.
Press and hold the reset button until
^
the «Exhaust filter change indicator»
indicator goes out.
The indicator is only reset if pressed
while lit. If the indicator is pressed
before it lights it will not be reset.
Exchanging exhaust filters
Depending on the model, your vacuum
cleaner will use one of the following
standard exhaust filters (see fig. 27):
a Air Clean
b Active Air Clean (black)
c Active HEPA (blue)
If you wish, you can use one of the
alternative filters instead of the
standard filter supplied with your
appliance. Each filter offers different
characteristics (see section «Optional
accessories»).
Important
1. If you replace exhaust filter a with
exhaust filter b or c, you must be sure
to remove the filter frame before
inserting the new filter type.
^
Close the exhaust filter compartment
lid.
If you wish to use an Air Clean filter
see «Exchanging exhaust filters».
Resetting the exhaust filter change
indicator (see fig. 28)
If your vacuum cleaner has a reset
button, it must be pressed each time
the exhaust filter is changed.
^
Turn the vacuum on.
16
2. If you replace exhaust filter b or c
with exhaust filter a, be sure to place
the new filter in a filter frame *
(see fig. 30).
Do not use more than one filter at a
time.
* Filter frame — see «Optional accessories»
Some models are equipped with an
exhaust filter reset button (see fig.
28). This button indicates when to
change the Active Air Clean filter
and the Active HEPA filter. If an Air
Clean filter is used, the reset button
can be disregarded. The Air Clean
filter should be changed whenever a
new box of Miele FilterBags is
opened. The indicator goes out
when the reset button is pressed.
Removing hair and threads from the
Powerbrush (see fig. 34)
^ Turn off the vacuum and unplug it
from the outlet.
^ Release the body of the vacuum
cleaner and lower it to the floor (see
fig. 9).
^ Turn the vacuum cleaner over.
^ Use scissors to cut any threads or
hair that have wound around the
roller brush. Guide the scissors along
the guide track on the beater bar.
en
Guide the swivel elbow at the end of
^
the suction hose over the catch
hooks, to increase the stability the
vacuum cleaner (see fig. 18).
A Undo the suction hose in the
direction of the arrow.
B Pull the suction hose connector off
the swivel elbow.
Remove all blockages
^
Put the connector back on and click
^
it shut.
If you still have not been able to remove
the obstruction(s), there is another
method you can try.
Open the service flap on the bottom
rear of the vacuum cleaner.
A Use a coin to undo the two screws
until they stop.
B Pry the service flap free.
^ Remove all blockages.
Put the service flap back on and screw
into place.
The trimmings will be drawn into the
vacuum cleaner by the suction once
the vacuum cleaner is turned on.
Blockages (see fig. 35 + 36)
If there are large particles or other
blockages at the base of the suction
hose, you can open it up to clear the
passage.
^
Click the vacuum cleaner into the full
upright position.
^
Press the release button on the
telescopic wand and remove the
handle from the suction hose
Cleaning and care
Cleaning
,
Turn the vacuum cleaner off and
unplug it from the outlet before
performing any maintenance work.
Vacuum cleaner and accessories
The vacuum cleaner and all plastic
accessories can be cleaned using a
damp cloth and a cleaner suitable for
plastics.
17
Loading…
Miele S7580 Vacuum Cleaner PDF User Guides and Manuals for Free Download: Found (1) Manuals for Miele S7580 Device Model (Specifications)
Miele S7580 Specifications
Details:
- Manufacturer: Miele
- Product Name/ID: Miele S7580 / #555726
- Category: Vacuum Cleaner
- File Path: miele/s7580_555726.pdf
- Last Updated: 15 May 2025
- Description: The Miele S7580 manual is your comprehensive guide, providing step-by-step setup instructions, feature exploration tips, and troubleshooting methods to ensure seamless use of your device.
- Document Type: User Manual
- Pages: 2
|
Pages Preview: |
Download PDF
Read Online
The Miele S7580 vacuum cleaner is a standout model from the renowned Miele brand, known for its commitment to quality and performance. With its sleek design and advanced features, the S7580 is engineered to tackle a variety of cleaning challenges, making it a worthy investment for those serious about maintaining a spotless home. This review delves into its core features, usability, and overall performance, providing you with a comprehensive overview.
One of the most notable aspects of the Miele S7580 is its powerful motor. With a suction power of up to 1200 watts, this vacuum cleaner can handle everything from fine dust to larger debris. This strength is complemented by Miele’s AirClean filtration system which captures 99.9% of particles as small as 0.3 microns, ensuring that the air quality remains high—a significant advantage for allergy sufferers.
In addition, the S7580 comes equipped with a range of accessories and cleaning tools that enhance its versatility:
- Electro Premium Floorhead: This motorized brush head adjusts automatically to different floor types, ensuring effective cleaning on carpets and hard floors.
- Dusting Brush: Perfect for delicate surfaces like furniture and shelves, this tool features soft bristles to prevent scratches.
- Upholstery Tool: Ideal for cleaning sofas and drapes, helping to keep fabric items looking fresh.
- Crevice Tool: Designed to reach tight spaces, ensuring that no dust bunny is left behind.
The design of the Miele S7580 is user-friendly and emphasizes convenience. The vacuum features a 36-foot operating radius, allowing you to cover a large area without constantly switching outlets. Its 7-setting suction control lets users adjust the power according to surface type, making it effective on everything from delicate rugs to thick carpets. Furthermore, the S7580 is fitted with an ergonomic handle and a lightweight body, ensuring ease of use even during long cleaning sessions.
One of the standout design features of the Miele S7580 is its sealed system. This innovative engineering keeps dirt and dust trapped inside, preventing them from re-entering the air supply. This is particularly advantageous for homeowners who prioritize a clean, healthy living environment.
While the Miele S7580 presents a variety of strengths, it is important to consider its price point. Miele products are often at the higher end of the market; however, the combination of build quality, performance, and longevity justifies the investment for many users. For those considering an upgrade, the S7580 could very well provide better longer-term value than cheaper competitors.
In summary, the Miele S7580 vacuum cleaner stands out due to its exceptional performance, user-friendly design, and advanced filtration system. While it may come with a higher price tag, the quality materials and innovative features ensure that it is a valuable addition to any home. Whether you are dealing with pet hair, allergens, or just everyday dust, the S7580 equips you with the tools needed to keep your space clean and welcoming.
-
Page 1
Operating Instructions Upright Vacuum cleaner Instructions d’utilisation Aspirateur vertical S 7000 M.-Nr. 09 591 990 en, fr — US, CA HS08[…]
-
Page 2
2 Only Miele FilterBags, filters and accessories with the «Original Miele» logo can be used with this vacuum. Only then can the suction power of the vacuum cleaner reach its optimum potential creating the best possible cleaning results. USE OF NON-MIELE COMPONENTS MAY VOID THE WARRANTY. , The use of FilterBags made of paper or a similar m[…]
-
Page 3
Guide to the vacuum cleaner IMPORTANT SAFETY INSTRUCTIONS Before the first use Included accessories Use Power cord . . . . . . . . . . . . . . . . . . . . . . . . . . . . . . . . . . . . . . . . . . . . . . . . . . . . . . . . 9 Rewinding the power cord . . . . . . . . . . . . . . . . . . . . . . . . . . . . . . . . . . . . . . . . . . . . 9 Releas[…]
-
Page 4
The illustration shows the vacuum cleaner with all available options. Options vary depending on model. en — Guide to the vacuum cleaner 4[…]
-
Page 5
a Hand piece b On/Off switch c Carpet/Floor Powerbrush selector d Power cord e Control panel f FilterBag g Dust compartment lid release h Airflow indicator i Headlight * j Powerbrush k Exhaust filter compartment l Exhaust filter * m Foot pedal to recline vacuum n Telescopic wand release button o Dust compartment filter (pre-motor filter) p Telescop[…]
-
Page 6
When using an electrical appliance, basic precautions should always be followed, including the following: READ ALL INSTRUCTIONS BEFORE USING THIS APPLIANCE WARNING- To reduce the risk of fire, electric shock or injury: Before using ~ Check the voltage rating of the vacuum cleaner before connecting the power cord to an electrical outlet. The power s[…]
-
Page 7
Use ~ Do not use on people or animals. ~ Do not use outdoors or on wet surfaces. Only dry surfaces should be vacuumed. ~ Use only as described in this manual with Miele recommended accessories. ~ This appliance is intended for household use only. ~ Do not allow the vacuum cleaner to be used as a toy. Close attention is necessary when used near chil[…]
-
Page 8
~ Turn off all controls before unplugging. ~ Use extra care when cleaning on stairs. ~ The hose, wand and accessories must not be used at head level to avoid injury to eyes and ears. ~ Monitor the airflow indicator and inspect all filters regularly. For best performance, the FilterBags and filters should be replaced when necessary. A full bag or bl[…]
-
Page 9
The illustrations referred to in the text are shown on the fold-out pages at the end of these operating instructions. Before the first use Assembly (see fig. 1) ^ Put the vacuum cleaner in an upright position. ^ Push the handle down into the body of the vacuum cleaner until it engages (see illustration). Included accessories (see fig. 2) The follow[…]
-
Page 10
Release the vacuum cleaner (see fig. 9) ^ Briefly press the foot pedal and recline the body of the vacuum cleaner to a comfortable position. Turning the vacuum cleaner On/Off (see fig. 10) Always follow the flooring manufacturer’s cleaning and care instructions. ^ Press the On/Off button on the handle. The vacuum cleaner turns on. Comfort Line[…]
-
Page 11
Premium Line Models (see fig. 13) a «Automatic» button b + / — controls, to set the desired suction power setting c § «Thermo» indicator d Blockage protection indicator e Exhaust filter change indicator (reset button) f «Carpet» indicator, the Powerbrush was turned on using the Carpet/Floor button on the hand piece. +[…]
-
Page 12
^ Press the release button on the telescopic wand and pull the vacuum hose handle upwards. ^ To increase the stability of the vacuum cleaner, slip the elbow over the vacuum hose so it engages. For regular vacuuming, you will need to snap the handle back into the telescopic wand and place the wand back into the bracket (see the upper illustration). […]
-
Page 13
You can also use the button to switch off the Powerbrush while vacuuming, for example when moving from carpet to hard floors. The Powerbrush automatically shuts off anytime the body of the vacuum cleaner is placed into the full upright position. ^ For best results, move the Powerbrush slowly back and forth over the area you wish to clean. Maintenan[…]
-
Page 14
The exhaust filter supplied with the vacuum cleaner can be exchanged with another type of Original Miele filter (see «Exchanging exhaust filters»). When to change the FilterBag (see fig. 22) Change the FilterBag when the colored marker in the airflow indicator fills the display. Miele FilterBags are disposable and made to be used only onc[…]
-
Page 15
^ Close the dust compartment lid until it clicks into place, taking care not to catch the FilterBag in the lid. The FilterBag is automatically aligned with the vacuum hole. , An empty-operation-barrier blocks the dust compartment lid from closing if no FilterBag is inserted or if it is not inserted correctly. Do not force it closed. When to change […]
-
Page 16
^ Open the filter frame and use one of the two clean corners to remove the used Air Clean filter. ^ Insert a new Air Clean filter. If you wish to replace the Air Clean filter with an Active Air Clean filter or Active HEPA filter see «Maintenance and care — Exchanging exhaust filters». ^ Close the filter frame and insert it back into the c[…]
-
Page 17
Some models are equipped with an exhaust filter reset button (see fig. 28). This button indicates when to change the Active Air Clean filter and the Active HEPA filter. If an Air Clean filter is used, the reset button can be disregarded. The Air Clean filter should be changed whenever a new box of Miele FilterBags is opened. The indicator goes out […]
-
Page 18
, Do not use abrasive, oil-based, glass or all purpose cleaners! Dust compartment If the dust compartment needs to be cleaned, use another vacuum cleaner, a dry cloth or dusting brush. , Do not submerge the vacuum cleaner in water. If moisture gets into the appliance, there is the risk of electric shock. Frequently asked questions What if the vacuu[…]
-
Page 19
Technical service In the event of a fault you cannot easily fix yourself please contact the Miele Technical Service Department using the information on the back of this manual. ^ Please quote the model number on the data plate located on the bottom of the Powerbrush. Optional accessories Always follow the flooring manufacturer’s cleaning and c[…]
-
Page 20
Filter Filter frame The filter frame is needed if you would like to exchange the Active Air Clean or Active HEPA filters with the Air Clean filter (see «Exchanging exhaust filters»). Active Air Clean exhaust filter This special active charcoal filter absorbs odors collected in the FilterBag. The filter effectively controls most odors. The[…]
-
Page 21
What The Warranty Covers And For What Period The Coverage Extends Miele, Inc. (hereinafter «Miele») warrants to the original purchaser of this product, living in the United States of America, who purchased their vacuum from a Miele authorized distributor or dealer: a. That this product, including all of its Miele authorized parts is free […]
-
Page 22
Exclusion of Other Warranties Except for the limited warranty provided herein, Miele disclaims any and all other express warranties with respect to the product. Any warranty of merchantability or fitness for a particular purpose is limited in its duration to the term of the limited warranty provided herein. Some states do not allow limitations on h[…]
-
Page 23
23[…]
-
Page 24
INSTRUCTIONS IMPORTANTES SUR LA SÉCURITÉ ………………..2 6 Guide de l’appareil …………………………………………3 0 Avant la première utilisation ………………………………….3 2 Utilisation ……………………………………………….3 2 Cordon d’alimentation ……………………………[…]
-
Page 25
25 Seuls des sacs à poussière, des filtres et des accessoires portant le logo «Original Miele» doivent être utilisés avec cet aspirateur. Ceux-ci permettent de maximiser la puissance d’aspi — ration de l’aspirateur et de produire des résultats de nettoyage optimaux. L’UTILISATION DE COMPOSANTES D’UNE AUTRE MARQUE […]
-
Page 26
Lorsque vous utilisez un appareil électrique, respectez toujours les consignes de sécurité élémentaires : LISEZ ATTENTIVEMENT TOUTES LES INSTRUCTIONS AVANT D’UTILISER L’APPAREIL Le fabricant ne peut être tenu responsable des dommages causés par le non-respect des présentes instructions sur la sécurité. AVERTISSEMENT- Pour diminu[…]
-
Page 27
~ Utilisez l’appareil conformément aux instructions du présent manuel avec les accessoires recommandés par Miele. ~ Le fabricant ne peut être tenu re — sponsable des dommages causés par le non-respect des présentes instruc — tions sur la sécurité. Cet appareil est destiné uniquement à un usage domes — tique. ~ Cet aspirateur n’e[…]
-
Page 28
~ Éteignez toutes les commandes avant de débrancher l’appareil. ~ Soyez prudent au moment de net — toyer un escalier. ~ Le tuyau, le tube et les accessoires ne doivent pas être utilisés à la hauteur de la tête afin d’éviter tout risque de blessure aux yeux et aux oreilles. ~ Surveillez l’indicateur de circulation d’air et[…]
-
Page 29
29[…]
-
Page 30
L’ensemble des options offertes pour l’aspirateur sont présentées sur l’illustration. Les options varient en fonction du modèle. fr — Guide de l’appareil 30[…]
-
Page 31
a Poignée b Interrupteur marche/arrêt c Sélecteur d’électrobrosse tapis/plancher d Cordon d’alimentation e Panneau de commande f Sac à poussière g Bouton d’ouverture du couvercle du réservoir à poussière h Indicateur de circulation d’air i Lumière située à l’avant * j Électrobrosse k Compartiment du filtre d&ap[…]
-
Page 32
Vous trouverez les croquis signalés dans les différents chapitres dans les volets, à la fin de ce mode d’emploi. Avant la première utilisation Assemblage (voir fig. 1) ^ Mettez l’aspirateur en position verti- cale. ^ Poussez la poignée vers le bas dans le boîtier de l’aspirateur jusqu’à ce qu’elle s’enclenche (v[…]
-
Page 33
Branchez l’aspirateur (voir fig.
 ^ Glissez le cordon d’alimentation dans le cran situé sur le côté et passez le par dessus le crochet supérieur (voir l’illustration). Le cordon restera dans une position optimale, ce qui ne gênera pas l’aspira — tion. De plus, le cordon d’alimentation ne se coincera pas dans la poign[…]
 -
Page 34
Modèles de la gamme Supérieure (voir fig. 13) a Bouton «automatique» b Boutons + / — , pour choisir le niveau de puissance d’aspiration souhaité. c § Voyant «thermique» d Voyant de protection contre les ob — structions e Voyant de remplacement du filtre d’évacuation (bouton de réinitialisati — on) f Voyant «[…]
-
Page 35
^ Mettez l’aspirateur en position verti — cale. ^ Appuyez sur le bouton de dégage — ment situé sur le tube télescopique et tirez la poignée du tuyau de l’aspira — teur vers le haut. ^ Pour augmenter la stabilité de l’aspi — rateur, glissez le coude par dessus le tuyau jusqu’à ce qu’il s’enclenche. Pour un nettoya[…]
-
Page 36
L’électrobrosse se met en marche. Le voyant du panneau de commande de — vient jaune. Vous pouvez également utiliser ce bou — ton pour éteindre l’électrobrosse pen — dant le nettoyage, par exemple lorsque vous passez d’un tapis à un sol dur. L’électrobrosse s’éteint automati — quement lorsque le corps de l’aspi -[…]
-
Page 37
Si vous souhaitez acheter des filtres d’évacuation ou des filtres de réservoir à poussière séparément, veuillez noter le numéro de modèle figurant sur la plaque signalétique qui se trouve en dessous de l’électrobrosse de votre ap — pareil. Vous pouvez remplacer le filtre d’éva — cuation fourni avec l’aspirateur par un[…]
-
Page 38
^ Tirez sur la languette du col et glis — sez le sac à poussière vers le haut et loin de la prise d’aspiration avant de le retirer de la grille. Le sac à poussière est muni d’un rabat qui se ferme automatiquement pour évi — ter que la poussière se répande lors — que vous retirez le sac. ^ Ne dépliez pas le sac à poussière lorsqu[…]
-
Page 39
Le voyant devient rouge après environ 50 heures de fonctionnement, ce qui représente une année d’utilisation moy — enne. Vous pouvez continuer d’utiliser l’aspirateur une fois le voyant allumé. Toutefois, la performance du filtre et la puissance d’aspiration seront réduites. Si un filtre Air Clean est utilisé, vous pouvez […]
-
Page 40
Interchanger les filtres d’évacuation Selon le modèle de votre aspirateur, l’un des filtres standard d’évacuation suivants convient à votre appareil (voir fig. 27) : a Air Clean b Active Air Clean (noir) c Active HEPA (bleu) Si vous le souhaitez, vous pouvez utili — ser l’un des autres types de filtres à la place des filtre[…]
-
Page 41
Si de larges particules ou d’autres ma — tériaux obstruent la base du tuyau d’aspiration, il est possible de les élimi — ner (voir fig. 35 + 36). ^ Placez l’aspirateur en position verti — cale. ^ Appuyez sur le bouton de dégage — ment situé sur le tube télescopique et retirez la poignée du tuyau d’aspirati — on. ^ Placez l[…]
-
Page 42
L’aspirateur s’éteint automatiquement. Modèles de la gamme Confort : Le voyant «marche» devient rouge. Modèles de la gamme Supérieure : Le voyant thermique devient rouge § . Cause possible Solution L’aspirateur surchauffe. Le limiteur de température éteint au — tomatiquement l’appareil. Cela peut se produire lor[…]
-
Page 43
Service technique Si vous ne pouvez résoudre certains problèmes, veuillez communiquer avec le Service technique Miele aux coor — données indiquées au verso de cette brochure. ^ Veuillez noter le numéro de modèle figurant sur la plaque signalétique qui se trouve en dessous de l’électro — brosse de votre appareil. Accessoires offerts en […]
-
Page 44
Boîtier d’accessoires MicroSet (SMC 20) Accessoires conçus pour les petits arti — cles ou les articles difficiles d’accès (chaînes stéréo, claviers d’ordinateurs, miniatures, etc.). Filtre Filtre d’évacuation Active Air Clean Absorbe les odeurs du sac à poussière. Filtre d’évacuation Active HEPA Excellent filtre d[…]
-
Page 45
Limited WarrantyCanada The following warranty conditions are valid in Canada only. Miele Limited, (hereinafter «Miele») warrants to the original purchaser that this product, including all of it’s Miele authorized parts and accessories, is free of defects in material and workmanship. 1. Duration of Warranty This warranty is valid during […]
-
Page 46
5. Exclusions Warranty coverage excludes any product, including its parts and accessories, that: a) was not installed according to Miele’s installation instruction; b) was damaged by negligence, accident, abuse, misuse, improper or abnormal usage, maintenance or transportation; c) contains non-authentic Miele accessories or replacement parts, […]
-
Page 47
Garantie LimitéeCanada Les conditions de la garantie suivante sont valides au Canada seulement. Miele Limitée, (ci-après nommée «Miele») garantit à l’acheteur original que ce produit, y compris tous ses accessoires et pièces autorisés par Miele, est libre de tout défaut de matériel et de fabrication. 1. Entrée en vigueur et du[…]
-
Page 48
5. Exclusions de la garantie La garantie ne couvre pas les produits, y compris les pièces et les accessoires de ces produits, qui : a) n’ont pas été installés conformément aux instructions d’installation de Miele; b) ont été endommagés par négligence, à la suite d’un accident ou d’une utilisation mauvaise, inapproprié[…]
-
Page 49
49[…]
-
Page 50
50[…]
-
Page 51
Tous droits réservés (S 7000) — 0913 LES RENSEIGNEMENTS FOURNIS PEUVENT ÊTRE MODIFIÉS. VEUILLEZ CONSULTER NOTRE SITE WEB POUR CONNAÎTRE LES CARACTÉRISTIQUES LES PLUS RÉCENTES DES PRODUITS AINSI QUE LES DERNIERS RENSEIGNEMENTS TECHNIQUES ET L’INFORMATION MISE À JOUR ONCERNANT LA GARANTIE.[…]
-
Page 52
[…]
-
Page 53
[…]
-
Page 54
[…]
-
Page 55
[…]
-
Page 56
M.-Nr. 09 591 990 / 00 Alteration rights reserved (S 7000) — 0913 INFORMATION IS SUBJECT TO CHANGE. PLEASE REFER TO OUR WEBSITE TO OBTAIN THE MOST CURRENT PRODUCT SPECIFICATIONS, TECHNICAL & WARRANTY INFORMATION. M.-Nr. 09 591 990 / 00[…]
- Главная
-
Miele
-
Пылесосы
-
S7580 Swing
На этой странице вы найдёте полный список документов на Пылесосы Miele S7580 Swing.
Выберите необходимый PDF файл.
-
Пылесосы
Miele S7580 Swing Инструкции по работе и монтажуТип файла
PDFРазмер
2.21 MbКол-во страниц
32Просмотров
2229Download / Read online
- 1
Другие Miele Пылесосы
-
Miele Scout RX1 Инструкции по работе и монтажу
PDF файлов
1Просмотров
8078 -
Miele Compact C2 HomeCare Инструкции по работе и монтажу
PDF файлов
1Просмотров
7316 -
Miele S2181 Titan Инструкции по работе и монтажу
PDF файлов
1Просмотров
6319 -
Miele S7260 Cat & Dog Инструкции по работе и монтажу
PDF файлов
1Просмотров
6017 -
Miele Complete C3 Cat & Dog Инструкции по работе и монтажу
PDF файлов
1Просмотров
5734 -
Miele Complete C3 HomeCare Инструкции по работе и монтажу
PDF файлов
1Просмотров
5235
Другие устройства Miele
-
Посудомоечные машины
Miele G 646 SC Руководство по эксплуатацииPDF файлов
1Просмотров
58408 -
Кухонные плиты
Miele HR 1954 DF Руководство пользователяPDF файлов
6Просмотров
51156 -
Кухонные плиты
Miele HR 1955 DF GR Руководство пользователяPDF файлов
6Просмотров
47709 -
Сушильные машины
Miele T 7744 C Инструкция по эксплуатацииPDF файлов
1Просмотров
34913 -
Кухонные плиты
Miele HR 1956 DF GD Руководство пользователяPDF файлов
6Просмотров
34007 -
Сушильные машины
Miele NOVOTRONIC T 7644 C Инструкция по эксплуатацииPDF файлов
1Просмотров
33160
Ранее вы смотрели
Производители
Adept Technology
Americana Appliances
Endura
FARGO electronic
FLO TV
IRiver
MSC
SentrySafe
TIC
West Elm
Типы устройств
Варочные плиты
Вакуумные пылесосы для плавательного бассейна
Портативное оборудование
Средства подключения смартфона
Панель контроля хода полета
Холодильные витрины
Отдых и развлечения
Управление беспроводными сетями
Серверная система Moonshot
Холодильники
Устройства
ASUS Chromebox (commercial) Q8875
Axis Communications Q1602-E
Brother BAS-415
De’Longhi DP6
Finlux 22F6072
JVC GZ-HD620U
KitchenAid Blender 5KSB555AOB
LG 22LT380C/380H-ZA
Realistic Pro-31
Tekkeon HEALTHY WHITE HX6782
freeuserguide.ru
About Us
Contacts
Disclamers
Privacy Policy
Эта страница полезна для вас? Поделитесь ссылкой: