
К сожалению, для вашей корзины недостаточно места.
Удалить продукт
Без этого продукта нельзя активировать имеющийся купон или промокод.
Вы действительно хотите удалить этот продукт?
Политика конфиденциальности
Установите этот флажок, чтобы перейти на веб-сайт Samsung.com.
Я даю свое согласие на получение новостей, специальных предложений и другой информации о продуктах и услугах компании Samsung и ее партнеров по электронной почте, посредством SMS-сообщений и уведомлений.
Просмотреть настройки
Помогите нам составить для вас рекомендации. Для этого обновите настройки продукта.

HW-K360
Беспроводной сабвуфер
(PS-WK360)
Руководство пользователя
Беспроводная акустическая
система Soundbar
Удивительные возможности
Благодарим за приобретение устройства компании Samsung.
Для наилучшего обслуживания зарегистрируйте свое устройство по адресу:
www.samsung.com/register

НАЧАЛО РАБОТЫ
ВОЗМОЖНОСТИ
Приложение Samsung Audio Remote
Управляйте системой Soundbar с мобильного
смарт-устройства с ОС Android, используя
приложение Samsung Audio Remote. Это приложение
обеспечивает управление всеми основными
функциями системы Soundbar, таких как: питание,
громкость звука, управление мультимедийным
содержимым, а также некоторыми функциями
настройки, например эквалайзером.
Усиление эффекта объемного звучания
При использовании функции усиления эффекта
объемного звучания звук воспроизводится более
глубоко и объемно.
Функция TV SoundConnect
Прослушивайте звук телевизора через систему
Soundbar, подключая ее к телевизору через Bluetooth
с помощью функции TV SoundConnect. Благодаря
простому беспроводному подключению панели
Soundbar к телевизору, комната не будет излишне
загромождена, и вы сможете в полной мере
насладиться утонченным дизайном обоих устройств.
Для управления системой Soundbar и телевизором
можно использовать пульт дистанционного
управления телевизора.
Поддержка USB-хоста
Можно подключать и воспроизводить файлы с
внешних USB накопителей, например MP3-
проигрывателя, флэш-памяти USB и т.д., используя
функцию USB HOST системы Soundbar.
Функция Bluetooth
Устройство Bluetooth можно подключить к системе
Soundbar для воспроизведения музыки с
высококачественным стереозвучанием, причем не
используя проводов.
ЛИЦЕНЗИИ
Произведено по лицензии Dolby Laboratories.
Dolby и символ двойного D являются товарными
знаками Dolby Laboratories.
Патенты на DTS см. на http://patents.dts.com.
Произведено по лицензии DTS Licensing Limited.
DTS и соответствующий символ вместе и по
отдельности являются зарегистрированными
товарными знаками, а DTS 2.0 Channel является
товарным знаком DTS, Inc. © DTS, Inc. Все права
защищены.
2

НАЧАЛО РАБОТЫ
ИНФОРМАЦИЯ ПО ТЕХНИКЕ
БЕЗОПАСНОСТИ
МЕРЫ ПРЕДОСТОРОЖНОСТИ
ВО ИЗБЕЖАНИЕ ПОРАЖЕНИЯ ЭЛЕКТРИЧЕСКИМ ТОКОМ НЕ СНИМАЙТЕ КРЫШКУ (ИЛИ ЗАДНЮЮ ПАНЕЛЬ)
УСТРОЙСТВА.
ВНУТРИ УСТРОЙСТВА ОТСУТСТВУЮТ ДЕТАЛИ, РЕМОНТ КОТОРЫХ МОЖЕТ ВЫПОЛНЯТЬ ПОЛЬЗОВАТЕЛЬ.
ОБСЛУЖИВАНИЕ ДОЛЖНО ПРОИЗВОДИТЬСЯ КВАЛИФИЦИРОВАННЫМИ СПЕЦИАЛИСТАМИ.
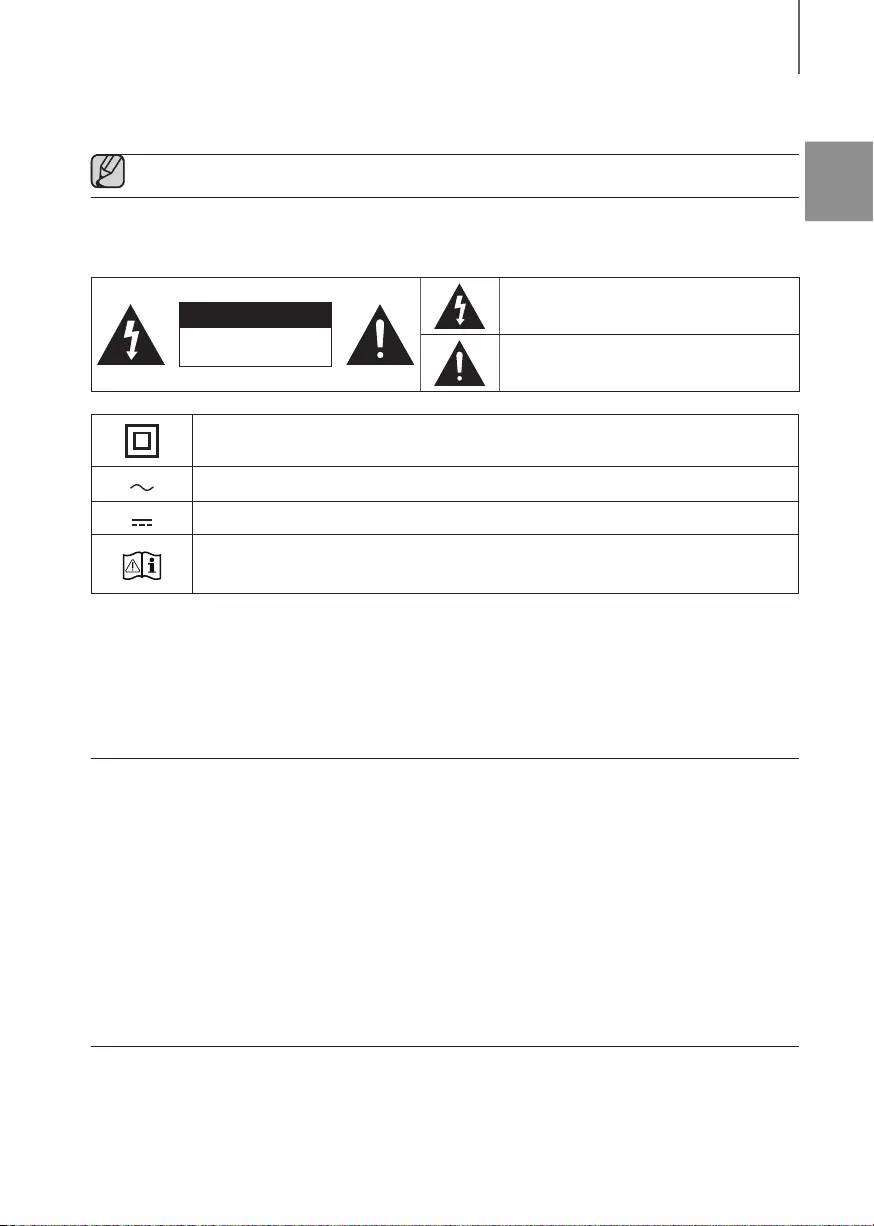
Этот символ свидетельствует о наличии
внутри устройства опасного напряжения,
ВНИМАНИЕ
ОПАСНОСТЬ ПОРАЖЕНИЯ
ЭЛЕКТРИЧЕСКИМ ТОКОМ.
НЕ ОТКРЫВАТЬ!
Продукт класса II: данным символом обозначается отсутствие требования к заземлению для
обеспечения безопасного подключения.
Напряжение переменного тока: данное обозначение используется для обозначения
номинального напряжения переменного тока.
Напряжение постоянного тока: данным символом обозначается номинальное напряжение
постоянного тока.
Внимание – ознакомьтесь с инструкциями по использованию: данный символ означает, что
для получения дальнейшей информации о безопасности пользователю следует обратиться к
материалам руководства пользователя.
Символ «не для пищевой продукции» применяется в соответствие с техническим
регламентом Таможенного союза «О безопасности упаковки» 005/2011 и указывает на
то, что упаковка данного продукта не предназначена для повторного использования и
подлежит утилизации. Упаковку данного продукта запрещается использовать для
хранения пищевой продукции.
которое может вызвать поражение
электрическим током или привести к травме.
Данный символ обозначает важные указания
по использованию устройства.
RUS
Символ «петля Мебиуса» указывает на возможность утилизации упаковки. Символ может
быть дополнен обозначением материала упаковки в виде цифрового и/или буквенного
обозначения.
ПРЕДУПРЕЖДЕНИЕ. Чтобы снизить риск возникновения пожара или поражения электрическим током, не
подвергайте это устройство воздействию дождя или влаги.
ВНИМАНИЕ! Чтобы отключить устройство от электросети, необходимо извлечь вилку кабеля питания из
розетки, соответственно, вилка всегда должна содержаться в исправном состоянии.
ВНИМАНИЕ
• Не подвергайте это устройство воздействию воды. Не ставьте на устройство предметы, заполненные
жидкостью, например вазы.
• Для полного отключения питания устройства следует извлечь вилку из розетки. Поэтому вилка должна быть
всегда доступна.
3
НАЧАЛО РАБОТЫ
99.1mm 99.1mm
68.6
mm
99.1mm
МЕРЫ ПРЕДОСТОРОЖНОСТИ
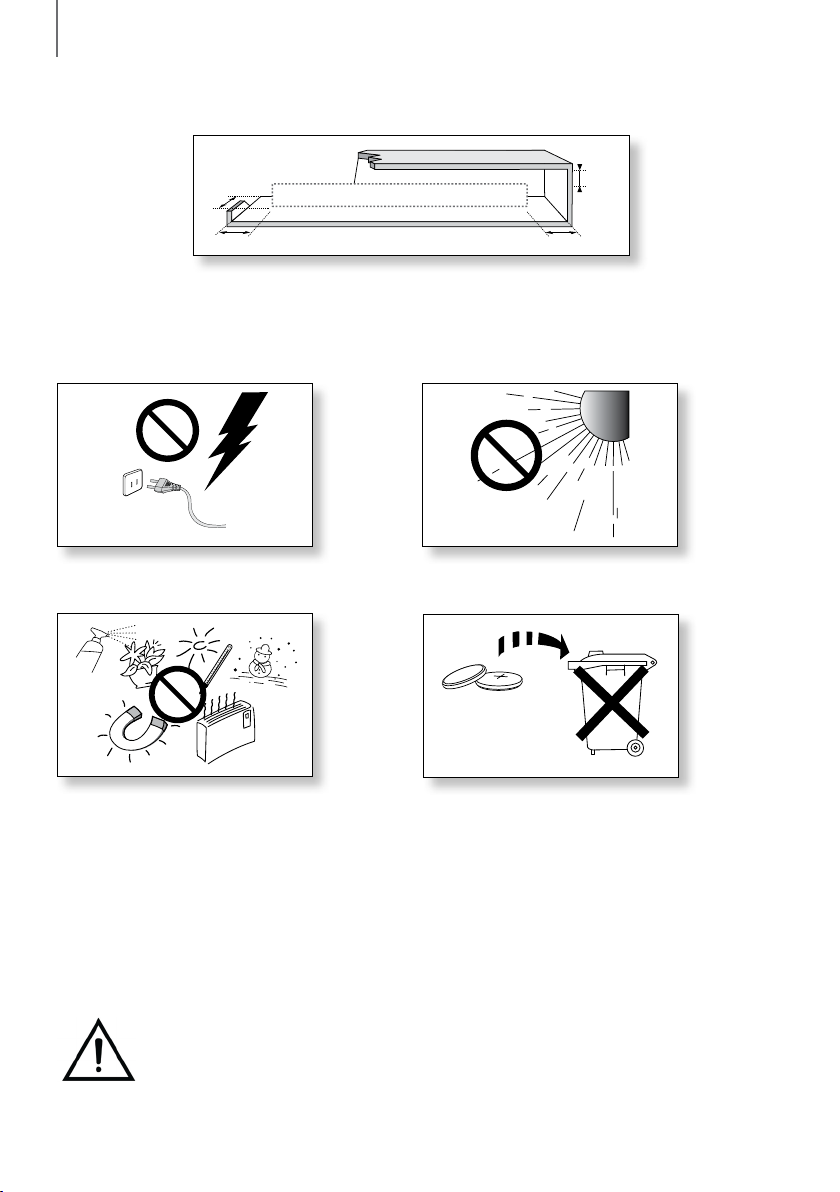
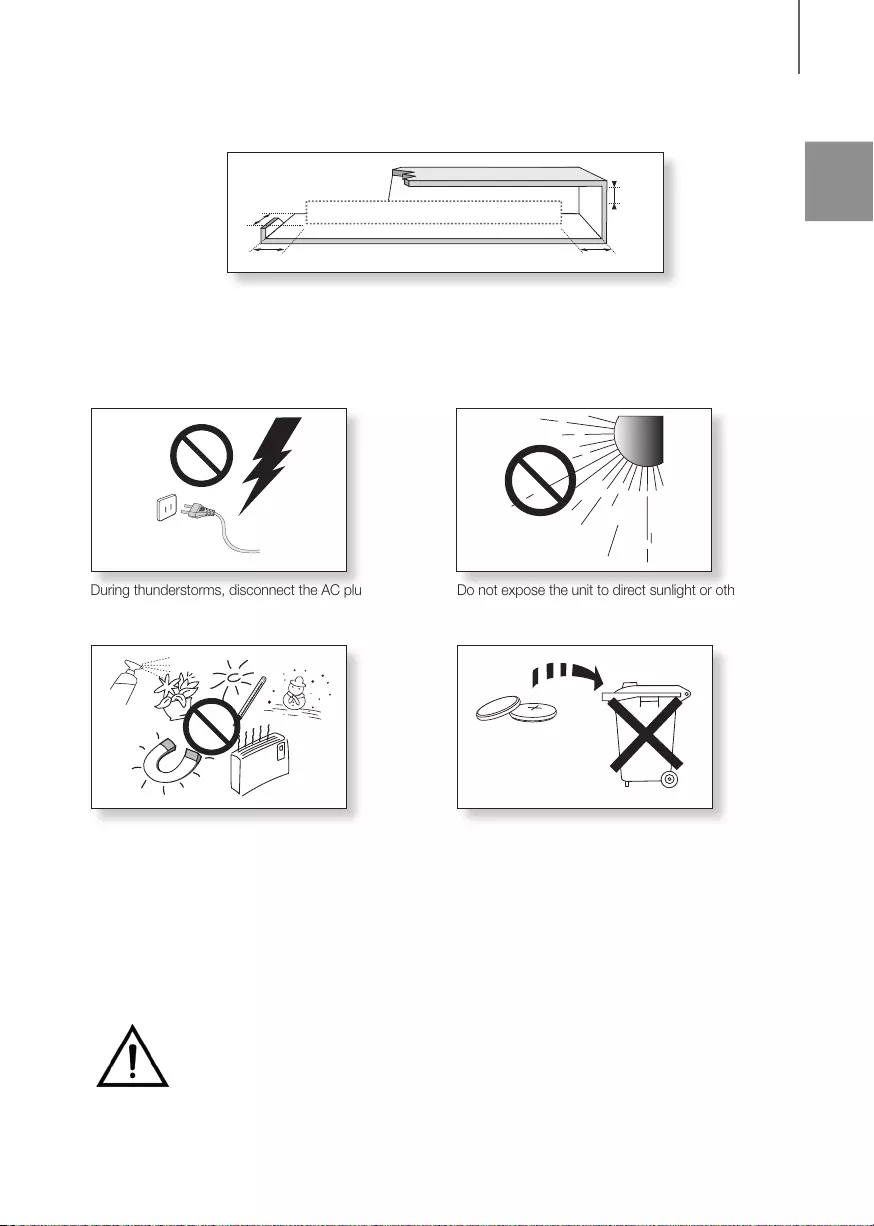
Убедитесь, что источник питания переменного тока соответствует требованиям, указанным на идентификационной
наклейке, расположенной в нижней части устройства. Установите устройство горизонтально на подходящую поверхность
(мебель), обеспечив достаточно места вокруг него для вентиляции (7-10 см). Убедитесь, что вентиляционные отверстия не
закрыты. Не устанавливайте устройство на усилители или другое оборудование, которое может сильно нагреться. Данное
устройство предназначено для продолжительного использования. Для полного отключения устройства отсоедините вилку
от сетевой розетки. Если планируется не использовать устройство в течение длительного времени, отключите его от сети.
Отсоединяйте вилку от сетевой розетки во время грозы.
Возникающие из-за молний скачки напряжения могут
повредить устройство.
Не подвергайте устройство воздействию влаги (например,
вода из вазы), чрезмерному нагреванию (например, не
ставьте рядом с камином), не размещайте поблизости
оборудование, излучающее сильные магнитные или
электрические поля. В случае неисправной работы
устройства отсоедините кабель питания переменного тока
от сетевой розетки. Данное устройство не предназначено
для промышленного использования. Оно предназначено
только для личного использования. При хранении
устройства в условиях низкой температуры возможно
образование конденсата. Перед использованием
устройства после транспортировки в зимнее время
подождите, пока оно не нагреется до комнатной
температуры. Это займет примерно 2 часа.
Не подвергайте устройство воздействию прямых солнечных
лучей и других источников тепла. Это может вызвать
перегрев и привести к неисправности устройства.
Батарея, используемая в данном устройстве, содержит
вредные для окружающей среды химические элементы. Не
выбрасывайте батарею в контейнер для бытовых отходов.
Не подвергайте батарею перегреву, воздействию прямых
солнечных лучей и возгоранию. Не допускайте короткого
замыкания, перегревания батареи и не разбирайте ее. В
случае неправильной замены батареи существует опасность
взрыва. Для замены используйте только батареи
аналогичного типа.
ПРЕДУПРЕЖДЕНИЕ. НЕ ДОПУСКАЙТЕ ПРОГЛАТЫВАНИЯ БАТАРЕИ – ОПАСНОСТЬ ХИМИЧЕСКОГО ОЖОГА.
Пульт дистанционного управления, поставляемый в комплекте с данным устройством, содержит батарею
типа “таблетка”. Проглатывание батареи типа “таблетка” может вызвать серьезные внутренние ожоги уже
через 2 часа и привести к смертельному исходу. Храните новые и использованные батареи в
недоступном для детей месте. Если отсек для батарей надежно не закрывается, прекратите
использование устройства и держите его подальше от детей. Если вы подозреваете, что батарея была проглочена,
немедленно обратитесь к врачу.
4

СОДЕРЖАНИЕ
2 НАЧАЛО РАБОТЫ
2 Функции
3 Информация по технике
безопасности
6 Комплект поставки
7 ОПИСАНИЕ
7 Передняя/правая боковая панель
8 Нижняя панель
9 Пульт дистанционного управления
12 УСТАНОВКА
12 Установка системы Soundbar
12 Установка настенного крепления
НАЧАЛО РАБОТЫ
RUS
26 ФУНКЦИИ
26 Режим входа
27 Bluetooth
30 Обновление ПО
31 УСТРАНЕНИЕ
НЕИСПРАВНОСТЕЙ
31 УСТРАНЕНИЕ НЕИСПРАВНОСТЕЙ
32 ПРИЛОЖЕНИЕ
32 Технические характеристики
17 ПОДКЛЮЧЕНИЯ
17 Подключение сабвуфера
18 ПОДКЛЮЧЕНИЕ САБВУФЕРА И SWA-
8000S (ПРОДАЕТСЯ ОТДЕЛЬНО)
20 Подключение к телевизору
20 Подключение к ТВ с помощью цифрового
оптического кабеля
21 Функция TV SoundConnect
23 Подключение к внешним
устройствам
23 Оптический или аналоговый аудиокабель
24 USB
● Рисунки и изображения в этом руководстве
пользователя представлены только для справки
и могут отличаться от реального внешнего вида
устройства.
● Плата за обслуживание может взиматься в
следующих случаях:
(a) если вы вызовете специалиста, и он не
обнаружит неисправности устройства (это
возможно, если вы не знакомы с настоящим
руководством;
(б) если вы передадите устройство в ремонтный
центр, и его специалисты не обнаружат
неисправности (это возможно, если вы не
знакомы с настоящим руководством).
● Информация об оплате за обслуживание
предоставляется до выезда технического
специалиста.
5

НАЧАЛО РАБОТЫ
КОМПЛЕКТ ПОСТАВКИ
ПРЕЖДЕ ЧЕМ ОЗНАКОМИТЬСЯ С РУКОВОДСТВОМ
ПОЛЬЗОВАТЕЛЯ
Перед прочтением данного руководства пользователя обратите внимание на следующие термины.
+ Значки, используемые в данном руководстве
Значок Термин Определение
Внимание!
Примечание
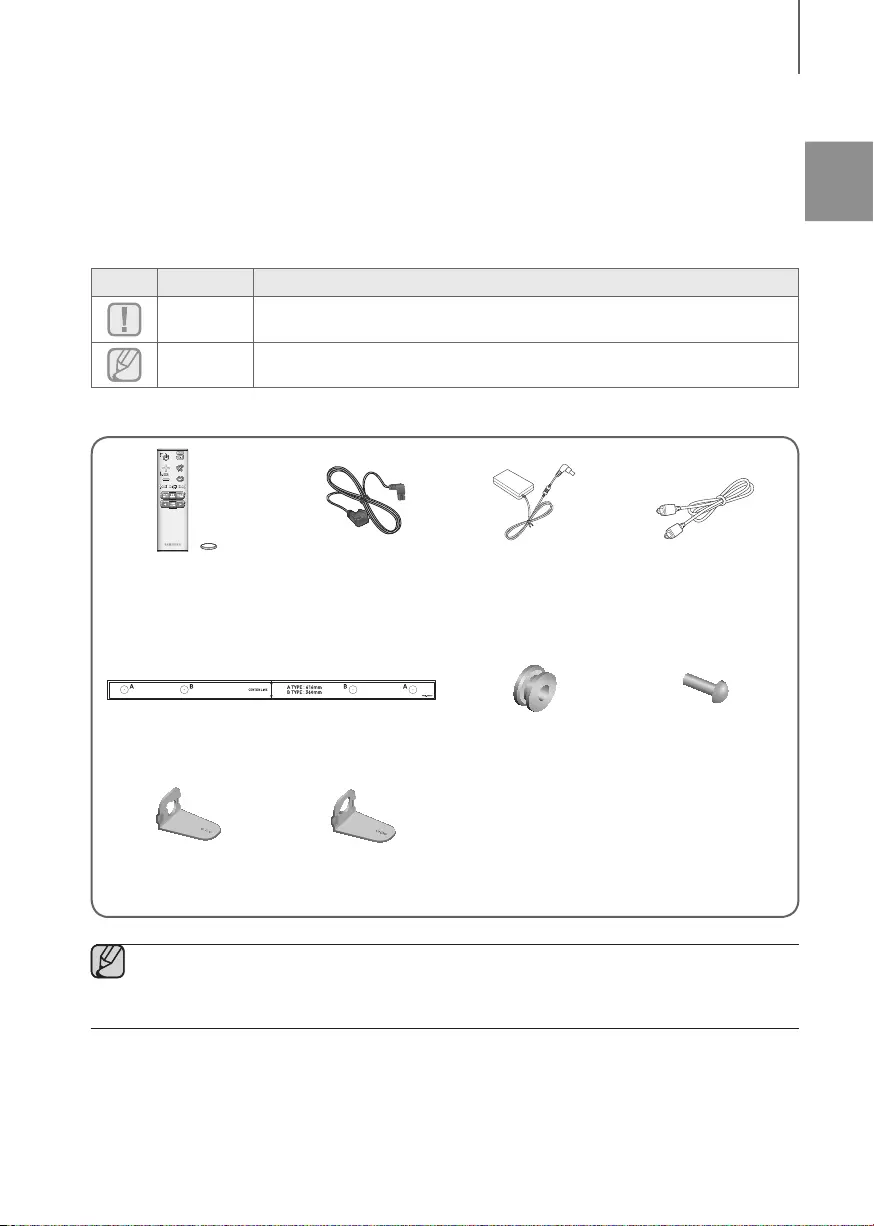
Проверьте наличие указанных ниже принадлежностей, входящих в комплект поставки.
Этот значок присутствует в тех случаях, когда функция не работает или
возможна отмена настроек.
Этот значок указывает на советы или инструкции по использованию той или
иной функции.
Пульт ДУ/литиевая
батарея (3 В: CR2032)
Ориентир для монтажа на стене Держатель винта: 2 шт. Винт: 2 шт.
Кронштейн для
настенного монтажа –
левый
● Внешний вид принадлежностей может несколько отличаться от приведенных выше изображений.
● Кабели Микро USB продаются отдельно. Для приобретения обратитесь в сервисный центр Samsung
или центр поддержки покупателей Samsung.
Кабель питания: 2 шт.
Кронштейн для
настенного монтажа –
правый
Адаптер питания
переменного/
постоянного тока
Оптический кабель
6
ОПИСАНИЕ
DESCRIPTIONS
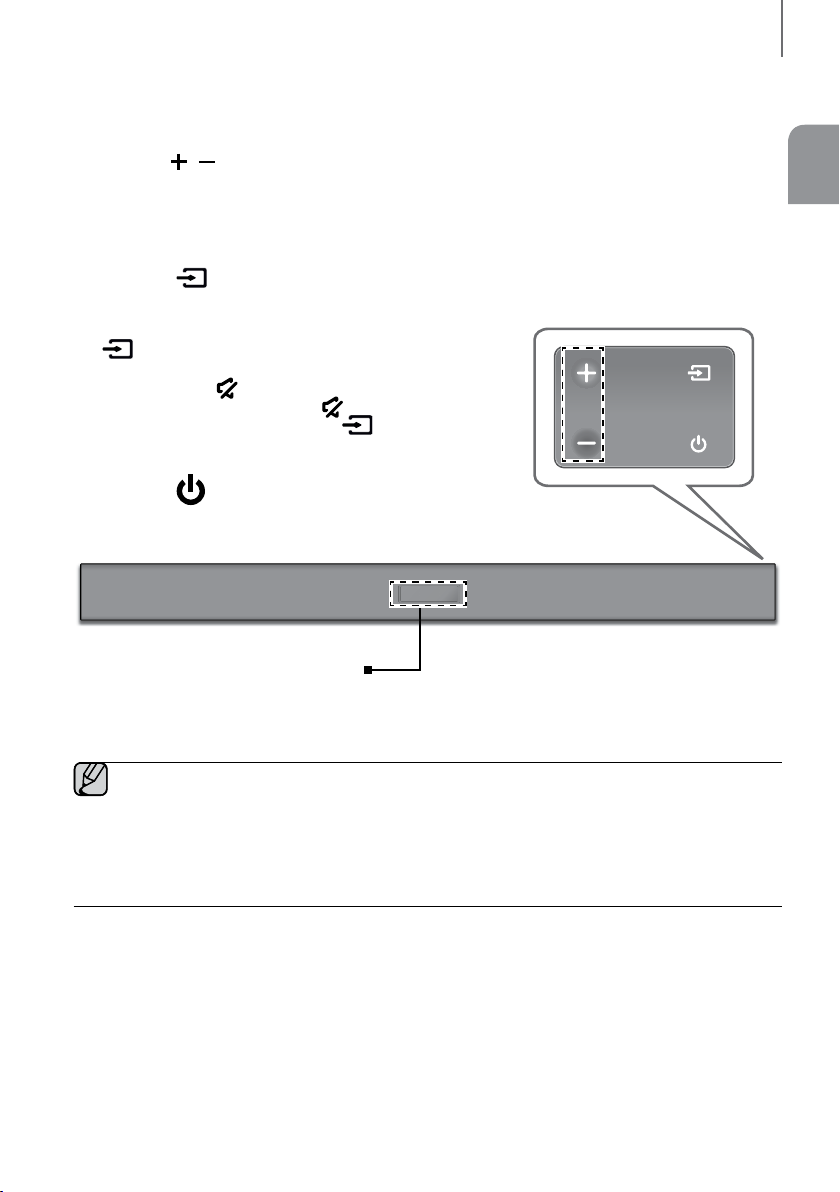
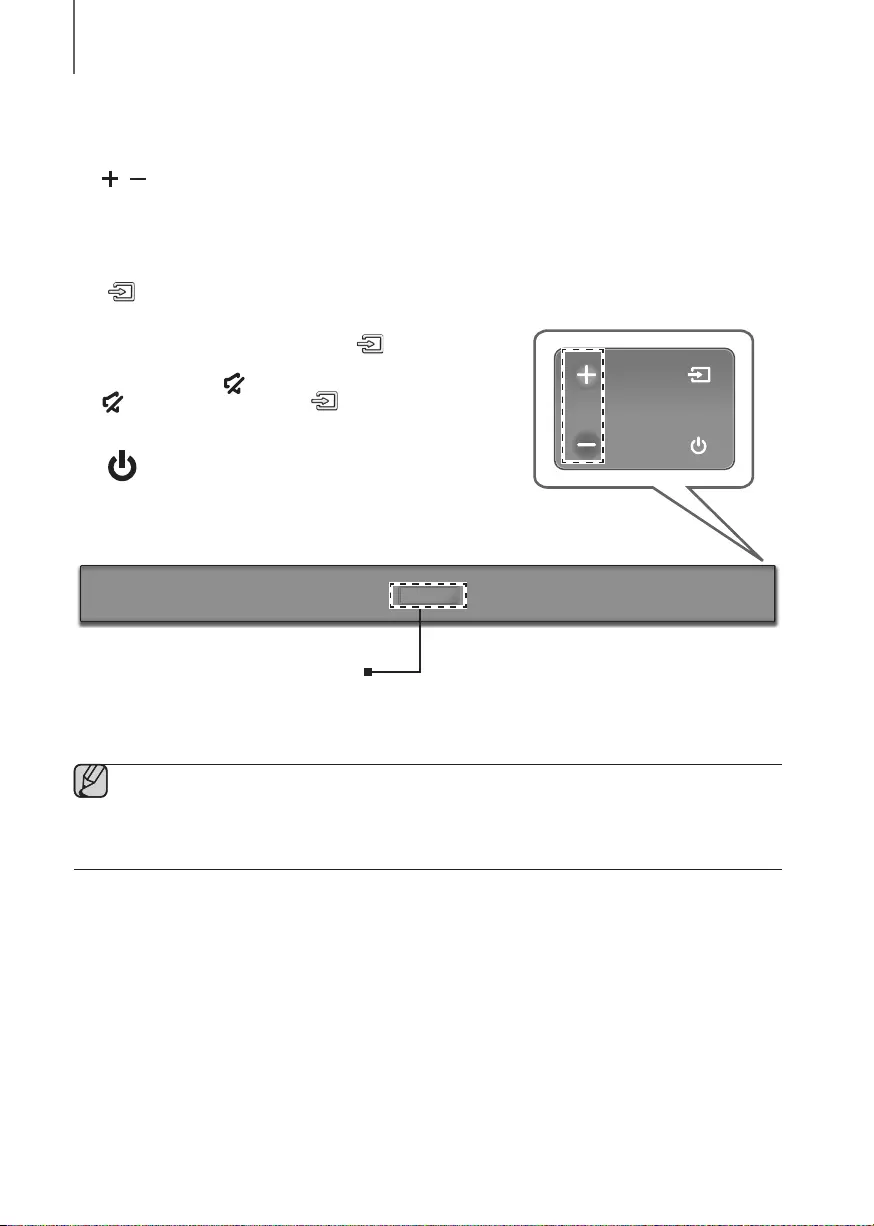
ПЕРЕДНЯЯ/ПРАВАЯ БОКОВАЯ ПАНЕЛЬ
1
Кнопка
Регулировка уровня громкости.
Цифровое значение уровня громкости отображается на
дисплее на передней панели.
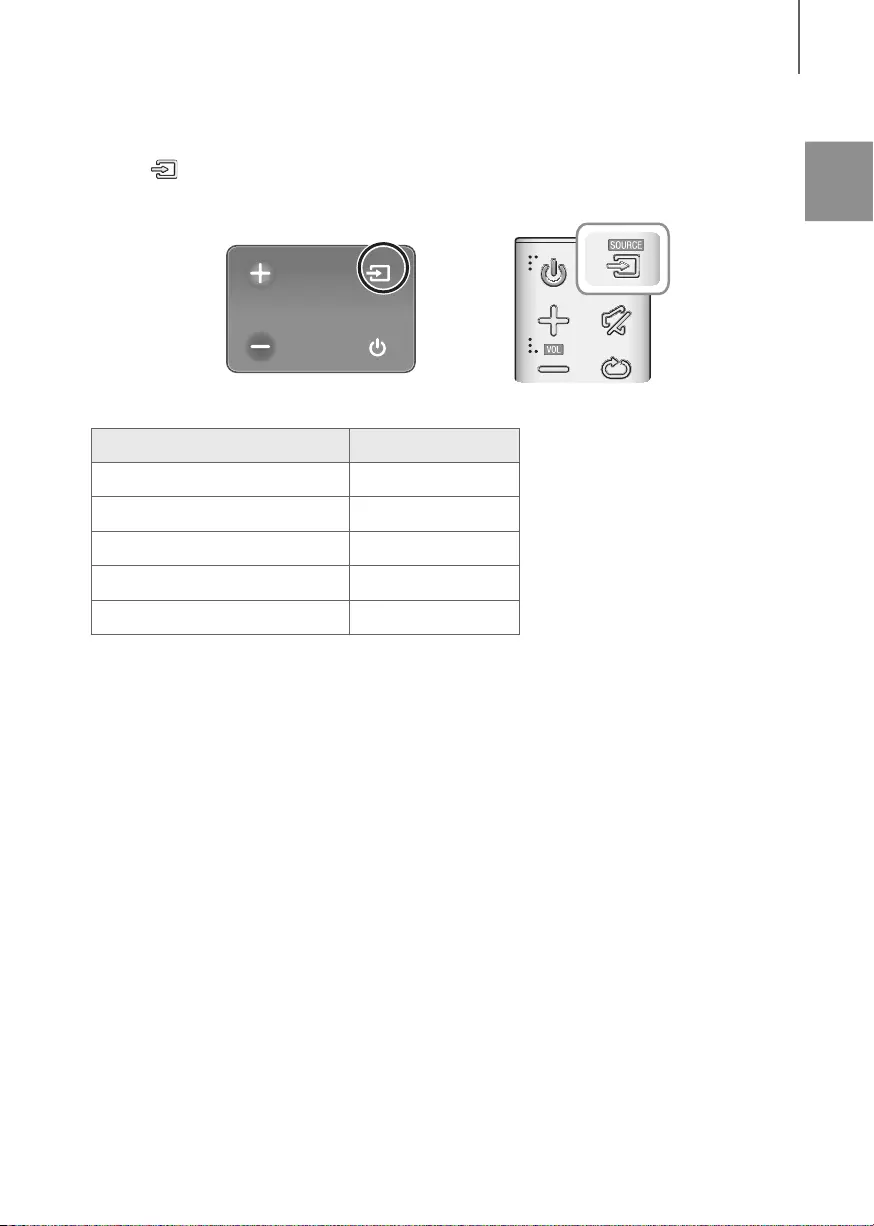
2 Кнопка (Источник)
Выберите D.IN, AUX, BT, ТВ или вход USB.
● Если нажать и удерживать более 3 секунд кнопку
устройства, она будет работать в качестве кнопки
отключения звука
функции кнопки отключения звука
снова нажмите и удерживайте кнопку
(Источник) более 3 секунд.
3 Кнопка (Питание)
Включение и выключение питания.
/
(Громкость звука)
(Источник) при включенном питании
(Откл. звука). Для деактивации
(Откл. звука)
Правая панель
2
1
3
RUS
Отображение на дисплее
Отображает текущий режим.
● При подключении кабеля питания переменного тока кнопка питания активируется через 4 — 6
секунд.
● Воспроизведение звука начнется только через 4 – 5 секунд после включения питания устройства.
● Если требуется воспроизвести звук только с системы Soundbar, необходимо отключить
громкоговорители телевизора в меню настройки звука телевизора. См. руководство пользователя,
прилагаемое к ТВ.
7
ОПИСАНИЕ
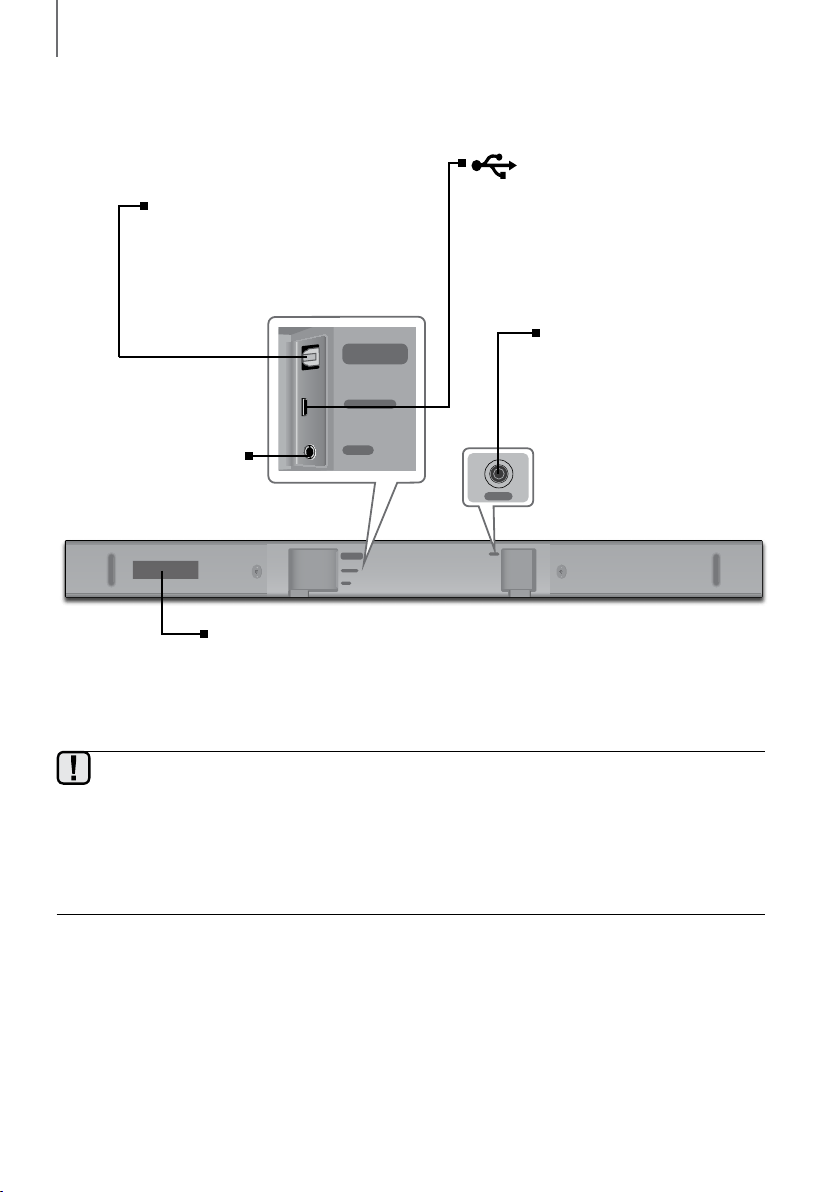
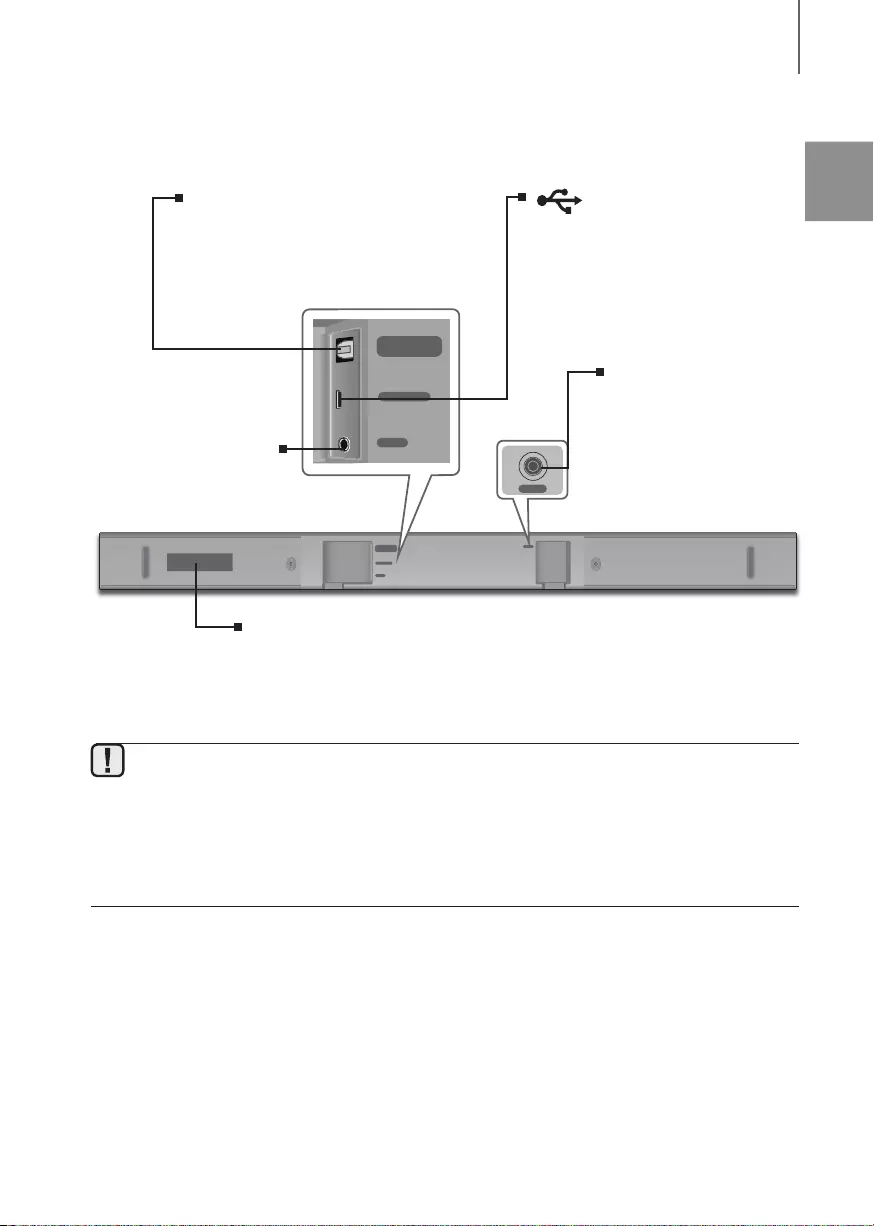
НИЖНЯЯ ПАНЕЛЬ
ЦИФРОВОЙ АУДИОВХОД
(ОПТИЧЕСКИЙ)
Подключение к цифровому (оптическому)
выходу внешнего устройства.
DIGITAL AUDIO IN
(OPTICAL)
USB (5V 0.5A)
DIGITAL AUDIO IN
(OPTICAL)
USB (5V 0.5A)
AUX IN
AUX IN
РАЗЪЕМ AUX IN
Подключение к аналоговому
выходу внешнего
устройства.
(Порт Micro USB)
Подключите кабель Micro USB к порту Micro
USB с использованием стандартного
адаптера USB (не входит в комплект), затем
подключите устройство USB к адаптеру для
воспроизведения музыки с устройства USB.
См. технические характеристики кабеля USB
на стр. 24.
19 В постоянного тока
(входной разъем
источника питания)
Соедините разъем адаптера
переменного/постоянного тока с
разъемом источника питания,
затем вставьте вилку адаптера
питания переменного/постоянного
DC 19V
тока в сетевую розетку.
DC 19V
НАКЛЕЙКА
● При отсоединении кабеля питания адаптера питания переменного/постоянного тока от розетки
держите его за вилку. Не тяните за кабель питания.
● Не следует подключать это устройство или другие компоненты к розетке переменного тока пока не
будут выполнены все подключения компонентов.
● Обязательно положите адаптер питания переменного/постоянного тока на стол или на пол. Если
оставить адаптер висеть входом кабеля переменного тока вверх, внутрь адаптера могут попасть вода
или другие загрязнители, что может стать причиной его неисправности.
8

ПУЛЬТ ДИСТАНЦИОННОГО
УПРАВЛЕНИЯ
ИСТОЧНИК
Выбор источника, подключенного к системе Soundbar.
Отключение звука
С помощью нажатия на эту кнопку можно отключить звук. Для
восстановления прежнего уровня громкости нажмите эту кнопку еще раз.
Повтор
Нажмите для выбора функции повтора во время воспроизведения музыкальных
файлов с устройства USB.
БЕЗ ПОВТОРА: отмена повторного воспроизведения.
ПОВТОР ДОРОЖКИ: повторное воспроизведение дорожки.
ПОВТОР ВСЕХ: повторное воспроизведение всех дорожек.
ПРОИЗВОЛЬНЫЙ ПОВТОР: воспроизведение дорожек в произвольном
порядке. (Можно повторить воспроизведение дорожки.)
Переход вперед
Если на устройстве имеется несколько файлов, то при нажатии кнопки
] будет выбран следующий файл.
ПИТАНИЕ Bluetooth
Нажмите кнопку Bluetooth POWER (ПИТАНИЕ Bluetooth)на пульте
дистанционного управления для включения или выключения функции
Bluetooth Power. Подробнее см. на стр. 22 и 28.
ЗВУК
При использовании функции объемного звучания звук воспроизводится
более глубоко и объемно. При повторном нажатии кнопки
(ЗВУК) происходит переключение настроек объемного звучания: ON
– SURROUND SOUND, OFF – SURROUND SOUND
Нажмите и удерживайте кнопку примерно в течение 5 секунд, чтобы
включить или выключить функцию автоматического включения цепи питания.
OFF – POWER LINK (ЦЕПЬ ПИТАНИЯ ВЫКЛ.), ON – POWER LINK (ЦЕПЬ
ПИТАНИЯ ВКЛ.)
* Автоматическое включение цепи питания
При включении телевизора автоматически включается система Soundbar,
подключенная как источник через оптическое соединение (см. стр. 20).
• Эта функция доступна только в режиме D.IN.
ЗВУКОВОЙ ЭФФЕКТ
Можно выбрать любой из 6 звуковых эффектов: STANDARD (Original Sound)
(СТАНДАРТНЫЙ (Оригинальный Звук)), MUSIC (МУЗЫКА), CLEAR VOICE
(ЧЕТКИЙ ГОЛОС), SPORTS (СПОРТ), MOVIE (КИНО) и NIGHT MODE (НОЧНОЙ
РЕЖИМ) – в зависимости от содержимого, которое необходимо
воспроизвести.
Выберите режим STANDARD (СТАНДАРТНЫЙ) для прослушивания исходного
звука без изменений.
ОПИСАНИЕ
RUS
SOUND
● Soundbar является собственным названием Samsung.
● Для управления телевизором используйте прилагаемый пульт дистанционного управления.
9

ОПИСАНИЕ
Питание
Включение и выключение системы Soundbar.
Громкость
Настройка уровня громкости устройства.
Воспроизведение/пауза
p
Нажмите кнопку
При повторном нажатии кнопки
Если на устройстве имеется несколько файлов, то при нажатии кнопки
Выберите элемент: TREBLE (ВЫСОКИЕ ЧАСТОТЫ), BASS (НИЗКИЕ
ЧАСТОТЫ), SUBWOOFER LEVEL (УРОВЕНЬ ГРОМКОСТИ САБВУФЕРА),
AUDIO SYNC (СИНХРОНИЗАЦИЯ ЗВУКА), REAR SPEAKER (ЗАДНИЙ
Затем с помощью кнопок
частот от -6 до +6, а УРОВЕНЬ ГРОМКОСТИ САБВУФЕРА от -12, -6 до ~ +6.
Нажмите и удерживайте кнопку SOUND CONTROL (УПРАВЛЕНИЕ ЗВУКОМ)
примерно в течение 5 секунд, чтобы настроить звучание каждого частотного
диапазона. Доступны варианты: 150 Гц, 300 Гц, 600 Гц, 1,2 кГц, 2,5 кГц, 5 кГц
и 10 кГц. Для каждого из них можно установить громкость от -6 до +6.
• Чтобы отрегулировать уровень громкости сабвуфера с помощью
мобильного приложения Samsung Audio Remote, нажмите кнопки
для уменьшения или увеличения уровня громкости сабвуфера в течение 3
видеоизображение отстает от звука, нажмите кнопку SOUND CONTROL
(УПРАВЛЕНИЕ ЗВУКОМ) для выбора функции СИНХРОНИЗАЦИИ ЗВУКА с
видеоизображением. С помощью кнопок
звука в диапазоне от 0 до 300 мс. Использование функции синхронизации
для временной приостановки воспроизведения файла.
ГРОМКОГОВОРИТЕЛЬ) или REAR LEVEL (УРОВЕНЬ ЗАДНЕГО
,
Если система Soundbar подключена к цифровому телевизору и
p
воспроизведение выбранного файла
[
будет выбран предыдущий файл.
отрегулируйте громкость высоких или низких
секунд на кнопке WOOFER (САБВУФЕР).
,
настройте время задержки
звука доступно только в режиме USB, ТВ и BT.
возобновляется.
Переход назад
УПРАВЛЕНИЕ ЗВУКОМ
ГРОМКОГОВОРИТЕЛЯ).
[
, ]
Для контроля громкости звука заднего громкоговорителя выберите
элемент REAR SPEAKER (ЗАДНИЙ ГРОМКОГОВОРИТЕЛЬ) в настройках
управления звуком, а затем с помощью кнопок
,
регулируйте
включение и выключение заднего громкоговорителя.
Для контроля уровня громкости звука заднего громкоговорителя выберите
элемент REAR LEVEL (УРОВЕНЬ ЗАДНЕГО ГРОМКОГОВОРИТЕЛЯ) в
настройках управления звуком, а затем с помощью кнопок
,
регулируйте звук заднего громкоговорителя от -6 до ~+6.
• Режим REAR SPEAKER (ЗАДНИЙ ГРОМКОГОВОРИТЕЛЬ) и REAR
LEVEL (УРОВЕНЬ ЗАДНЕГО ГРОМКОГОВОРИТЕЛЯ) доступен только для
подключения SWA-8000S (продается отдельно).
10
Loading…

Wireless Audio — Soundbar
Imagine the possibilities
Thank you for purchasing this Samsung product.
To receive more complete service, please register your product at
www.samsung.com/register
User manual
HW-K360
HW-KM36
HW-KM36C
Wireless Subwoofer (PS-WK360)

2
GETTING STARTED
FEATURES
GETTING STARTED
Samsung Remote App
Hold the control of your Soundbar in the palm of your
hand with an Android smart device and the Samsung
Audio Remote app. This convenient app lets you control
all the Soundbar‘s basic functions such as power,
volume, and the media controls, and lets you control
customizable functions such as the equalizer.
Surround Sound Expansion
The Surround Sound Expansion feature adds depth and
spaciousness to your listening experience.
TV SoundConnect
Listen to TV audio through the Soundbar by connecting
your TV and the Soundbar via Bluetooth with
TV SoundConnect. Easy connectivity and the absence of
trailing wires between the Soundbar and TV allows you
to showcase the slim and sleek design of both systems,
while maintaining a clean look in your living environment.
Easily control the Soundbar and TV from a single TV
remote.
USB Host Support
You can connect and play music files from external USB
storage devices such as MP3 players, USB flash
memory, etc. using the Soundbar‘s USB HOST function.
Bluetooth Function
You can connect a Bluetooth device to the Soundbar
and enjoy music with high quality stereo sound, all
without wires!
LICENSES
Manufactured under license from Dolby Laboratories.
Dolby and the double-D symbol are trademarks of Dolby
Laboratories.
For DTS patents, see http://patents.dts.com.
Manufactured under license from DTS Licensing Limited.
DTS, the Symbol, & DTS and the Symbol together are
registered trademarks, and DTS 2.0 Channel is a
trademark of DTS, Inc. © DTS, Inc. All Rights Reserved.
ENG
3
GETTING STARTED
SAFETY INFORMATION
●The following also applies to the Wireless Subwoofer (PS-WK360).
SAFETY WARNINGS
TO REDUCE THE RISK OF ELECTRIC SHOCK, DO NOT REMOVE THE COVER (OR BACK).
NO USER-SERVICEABLE PARTS ARE INSIDE. REFER SERVICING TO QUALIFIED SERVICE PERSONNEL.
CAUTION
RISK OF ELECTRIC SHOCK.
DO NOT OPEN.
The lighting flash and arrowhead within the triangle
indicates that there is dangerous voltage Inside the
product.
The explanation point within the triangle indicates
that there are important instructions accompanying
the product.
Class II product : This symbol indicates that a safety connection to electrical earth (ground) is not required.
AC voltage : Rated voltage marked with this symbol is AC voltage
DC voltage : Rated voltage marked with this symbol is DC voltage.
Caution. Consult instructions for use : This symbol instructs the user to consult the user manual for further
safety related information.
WARNING
• To reduce the risk of fire or electric shock, do not expose this apparatus to rain or moisture.
• To prevent injury, this apparatus must be securely attached to the floor/wall in accordance with the installation instructions.
• This product contains chemicals known to the State of California to cause cancer and birth defects or other reproductive harm.
CAUTION
• Do not expose this apparatus to dripping or splashing. Do not put objects filled with liquids, such as vases on the apparatus.
• To turn this apparatus off completely, you must pull the power plug out of the wall socket. Consequently, the power plug must be
easily and readily accessible at all times.
This product satisfies FCC regulations when shielded cables and connectors are used to connect the unit to other equipment. To prevent
electromagnetic interference with electric appliances, such as radios and televisions, use shielded cables and connectors for
connections.
FCC NOTE (for U.S.A):
This equipment has been tested and found to comply with the limits for a Class B digital device, pursuant to Part 15 of the FCC Rules.
These limits are designed to provide reasonable protection against harmful interference in a residential installation.
This equipment generates, uses and can radiate radio frequency energy and, if not installed and used in accordance with the
instructions, may cause harmful interference to radio communications. However, there is no guarantee that interference will not occur in a
particular installation.
If this equipment does cause harmful interference to radio or television reception, which can be determined by turning the equipment off
and on, the user is encouraged to try to correct the interference by one or more of the following measures:
• Reorienting or relocating the receiving antenna.
• Increasing the separation between the equipment and receiver.
• Connecting the equipment to an outlet that is on a different circuit than the radio or TV.
• Consulting the dealer or an experienced radio/TV technician for help.
Caution : FCC regulations state that any unauthorized changes or modifications to this equipment may void the user’s authority to
operate it.

4
GETTING STARTED
Important Safety Instructions
Read these operating instructions carefully before using the unit. Follow all the safety instructions listed below. Keep these operating
instructions handy for future reference.
1) Read these instructions.
2) Keep these Instructions.
3) Heed all warnings.
4) Follow all instructions.
5) Do not use this apparatus near water.
6) Clean only with a dry cloth.
7) Do not block any ventilation openings. Install in accordance with the manufacturer’s instructions.
 Do not install near any heat sources such as radiators, heat registers, stoves, or other apparatus (including amplifiers) that produce
heat.
9) Do not defeat the safety purpose of the polarized or grounding-type plug. A polarized plug has two blades with one wider than the
other. A grounding type plug has two blades and a third grounding prong. The wide blade or the third prong are provided for your
safety. If the provided plug does not fit into your outlet, consult an electrician for replacement of the obsolete outlet.
10) Protect the power cord from being walked on or pinched particularly at plugs, convenience receptacles, and the point where they
exit from the apparatus.
11) Only use attachments/accessories specified by the manufacturer.
12) Use only with the cart, stand, tripod, bracket, or table specified by the manufacturer, or sold with the apparatus.
When a cart is used, use caution when moving the cart/apparatus combination to avoid injury from tip-over.
13) Unplug this apparatus during lightning storms or when unused for long periods of time.
14) Refer all servicing to qualified service personnel. Servicing is required when the apparatus has been damaged in
any way, such as when the power-supply cord or plug is damaged, liquid has been spilled or objects have fallen
into the apparatus, the apparatus has been exposed to rain or moisture, does not operate normally, or has been dropped.
ENG
5
GETTING STARTED
WARNING: DO NOT INGEST BATTERY. CHEMICAL BURN HAZARD. The remote control supplied with
this product contains a coin/button cell battery. If the coin/button cell battery is swallowed, it can cause
severe internal burns in just 2 hours and can lead to death. Keep new and used batteries away from
children. If the battery compartment does not close securely, stop using the remote and make sure to
keep it away from children. If you think the battery might have been swallowed or placed inside any part of the body,
seek immediate medical attention.
PRECAUTIONS
Ensure that the AC power supply in your house complies with the power requirements listed on the identification sticker
located on the bottom of your product. Install your product horizontally, on a suitable base (furniture), with enough space
around it for ventilation (3~4 inches). Make sure the ventilation slots are not covered. Do not place the unit on amplifiers
or other equipment which may become hot. This unit is designed for continuous use. To fully turn off the unit, disconnect
the AC plug from the wall outlet. Unplug the unit if you intend to leave it unused for a long period of time.
3.9 inch 3.9 inch
2.7 inch
3.9 inch
During thunderstorms, disconnect the AC plug from the
wall outlet. Voltage peaks due to lightning could damage
the unit.
Protect the product from moisture (i.e. vases), and
excess heat (e.g. a fireplace) or equipment creating
strong magnetic or electric fields. Unplug the power
cable from the AC wall socket if the unit malfunctions.
Your product is not intended for industrial use. It is for
personal use only. Condensation may occur if your
product has been stored in cold temperatures.
If transporting the unit during the winter, wait
approximately 2 hours until the unit has reached room
temperature before using.
Do not expose the unit to direct sunlight or other heat
sources. This could lead to overheating and cause the
unit to malfunction.
The battery used with this product contains chemicals
that are harmful to the environment. Do not dispose of
the battery in the general household trash. Do not
expose the battery to excess heat, direct sunlight, or fire.
Do not short circuit, disassemble, or overheat the battery.
Danger of explosion if the battery is replaced incorrectly.
Replace only with the same or equivalent type.

6
GETTING STARTED
Figures and illustrations in this User Manual are
provided for reference only and may differ from actual
product appearance.
CONTENTS
2 GETTING STARTED
2 Features
3 Safety Information
7 What’s Included
8 DESCRIPTIONS
8 Front / RIGHT SIDE Panel
9 Bottom Panel
10 Remote Control
13 INSTALLATION
13 Installing the Soundbar
13 Installing the Wall Mount
18 CONNECTIONS
18 Connecting the Subwoofer
18 Connecting the Subwoofer Automatically
18 Connecting the Subwoofer Manually
19 Connecting the Subwoofer and the
SWA-8000S (Sold Separately)
19 Connecting the Subwoofer and the SWA-
8000S (Sold Separately) Manually
20 Connectiog the Surround Speakers (Sold
Separately)
21 Connecting to a TV
21 Connecting to a TV Using a Digital Optical
Cable
22 TV SoundConnect
24 Connecting to External Devices
24 Optical or Analog Audio Cable
25 USB
27 FUNCTIONS
27 Input Mode
28 Bluetooth
31 Software Update
32 TROUBLESHOOTING
32 Troubleshooting
33 APPENDIX
33 Specifications
ENG
7
GETTING STARTED
WHAT’S INCLUDED
BEFORE READING THE USER’S MANUAL
Note the following terms before reading the user manual.
+Icons used in this manual
Icon Term Definition
Caution
Indicates a situation where a function does not operate or settings may be canceled.
Note
Indicates tips or instructions on the page that help you operate a function.
Check for the supplied accessories shown below.
Remote Control /
Lithium Battery
(3V : CR2032)
(AH59-02733B /
4301-001042)
Power Cord : 2 EA
(3903-000853)
AC/DC Adapter: 2 EA
(BN44-00835A)
Optical Cable
(AH39-00779A)
Wall Mount Guide
(AH63-04369A)
Holder-Screw: 2 EA
(AH61-04110A)
Screw: 2 EA
(6003-001334)
Bracket-Wall Mount L
(AH61-04106A)
Bracket-Wall Mount R
(AH61-04114A)
●The appearance of the accessories may differ slightly from the illustrations above.
●The Micro USB cable is sold separately. To purchase, contact a Samsung Service Center or Samsung
Customer Care.
8
DESCRIPTIONS
FRONT / RIGHT SIDE PANEL
1 /
(Volume) Button
Controls the volume level.
The numeric value of the volume level appears in the front
panel display.
2
(Source) Button
Selects the D.IN, AUX, BT, TV, or USB input.
●While the unit is powered on, pressing the
(Source) button for more than 3 seconds sets the
button to act as the (Mute) button. To cancel the
(Mute) button setup, press the (Source) button
for more than 3 seconds again.
3 (Power) Button
Turns the power on and off.
2
3
Right Side
Display
Displays the current mode.
1
●When you plug in the AC cord, the power button will begin working in 4 to 6 seconds.
●When you turn on this unit, there will be a 4 to 5 second delay before it produces sound.
●If you want to enjoy sound only from the Soundbar, you must turn off the TV’s speakers in the Audio Setup
menu of your TV. Refer to the owner’s manual supplied with your TV.
DESCRIPTIONS
ENG
9
DESCRIPTIONS
BOTTOM PANEL
DIGITAL AUDIO IN
(OPTICAL)
USB (5V 0.5A)
AUX IN
DC 19V
DC 19V
DIGITAL AUDIO IN
(OPTICAL)
USB (5V 0.5A)
AUX IN
DC 19V
(Power Supply In)
Connect the AC/DC power
adaptor to the power supply
jack, and then connect the
AC/DC power adaptor plug to
a wall outlet.
AUX IN
Connect to the Analog output
of an external device.
LABEL
(Micro USB Port)
Connect a Micro USB to Standard USB
adapter (not supplied) to the Micro USB
port, and then connect a USB device to
the adapter to play music from the USB
device. Refer to the USB Cable
specification on page 25.
DIGITAL AUDIO IN (OPTICAL)
Connect to the digital (optical) output of an
external device.
●When disconnecting the power cable of the AC/DC power adaptor from a wall outlet, pull the plug.
Do not pull the cable.
●Do not connect this unit or other components to an AC outlet until all connections between components
are complete.
●Make sure to rest the AC/DC Adapters flat on a table or the floor. If you place an AC/DC Adapter so that it
is hanging with the AC cord input facing upwards, water or other foreign substances could enter the
Adapter and cause the Adapter to malfunction.

10
DESCRIPTIONS
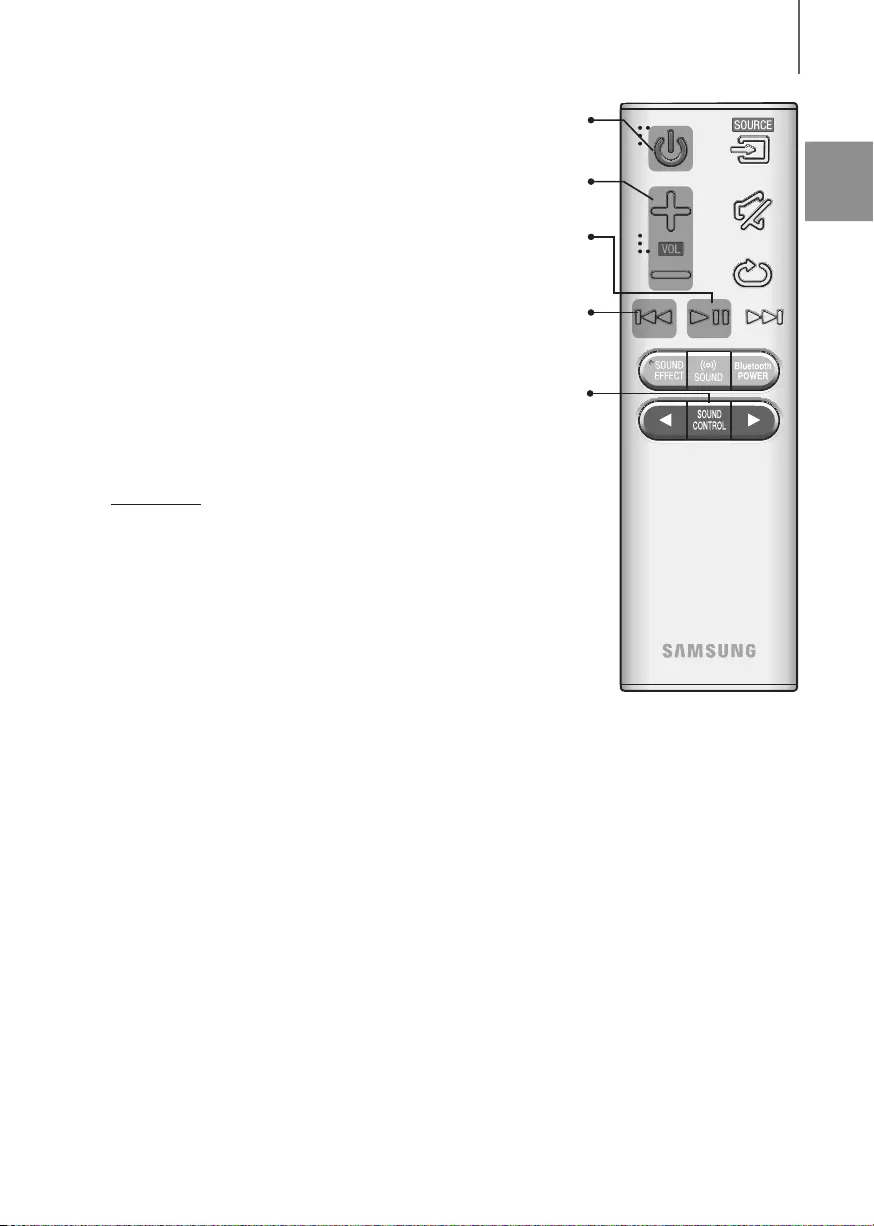
REMOTE CONTROL
Repeat
Press to set the Repeat function during music playback from a USB device.
OFF — REPEAT : Cancels Repeat Playback.
TRACK — REPEAT : Plays a track repeatedly.
ALL — REPEAT : Plays all tracks repeatedly.
RANDOM — REPEAT : Plays tracks in random order.
(A track that has already been played may be played again.)
Mute
You can turn the volume down to 0 with the push of a button.
Press again to restore the sound to the previous volume level.
SOURCE
Press to select a source connected to the Soundbar.
Skip Forward
If there is more than one file on the device you are playing, and you press
the ] button, the next file is selected.
Bluetooth POWER
Press the Bluetooth POWER button on the remote to turn the Bluetooth
POWER On function on and off. See pages 23 and 29 for details.
SOUND
Surr.Sound adds depth and spaciousness to the sound. Pressing the
SOUND button repeatedly cycles through the Surr.Sound settings :
ON — SURROUND SOUND, OFF — SURROUND SOUND
SOUND EFFECT
You can select from 6 different sound modes — STANDARD (Original Sound),
MUSIC, CLEAR VOICE, SPORTS, MOVIE, and NIGHT MODE — depending
on the content you want to listen to.
Select the STANDARD mode if you want to enjoy the original sound.
Press and hold the
button for about 5 seconds to turn the Auto Power Link
function on or off.
OFF — POWER LINK, ON — POWER LINK
* Auto Power Link
Synchronizes the Soundbar to a connected Optical source via the Optical jack
so it turns on automatically when you turn on your TV. (See page 21)
• This function is only available in the D.IN mode.
●Soundbar is a Samsung proprietary name.
●Operate the TV using the TV’s remote control.
ENG
11
DESCRIPTIONS
Volume
Adjusts the volume level of the unit.
Power
Turns the Soundbar on and off.
SOUND CONTROL
Press to select TREBLE, BASS, SUBWOOFER LEVEL, AUDIO SYNC,
REAR
SPEAKER, or REAR LEVEL
.
Then, use the
,
buttons to adjust the Treble or Bass volume from -6 ~ +6,
SUBWOOFER LEVEL volume from -12, -6 ~ +6.
Press and hold the SOUND CONTROL button for about 5 seconds to adjust
the sound for each frequency band. 150Hz, 300Hz, 600Hz, 1.2KHz, 2.5KHz,
5KHz and 10KHz are selectable and each can be adjusted to a setting between
-6 and +6.
• To adjust the woofer level using the Samsung Audio Remote mobile app,
press the
[
, ] buttons to decrease or increase the woofer level within 3
seconds of pressing the WOOFER button.
If the Soundbar is connected to a digital TV and the video appears out of sync
with the audio, press the SOUND CONTROL button to select AUDIO SYNC to
sync the audio with the video. Use the
,
buttons to set the audio delay
between 0 ms and 300 ms. In USB mode, TV mode, and BT mode, the Audio
Sync function is not available.
To control the volume of the rear speaker sound, select REAR SPEAKER in
Sound Control, and then use the , buttons to toggle the rear volume
between OFF-RS and ON-RS.
To control the volume of the rear level sound, select REAR LEVEL in
Sound
Control
, and then adjust the volume between RS -6~+6 using the ,
buttons.
• The REAR SPEAKER and the REAR LEVEL mode are only available when
you connect the SWA-8000S (sold separately).
Play / Pause
Press the
p
button to pause a file temporarily.
Press the
p
button again to play the selected file.
Skip Back
If there is more than one file on the device you are playing, and you press
the
[
button, the previous file is selected.
12
INSTALLATION
+Controlling the Soundbar using Your TV Remote Control
1. Press and hold the SOUND button for more than 5 seconds while the Soundbar is turned on.
2. «ON — TV REMOTE» appears on the Soundbar’s display.
3. In the TV’s menu, set the TV speaker to external speaker.
●TV menus differ by manufacturer and model. Refer to the TV’s user manual for further information.
●Only the VOLUME +/- and the MUTE buttons will be available to control the Soundbar.
●This function is not available when the Soundbar is in the TV SoundConnect mode.
●Manufacturers supporting this function:
— VIZIO, LG, Sony, Sharp, PHILIPS, PANASONIC, TOSHIBA, GRUNDIG, Hisense, RCA
—
This function may not be compatible with your TV‘s remote depending on the remote control’s manufacturer
.
●Each time you press and hold the SOUND button for 5 seconds, ON-TV REMOTE and OFF-TV
REMOTE alternate.
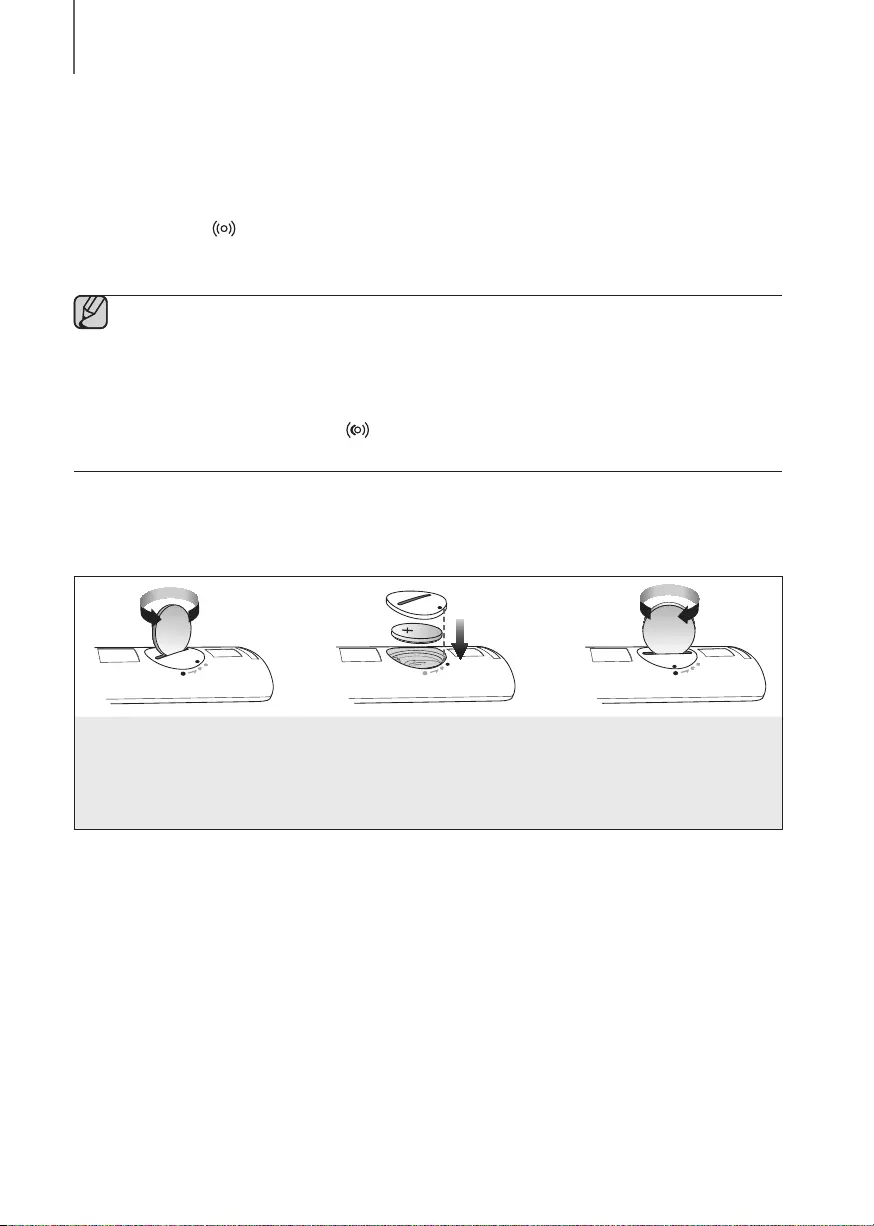
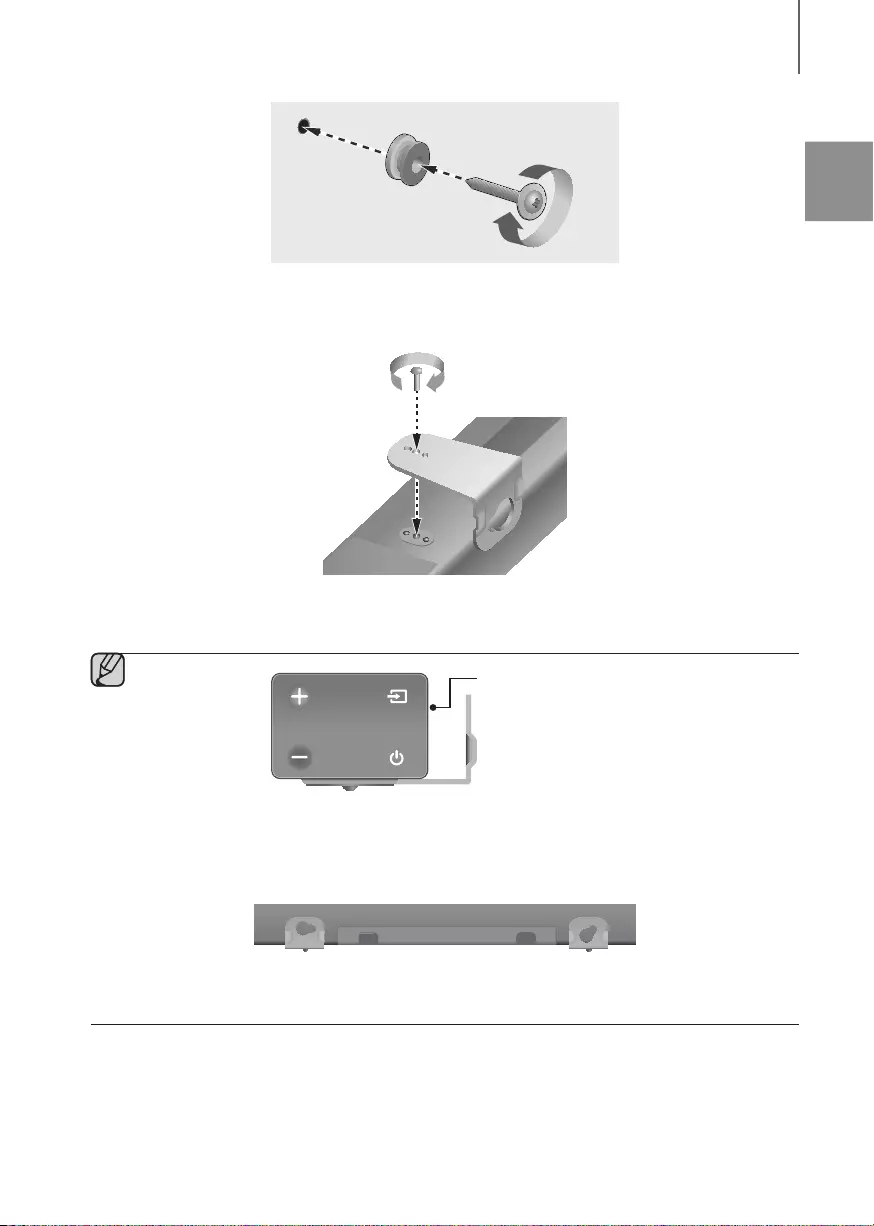
INSTALLING THE BATTERY IN THE REMOTE CONTROL
1. Use a suitable coin to turn the
remote control’s battery cover
counterclockwise to remove it
as shown in the figure above.
2. Insert a 3V lithium battery. Keep the
positive (+) pole facing up when inserting
the battery. Put the battery cover on and
align the ‘●’ marks side by side as
shown in the figure above.
3. Use a suitable coin to
turn the remote control
battery cover clockwise
as far as it will go to fix it
in place.
ENG
13
INSTALLATION
INSTALLING THE SOUNDBAR
INSTALLING THE WALL MOUNT
+Installation Precautions
●Install on a vertical wall only.
●For the installation, avoid a location with high temperature or humidity, or a wall that cannot sustain the weight of
the set.
●Check the strength of the wall. If the wall is not strong enough to support the unit, reinforce the wall or install the
unit on a different wall that can support the unit‘s weight.
●Purchase and use the fixing screws or anchors appropriate for the kind of wall you have (plaster board, iron board,
wood, etc.). If possible, fix the support screws into wall studs.
●Purchase wall mounting screws according to the type and thickness of the wall you will mount the Soundbar on.
—Diameter: M5
—Length: 1 3/8 inches or longer recommended.
●Connect cables from the unit to external devices before you install it on the wall.
●Make sure the unit is turned off and unplugged before you install it. Otherwise, it may cause an electric shock.
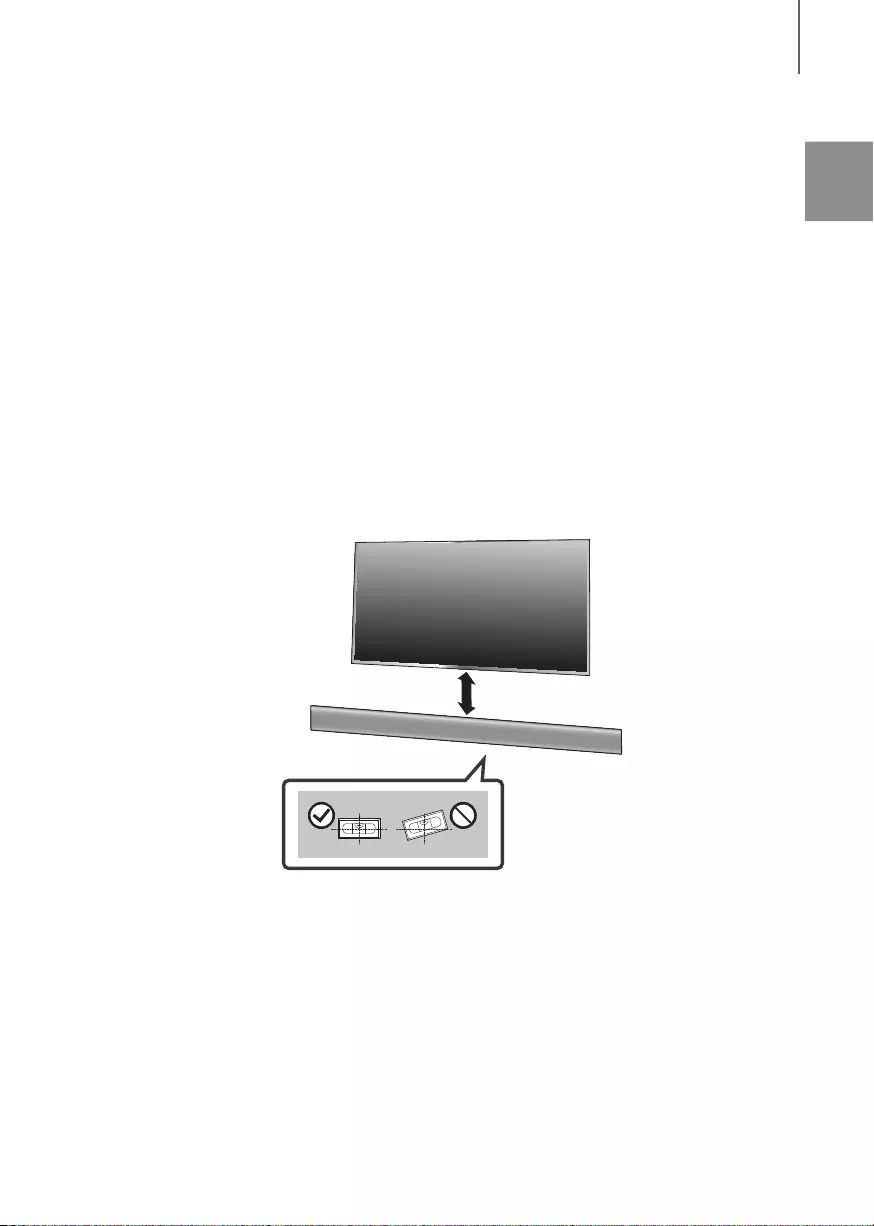
2 inches or more
1. Place the Wall Mount Guide against the wall surface.
• The Wall Mount Guide must be level.
• If your TV is mounted on the wall, install the Soundbar at least 2 inches (5 cm) below the TV.
INSTALLATION
14
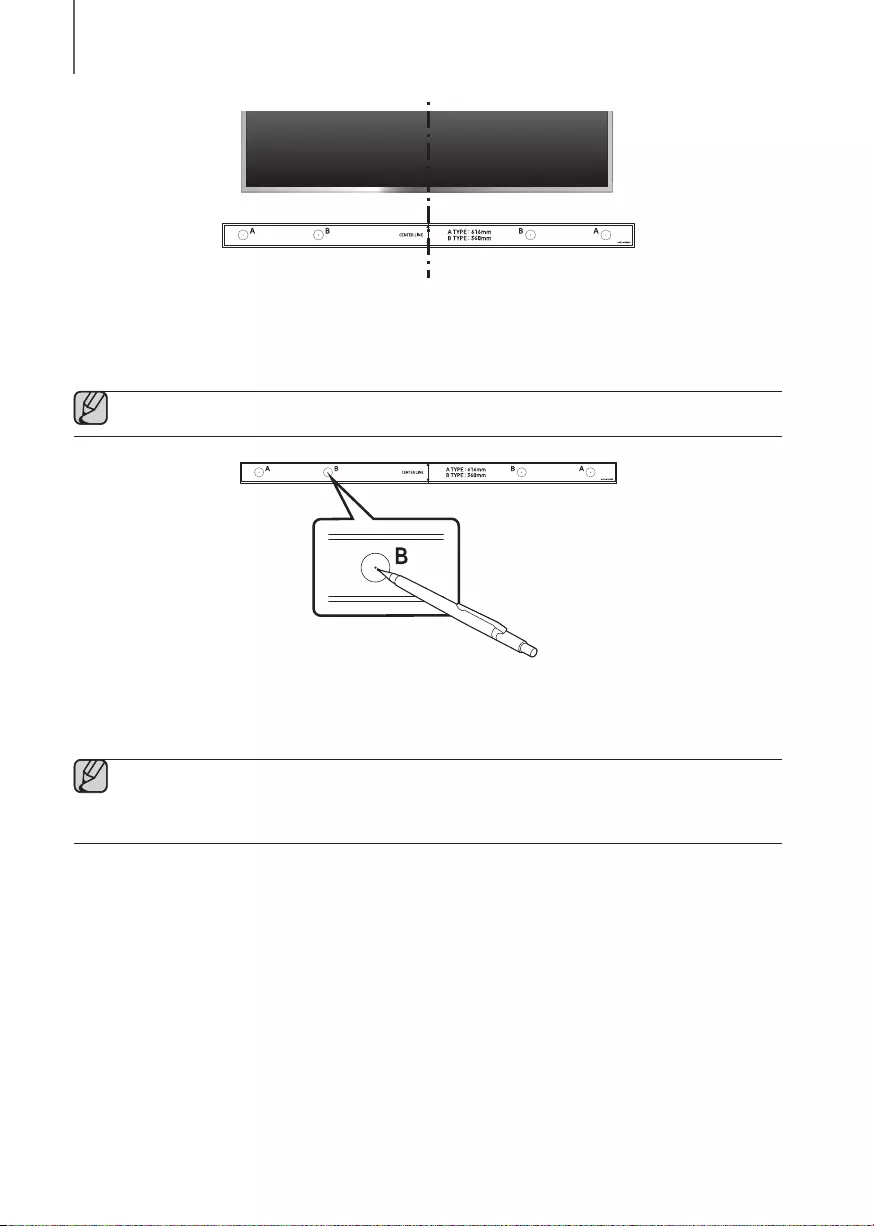
INSTALLATION
Center Line
2. Align the Wall Mount Guide’s Center Line with the center of your TV (if you are mounting the Soundbar below your
TV), and then fix the Wall Mount Guide to the wall using tape.
●If you are not mounting below a TV, place the Center Line in the center of the installation area.
3. Push a pen tip or sharpened pencil tip through the center of the B-TYPE images on each end of the Guide to
mark the holes for the supporting screws, and then remove the Wall Mount Guide.
4. Using an appropriately sized drill bit, drill a hole in the wall at each marking.
●If the markings do not correspond to the positions of studs, make sure you insert appropriate anchors or
mollies into the holes before you insert the support screws. If you use anchors or mollies, make sure the
holes you drill are large enough for the anchors or mollies you use.
ENG
15
INSTALLATION
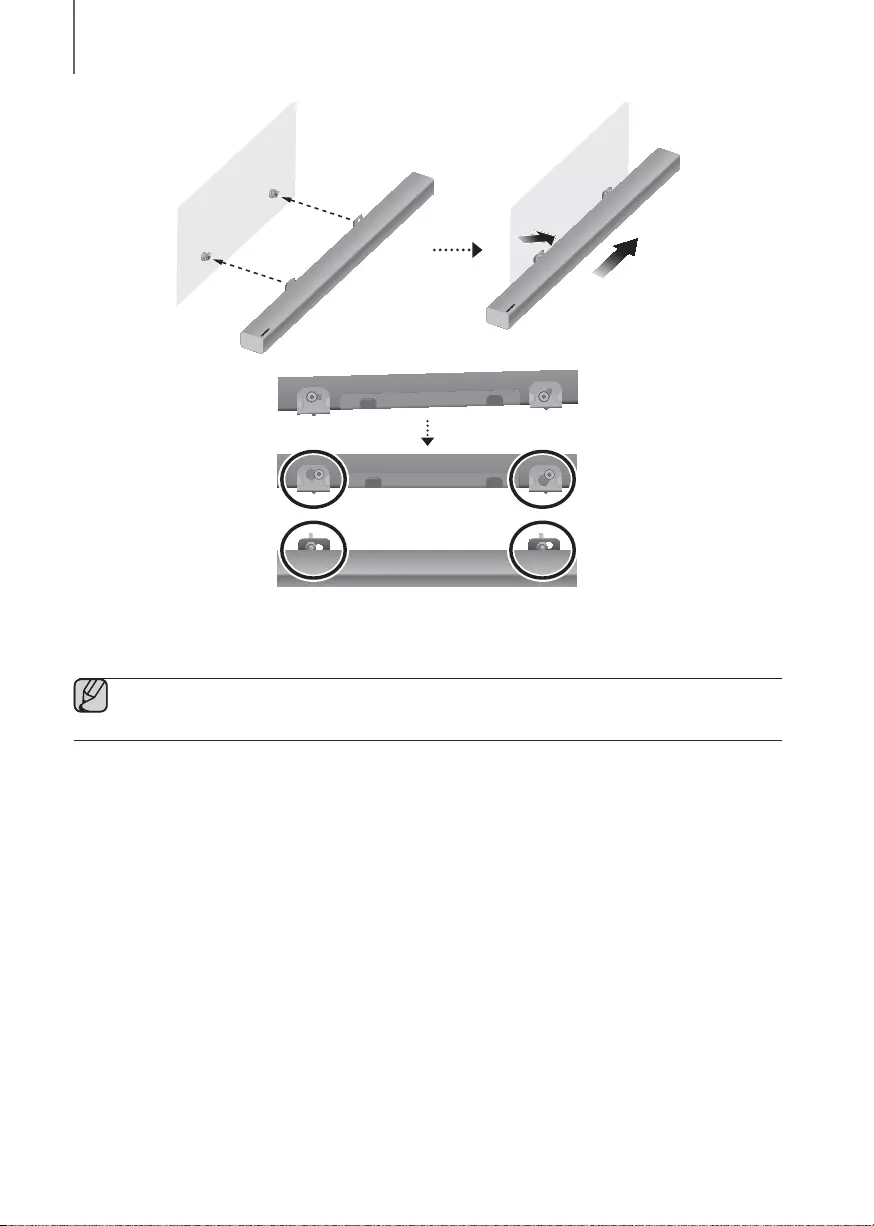
5. Push a screw (not supplied) through each Holder-Screw, and then screw each screw firmly into a support
screw hole.
6. Use the two Screws (M4 x L14) to attach both Bracket-Wall Mount L and R to the Soundbar’s bottom. For a
proper fit, make sure to align the bumps on the Soundbar to the holes on the brackets.
Rear of Soundbar
Right end of Soundbar
●When assembling, make sure the hanger part of the Bracket-Wall Mounts are located behind the rear of
the Soundbar. See the illustration above.
Wall Mount LWall Mount R
●The left and right mounts are different shapes. Make sure to position them correctly.
16
INSTALLATION
7. Install the Soundbar with the attached Bracket-Wall Mounts by hanging the Bracket-Wall Mounts on the
Holder-Screws on the wall.
●Slightly tilt the Soundbar to insert both Holder-Screw heads into the Bracket-Wall Mount holes. Push the
Soundbar in the direction of the arrow to make sure both sides are firmly fixed.
ENG
17
INSTALLATION
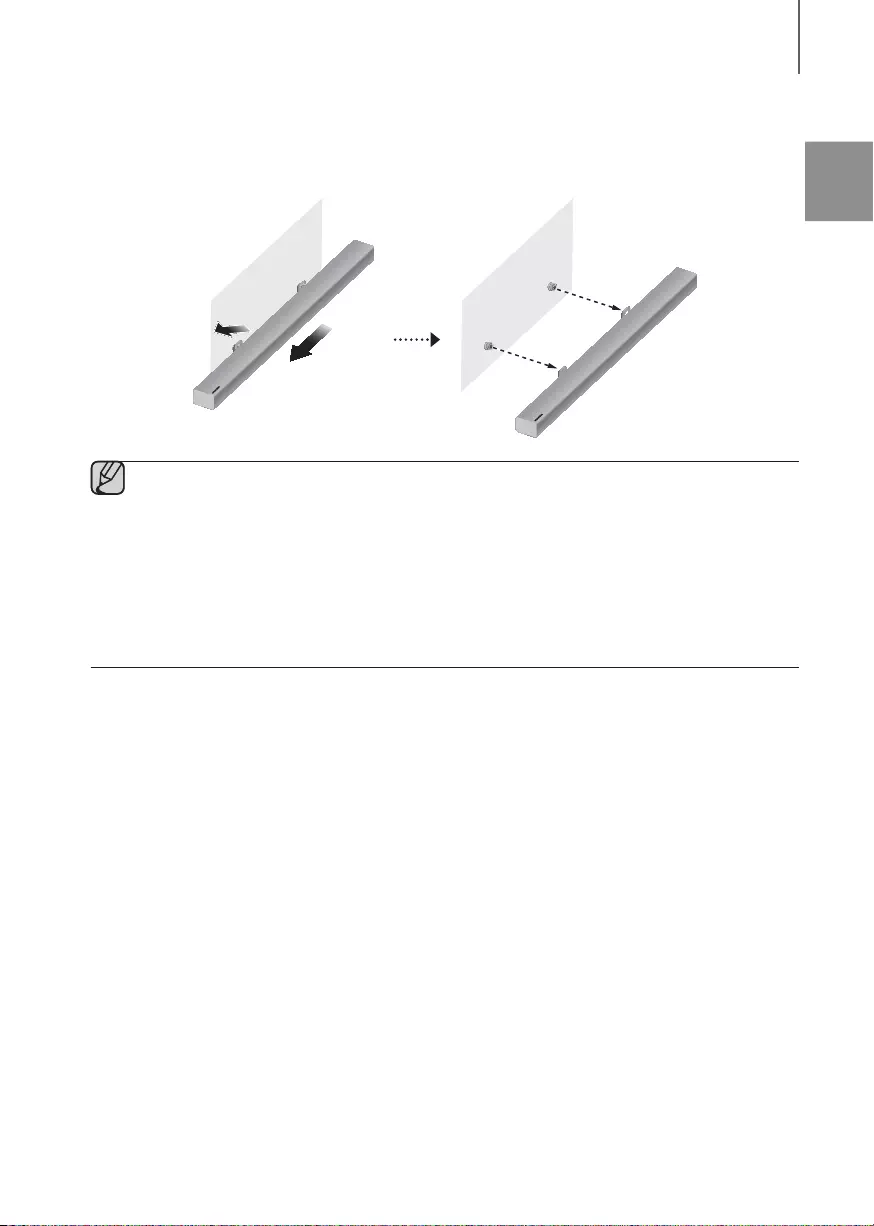
DETACHING THE SOUNDBAR FROM THE WALL
1. To separate the Soundbar from the wall, push it in the direction of the arrow, tilt the Soundbar slightly, and then pull
it away from the wall as shown.
●Do not hang onto the installed unit and avoid striking or dropping the unit.
●Secure the unit firmly to the wall so that it does not fall off. If the unit falls off, it may cause an injury or
damage the product.
●When the unit is installed on a wall, please make sure that children do not pull any of the connecting
cables, as this may cause it to fall.
●For the optimal performance of a wall mount installation, install the speaker system at least 2 inches
(5 cm) below the TV, if the TV is mounted on the wall.
●For your safety, if you do not mount the unit on the wall, install it on a secure, flat surface where it is unlikely
to fall.
18
CONNECTIONS
●Do not connect the power cord of this product or your TV to a wall outlet until all connections between
components are complete.
●Before moving or installing this product, be sure to turn off the power and disconnect the power cord.
CONNECTING THE SUBWOOFER
CONNECTING TO THE SUBWOOFER AUTOMATICALLY
The Subwoofer’s linking ID is preset at the factory and the main unit and subwoofer should link (connect wirelessly)
automatically when the main unit and subwoofer are turned on. When the subwoofer is completely connected, the
blue LED Link Indicator on the subwoofer stops blinking and glows continuously. See the indicator modes below:
1blue
Auto-connection is complete.
2blue
blinking
Auto-connection is not complete.
3blue
is not lit
a. Is the power cord plugged into the outlet? If not, connect the power plug to the outlet.
b. If the power cord is plugged in correctly, check the main unit. If your main unit is off (in standby
mode), the subwoofer will also be in standby mode and the blue LED won’t be lit.
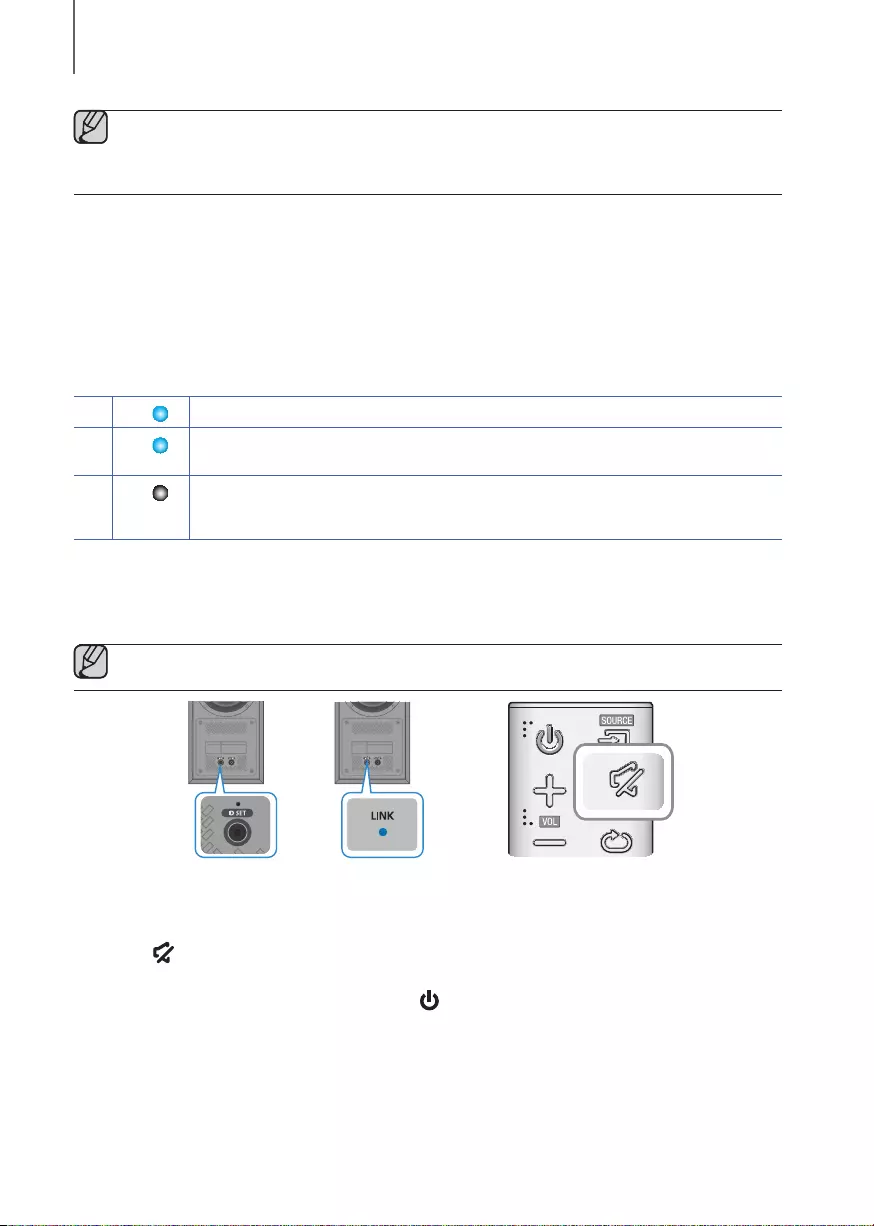
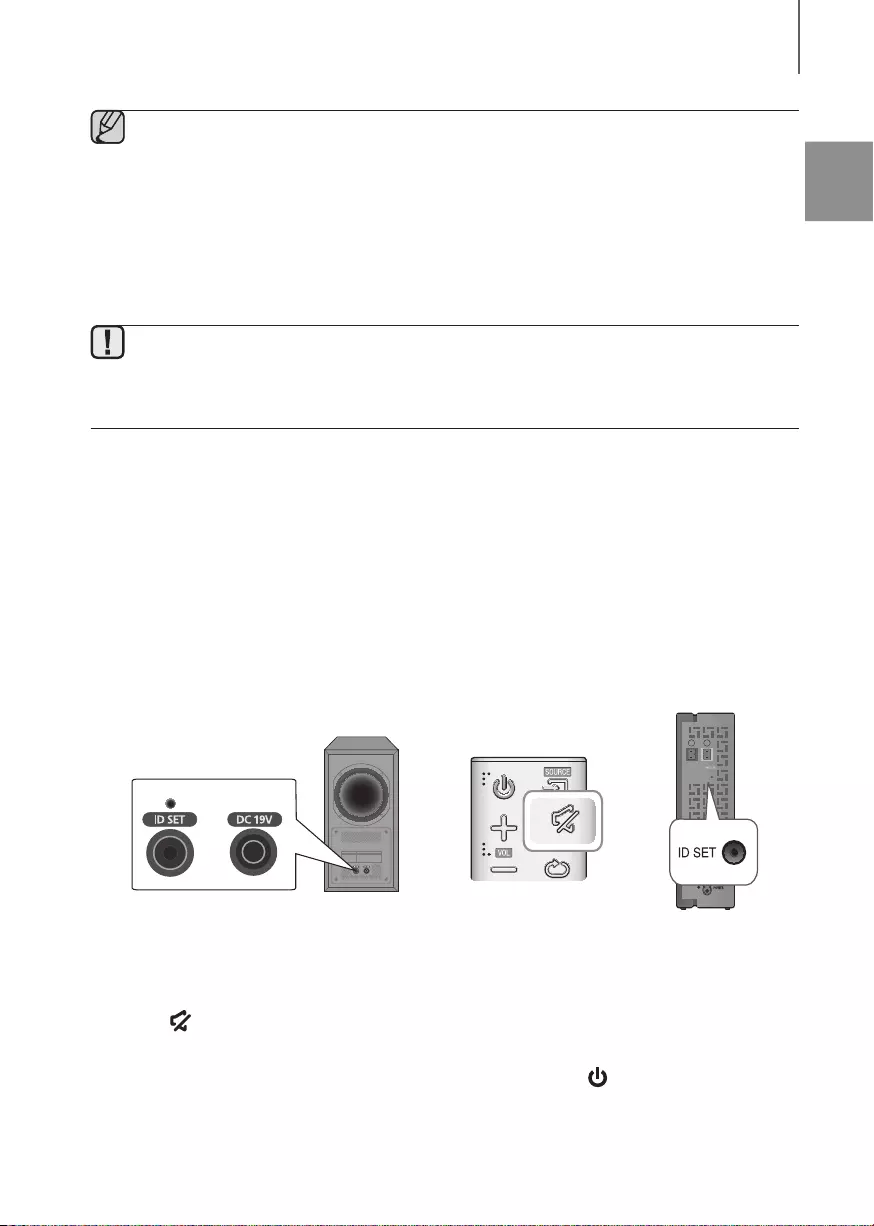
CONNECTING TO THE SUBWOOFER MANUALLY
If the indicator on the rear of the subwoofer does not light in blue, the subwoofer has not automatically connected. If
this occurs, follow the directions below to connect the subwoofer manually.
●Important: Before you begin, put the battery into the remote. See page 12 for instructions.
1. Plug the power cords of the main unit and subwoofer into an AC wall outlet.
2. Press the ID SET button on the rear of the subwoofer with a small, pointed object for 5 seconds.
• The LINK indicator (Blue LED) on the subwoofer blinks quickly.
3. Press the button on your remote control for 5 seconds while the main unit is turned OFF.
4. The ID SET message appears on the display of the main unit for a short period of time, and then disappears.
5. While the subwoofer’s indicator is blinking blue, press the button on your remote control or on the right side of the main
unit to turn on the main unit.
6. The connection is complete if the indicator on the rear of the subwoofer stops blinking and glows continuously.
• The main unit and the subwoofer should now be linked (connected).
• The LINK indicator (Blue LED) on the subwoofer should be glowing continuously and not blinking.
• If the LINK indicator is not solid blue, the linking process has failed. Turn off the main unit and start again from
Step 2.
• You can enjoy better sound from the wireless subwoofer by selecting a Sound Effect. (See page 10)
CONNECTIONS
ENG
19
CONNECTIONS
●Before moving or installing the product, be sure to turn off the power and disconnect the power cord.
●If you use a device that uses the same frequency (2.4GHz) as the Soundbar near the Soundbar,
interference may cause some sound interruption.
●The maximum transmission distance of the wireless signal between the main unit and subwoofer is about
32.8 ft, but may vary depending on your operating environment. If a steel-concrete or metallic wall is
between the main unit and the wireless subwoofer, the system may not operate at all because the wireless
signal cannot penetrate metal.
●If the main unit doesn’t make a wireless connection, repeat steps 1-6 starting on the previous page to
re-set the connection between the main unit and wireless subwoofer.
●The wireless receiving antenna is built into the wireless subwoofer. Keep the unit away from water and
moisture.
●For optimal listening performance, make sure that the area around the wireless subwoofer location is clear
of any obstructions.
Expand to true wireless surround sound by connecting the Samsung Wireless
Rear Speaker Kit (SWA-8000S) to your Soundbar. (Sold separately)
CONNECTING THE SUBWOOFER AND
THE SWA-8000S (SOLD SEPARATELY)
CONNECTING THE SUBWOOFER AND THE SWA-8000S
(SOLD SEPARATELY) MANUALLY
If the blue LEDs do not stop blinking when the main unit, subwoofer, and SWA-8000S are turned on, please reset the
linking ID by following the procedure below.
SURROUND SPEAKERS OUT
SPEAKER IMPED
ID SET
L
R
1. Plug the power cords of the main unit, subwoofer and the SWA-8000S into an AC wall outlet.
2. Press the ID SET button on the back of the subwoofer and the SWA-8000S with a small, pointed object for 5
seconds.
• The LINK indicators (Blue LEDs) on the subwoofer and the SWA-8000S blink quickly.
3. Press the button on your remote control for 5 seconds while the main unit is turned OFF.
4. The ID SET message appears on the display of the main unit for a short period of time, and then disappears.
5. While the subwoofer’s and the SWA-8000S‘s indicators are blinking blue, press the button on your remote control or
on the right side of the main unit to turn on the main unit.
6. The connection is complete if
the blue LEDs on the subwoofer and the SWA-8000S stop blinking
and glow
continuously.
20
CONNECTIONS
• The main unit, the subwoofer and the SWA-8000S should now be linked (connected).
• The LINK indicators (Blue LEDs) on the subwoofer and the SWA-8000S should be glowing continuously and
not blinking.
• If the LINK indicators are not solid blue, the linking process has failed. Turn off the main unit and start again
from Step 2.
• You can enjoy better sound from the wireless subwoofer by selecting a Sound Effect. (See page 10)
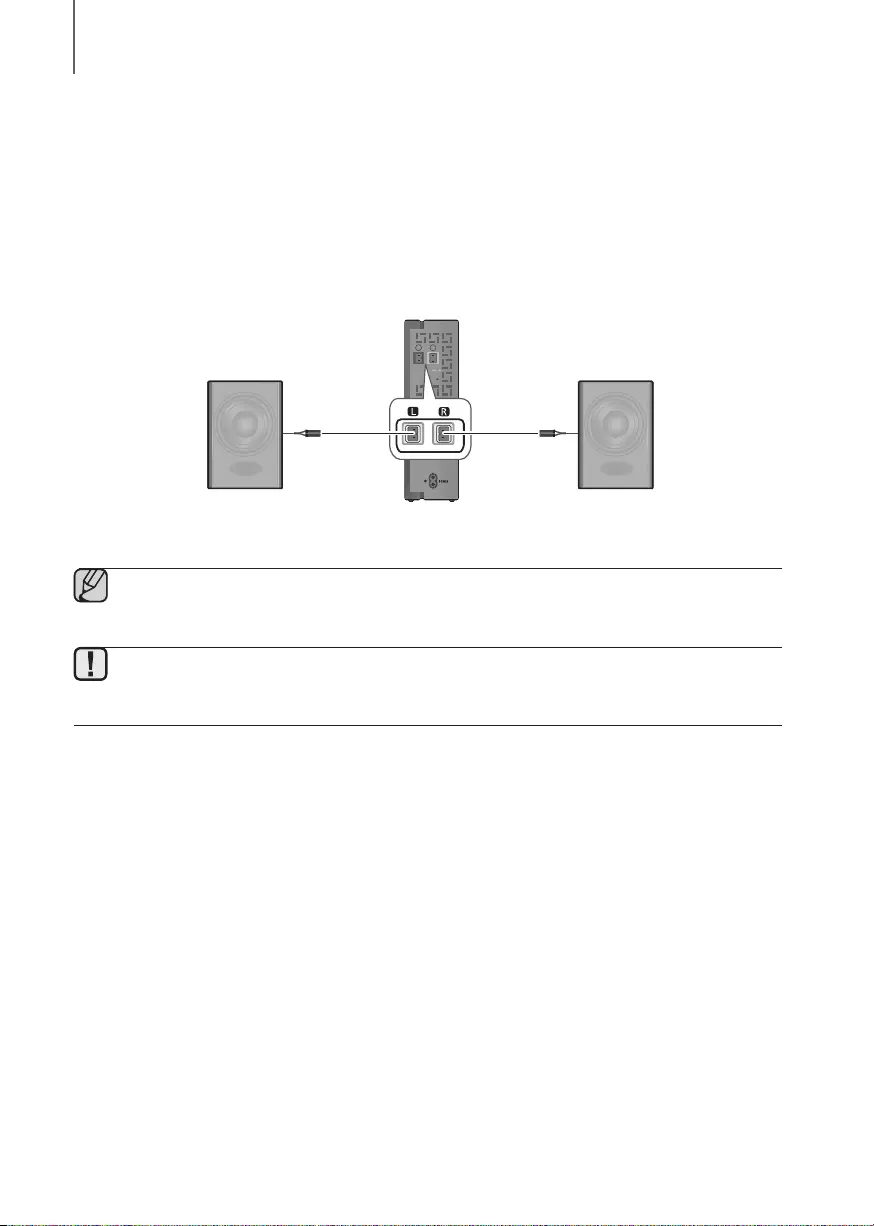
CONNECTING THE SURROUND SPEAKERS (SOLD
SEPARATELY)
SURROUND SPEAKERS OUT
SPEAKER IMPED
ID SET
L
R
Surround Speaker (L) Surround Speaker (R)
Wireless Receiver Module
●Place these speakers to the side of your listening position. If there isn’t enough room, place these
speakers so they face each other. Position them about 2 to 3 feet above your ear, facing slightly
downward.
●Surround speakers must be connected to the wireless receiver module.
●Each speaker has a colored label on its back or underside. Each cable has a single colored band near its end.
Match the band on each cable to the speaker label by color, and then connect the cable to the speaker.
ENG
21
CONNECTIONS
CONNECTING TO A TV
●Important: Before you begin, put the battery into the remote. See page 12 for instructions.
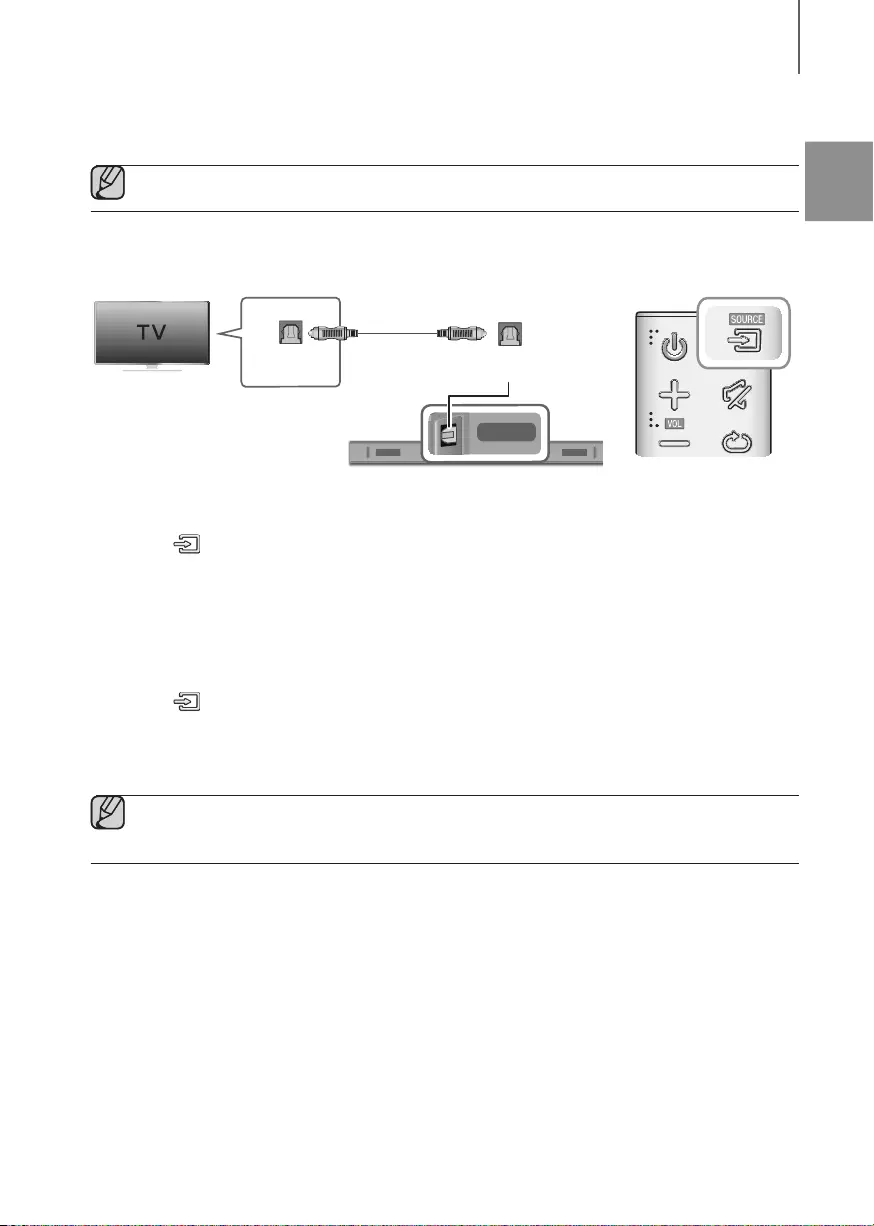
CONNECTING TO A TV USING A DIGITAL OPTICAL CABLE
DIGITAL AUDIO IN
(OPTICAL)
USB (5V 0.5A)
AUX IN
DC 19V
DIGITAL AUDIO IN
(OPTICAL)
DIGITAL AUDIO IN
(OPTICAL)
OPTICAL OUT
Optical Cable
1. Connect the DIGITAL AUDIO IN (Audio) jack on the Soundbar to the OPTICAL OUT jack of the TV with a digital
optical cable.
2. Press the (Source) button on the right side of the Soundbar or the SOURCE button on the remote control to
select the D.IN mode.
+Auto Power Link
If you have connected the main unit to a TV with a digital optical cable, you can set Auto Power Link to ON and
have the Soundbar turn on automatically when you turn the TV on.
1. Connect the Soundbar and
a TV
with a digital optical cable.
2. Press the (Source) button on the main unit’s right side or the SOURCE button on the remote control to select
the
D.IN
mode.
3. Press and hold the
button on the remote control for about 5 seconds
to toggle the Auto Power Link function
on or off.
●Depending on the connected device, Auto Power Link may not function.
●This function is only available when the Soundbar is in the D.IN mode.
22
CONNECTIONS
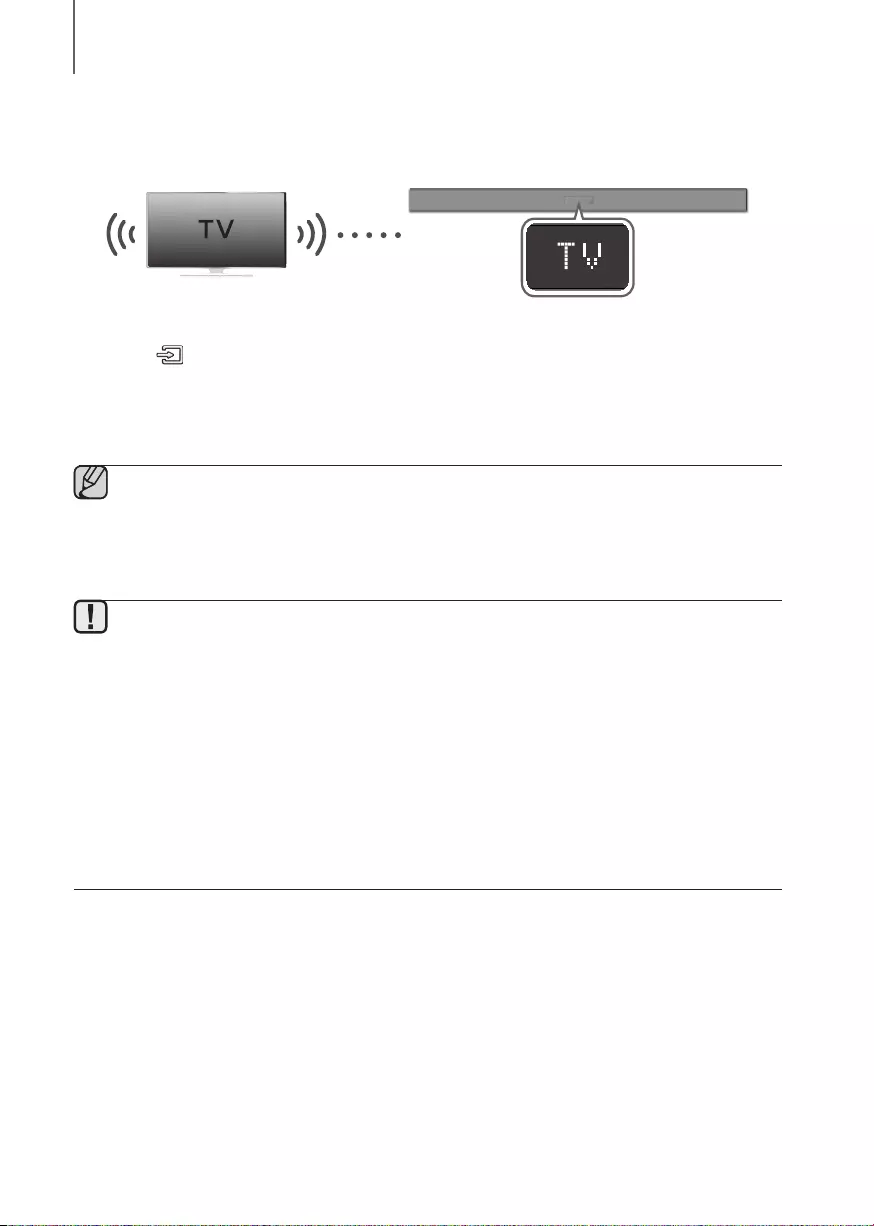
TV SOUNDCONNECT
You can enjoy TV sound through your Soundbar when it is connected to a Samsung TV that supports the
TV SoundConnect function.
Connect
1. Turn on the TV and Soundbar.
2. Press the button on the main unit’s right side or the SOURCE button on the remote control to select the TV
mode.
3. On the TV, a message asking whether to enable the TV SoundConnect function appears.
4. Select <Yes> using the TV‘s remote control to finish connecting the TV and Soundbar.
●Switching the Soundbar’s mode from TV to another mode automatically terminates TV SoundConnect.
●To connect the Soundbar to another TV, the existing connection must be terminated.
●To terminate the existing connection, press and hold the
p
button on the remote for 5 seconds or switch
to another mode. To connect to the other TV, follow Steps 1 through 4 above.
●The TV SoundConnect (SoundShare) function is supported by some Samsung TVs released from 2012 on.
Check whether your TV supports the TV SoundConnect (SoundShare) function before you begin.
(For further information, refer to the TV’s user manual.).
●If your Samsung TV was released before 2014, check the SoundShare setting menu.
●If the distance between the TV and Soundbar exceeds 16.4 ft, the connection may not be stable or the
audio may stutter. If this occurs, relocate the TV or Soundbar so that they are within operational range, and
then re-establish the TV SoundConnect connection.
●TV SoundConnect Operational Ranges:
—Recommended pairing range: within 78.7 inches (within 2 m).
—Recommended operational range: within 16.4 ft. (5 m).
●The Play/Pause, Next, and Prev buttons on the Soundbar or Soundbar’s remote do not control the TV.
ENG
23
CONNECTIONS
+Using the Bluetooth POWER On function
The Bluetooth POWER On function is available after you have successfully connected the Soundbar to a Bluetooth
compatible TV using TV SoundConnect. When the Bluetooth POWER On function is ON, turning the connected TV on
or off will turn the Soundbar‘s power on and off as well.
1. Connect the TV to your Soundbar using the TV SoundConnect function.
2. Press the Bluetooth POWER button on the Soundbar remote. ON — BLUETOOTH POWER appears on the
Soundbar’s display.
• ON — BLUETOOTH POWER : The Soundbar turns on and off when you turn the TV on or off.
• OFF — BLUETOOTH POWER : The Soundbar only turns off when you turn the TV off.
●This function is supported by some Samsung TVs released from 2013 on.
24
CONNECTIONS
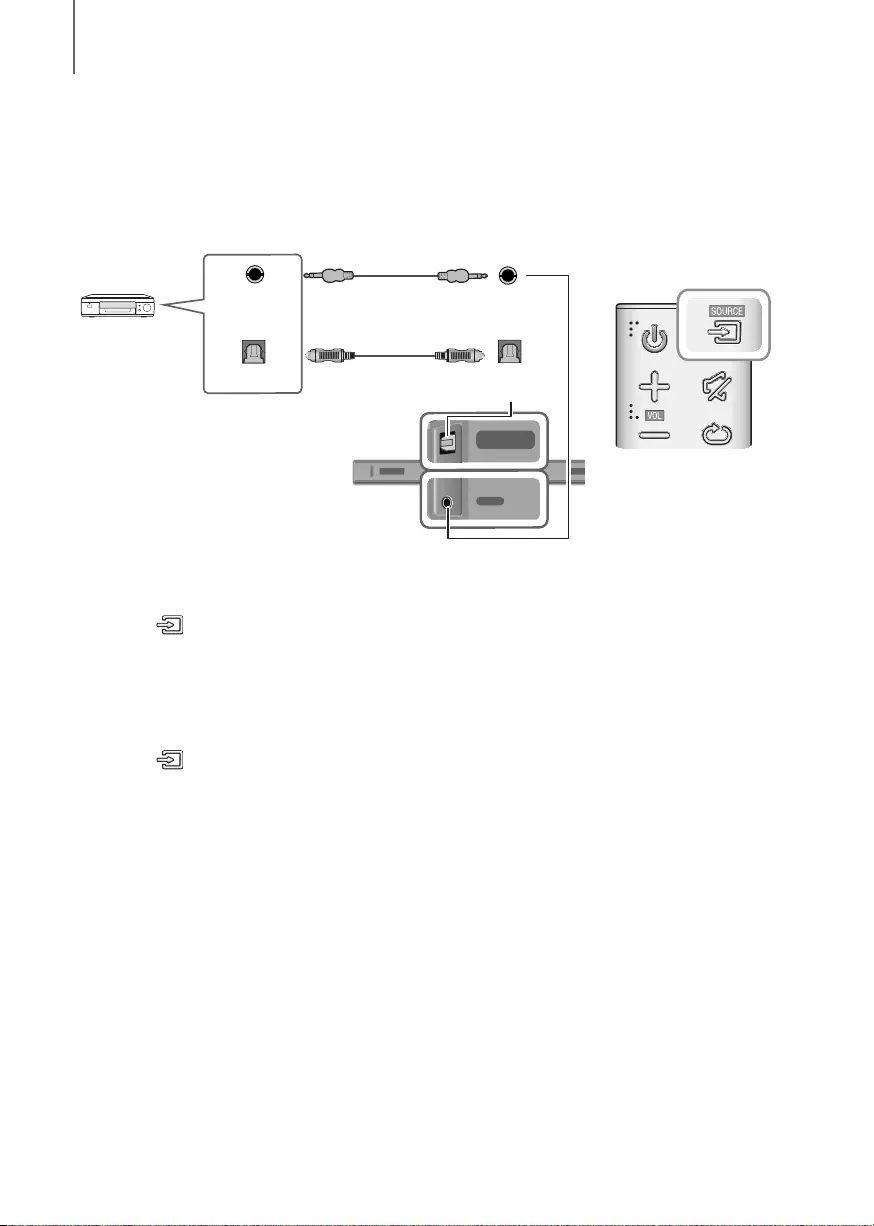
CONNECTING TO EXTERNAL DEVICES
OPTICAL OR ANALOG AUDIO CABLE
This unit comes equipped with one digital optical in jack and one analog audio (AUX) in jack, giving you two
ways to connect it to external devices.
DIGITAL AUDIO IN
(OPTICAL)
USB (5V 0.5A)
AUX IN
DC 19V
DIGITAL AUDIO IN
(OPTICAL)
USB (5V 0.5A)
AUX IN
DIGITAL AUDIO IN
(OPTICAL)
USB (5V 0.5A)
AUX IN
DIGITAL AUDIO IN
(OPTICAL)
OPTICAL OUT
AUX IN
AUX OUT
BD / DVD player /
Set-top box /
Game console
Audio Cable
(not supplied)
Optical Cable
+AUX Cable
1. Connect AUX IN (Audio) on the main unit to the AUDIO OUT jack of the Source Device using an audio cable.
2. Press the (Source) button on the right side of the Soundbar or the SOURCE button on the remote control to
select the AUX mode.
+Optical Cable
1. Connect DIGITAL AUDIO IN (Audio) on the main unit to the OPTICAL OUT jack of the Source Device using a
digital optical cable.
2. Press the (Source) button on the right side of the Soundbar or the SOURCE button on the remote control to
select the D.IN mode.
ENG
25
CONNECTIONS
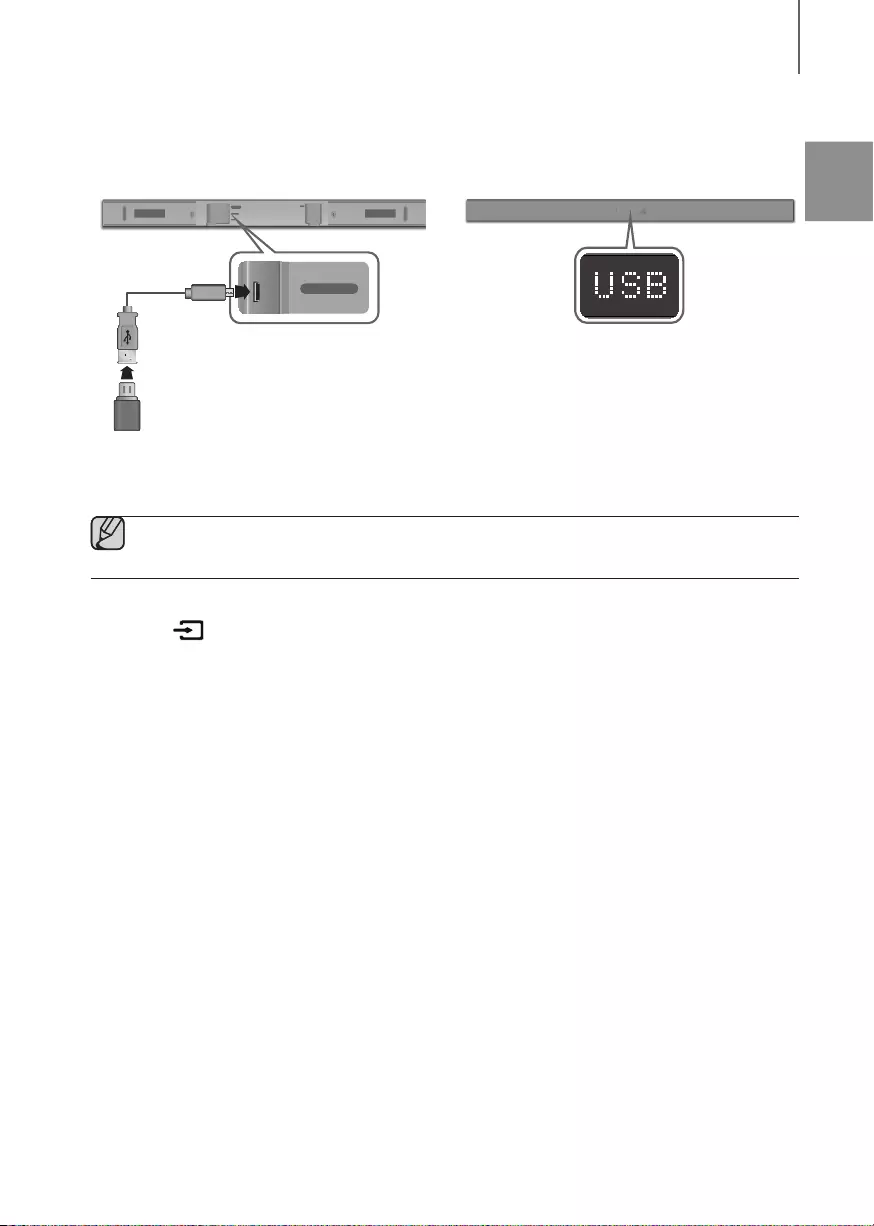
USB
You can play music files located on USB storage devices through the Soundbar.
DIGITAL AUDIO IN
(OPTICAL)
USB (5V 0.5A)
AUX IN
DC 19V
DIGITAL AUDIO IN
(OPTICAL)
USB (5V 0.5A)
AUX IN
Display
USB port
1. Connect a USB adapter cable with a male USB 2.0 Micro USB plug (Type B) on one end and a standard female
2.0 USB jack (Type A) on the other end to the micro USB jack on your Soundbar.
●The USB adapter cable is sold separately. To purchase, contact a Samsung Service Center or Samsung
Customer Care.
2. Connect your USB device to the female end of the adapter cable.
3. Press the button on the main unit’s right side or the SOURCE button on the remote control to select the
USB mode.
4. USB appears on the display screen.
• The Soundbar connection to the USB device is complete.
• The Soundbar automatically turns off (Auto Power Off) if no USB device has been connected for more than
5 minutes.
+Before you connect a USB device
Be aware of the following:
●If the file name of a file on a USB device exceeds 10 characters, it is not displayed on the Soundbar’s display.
●This product may not be compatible with certain types of USB storage media.
●The Soundbar supports the FAT16 and FAT32 file systems.
—The NTFS file system is not supported.
●Connect USB devices to the USB port of the product using a USB 2.0 Micro USB plug to standard female 2.0
USB jack adapter cable. Otherwise, you may encounter a USB compatibility problem.
●Do not connect multiple storage devices to the product via a multi-card reader. It may not operate properly.
●Digital camera PTP protocols are not supported.
●Do not remove the USB device while it is transferring files.
●DRM-protected music files (MP3, WMA) from commercial web sites cannot be played.
●External HDDs are not supported.
●Mobile phone devices are not supported.
USB Adapter Cable
(not supplied)
26
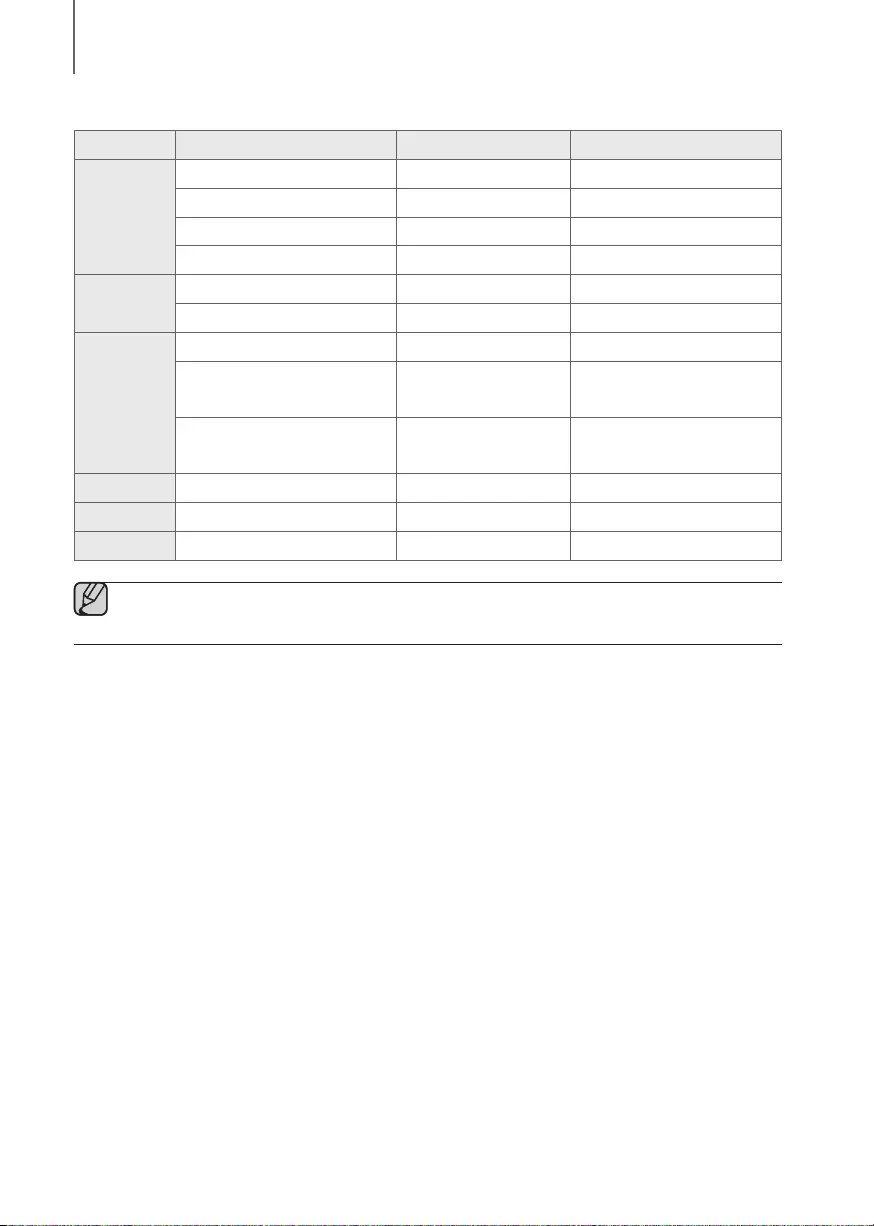
CONNECTIONS
●File Format Type Compatibility list:
Extension Codec Sampling Rate Bitrate
*.mp3
MPEG 1 Layer2 16KHz ~ 48KHz 80kbps~320kbps
MPEG 1 Layer3 16KHz ~ 48KHz 80kbps~320kbps
MPEG 2 Layer3 16KHz ~ 48KHz 80kbps~320kbps
MPEG 2.5 Layer3 16KHz ~ 48KHz 80kbps~320kbps
*.wma
Wave_Format_MSAudio1 16KHz ~ 48KHz 56kbps~128kbps
Wave_Format_MSAudio2 16KHz ~ 48KHz 56kbps~128kbps
*.aac
AAC 16KHz ~ 96KHz 48kbps~320kbps
AAC-LC 16KHz ~ 96KHz 128kbps~192kbps
5.1ch 320kbps
HE-AAC 24KHz ~ 96KHz 48kbps~64kbps
5.1ch 160kbps
*.wav
— 16KHz ~ 48KHz up to 3000kbps
*.ogg
OGG 1.1.0 16KHz ~ 48KHz 50kbps~500kbps
*.flac
FLAC 1.1.0, FLAC 1.2.1 16KHz ~ 96KHz up to 3000kbps
●If there are too many folders and files stored on the USB device, it may take the Soundbar some time to
access and play files.
ENG
27
FUNCTIONS
INPUT MODE
Press the (Source) button on the main unit’s
rig
ht
side or the
SOURCE button on the remote control to select
the mode you want.
Right Side of the Soundbar
Input mode Display
Optical Digital input D.IN
AUX input AUX
BLUETOOTH mode BT
TV SoundConnect TV
USB mode USB
AUTO POWER DOWN FUNCTION
The unit turns off automatically in the following situations.
●D.IN / AUX / BT / TV / USB Mode
—If there is no audio signal for 5 minutes.
●AUX Mode
—If the AUX cable is disconnected for 5 minutes.
—If there is no KEY input for 8 hours when the AUX cable is connected.
To turn the Auto Power Down function ON or OFF, press and hold the
p
button for 5 seconds.
ON — AUTO POWER DOWN / OFF — AUTO POWER DOWN appears on the display.
FUNCTIONS
28
FUNCTIONS
BLUETOOTH
You can connect a Bluetooth device to the Soundbar and enjoy music with high quality stereo sound, all without wires!
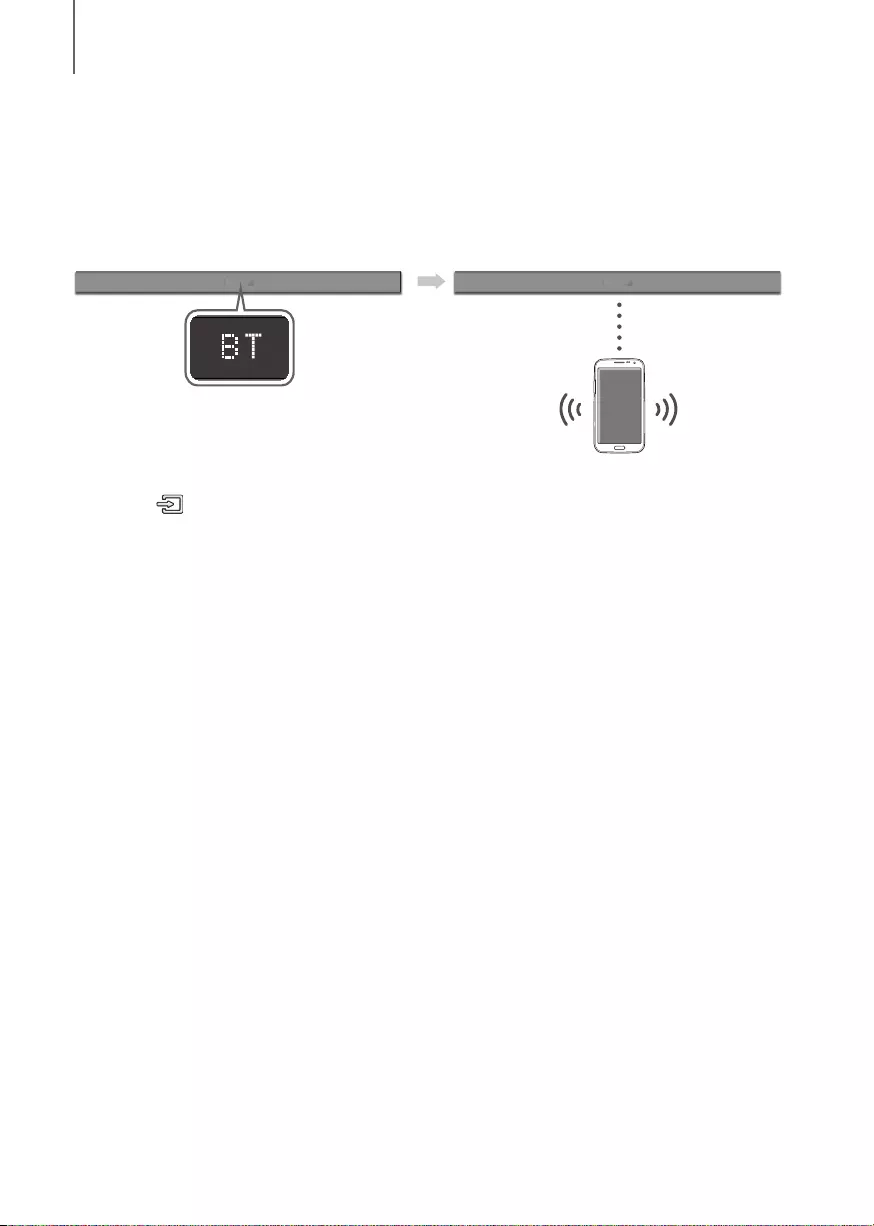
TO CONNECT THE SOUNDBAR TO A BLUETOOTH DEVICE
Check if the Bluetooth device supports the Bluetooth compliant stereo headset function.
Bluetooth device
Connect
1. Press the (Source) button on the main unit’s right side or the
SOURCE button on the remote control to select
the BT mode.
• You will see BT READY on the front display of the Soundbar.
2. Select the Bluetooth menu on the Bluetooth device you want to connect. (Refer to the Bluetooth device’s user
manual.)
3. Select the Stereo headset menu on the Bluetooth device.
• You will see a list of scanned devices.
4. Select «[AV] Samsung Soundbar Kxxx K-Series» from the list.
• When the Soundbar is connected to the Bluetooth device, it will display [Bluetooth device name]
BT on
the front display.
• The device name can only be displayed in English. An underline » _ » will be displayed if the name is not in
English.
• If the Bluetooth device has failed to pair with the Soundbar, delete the previous Soundbar listing found by the
Bluetooth device and have it search for the Soundbar again.
5. Play music on the connected device.
• You can listen to the music playing on the connected Bluetooth device over the Soundbar.
• In BT mode, the Play / Pause / Next / Prev functions are not available. However, these functions are available
on Bluetooth devices supporting AVRCP.

ENG
29
FUNCTIONS
●If asked for a PIN code when connecting a Bluetooth device, enter <0000>.
●Only one Bluetooth device can be paired at a time.
●The Bluetooth connection will be terminated when you turn the Soundbar off.
●The Soundbar may not perform Bluetooth search or connection correctly under the following
circumstances:
—If there is a strong electrical field around the Soundbar.
—If several Bluetooth devices are simultaneously paired with the Soundbar.
—If the Bluetooth device is turned off, not in place, or malfunctions.
●Note that such devices as microwave ovens, wireless LAN adaptors, fluorescent lights, and gas stoves use
the same frequency range as the Bluetooth device, which can cause electric interference.
●The Soundbar supports SBC data (44.1kHz, 48kHz).
●Connect only to a Bluetooth device that supports the A2DP (AV) function.
●You cannot connect the Soundbar to a Bluetooth device that supports only the HF (Hands Free) function.
●Once the set has been paired with a device, if the soundbar is in DIN, AUX, or USB mode and you select
“[AV]samsung soundbar Kxxx K-ser» from your Bluetooth device’s list, the set will automatically change to
BT mode.
—Available only if the Soundbar is listed among the Bluetooth device’s paired devices. (The Bluetooth
device and the Soundbar must have been previously paired at least once.)
●Soundbar will appear in the Bluetooth device’s searched devices list only when the Soundbar is displaying
BT READY.
●In the TV SoundConnect mode, the Soundbar cannot be paired or connected to Bluetooth device.
BLUETOOTH POWER ON (BLUETOOTH POWER)
If a previously paired Bluetooth device tries to pair with the Soundbar when the Bluetooth POWER On function is on
and the Soundbar is turned off, the Soundbar turns on automatically.
1. Press the Bluetooth POWER button on the remote while the Soundbar is turned on.
2. ON — BLUETOOTH POWER appears on the Soundbar’s display.
TO DISCONNECT A BLUETOOTH DEVICE FROM THE
SOUNDBAR
You can disconnect a Bluetooth device from the Soundbar. For instructions, see the Bluetooth device’s user manual.
●The Soundbar will be disconnected.
●When the Soundbar is disconnected from the Bluetooth device, the Soundbar will display
BT DISCONNECTED on the front display.
TO DISCONNECT THE SOUNDBAR FROM A BLUETOOTH
DEVICE
Press the SOURCE button on the remote control or the (Source) button on the product’s
rig
ht side to switch
from BT to another mode or turn off the Soundbar.
●The connected Bluetooth device will wait a certain amount of time for a response from the Soundbar before
terminating the connection. (Disconnection time may differ, depending on the Bluetooth device)
30
FUNCTIONS
●In Bluetooth connection mode, the Bluetooth connection will be lost if the distance between the Soundbar
and the Bluetooth device exceeds 16.4 ft (5 m).
●The Soundbar automatically turns off after 5 minutes in the Ready state.
+More About Bluetooth
Bluetooth is a technology that enables Bluetooth-compliant devices to interconnect easily with each other using a
short wireless connection.
●A Bluetooth device may cause noise or malfunction, depending on usage, if:
—A part of your body is in contact with the receiving/transmitting system of the Bluetooth device or the
Soundbar.
—It is subject to electrical variation from obstructions caused by a wall, corner, or office partition.
—It is exposed to electrical interference from same frequency-band devices including medical equipment,
microwave ovens, and wireless LANs.
●Pair the Soundbar with the Bluetooth device while they are close together.
●The further the distance between the Soundbar and Bluetooth device, the worse the quality is.
If the distance exceeds the Bluetooth operational range, the connection is lost.
●In poor reception areas, the Bluetooth connection may not work properly.
●The Bluetooth connection only works when it is close to the unit. The connection will be automatically cut off if the
Bluetooth device is out of range. Even within range, the sound quality may be degraded by obstacles such as
walls or doors.
●This wireless device may cause electric interference during its operation.
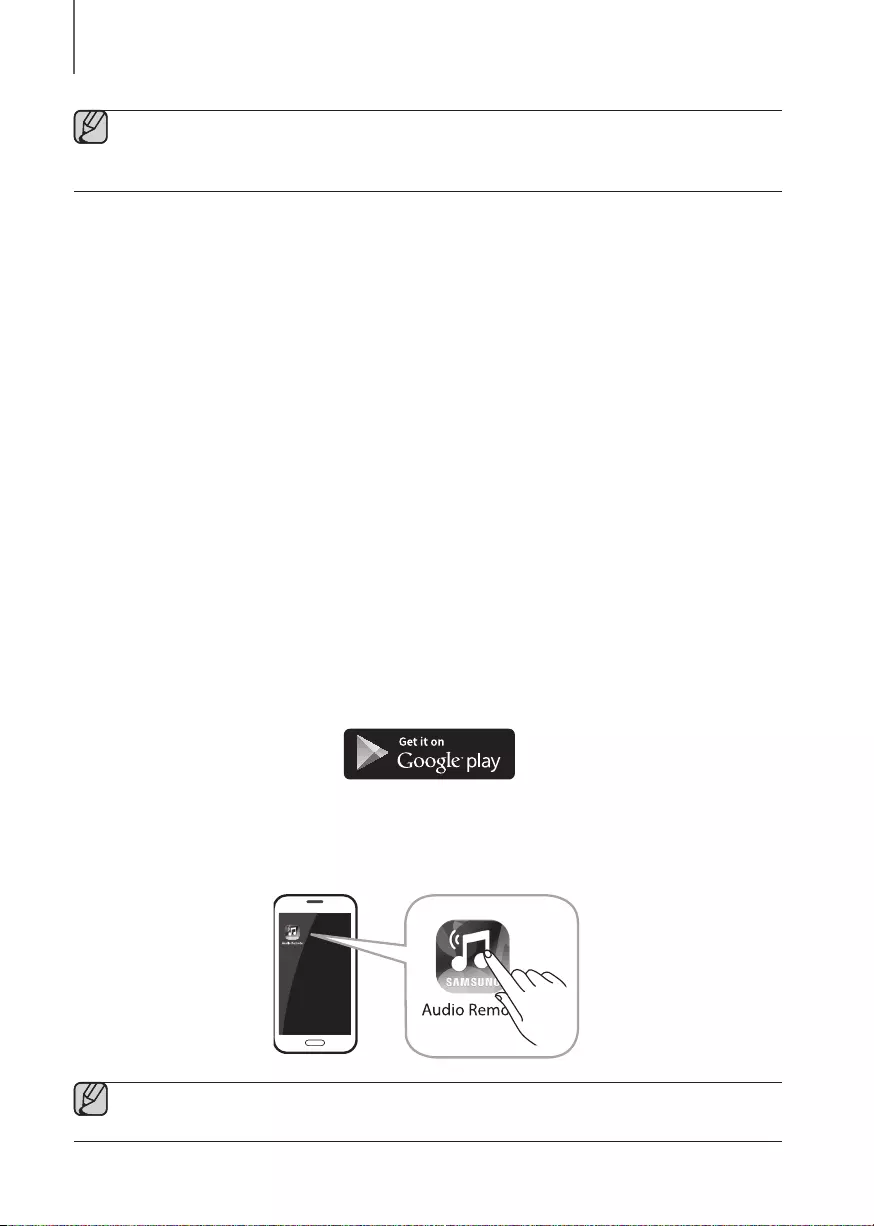
USING THE SAMSUNG AUDIO REMOTE APP
+Installing the Samsung Audio Remote App
To control the Soundbar with your smart device and the Samsung Audio Remote app, download the Samsung Audio
Remote app from the Google Play store.
Market search : Samsung Audio Remote
+Launching the Samsung Audio Remote App
To launch and use the Samsung Audio Remote app, touch the Audio Remote icon on your smart device, and then
follow the directions on the screen.
●The Samsung Audio Remote app is only compatible with Android mobile phones and mobile devices
running Android OS 3.0 or later.

ENG
31
FUNCTIONS
SOFTWARE UPDATE
DIGITAL AUDIO IN
(OPTICAL)
USB (5V 0.5A)
AUX IN
DC 19V
DIGITAL AUDIO IN
(OPTICAL)
USB (5V 0.5A)
AUX IN
Samsung may offer updates for the Soundbar’s system firmware in the future.
If an update is offered, you can update the firmware by connecting a USB device with the firmware update stored on it
to the USB port on your Soundbar.
Note that if there are multiple update files, you must load them onto the USB device singly and use them to update the
firmware one file at a time.
Please visit samsung.com or contact the Samsung call center to receive more information about downloading update
files.
● This product has a DUAL BOOT function. If the firmware fails to update, you can update the firmware
again.
●Connect a USB device containing the firmware upgrade to the standard end of a USB standard jack to
USB Micro plug Adapter cable. Connect the USB Micro plug end of the cable to the USB jack on the main
unit.
●Updating firmware may not work properly if audio files supported by the Soundbar are stored in the USB
storage device.
●Do not disconnect the power or remove the USB device while updates are being applied. The main unit will
turn off automatically after completing the firmware update.
●After the update, all settings are reset to their factory default settings. We recommend you write down your
settings so that you can easily reset them after the update. Note that updating firmware resets the
subwoofer connection too.
If the connection to the subwoofer is not re-established automatically after the update, refer to page 18.
If the firmware fails to update, we recommend formatting the USB device in FAT16 and trying again.
●Once the software update is completed, turn off the product and then press and hold the (
p
) button on
the remote control for more than 5 seconds. “INIT” appears on the display and the unit is powered off. The
updgrade is complete.
●Do not format the USB device in the NTFS format. The Soundbar does not support the NTFS file system.
●Depending on the manufacturer, some USB devices may not be supported.
USB Adapter Cable
(not supplied)
32
TROUBLESHOOTING
TROUBLESHOOTING
Refer to the table below if this product does not function properly. If the problem you are experiencing is not listed
below or if the instructions below do not help, turn off the product, disconnect the power cord, and contact Samsung
Electronics at 1-800-SAMSUNG (1-800-726-7864).
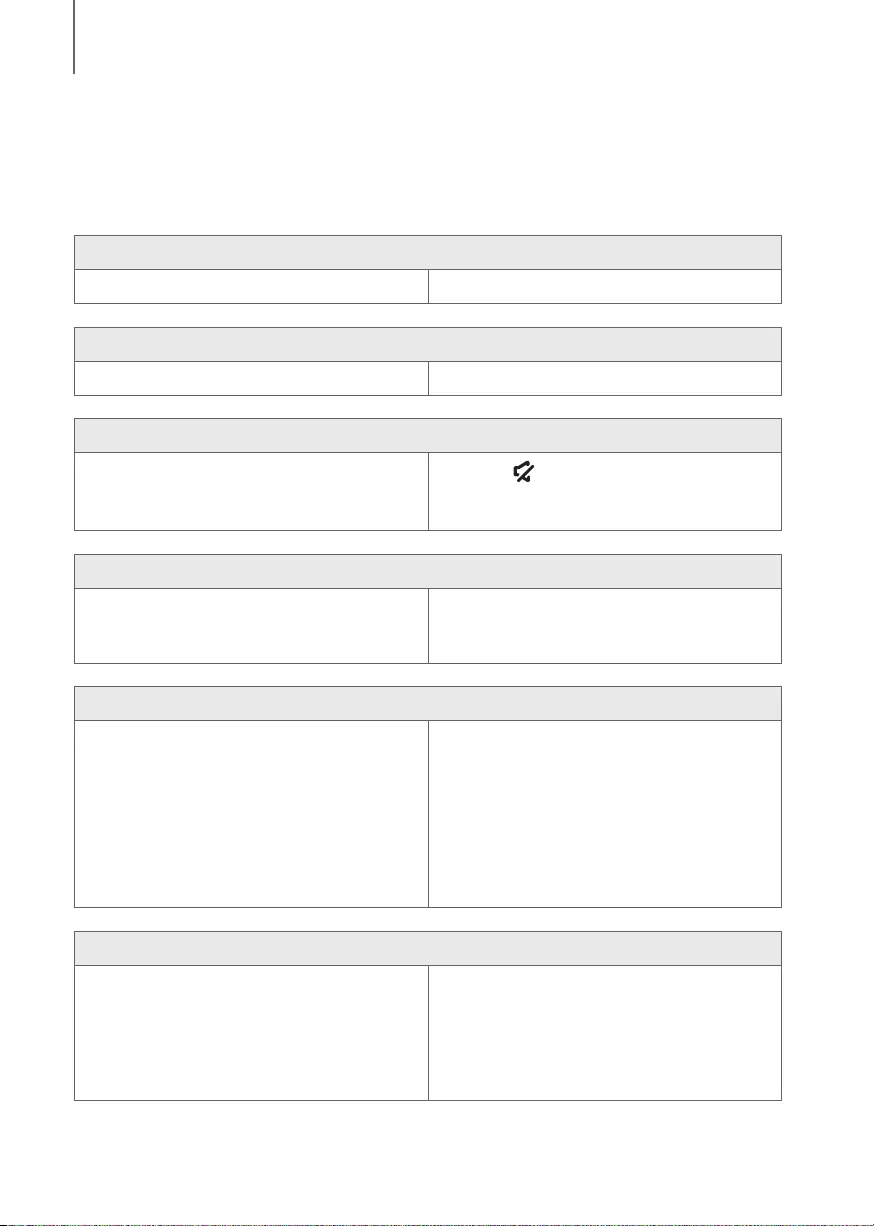
The unit will not turn on.
• Is the power cord plugged into the outlet? ¼Connect the power plug to the outlet.
A function does not work when the button is pressed.
• Is there static electricity in the air? ¼Disconnect the power plug and connect it again.
Sound is not produced.
• Is the Mute function on?
• Is the volume set to minimum?
¼Press the (Mute) button to cancel the Mute
function.
¼Adjust the volume.
The remote control does not work.
• Are the batteries drained?
• Is the distance between the remote control and main
unit too far?
¼Replace with new batteries.
¼Move closer to the unit.
The TV SoundConnect (TV pairing) failed.
• Does your TV support TV SoundConnect?
• Is your TV firmware the latest version?
• Does an error occur when connecting?
¼TV SoundConnect is supported by some Samsung
TVs released from 2012 on. Check your TV to see if it
supports TV SoundConnect.
¼Update your TV with the latest firmware.
¼Contact the Samsung Call Center.
¼Reset TV SoundConnect and connect again.
To reset the TV SoundConnect connection, press
and hold the
p
button for 5 seconds.
The blue indicator on the rear of the subwoofer is not lit and the subwoofer is not producing sound.
•
Is the main unit power on?
• Your subwoofer may not be connected to the
main unit of the product.
¼Check the power cord. If the power cord is plugged
in correctly, check the main unit. If your main unit is
off (in standby mode), the subwoofer will also be in
standby mode and the blue LED won’t be lit.
¼Try to connect your subwoofer again.
(See Page 18)
TROUBLESHOOTING
ENG
33
APPENDIX
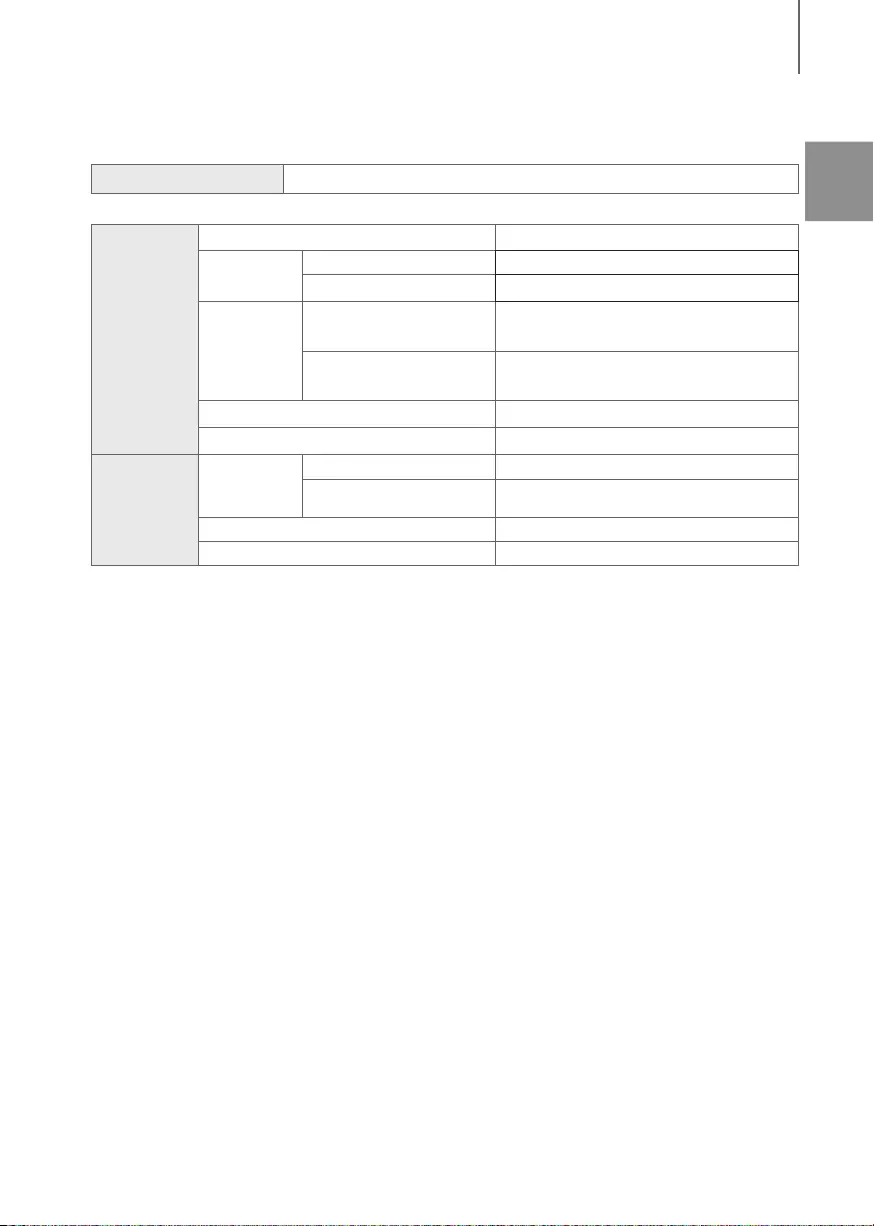
SPECIFICATIONS
Model name HW-K360, HW-KM36, HW-KM36C
GENERAL
USB 5V / 0.5A
Weight Main Unit 3.3 lbs (1.5 Kg)
Subwoofer (PS-WK360) 6.4 lbs (2.9 Kg)
Dimensions
(W x H x D)
Main Unit 35.7 x 2.1 x 2.8 inches
(907.5 x 53.5 x 70.5 mm)
Subwoofer (PS-WK360) 6.1 x 11.8 x 11.5 inches
(155.0 x 300.0 x 293.0 mm)
Operating Temperature Range +41°F to +95°F
Operating Humidity Range 10 % to 75 %
AMPLIFIER
Rated
Output
Power
Main Unit 35 W/CH x 2, 6 ohm, THD=10%, 1 kHz
Subwoofer (PS-WK360) 60 W, 3 ohm, THD=10%, 100 Hz
S/N Ratio (Analog Input) 65 dB
Separation (1kHz) 65 dB
* Design and specifications are subject to change without prior notice.
* S/N ratio, distortion, separation, and usable sensitivity are based on measurements using AES (Audio Engineering
Society) guidelines.
* Nominal specification
—Samsung Electronics Co., Ltd reserves the right to change the specifications without notice.
—Weight and dimensions are approximate.
—For more information about the power supply and power consumption, refer to the label attached to the
product.
—Dispose unwanted electronics through an approved recycler. To find the nearest recycling location,
go to our website: www.samsung.com/recyclingdirect or call (877) 278 — 0799.
aOpen Source License Notice
—To send inquiries and requests regarding open sources, contact Samsung via Email
(oss.request@samsung.com).
aImportant Note About Service
●An administration fee may be charged if either:
a. An engineer is called out to your home at your request and there is no defect in the product.
b. You bring the unit to a repair center and there is no defect in the product.
●You will be advised of the amount of the administration fee before any work is done or a home visit is made.
●If you have a problem with this product, we strongly recommend you read the appropriate section of this
manual, review the Troubleshooting section on page 32, visit the Support page for your product at
www.samsung.com, or call Samsung Product Support (1-800-726-7864) to find an answer before you contact
a service center for a repair.
APPENDIX

WARRANTY
LIMITED WARRANTY TO ORIGINAL PURCHASER
This SAMSUNG brand product, as supplied and distributed by Samsung Electronics America, Inc. (SAMSUNG) and delivered
new, in the original carton to the original consumer purchaser, is warranted by SAMSUNG against manufacturing defects in
materials and workmanship for a limited warranty period of:
One (1) Year Parts and Labor*
(*90 Days Parts and Labor for Commercial Use)
This limited warranty begins on the original date of purchase, and is valid only on products purchased and used in the United States.
To receive warranty service, the purchaser must contact SAMSUNG for problem determination and service procedures. Warranty
service can only be performed by a SAMSUNG authorized service center. The original dated bill of sale must be presented upon
request as proof of purchase to SAMSUNG or SAMSUNG’s authorized service center. Transportation of the product to and from the
service center is the responsibility of the purchaser.
SAMSUNG will repair or replace this product, at our option and at no charge as stipulated herein, with new or reconditioned
parts or products if found to be defective during the limited warranty period specified above. All replaced parts and products
become the property of SAMSUNG and must be returned to SAMSUNG. Replacement parts and products assume the
remaining original warranty, or ninety (90) days, whichever is longer.
SAMSUNG’s obligations with respect to software products distributed by SAMSUNG under the SAMSUNG brand name are
set forth in the applicable end user license agreement. Non-SAMSUNG hardware and software products, if provided, are on an
“AS IS” basis. Non-SAMSUNG manufacturers, suppliers, publishers, and service providers may provide their own warranties.
This limited warranty covers manufacturing defects in materials and workmanship encountered in normal, and except to the
extent otherwise expressly provided for in this statement, noncommercial use of this product, and shall not apply to the
following, including, but not limited to: damage which occurs in shipment; delivery and installation; applications and uses for
which this product was not intended; altered product or serial numbers; cosmetic damage or exterior finish; accidents, abuse,
neglect, fire, water, lightning or other acts of nature; use of products, equipment, systems, utilities, services, parts, supplies,
accessories, applications, installations, repairs, external wiring or connectors not supplied and authorized by SAMSUNG, or
which damage this product or result in service problems; incorrect electrical line voltage, fluctuations and surges; customer
adjustments and failure to follow operating instructions, cleaning, maintenance and environmental instructions that are covered
and prescribed in the instruction book; product removal or reinstallation; reception problems and distortion related to noise,
echo, interference or other signal transmission and delivery problems. SAMSUNG does not warrant uninterrupted or error-free
operation of the product.
THERE ARE NO EXPRESS WARRANTIES OTHER THAN THOSE LISTED AND DESCRIBED ABOVE, AND NO WARRANTIES
WHETHER EXPRESS OR IMPLIED, INCLUDING, BUT NOT LIMITED TO, ANY IMPLIED WARRANTIES OF MERCHANTABILITY OR
FITNESS FOR A PARTICULAR PURPOSE, SHALL APPLY AFTER THE EXPRESS WARRANTY PERIODS STATED ABOVE, AND NO
OTHER EXPRESS WARRANTY OR GUARANTY GIVEN BY ANY PERSON, FIRM OR CORPORATION WITH RESPECT TO THIS
PRODUCT SHALL BE BINDING ON SAMSUNG. SAMSUNG SHALL NOT BE LIABLE FOR LOSS OF REVENUE OR PROFITS,
FAILURE TO REALIZE SAVINGS OR OTHER BENEFITS, OR ANY OTHER SPECIAL, INCIDENTAL OR CONSEQUENTIAL DAMAGES
CAUSED BY THE USE, MISUSE OR INABILITY TO USE THIS PRODUCT, REGARDLESS OF THE LEGAL THEORY ON WHICH THE
CLAIM IS BASED, AND EVEN IF SAMSUNG HAS BEEN ADVISED OF THE POSSIBILITY OF SUCH DAMAGES. NOR SHALL
RECOVERY OF ANY KIND AGAINST SAMSUNG BE GREATER IN AMOUNT THAN THE PURCHASE PRICE OF THE PRODUCT
SOLD BY SAMSUNG AND CAUSING THE ALLEGED DAMAGE. WITHOUT LIMITING THE FOREGOING, PURCHASER ASSUMES
ALL RISK AND LIABILITY FOR LOSS, DAMAGE OR INJURY TO PURCHASER AND PURCHASER’S PROPERTY AND TO OTHERS
AND THEIR PROPERTY ARISING OUT OF THE USE, MISUSE OR INABILITY TO USE THIS PRODUCT SOLD BY SAMSUNG NOT
CAUSED DIRECTLY BY THE NEGLIGENCE OF SAMSUNG. THIS LIMITED WARRANTY SHALL NOT EXTEND TO ANYONE OTHER
THAN THE ORIGINAL PURCHASER OF THIS PRODUCT, IS NONTRANSFERABLE AND STATES YOUR EXCLUSIVE REMEDY.
The benefits of this Limited Warranty extend only to the original purchaser of Samsung products from an authorized Samsung
reseller. THIS LIMITED WARRANTY SHALL NOT APPLY TO ANY SAMSUNG PRODUCTS PURCHASED FROM UNAUTHORIZED
RESELLERS OR RETAILERS, EXCEPT IN STATES WHERE SUCH RESTRICTION MAY BE PROHIBITED. For a list of Samsung
authorized retailers, please go to: http://www.samsung.com/us/peaceofmind/authorized_resellers.html
Some states do not allow limitations on how long an implied warranty lasts, or the exclusion or limitation of incidental or
consequential damages, so the above limitations or exclusions may not apply to you. This warranty gives you specific legal
rights, and you may also have other rights which vary from state to state.
To obtain warranty hardware service, please contact SAMSUNG customer care center.
QUESTIONS OR COMMENTS?
COUNTRY CALL OR VISIT US ONLINE AT WRITE
U.S.A 1-800-SAMSUNG
(1-800-726-7864) www.samsung.com/us/support
Samsung Electronics America, Inc.
85 Challenger Road
Ridgefield Park, NJ 07660
©2016 Samsung Electronics Co.,Ltd. All rights reserved
Certification model only
The party responsible for product compliance:
Samsung Electronics Co., LTD.
America QA lab of Samsung
19 Chapin Rd. Building D,
Pine Brook New Jersey 07058
Samsung HW-K360 Soundbar Specification
The Samsung HW-K360 Soundbar is a sleek audio device designed to enhance the auditory experience of home entertainment systems. With a 2.1 channel configuration, it delivers a rich and immersive sound, boasting a total power output of 130 watts. The soundbar features a wireless subwoofer, which provides deep and powerful bass, enabling users to enjoy a full spectrum of sound without the clutter of cables. Connectivity options are diverse, including Bluetooth technology that allows for wireless streaming of music and audio content from compatible devices, ensuring a seamless connection with smartphones, tablets, and other Bluetooth-enabled equipment. Additionally, the soundbar is equipped with an optical input, offering a high-quality digital audio connection to TVs and other audio sources. The HW-K360 supports Samsung’s TV SoundConnect feature, which simplifies the connection process with Samsung TVs, minimizing the need for additional wires and providing a clean setup. Users can also control the soundbar with the Samsung Audio Remote app, available for Android devices, offering convenient adjustments and customization of sound settings from a smartphone. Designed with a compact and modern aesthetic, the HW-K360 can be wall-mounted or placed on a shelf, fitting effortlessly into various home decor styles. Its intuitive design promotes ease of use, enabling straightforward installation and operation. The Samsung HW-K360 Soundbar presents a sophisticated solution for those seeking to elevate their home audio experience with minimalistic design and robust sound performance.
Samsung HW-K360 Soundbar F.A.Q.
To connect your Samsung HW-K360 Soundbar to your TV, you can use either an HDMI cable, an optical cable, or Bluetooth. For HDMI, connect one end of the HDMI cable to the HDMI OUT port on the soundbar and the other end to the HDMI IN port on the TV. Ensure your TV’s audio output is set to the soundbar.
First, check all cable connections to ensure they are secure. Make sure the soundbar is set to the correct input source. Verify that the TV or device audio output settings are configured to send audio to the soundbar. Also, check the volume levels on both the soundbar and the TV.
To reset your soundbar, turn it on and press and hold the Play/Pause button on the remote for about 5 seconds until you see ‘INIT’ on the display. This will reset the soundbar to its factory settings.
Yes, you can use a universal remote with your Samsung HW-K360 Soundbar. You will need to program the remote using the correct code for Samsung audio devices. Refer to the universal remote’s manual for specific instructions.
Keep your soundbar dust-free by wiping it with a soft, dry cloth. Avoid using water or cleaning solutions. Ensure ventilation slots are not blocked to prevent overheating. Store in a cool, dry place and avoid exposing it to direct sunlight.
To update the firmware, download the latest firmware from the Samsung website onto a USB drive. Insert the USB drive into the soundbar’s USB port and follow the on-screen instructions to update. Ensure the soundbar is powered on during this process.
Yes, the Samsung HW-K360 Soundbar can be wall-mounted. Wall mounting brackets are typically included with the soundbar. Follow the instructions in the user manual for proper installation.
The Samsung HW-K360 Soundbar comes with a wireless subwoofer. To connect, power on both the soundbar and the subwoofer. They should automatically connect. If not, press the ID SET button on the subwoofer with a small pointed object, then press the pairing button on the soundbar.
The Samsung HW-K360 Soundbar supports a variety of audio formats including Dolby Digital, DTS 2.0, and PCM audio formats, ensuring compatibility with most content.
Ensure the soundbar is in Bluetooth pairing mode and within range of the device you are trying to connect. Check that Bluetooth is enabled on your device and that it is not already connected to another Bluetooth device. Restart both the soundbar and your device, then try pairing again.
HW-K360 Беспроводной сабвуфер (PS-WK360) Руководство пользователя Беспроводная акустическая система Soundbar Удивительные возможности Благодарим за приобретение устройства компании Samsung. Для наилучшего обслуживания зарегистрируйте свое устройство по адресу: www.samsung.com/register
НАЧАЛО РАБОТЫ ВОЗМОЖНОСТИ Приложение Samsung Audio Remote Управляйте системой Soundbar с мобильного смарт-устройства с ОС Android, используя приложение Samsung Audio Remote. Это приложение обеспечивает управление всеми основными функциями системы Soundbar, таких как: питание, громкость звука,
МЕРЫ ПРЕДОСТОРОЖНОСТИ ВО ИЗБЕЖАНИЕ ПОРАЖЕНИЯ ЭЛЕКТРИЧЕСКИМ ТОКОМ НЕ СНИМАЙТЕ КРЫШКУ (ИЛИ ЗАДНЮЮ ПАНЕЛЬ) УСТРОЙСТВА. ВНУТРИ УСТРОЙСТВА ОТСУТСТВУЮТ ДЕТАЛИ, РЕМОНТ КОТОРЫХ МОЖЕТ ВЫПОЛНЯТЬ ПОЛЬЗОВАТЕЛЬ. ОБСЛУЖИВАНИЕ ДОЛЖНО ПРОИЗВОДИТЬСЯ КВАЛИФИЦИРОВАННЫМИ СПЕЦИАЛИСТАМИ. Этот символ свидетельствует о
НАЧАЛО РАБОТЫ МЕРЫ ПРЕДОСТОРОЖНОСТИ 68.6 mm 99.1mm 99.1mm 99.1mm Убедитесь, что источник питания переменного тока соответствует требованиям, указанным на идентификационной наклейке, расположенной в нижней части устройства. Установите устройство горизонтально на подходящую поверхность (мебель),
НАЧАЛО РАБОТЫ СОДЕРЖАНИЕ 2 3 6 7 НАЧАЛО РАБОТЫ 26 ФУНКЦИИ Информация по технике безопасности 27 Функции Комплект поставки Передняя/правая боковая панель 9 Пульт дистанционного управления 8 12 Нижняя панель 18 20 20 21 23 23 24 Обновление ПО Bluetooth НЕИСПРАВНОСТЕЙ УСТРАНЕНИЕ НЕИСПРАВНОСТЕЙ 32
НАЧАЛО РАБОТЫ КОМПЛЕКТ ПОСТАВКИ ПРЕЖДЕ ЧЕМ ОЗНАКОМИТЬСЯ С РУКОВОДСТВОМ ПОЛЬЗОВАТЕЛЯ Перед прочтением данного руководства пользователя обратите внимание на следующие термины. ++Значки, используемые в данном руководстве Значок Термин Внимание! Примечание Определение Этот значок присутствует в тех
ОПИСАНИЕ DESCRIPTIONS ПЕРЕДНЯЯ/ПРАВАЯ БОКОВАЯ ПАНЕЛЬ Кнопка / (Громкость звука) RUS 1 Регулировка уровня громкости. Цифровое значение уровня громкости отображается на дисплее на передней панели. 2 Кнопка (Источник) Выберите D.IN, AUX, BT, ТВ или вход USB. ●● Если нажать и удерживать более 3 секунд
ОПИСАНИЕ НИЖНЯЯ ПАНЕЛЬ (Порт Micro USB) ЦИФРОВОЙ АУДИОВХОД (ОПТИЧЕСКИЙ) Подключение к цифровому (оптическому) выходу внешнего устройства. Подключите кабель Micro USB к порту Micro USB с использованием стандартного адаптера USB (не входит в комплект), затем подключите устройство USB к адаптеру для
ИСТОЧНИК Выбор источника, подключенного к системе Soundbar. RUS ПУЛЬТ ДИСТАНЦИОННОГО УПРАВЛЕНИЯ ОПИСАНИЕ Отключение звука С помощью нажатия на эту кнопку можно отключить звук. Для восстановления прежнего уровня громкости нажмите эту кнопку еще раз. Повтор Нажмите для выбора функции повтора во время
ОПИСАНИЕ Питание Включение и выключение системы Soundbar. Громкость Настройка уровня громкости устройства. Воспроизведение/пауза Нажмите кнопку p для временной приостановки воспроизведения файла. При повторном нажатии кнопки p воспроизведение выбранного файла возобновляется. Переход назад Если на
УСТАНОВКА ++Настройка системы Soundbar с помощью пульта дистанционного управления ТВ RUS 1. При включенной системе Soundbar нажмите кнопку SOUND (ЗВУК) более 5 секунд. 2. На дисплее системы Soundbar появится сообщение “ON — TV REMOTE” 3. В меню ТВ для выбора громкоговорителя выберите внешний
УСТАНОВКА УСТАНОВКА СИСТЕМЫ SOUNDBAR УСТАНОВКА НАСТЕННОГО КРЕПЛЕНИЯ ++Меры предосторожности при установке ●● Устанавливайте устройство только на вертикальных стенах. ●● Не выбирайте для установки помещения с высокой температурой или влажностью, а также стены, не способные выдержать вес устройства.
УСТАНОВКА RUS Центральная линия 2. Совместите Center Line (Центральную линию) ориентира для монтажа на стене с центром ТВ (если устанавливаете систему Soundbar под ТВ), и закрепите Wall Mount Guide (Ориентир для монтажа на стене) липкой лентой. ●● Если система устанавливается не под ТВ, поместите
УСТАНОВКА 5. Вставьте винты (не входят в комплект поставки) в каждый Holder-Screw (держатель винта) и до упора вкрутите их в отверстия. 6. Используйте два Screws (винта)(M4 x L14), чтобы закрепить Bracket-Wall Mount (Кронштейн для настенного монтажа) — L (левый) и R (правый) – на нижней панели
УСТАНОВКА RUS 7. Установите систему Soundbar с прикрепленным Bracket-Wall Mounts (Кронштейном для настенного монтажа), подвесив Bracket-Wall Mounts (Кронштейн для настенного монтажа) на стену за держатели винтов. ●● Слегка наклоните Soundbar, чтобы вставить обе головки Holder-Screw (Держателей
УСТАНОВКА СНЯТИЕ СИСТЕМЫ SOUNDBAR СО СТЕНЫ 1. Чтобы снять систему Soundbar со стены, сдвиньте ее в направлении стрелки, приподнимите и потяните ее на себя, как показано на рисунке. ●● После установки не опирайтесь на устройство и не подвергайте его ударам или падению. ●● Тщательно прикрепите
ПОДКЛЮЧЕНИЯ ПОДКЛЮЧЕНИЕ САБВУФЕРА RUS ●● Не следует подключать кабель питания этого устройства или телевизора к сетевой розетке, пока не будут выполнены все подключения компонентов. ●● Прежде чем перемещать или устанавливать устройство, обязательно выключите его и отсоедините кабель питания от
ПОДКЛЮЧЕНИЯ ●● Прежде чем перемещать или устанавливать устройство, обязательно выключите его и отсоедините кабель питания. ●● Если для устройства используется та же частота (2,4 ГГц), что и для Soundbar, то вблизи Soundbar могут иметь место помехи в звуке. ●● Для беспроводной передачи сигналов
ПОДКЛЮЧЕНИЯ 5. Пока будут мигать синие индикаторы сабвуфера и комплекта SWA-8000S, нажмите кнопку на пульте дистанционного управления или на правой панели основного устройства, чтобы включить его. ПОДКЛЮЧЕНИЕ ГРОМКОГОВОРИТЕЛЕЙ ОБЪЕМНОГО ЗВУЧАНИЯ (ПРОДАЮТСЯ ОТДЕЛЬНО) R L SURROUND SPEAKERS OUT
ПОДКЛЮЧЕНИЯ ПОДКЛЮЧЕНИЕ К ТВ ●● Важно: прежде чем начать, вставьте батарею в пульт дистанционного управления (инструкции см. на стр. 11). ПОДКЛЮЧЕНИЕ К ТВ С ПОМОЩЬЮ ЦИФРОВОГО ОПТИЧЕСКОГО КАБЕЛЯ Оптический кабель DIGITAL AUDIO IN (OPTICAL) OPTICAL OUT DIGITAL AUDIO IN (OPTICAL) DIGITAL AUDIO IN
ФУНКЦИЯ TV SOUNDCONNECT ПОДКЛЮЧЕНИЯ RUS Эта функция позволяет воспроизводить звук, поступающий с телевизора, на системе Soundbar, подключенной к ТВ Samsung с поддержкой функции TV SoundConnect. Подключение 1. Включите ТВ и систему Soundbar. на правой панели основного устройства или кнопку SOURCE
ПОДКЛЮЧЕНИЯ ++Использование функции включения питания устройства Bluetooth Функция включения питания устройства Bluetooth становится доступна после успешного подключения системы Soundbar к телевизору с поддержкой Bluetooth с помощью функции TV SoundConnect. Если функция включения питания устройства
ОПТИЧЕСКИЙ ИЛИ АНАЛОГОВЫЙ АУДИОКАБЕЛЬ Данное устройство оснащено одним оптическим цифровым входным разъемом и одним аналоговым входным аудиоразъемом (AUX) для подключения к внешним устройствам. Аудиокабель (не входит в комплект) AUX OUT Проигрыватель дисков BD/DVD/ приставка/ игровая консоль AUX IN
ПОДКЛЮЧЕНИЯ USB Можно воспроизводить музыкальные файлы, сохраненные на USB-накопителях, через Soundbar. Отображение на дисплее Порт USB DIGITAL AUDIO IN (OPTICAL) DC 19V USB (5V 0.5A) AUX IN Кабель USB (не входит в комплект) DIGITAL AUDIO IN (OPTICAL) USB (5V 0.5A) AUX IN 1. Подключите
ПОДКЛЮЧЕНИЯ ●● Воспроизведение музыкальных файлов с технологией DRM (MP3, WMA), загруженных с коммерческих веб-сайтов, невозможно. RUS ●● Внешние жесткие диски не поддерживаются. ●● Мобильные телефоны не поддерживаются. ●● Список совместимых форматов файлов Расширение Кодек Частота дискретизации
ФУНКЦИИ РЕЖИМ ВХОДА Нажмите кнопку (Источник) на боковой панели основного устройства или кнопку SOURCE (ИСТОЧНИК) на пульте дистанционного управления, чтобы выбрать требуемый режим. Правая панель системы Soundbar Режим входа Отображение на дисплее Оптический цифровой вход D.IN Вход AUX Режим
ФУНКЦИИ Bluetooth ПОДКЛЮЧЕНИЕ СИСТЕМЫ SOUNDBAR К УСТРОЙСТВУ BLUETOOTH Проверьте, поддерживает ли устройство Bluetooth функцию Bluetooth-совместимых стереонаушников. Подключение Устройство Bluetooth (Источник) на боковой панели основного устройства или кнопку SOURCE 1. Нажмите кнопку (ИСТОЧНИК) на
ФУНКЦИИ ●● ●● ●● ●● ●● ●● ●● ●● ●● ●● ●● Если при подключении к устройству Bluetooth появится запрос на ввод PIN-кода, введите <0000>. Одновременно возможно выполнить сопряжение только с одним устройством Bluetooth. При выключении системы Soundbar подключение Bluetooth будет прервано. В следующих
ФУНКЦИИ ++Что такое Bluetooth? Bluetooth – это технология, которая позволяет устройствам, поддерживающим эту технологию, легко взаимодействовать друг с другом с помощью беспроводного соединения на коротком расстоянии. ●● При некоторых условиях устройство Bluetooth может создавать помехи или
ФУНКЦИИ ОБНОВЛЕНИЕ ПО DC 19V DIGITAL AUDIO IN (OPTICAL) USB (5V 0.5A) AUX IN DIGITAL AUDIO IN (OPTICAL) USB (5V 0.5A) AUX IN В дальнейшем корпорация Samsung может предлагать обновления для микропрограммы Soundbar. При наличии обновления его можно установить путем подключения устройства USB с
УСТРАНЕНИЕ НЕИСПРАВНОСТЕЙ TROUBLESHOOTING УСТРАНЕНИЕ НЕИСПРАВНОСТЕЙ Устройство не включается. • Подключен ли кабель питания к розетке? ¼¼Вставьте вилку сетевого шнура в розетку. Одна из функций не работает при нажатии кнопки. • Нет ли в воздухе статического электричества? ¼¼Отсоедините вилку кабеля
ПРИЛОЖЕНИЕ ТЕХНИЧЕСКИЕ ХАРАКТЕРИСТИКИ Название модели USB Вес ОБЩАЯ Размеры ИНФОРМАЦИЯ x В x Г) HW-K360 Основное устройство Сабвуфер (PS-WK360) (Ш Основное устройство Сабвуфер (PS-WK360) Диапазон рабочих температур Диапазон влажности при работе УСИЛИТЕЛЬ * * * Номинальная Основное устройство
© 2016 Samsung Electronics Co., Ltd. Все права защищены. Связывайтесь с SAMSUNG по всему миру Если у вас есть предложения или вопросы по продукции Samsung, обращайтесь, пожалуйста, в информационный центр компании Samsung. ` CIS RUSSIA Area Contact Centre 8-800-555-55-55 (VIP care 8-800-555-55-88)